<center>https://cdn.discordapp.com/attachments/404587860872921088/407939181751304194/steempy_flask.png
</center>
<center><sup>Thanks to @oups for the image!</sup></center>
I've recently created [my own web application using Flask](https://github.com/amosbastian/PMTC) and had some trouble with a few things, so once I figured them out, I thought I might as well make a tutorial series so others don't have to run into the same problems as myself! In this tutorial we will go through how to redirect a user to a different page, how to create and handle a login form and see if a user exists in your database.
---
#### What will I learn
- How to redirect a user
- How to create a login form
- How to handle a login form
- How to see if a user exists in your database
#### Requirements
- Python2 or Python3.3+
#### Difficulty
- Intermediate
---
### Tutorial
If you find it easier to follow along this way you can get the entire code for this tutorial from [here](https://github.com/amosbastian/flask-tutorial/tree/part5), where I have split everything up into the relevant sections.
#### Redirecting a user
Once a user has registered we should redirect them to the login page. Doing this is really easy, we can simply use the `redirect()` and `url_for` functions! After importing them from `flask` we can simply uncomment the code at the end of the `register()` function we created in `app.py`. The way this works is that instead of rendering a given template, it simply directs the user to the URL for a given template, which is pretty similar. Of course this will currently give us an error as we haven't created a template or route for `login` yet, so let's do that now!
#### Creating a login form and route in `app.py`
First things first, let's create the form and route needed for our login template! Just like how we created our `RegistrationForm` in part 4, we can do the same and create a `LoginForm` instead. In this form we only need the user's name and the user's password. For now let's create a simple one where we just require something to be entered, with some placeholders like Steemit uses
```
class LoginForm(FlaskForm):
name = StringField("Name", validators=[DataRequired()],
render_kw={"placeholder": "Enter your username"})
password = PasswordField("Password", validators=[DataRequired()],
render_kw={"placeholder": "Password or WIF"})
```
Now we have our form we should create a route to our template. Once again we can use the same code as for the registration template, so I won't explain everything again
```
@app.route("/login", methods=["GET", "POST"])
def login():
form = LoginForm()
if form.validate_on_submit():
pass
# HANDLE FORM
return render_template("login.html", form=form)
```
#### Creating our login template
Before we think about handling the form's data we need to actually create our template first. This is very easy since we can once again reuse the code from `registration.html`, but without the password confirmation field! Let's also change it from a `form-group` class to an `input-group` class so we can prepend the `@` sign just like Steemit does on the login page!
```
{% extends "layout.html" %}
{% block body %}
<h2>Returning Users: Login</h2>
<form method="POST" action="{{ url_for('login') }}" class="form-horizontal">
{{ form.csrf_token }}
<div class="input-group mb-3">
<div class="input-group-prepend">
<span class="input-group-text" id="basic-addon1">@</span>
</div>
{{ form.name(class_="form-control") }}
</div>
{% for error in form.name.errors %}
<div class="alert alert-danger" role="alert">
{{ error }}
</div>
{% endfor %}
<div class="input-group mb-3">
{{ form.password(class_="form-control") }}
</div>
{% for error in form.password.errors %}
<div class="alert alert-danger" role="alert">
{{ error }}
</div>
{% endfor %}
<p><input type="submit" name="Submit" class="btn btn-outline-primary"></p>
</form>
{% endblock %}
```
As you can see in the picture below it's already looking pretty nice (with input validation working)! The next step is actually handling the data that the user enters!
<center>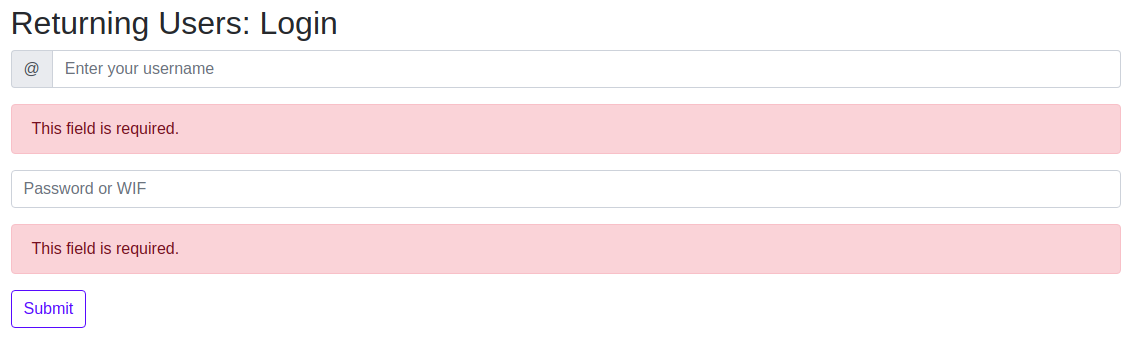</center>
#### Handling the form
So now we've created the form in both `app.py` and `login.html` we need a way to actually handle it. This time instead of inserting the data into a database, we want to check if the user is already in the database or not. To do this we need to extract the data from the form, create a cursor and execute a command to see if the user is already in the database. First of all let's see if we can find the user in the database and just print a confirmation to the terminal for now. The way to do this is pretty similar to inserting a user in the database, as you will see in the code below
```
@app.route("/login", methods=["GET", "POST"])
def login():
form = LoginForm()
if form.validate_on_submit():
# Get data from the form
name = form.name.data
password = form.password.data
# Create a cursor
cursor = mysql.connection.cursor()
# Execute command to find user in database
result = cursor.execute("SELECT * FROM users WHERE name = %s", [name])
# If user exists
if result == 1:
print("Found user {}!".format(name))
# If user doesn't exist
else:
print("Couldn't find user {}!".format(name))
return render_template("login.html", form=form)
```
As you can see we simply extract the data from the form, create a cursor and execute a command to find any users with the given name. If the user exists then the result should equal 1 and we print ""Found user `name`!", otherwise we print "Couldn't find user `name`!". Let's run `app.py` and see if this works!
<center></center>
#### Adding errors and comparing passwords
So we can now see if a user exists in our database, but we don't actually use the password for anything yet. Let's change that! To do this we can use our cursor to fetch the user's password and then use `passwordlib` to compare the two and see if they match. We should also give the user some feedback, because currently they don't know what's happening. We can do this by passing an error to our template, like how we pass our form to the template!
```
# If user exists
if result == 1:
# Fetch the user and password
user = cursor.fetchone()
fetched_password = user["password"]
# If passwords match
if sha512_crypt.verify(password, fetched_password):
pass
# If passwords don't match
else:
error = "Invalid password!"
return render_template("login.html", form=form, error=error)
# If user doesn't exist
else:
error = "User does not exist!"
return render_template("login.html", form=form, error=error)
```
To show the error in `login.html` we can just add an *if* statement above our form with a `div` showing the error, like so
```
{% if error %}
<div class="alert alert-danger" role="alert">
{{ error }}
</div>
{% endif %}
```
Let's run `app.py` once again and see if it works! Indeed, it shows an error when entering an invalid password or username!
<center>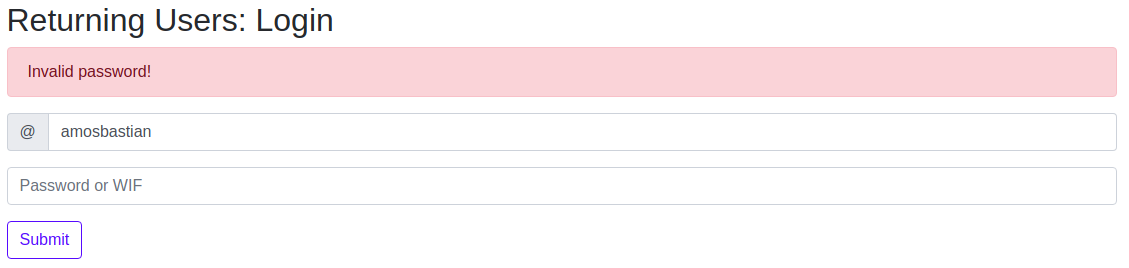</center>
**Congratulations**, you've now learned how to redirect a user to a different page, how to create and handle a login form and see if a user exists in your database.
### Curriculum
- [Part 1 - Creating a web application with Flask - Initial setup and routes](https://utopian.io/utopian-io/@amosbastian/part-1-creating-a-web-application-with-flask-initial-setup-and-routes)
- [Part 2 - Creating a web application with Flask - Including and extending templates](https://utopian.io/utopian-io/@amosbastian/part-2-creating-a-web-application-with-flask-including-and-extending-templates)
- [Part 3 - Creating a web application with Flask - For loops, creating a database and forms](https://utopian.io/utopian-io/@amosbastian/part-3-creating-a-web-application-with-flask-for-loops-creating-a-database-and-forms)
- [Part 4 - Creating a web application with Flask - Handling form data](https://utopian.io/utopian-io/@amosbastian/part-4-creating-a-web-application-with-flask-handling-form-data)
---
The code for this tutorial can be found on [GitHub](https://github.com/amosbastian/flask-tutorial/tree/part5)!
In the next tutorial we will find out how to store information about a user, how to hide and show content depending on if a user is logged in or not, how to log a user out and how to restrict a user's access.
<br /><hr/><em>Posted on <a href="https://utopian.io/utopian-io/@amosbastian/part-5-creating-a-web-application-with-flask-redirecting-and-logging-in">Utopian.io - Rewarding Open Source Contributors</a></em><hr/>