In the first two parts, we have learned about the bias and the dark frames. Both of them are used to reduce the noise in the image. In this part, we will talk about flat frames, what they are used for and of course how they will be stacked to a master flat. ## Flat frames Like bias and dark frames, flat frames are also calibration frames, but instead of reducing noise the flat frames are used to reduce optical disturbances. Every setup will create some visual disturbances in the image, some more, the other less. These disturbances can be dust on the sensor, on any other glass surface or the vignette of the optic. But in every case, it will have effects on the quality of the images. The picture below is an extremely stretched master flat to bring out all the all the details. You see clearly two spots which are caused due to dust on the cover glass of the sensor, and you see the vignetting of the telescope in the corners. The lower right corner also has a shading due to the filter holder. [](https://cdn.steemitimages.com/DQmXvwyLhU5NhmKHRKSCj2JTNBvAwkX9Hjo58GxGA8TddwM/flat_rgb.jpg) Flat frames are a little bit tricky. You need an evenly bright surface that is in front of your optic. I use an old notebook display with some layers of opaque foil. You can also use a white T-shirt and illuminate it with a torch. Make sure, that your camera is still at the same angle, so you have not rotated it yet, and the focuser is in the same position as for the light frames. In the recording settings, make sure that you use the same ISO. The automatic mode of your DSLR can do the other parameters. If you want to make them manually or if you have no automatic mode, like on an astrocamera, then you have to look that the peak of the histogram. This peak should be between in the left third and the middle of the histogram. It should not go to the edges, whether left or right. 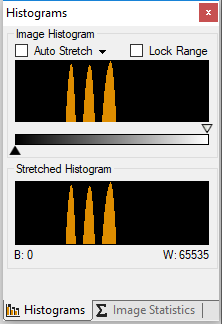 This is a screenshot of the histogram from [SequenceGeneratorPro](http://mainsequencesoftware.com/); the flat is exposed correctly. The peaks are between the left third and the middle. As I am capturing with a color camera, the three peaks represent the colors red, green and blue. ## How do flat frames effect in the final image To show you how the usage of flat frames will effect on the final image I have made to different images, one with and one without flat frames. I have put them together in one picture to show the difference. Both images had just an auto stretch without any further editing. [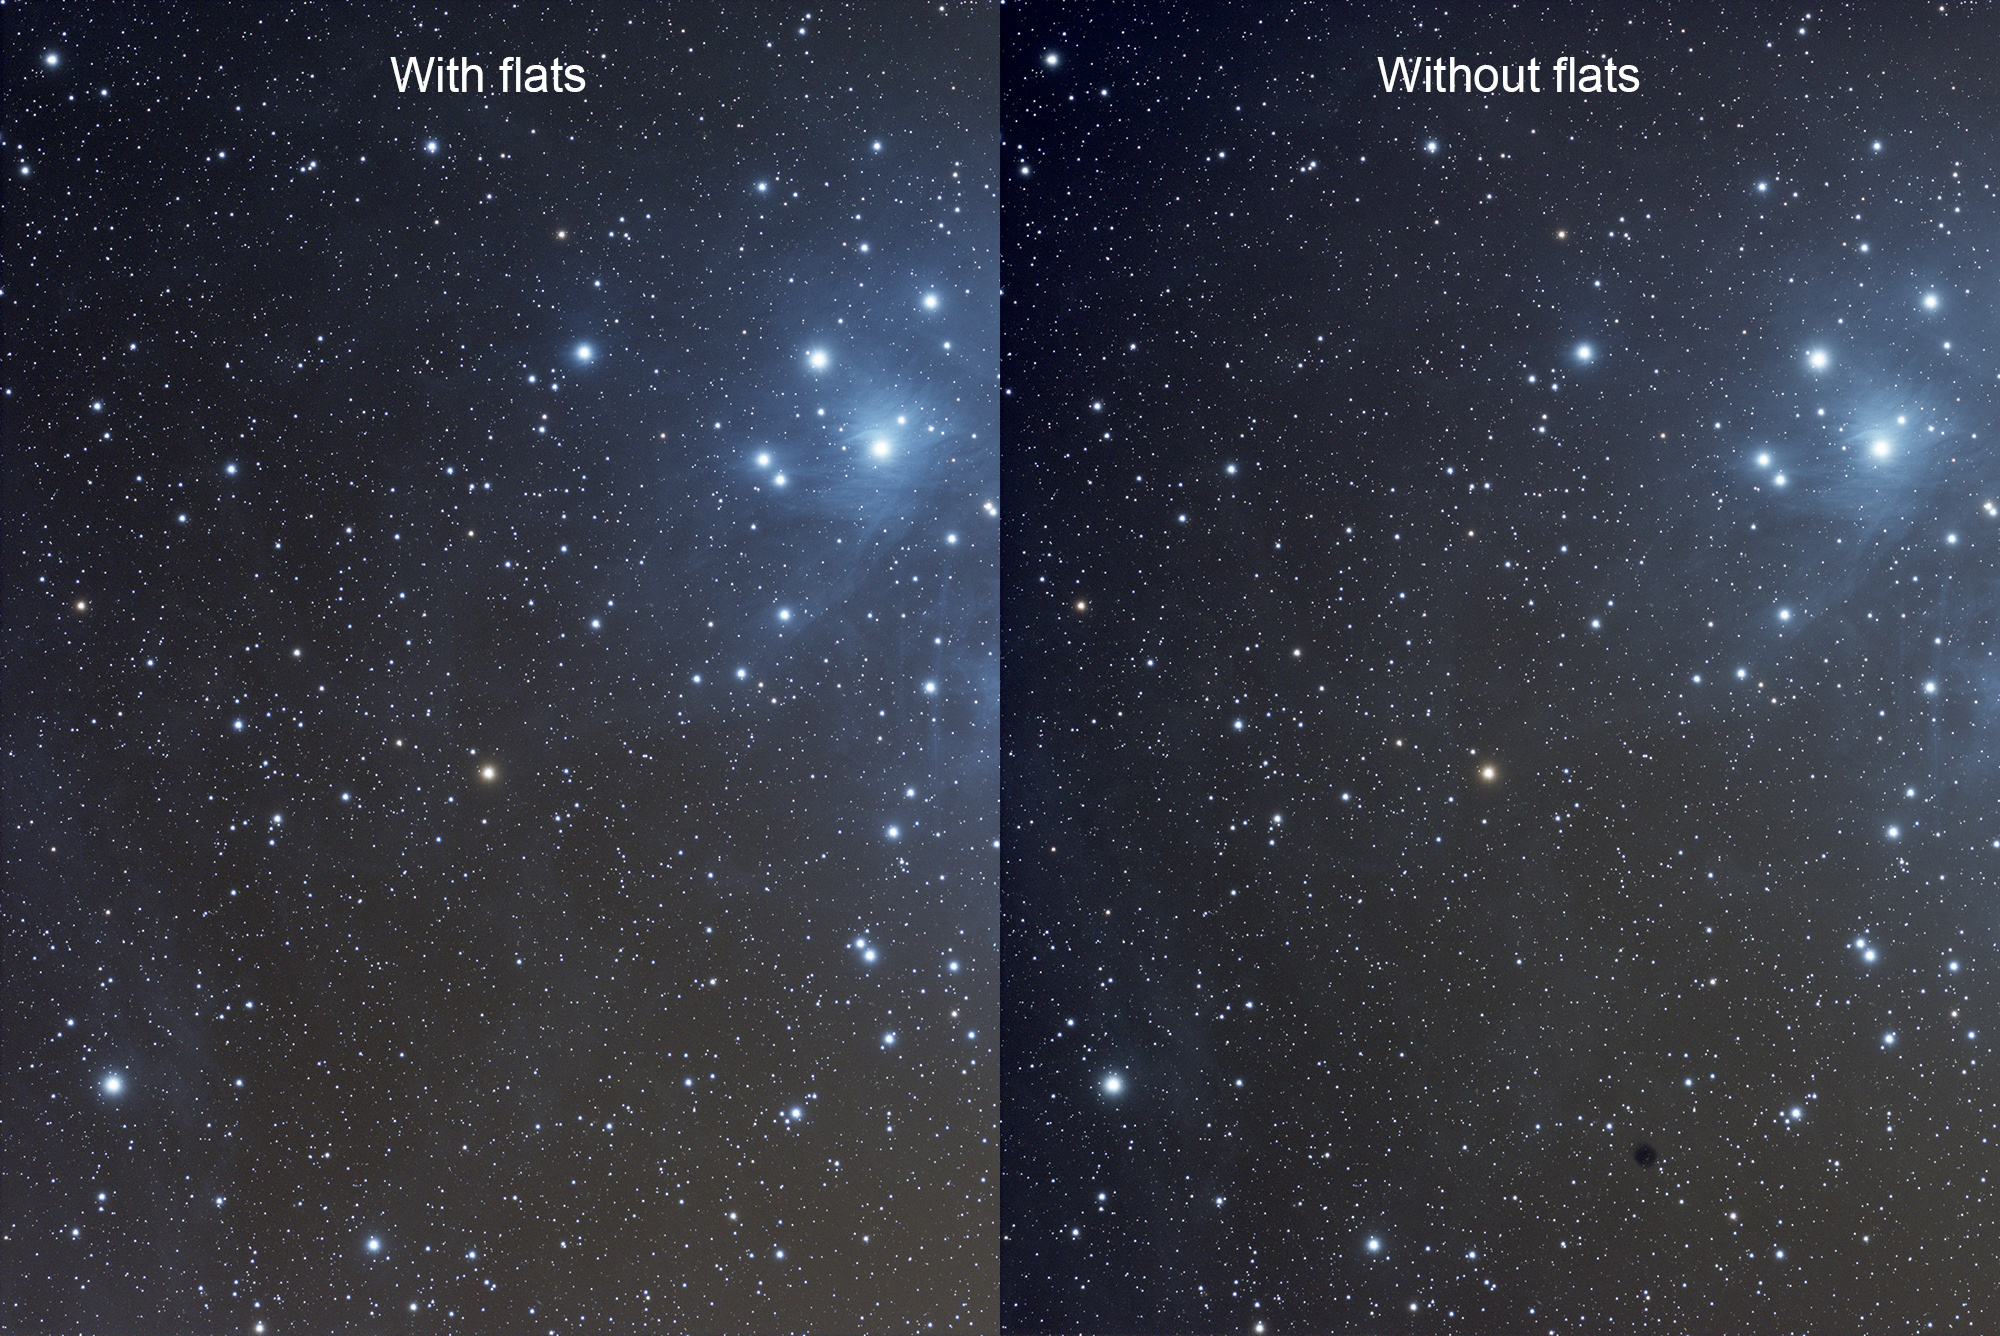](https://cdn.steemitimages.com/DQmdYhvHDqxZtmnphgLVATBeh6EAn1XDwXbEichCqM819Yy/mit-flat_ohne-flat.jpg) You will see that the dust spots disappear in the image with flat frames. Also, the background is smoother; you will see this especially in the left corner at the bottom. In the image without flat calibration, this area is much darker. When you take a look at the flat frame above again, you will see how it matches. ## Master flat As for all other types of images, we do in astrophotography, we also need to make a master for the flat frames. The simple reason for this is that it will reduce the noise. If your light source is bright enough we only need a short exposure time, so we can make a lot of flat frames without investing much time. My flats have an exposure time of 0.27 seconds. I think you should also be below one second, even if your light source isn’t very bright. As for the bias frames, the more flat frames you make, the better will be the result. I took 100 pieces for this project. To practice the stacking, we now do our master flat and go through to the process of stacking again. At first, we need to calibrate our flat frames with our master bias that we had created in the [first part](https://steemit.com/steemstem/@astrophoto.kevin/basic-astrophotography-image-processing-with-pixinsight-part-1) of this series. For this step we are using the ImageCalibration process (PROCESS -> ImageCalibration -> ImageCalibration). We now add all our flat frames by clicking “Add Files”. [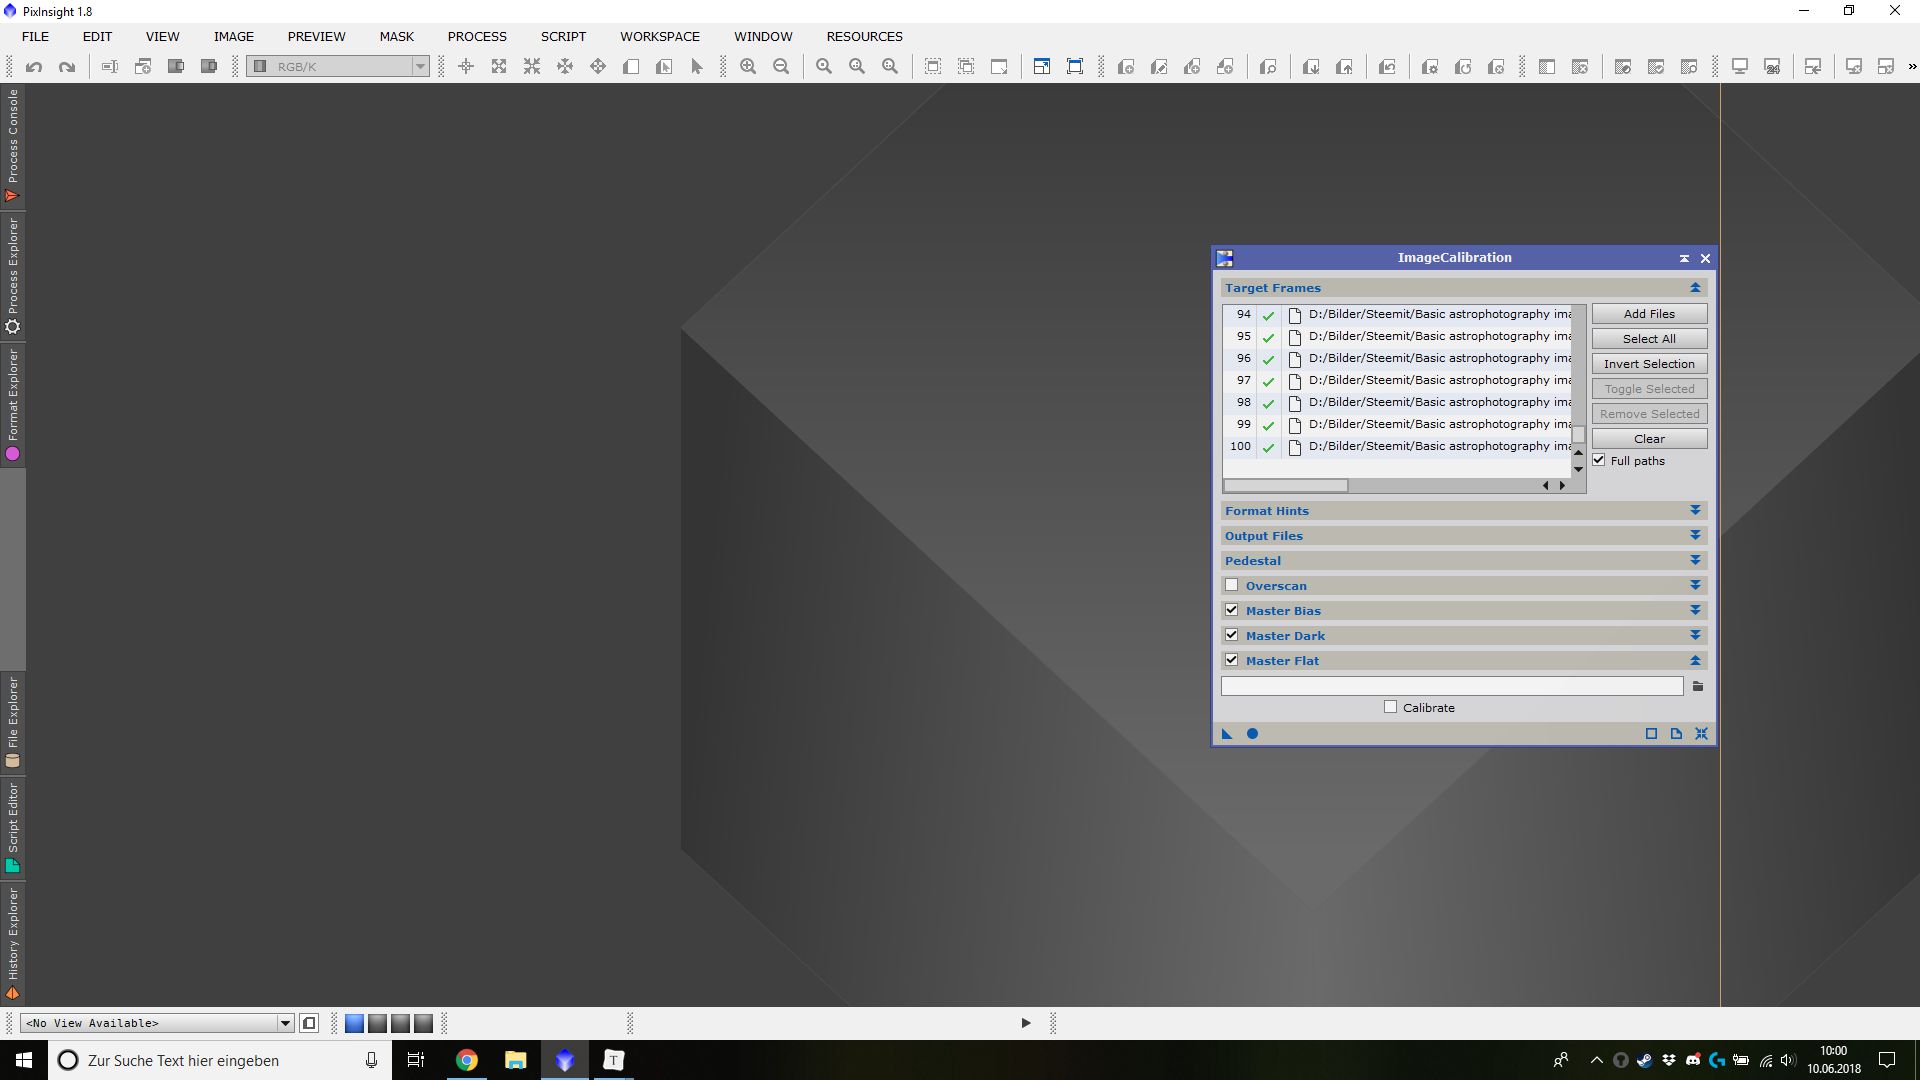](https://cdn.steemitimages.com/DQmTHmRKsVfUtuo8z6Ush9eWg87QZoNG3QNx1ydoAnHhWje/ImageCal_add.jpg) If you have added, all your flat frames go to the “Output Files” tab. Here we need to set the path were the calibrated images will be stored. I made a folder called “calibrated” in the folder were my flats are. To choose the folder click the small folder icon on the right side. [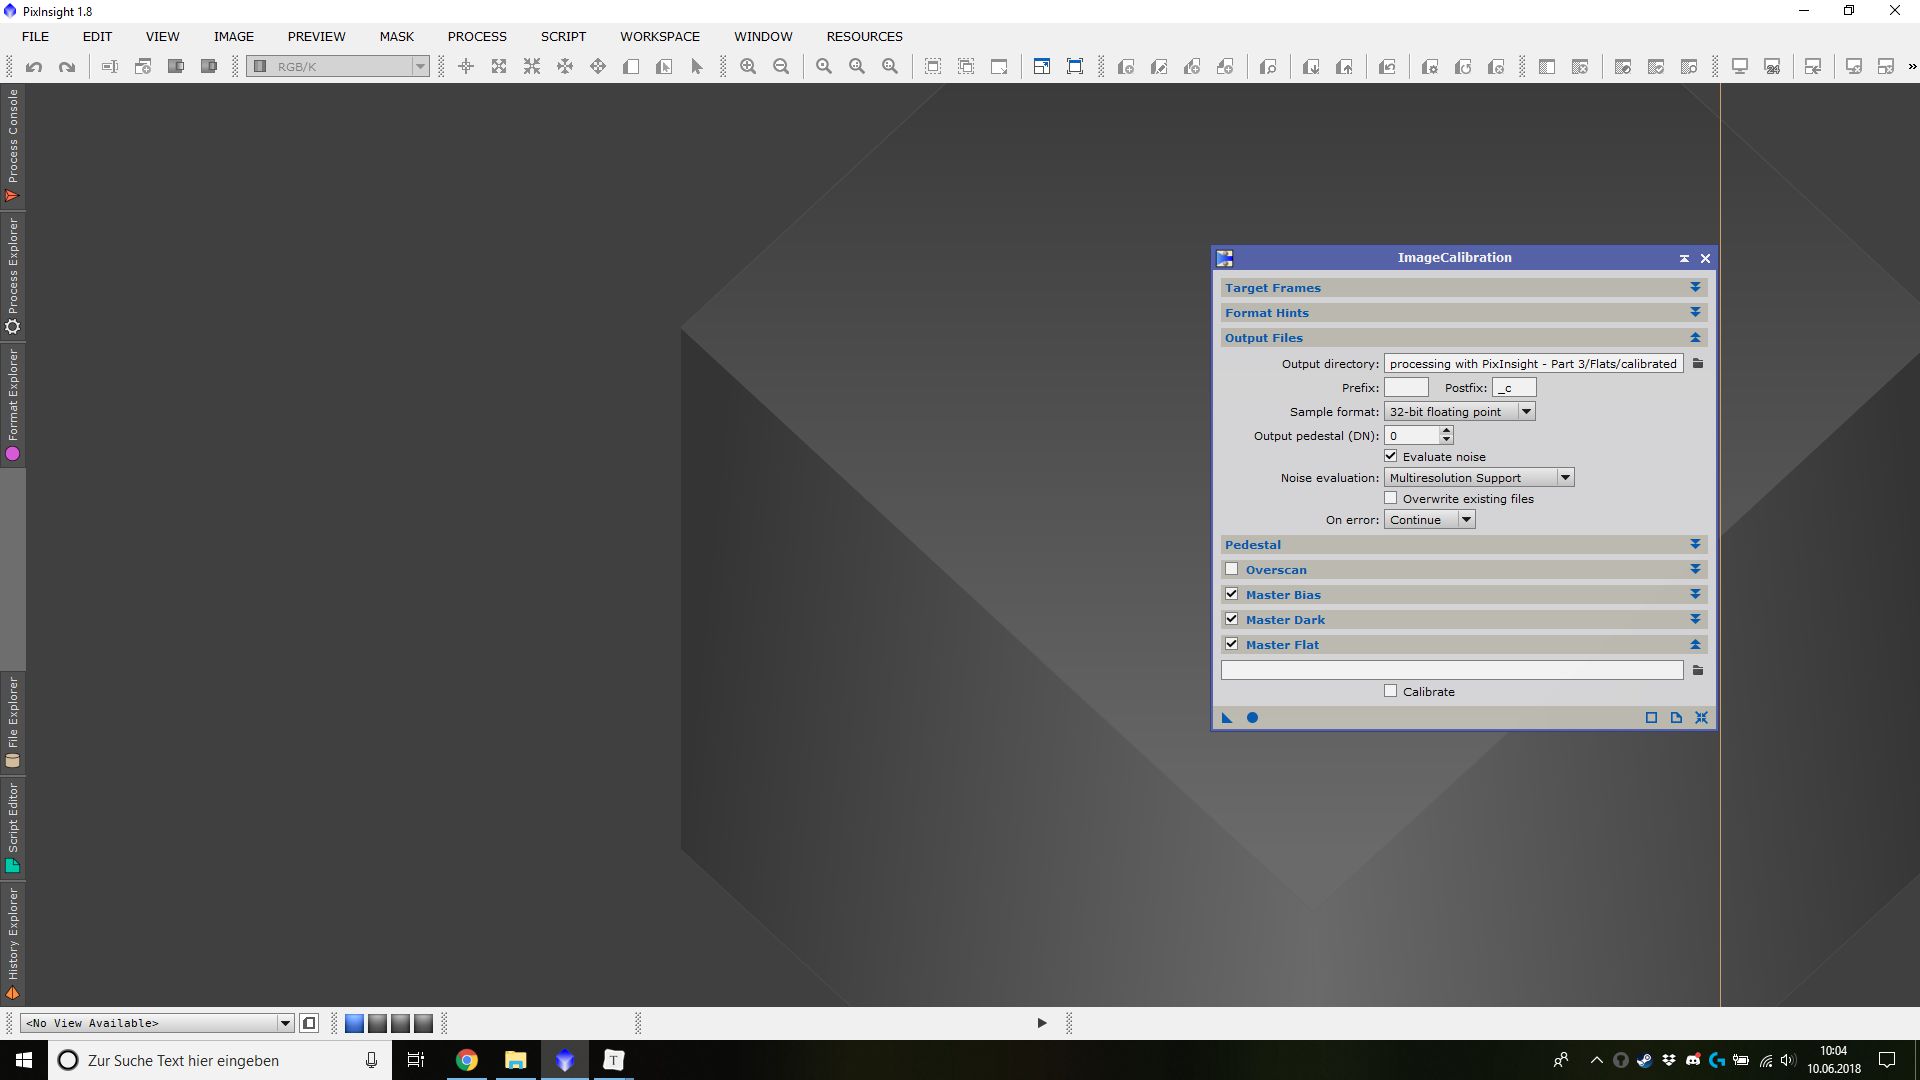](https://cdn.steemitimages.com/DQmc5AF8rTpAseqcPsgUpu2awVGSjYxFxKmcDGJYT7AiNx5/ImageCal_out.jpg) As we need to only calibrate with the master bias, we have to uncheck everything except “Master Bias”. Choose your master bias file by clicking on the small folder icon. [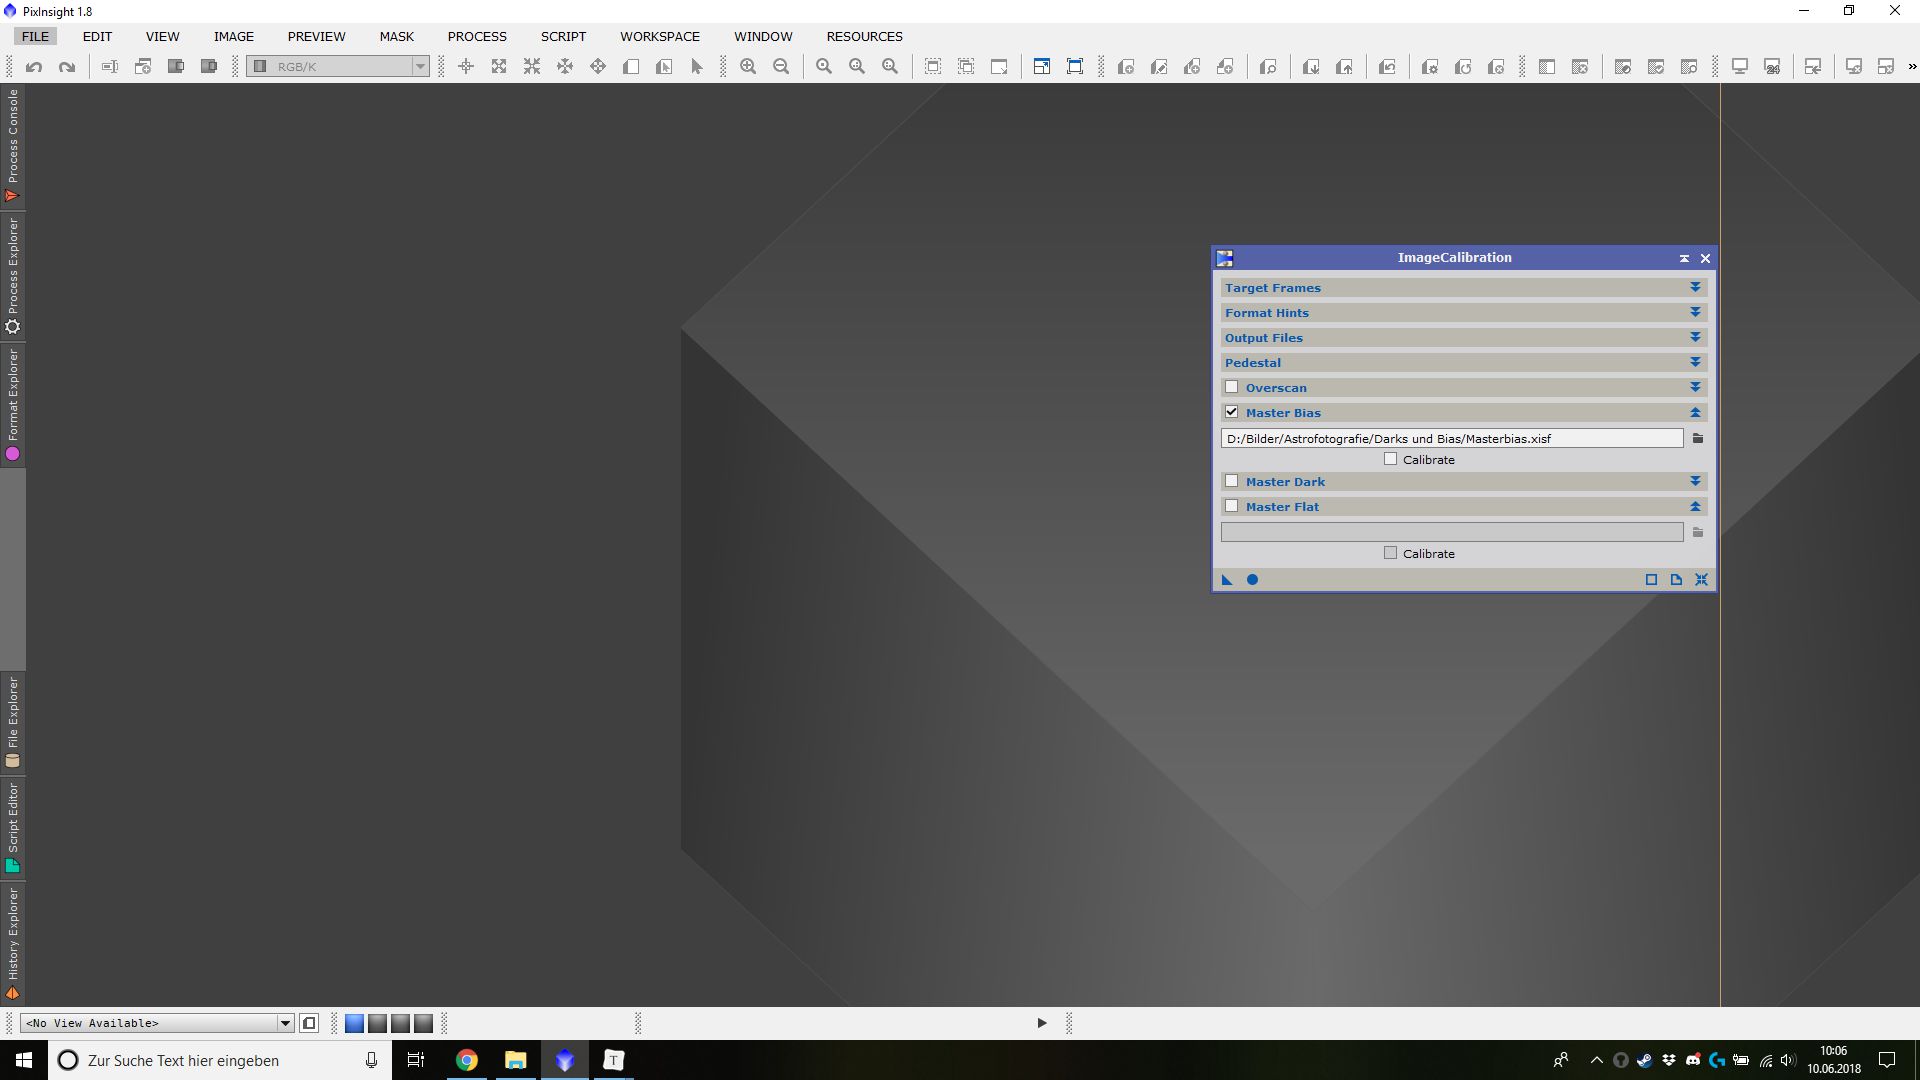](https://cdn.steemitimages.com/DQmSNVCMicPKRYJmZ7NWDVM7hQriY1M9Sep862oqTvumjda/ImageCal_bias.jpg) Once everything is set up, click the small circle (Apply Global) at the bottom of the ImageCalibration window, this will start the process. [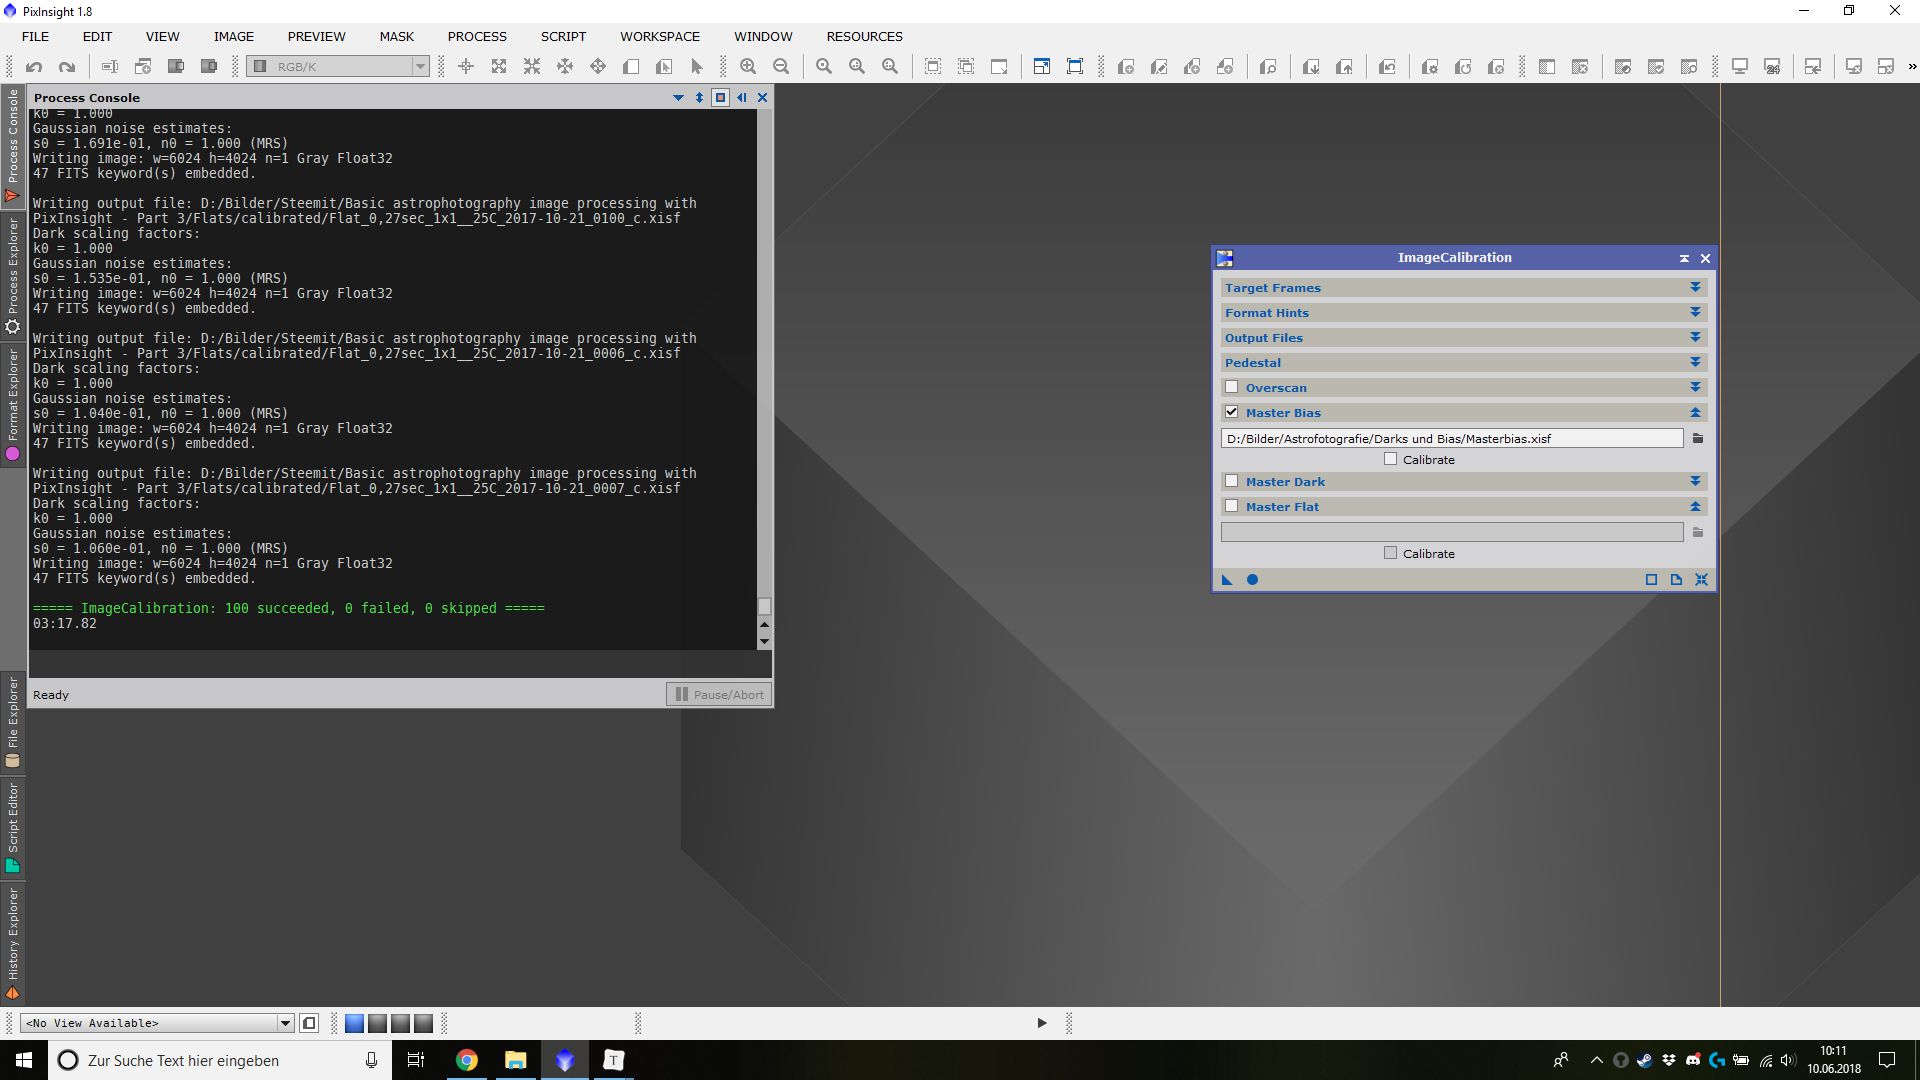](https://cdn.steemitimages.com/DQmfMtK8C4NB8W43koJ8QFJmW1cWGK15bfM4EyDWWeFbLGa/ImageCal_finish.jpg) When the process has finished, we want to stack our newly generated calibrated flat frames. Open the ImageIntegration process (PROCESS -> ImageIntegration -> ImageIntegration) and add all of your calibrated flat frames by clicking “Add Files”. [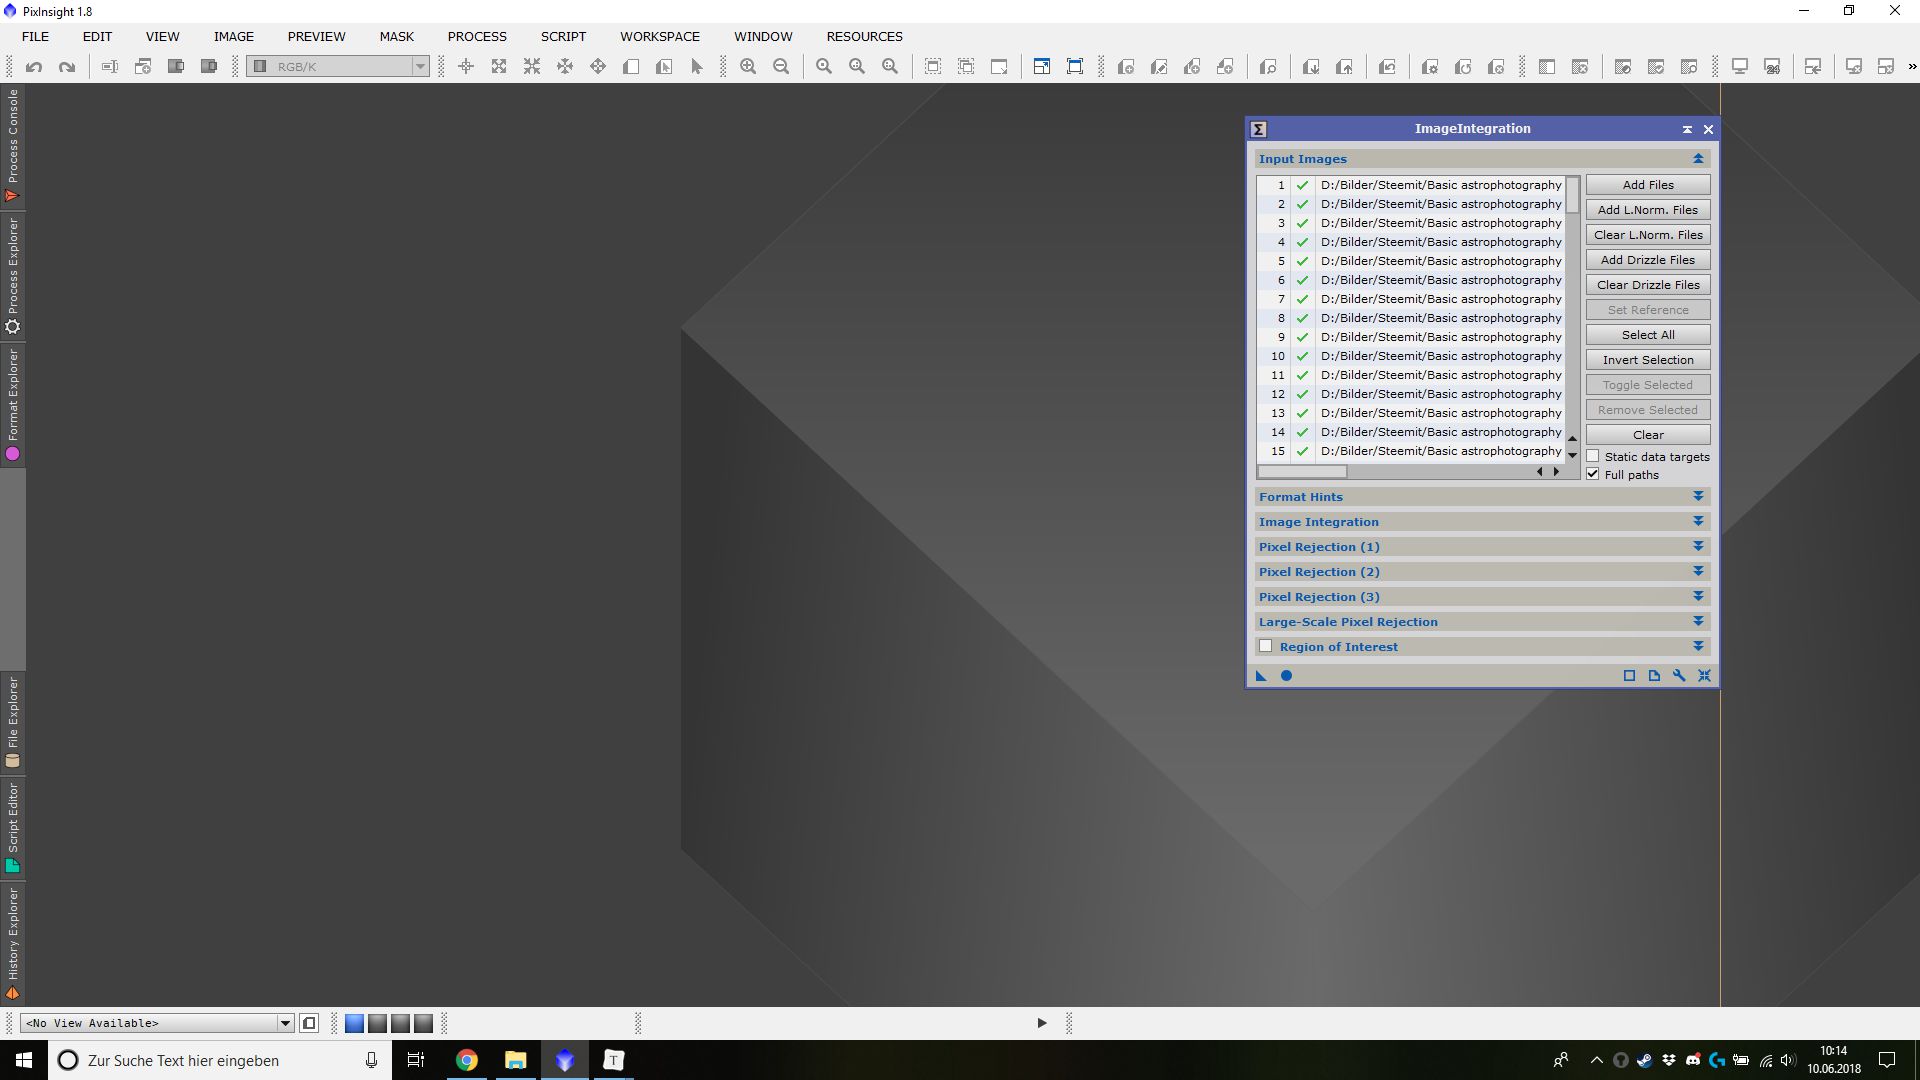](https://cdn.steemitimages.com/DQmWhXxojkrmMM7G6Q2FmJXddtSd7se3m8nZRXtGFwtYZ4H/ImageInt_add.jpg) If you have added, all your calibrated flat frames go to the “Image Integration” tab. Here we have to make some settings. The settings here are the same as for the bias frames. - Combination: Average - Normalization: Multiplicative - Weights: Don't care (all weights = 1) - Check "Generate integrated image" - Check "Evaluate noise" [](https://cdn.steemitimages.com/DQmW34aBarmb5k5nGZxNELFkPgBWkcuRLy6fyhPhBBjH6hK/ImageInt_int.jpg) If you have set up everything like in the screenshot, go to the “Pixel Rejection (1)” tab. Here we use the following settings. - Rejection algorithm: Percentile Clipping - Normalization: Equalize fluxes - Check "Generate rejection maps" - Check "Clip low pixels" - Check "Clip high pixels" [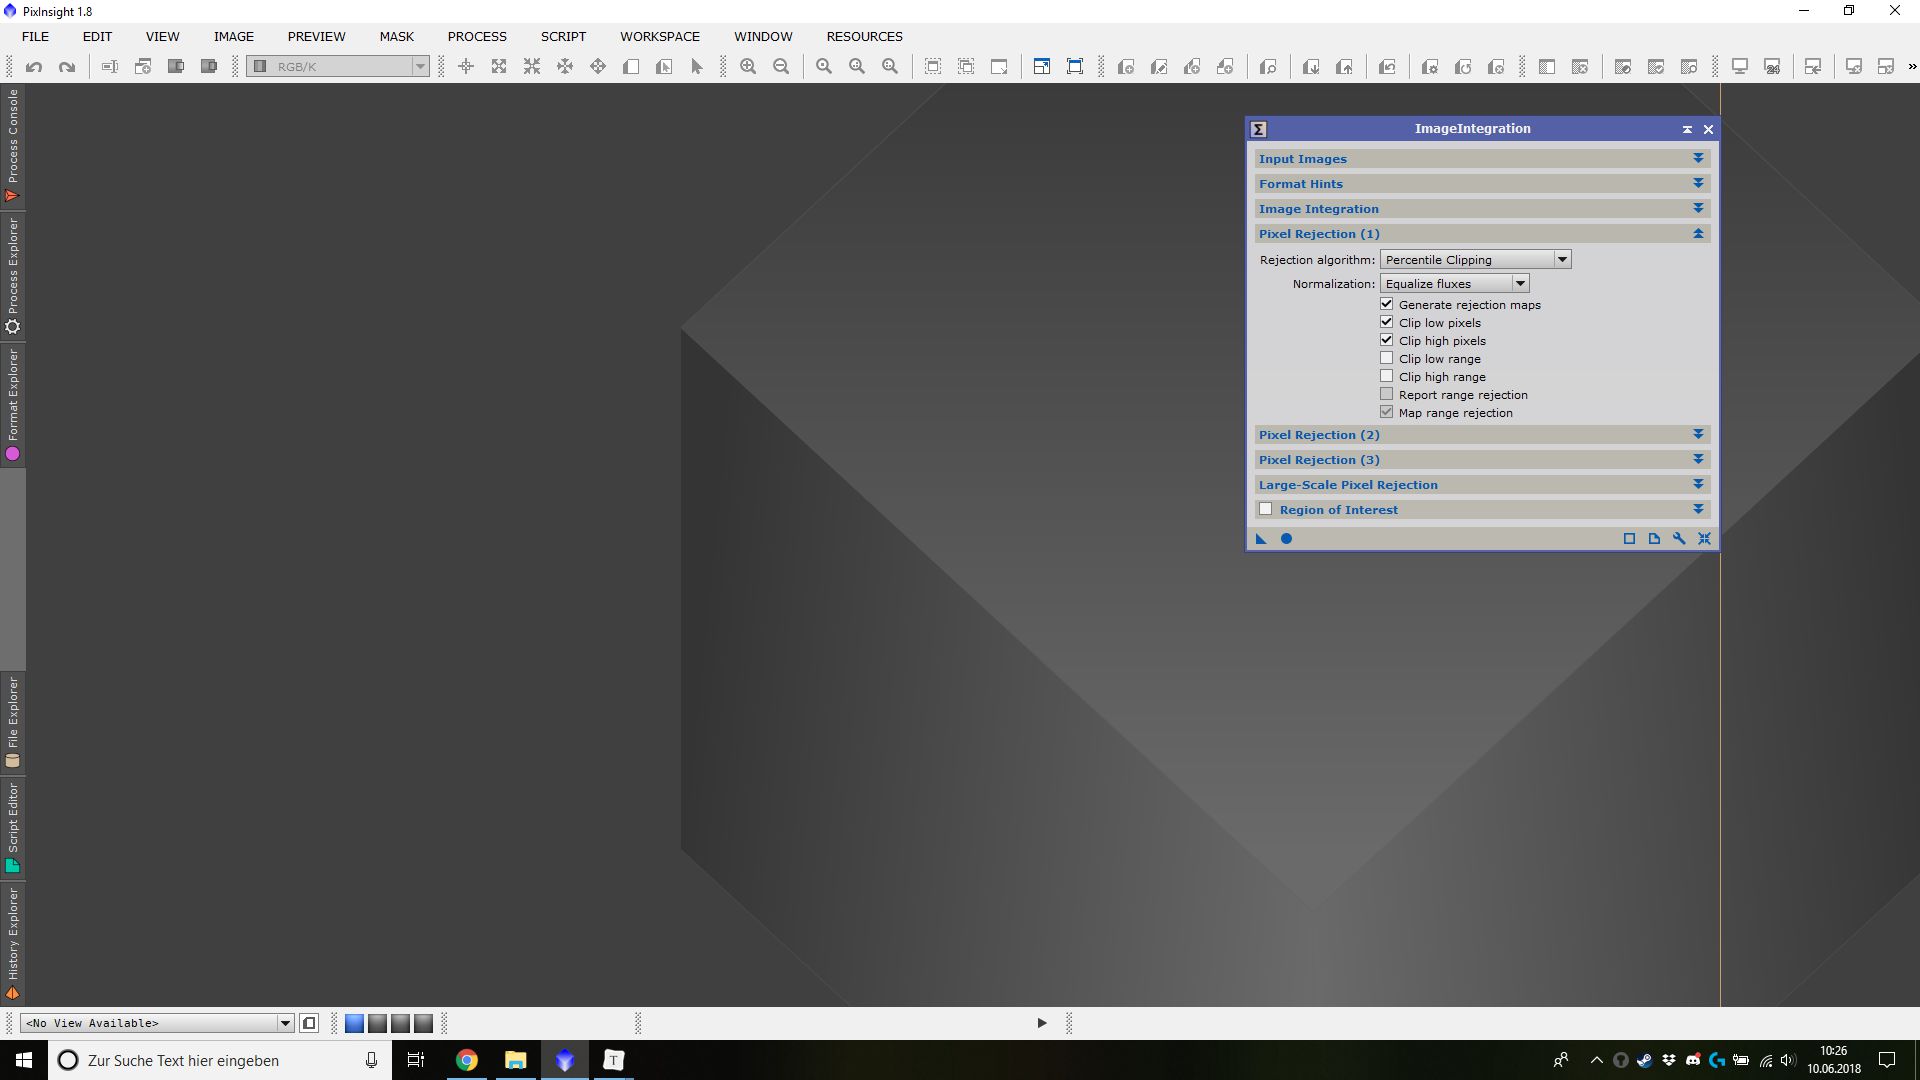](https://cdn.steemitimages.com/DQmabsJ9NWQUj3Zi384FfiKrLSzHEiN5trQVJqziFB4DU8p/ImageInt_Rej1.jpg) Have you everything set up? Then we go to the “Pixel Rejection (2)” tab. Here we will leave the default settings, which will work in the most cases. [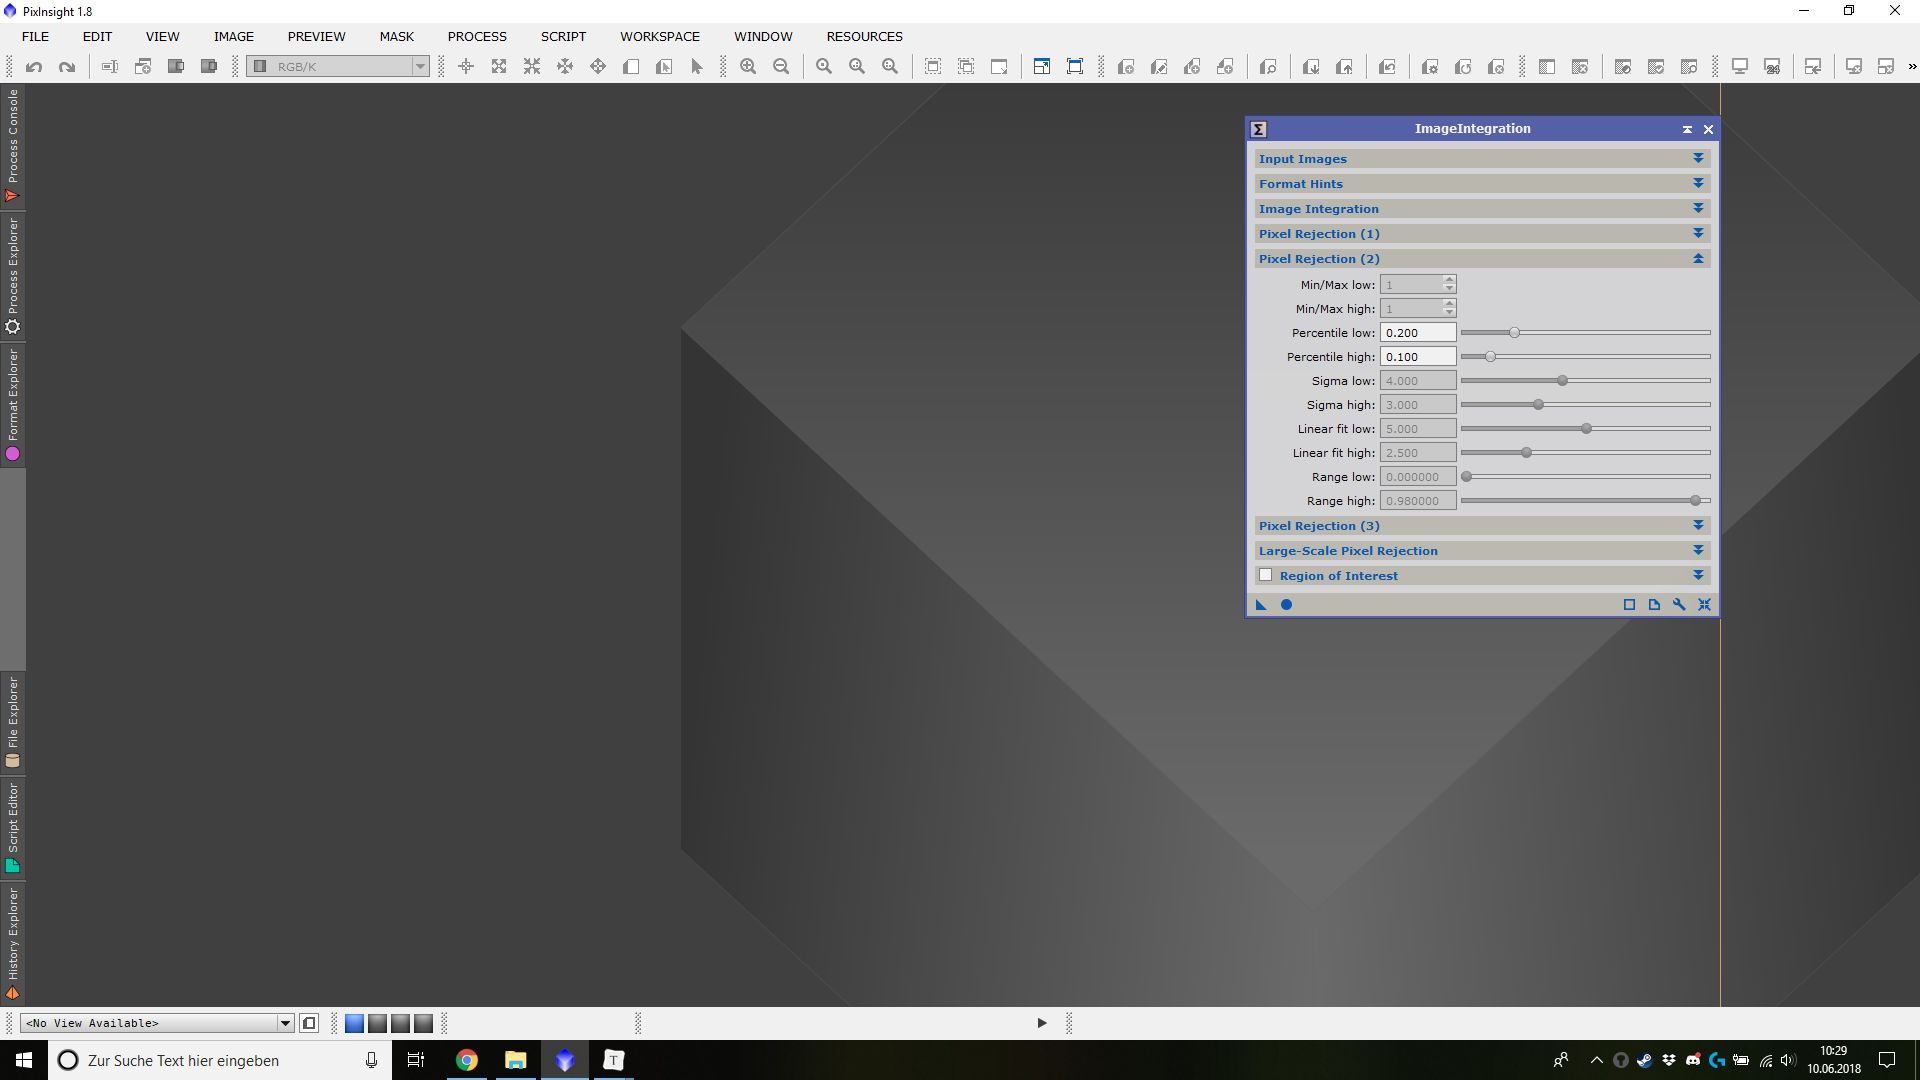](https://cdn.steemitimages.com/DQmcVpUfJFjNp78FdnA1mNNmM29rzk4xbNSNntKZfa2o5CT/ImageInt_Rej2.jpg) Once everything is set up and done, we click the small circle (Apply Global) at the bottom of the ImageIntegration window, this will start the stacking process. After the process has finished, three new images will appear. The image that is interesting for us is the one that is called “integration”. The other two images will contain the rejected information. Use the auto stretch with the ScreenTransferFunktion to see the data in the images. [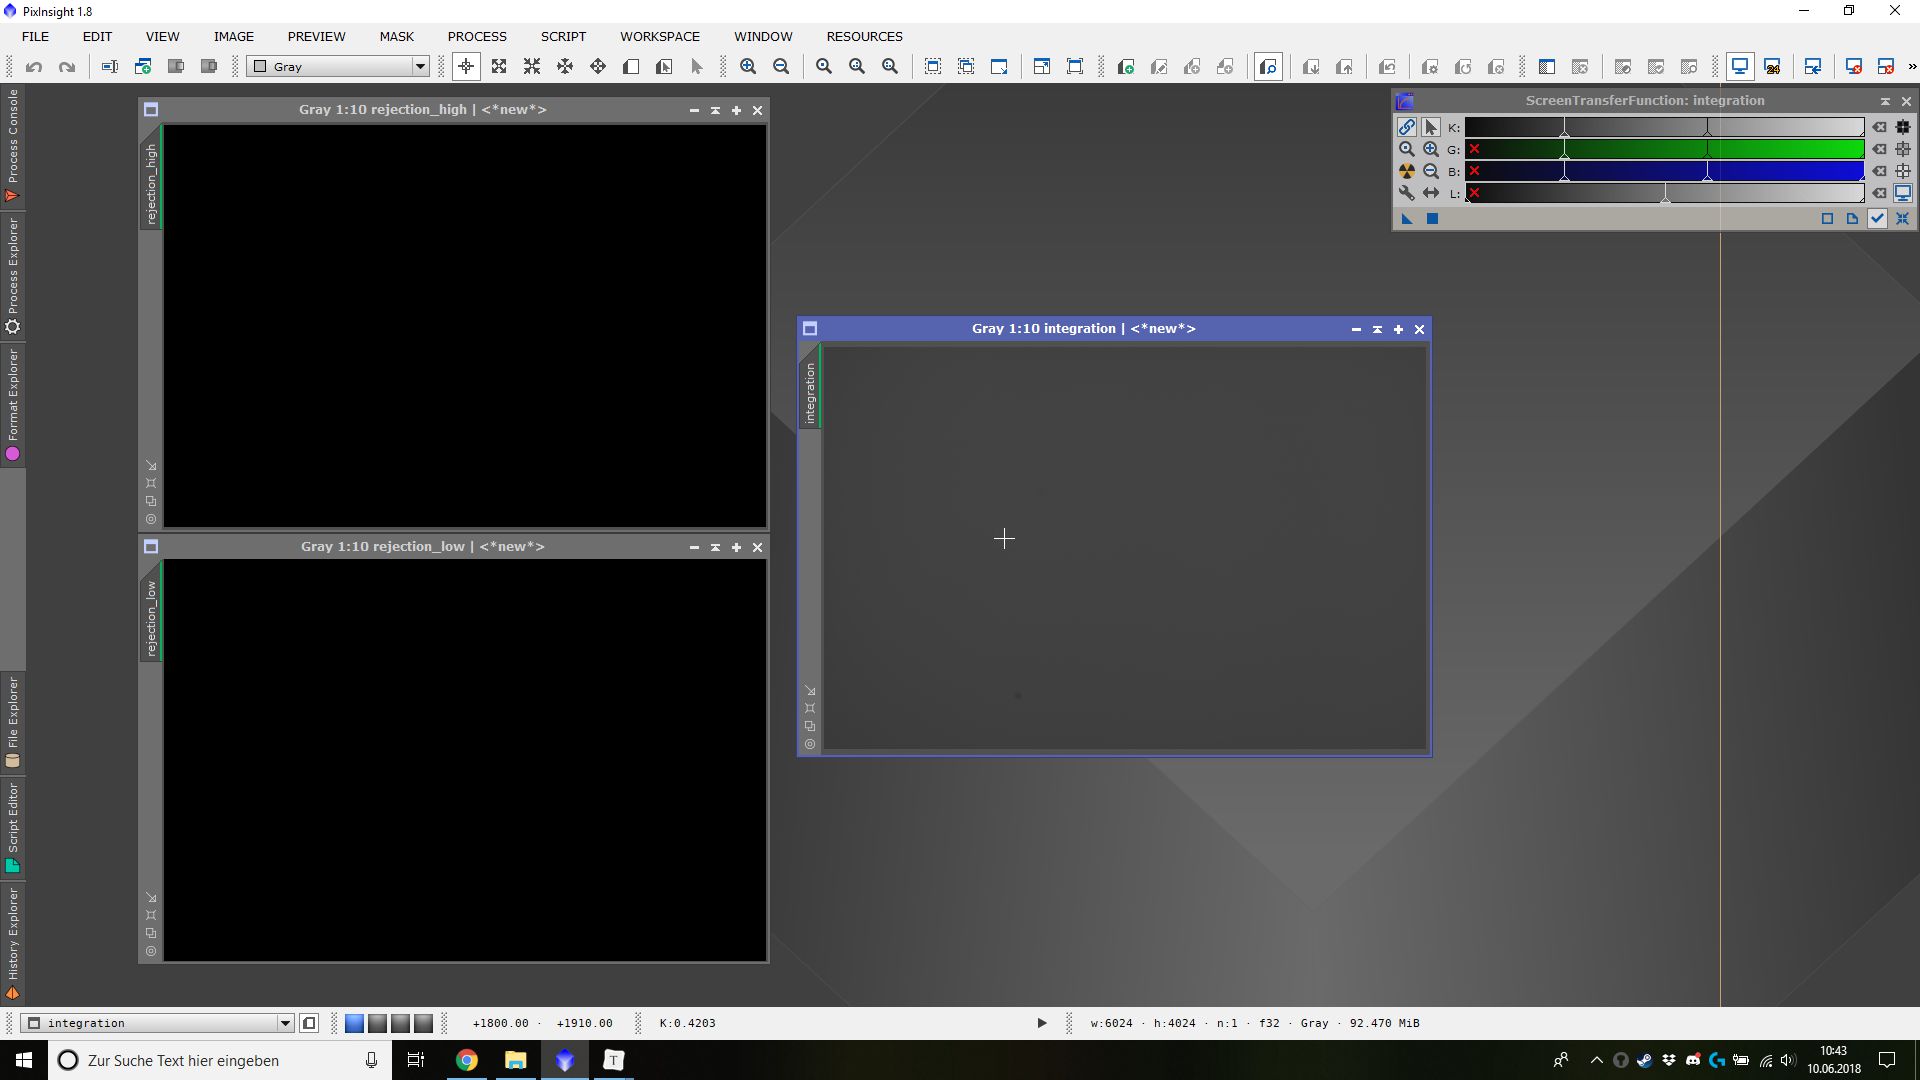](https://cdn.steemitimages.com/DQmWKpbAULz1jC2WFzuXsoEMbMMajQkmTUJbVxtJ5zXeYau/ImageInt_finish.jpg) After we have inspected the images and we think that everything is ok, we safe the “integration” image as “Masterflat”. Make sure you use the PixInsight file format “.xisf”. ## Conclusion We have now made all of the calibration frames that we need to optimize our images. This means that we will start to make the final image in the next parts. So we will leave the black, grey and noisy calibration frames behind us and we will go to straight ahead to a pretty and colorful image. ------ **Thank you very much for visiting and reading!** I hope that this has been a useful article for you. If you have any questions or suggestions, please don't be afraid to let me know of anything you thought about this post! Yours, [@astrophoto.kevin](https://steemit.com/@astrophoto.kevin) ------ All images, otherwise clearly indicated, in this post are my own work. You can use it for free if you credit them to [@astrophoto.kevin](https://steemit.com/@astrophoto.kevin) 
| author | astrophoto.kevin |
|---|---|
| permlink | basic-astrophotography-image-processing-with-pixinsight-part-3 |
| category | steemstem |
| json_metadata | {"tags":["steemstem","astronomy","tutorial","photography","fotofeed"],"image":["https://cdn.steemitimages.com/DQmXvwyLhU5NhmKHRKSCj2JTNBvAwkX9Hjo58GxGA8TddwM/flat_rgb.jpg","https://cdn.steemitimages.com/DQmUkEYYi8BfVJaH1ncE1M4oWouMjmvmDuokpoHUnpPcWHv/flat_histogram.png","https://cdn.steemitimages.com/DQmdYhvHDqxZtmnphgLVATBeh6EAn1XDwXbEichCqM819Yy/mit-flat_ohne-flat.jpg","https://cdn.steemitimages.com/DQmTHmRKsVfUtuo8z6Ush9eWg87QZoNG3QNx1ydoAnHhWje/ImageCal_add.jpg","https://cdn.steemitimages.com/DQmc5AF8rTpAseqcPsgUpu2awVGSjYxFxKmcDGJYT7AiNx5/ImageCal_out.jpg","https://cdn.steemitimages.com/DQmSNVCMicPKRYJmZ7NWDVM7hQriY1M9Sep862oqTvumjda/ImageCal_bias.jpg","https://cdn.steemitimages.com/DQmfMtK8C4NB8W43koJ8QFJmW1cWGK15bfM4EyDWWeFbLGa/ImageCal_finish.jpg","https://cdn.steemitimages.com/DQmWhXxojkrmMM7G6Q2FmJXddtSd7se3m8nZRXtGFwtYZ4H/ImageInt_add.jpg","https://cdn.steemitimages.com/DQmW34aBarmb5k5nGZxNELFkPgBWkcuRLy6fyhPhBBjH6hK/ImageInt_int.jpg","https://cdn.steemitimages.com/DQmabsJ9NWQUj3Zi384FfiKrLSzHEiN5trQVJqziFB4DU8p/ImageInt_Rej1.jpg","https://cdn.steemitimages.com/DQmcVpUfJFjNp78FdnA1mNNmM29rzk4xbNSNntKZfa2o5CT/ImageInt_Rej2.jpg","https://cdn.steemitimages.com/DQmWKpbAULz1jC2WFzuXsoEMbMMajQkmTUJbVxtJ5zXeYau/ImageInt_finish.jpg","https://cdn.steemitimages.com/DQmT95DJLfEgZXVJiCyWNDZQvYCHBEWGYLrkR9ze7yerrbR/dmbwP4E.png"],"links":["https://cdn.steemitimages.com/DQmXvwyLhU5NhmKHRKSCj2JTNBvAwkX9Hjo58GxGA8TddwM/flat_rgb.jpg","http://mainsequencesoftware.com/","https://cdn.steemitimages.com/DQmdYhvHDqxZtmnphgLVATBeh6EAn1XDwXbEichCqM819Yy/mit-flat_ohne-flat.jpg","https://steemit.com/steemstem/@astrophoto.kevin/basic-astrophotography-image-processing-with-pixinsight-part-1","https://cdn.steemitimages.com/DQmTHmRKsVfUtuo8z6Ush9eWg87QZoNG3QNx1ydoAnHhWje/ImageCal_add.jpg","https://cdn.steemitimages.com/DQmc5AF8rTpAseqcPsgUpu2awVGSjYxFxKmcDGJYT7AiNx5/ImageCal_out.jpg","https://cdn.steemitimages.com/DQmSNVCMicPKRYJmZ7NWDVM7hQriY1M9Sep862oqTvumjda/ImageCal_bias.jpg","https://cdn.steemitimages.com/DQmfMtK8C4NB8W43koJ8QFJmW1cWGK15bfM4EyDWWeFbLGa/ImageCal_finish.jpg","https://cdn.steemitimages.com/DQmWhXxojkrmMM7G6Q2FmJXddtSd7se3m8nZRXtGFwtYZ4H/ImageInt_add.jpg","https://cdn.steemitimages.com/DQmW34aBarmb5k5nGZxNELFkPgBWkcuRLy6fyhPhBBjH6hK/ImageInt_int.jpg","https://cdn.steemitimages.com/DQmabsJ9NWQUj3Zi384FfiKrLSzHEiN5trQVJqziFB4DU8p/ImageInt_Rej1.jpg","https://cdn.steemitimages.com/DQmcVpUfJFjNp78FdnA1mNNmM29rzk4xbNSNntKZfa2o5CT/ImageInt_Rej2.jpg","https://cdn.steemitimages.com/DQmWKpbAULz1jC2WFzuXsoEMbMMajQkmTUJbVxtJ5zXeYau/ImageInt_finish.jpg","https://steemit.com/@astrophoto.kevin"],"app":"steemit/0.1","format":"markdown"} |
| created | 2018-06-11 09:44:30 |
| last_update | 2018-06-11 09:44:30 |
| depth | 0 |
| children | 8 |
| last_payout | 2018-06-18 09:44:30 |
| cashout_time | 1969-12-31 23:59:59 |
| total_payout_value | 28.298 HBD |
| curator_payout_value | 8.962 HBD |
| pending_payout_value | 0.000 HBD |
| promoted | 0.000 HBD |
| body_length | 9,529 |
| author_reputation | 86,277,108,443,159 |
| root_title | "Basic astrophotography image processing with PixInsight - Part 3" |
| beneficiaries | [] |
| max_accepted_payout | 1,000,000.000 HBD |
| percent_hbd | 10,000 |
| post_id | 60,269,593 |
| net_rshares | 14,197,378,070,678 |
| author_curate_reward | "" |
| voter | weight | wgt% | rshares | pct | time |
|---|---|---|---|---|---|
| wackou | 0 | 81,120,708,755 | 1.07% | ||
| lafona-miner | 0 | 491,138,203,440 | 20% | ||
| justtryme90 | 0 | 396,351,407,664 | 20% | ||
| anwenbaumeister | 0 | 60,173,842,659 | 3.59% | ||
| roelandp | 0 | 58,064,258,039 | 1.79% | ||
| raymondspeaks | 0 | 202,444,818 | 1.79% | ||
| shaka | 0 | 569,266,334,478 | 20% | ||
| lemouth | 0 | 99,595,495,556 | 20% | ||
| rjbauer85 | 0 | 1,237,064,451 | 20% | ||
| anarchyhasnogods | 0 | 41,584,476,026 | 12% | ||
| lk666 | 0 | 186,544,840 | 0.35% | ||
| remlaps1 | 0 | 8,378,666,881 | 17% | ||
| curie | 0 | 109,458,221,184 | 3.59% | ||
| hendrikdegrote | 0 | 1,828,303,607,586 | 3.59% | ||
| vact | 0 | 48,432,573,990 | 3.59% | ||
| steemstem | 0 | 579,878,889,146 | 20% | ||
| sethroot | 0 | 119,588,608 | 0.35% | ||
| foundation | 0 | 2,768,780,260 | 20% | ||
| the-devil | 0 | 2,628,101,433 | 20% | ||
| remlaps2 | 0 | 4,549,260,758 | 100% | ||
| thevenusproject | 0 | 11,234,645,694 | 20% | ||
| dna-replication | 0 | 5,626,818,224 | 20% | ||
| lisa.palmer | 0 | 991,870,289 | 17% | ||
| lenin-mccarthy | 0 | 100,807,811 | 1.79% | ||
| boynashruddin | 0 | 198,596,668 | 5% | ||
| cub2 | 0 | 4,287,904,800 | 100% | ||
| astronomyizfun | 0 | 1,405,027,492 | 25% | ||
| pacokam8 | 0 | 258,351,288 | 1.43% | ||
| borislavzlatanov | 0 | 1,636,954,231 | 20% | ||
| betelzeus | 0 | 5,007,356,295 | 100% | ||
| michelios | 0 | 879,946,104 | 0.53% | ||
| awesomianist | 0 | 474,774,881 | 0.71% | ||
| jamhuery | 0 | 50,383,979 | 20% | ||
| moksamol | 0 | 422,341,857 | 1.79% | ||
| getrichordie | 0 | 134,063,106 | 1.79% | ||
| thatsweeneyguy | 0 | 209,972,996 | 1.79% | ||
| devi1714 | 0 | 113,008,031 | 1.79% | ||
| eurogee | 0 | 429,180,553 | 2% | ||
| iansart | 0 | 1,907,136,940 | 1.79% | ||
| mrstaf | 0 | 75,028,513 | 1.79% | ||
| kryzsec | 0 | 11,907,097,934 | 20% | ||
| fredrikaa | 0 | 43,671,578,394 | 20% | ||
| tantawi | 0 | 176,683,561 | 3.59% | ||
| robertvogt | 0 | 426,824,354 | 1.79% | ||
| locikll | 0 | 1,490,287,068 | 7.18% | ||
| dber | 0 | 4,491,937,353 | 20% | ||
| mahdiyari | 0 | 11,584,127,861 | 10% | ||
| aboutyourbiz | 0 | 636,557,608 | 3.59% | ||
| kerriknox | 0 | 25,062,961,416 | 20% | ||
| alexander.alexis | 0 | 2,346,309,093 | 8% | ||
| howtostartablog | 0 | 283,913,652 | 0.35% | ||
| cobloc | 0 | 87,758,990 | 1.79% | ||
| jayna | 0 | 171,370,234 | 0.53% | ||
| blessing97 | 0 | 652,392,695 | 20% | ||
| cryptokrieg | 0 | 759,241,810 | 3.59% | ||
| rockeynayak | 0 | 122,182,067 | 20% | ||
| ertwro | 0 | 8,294,564,908 | 20% | ||
| makrotheblack | 0 | 118,073,726 | 1.79% | ||
| juanjdiaz89 | 0 | 353,214,955 | 20% | ||
| thinknzombie | 0 | 5,393,085,665 | 1.79% | ||
| nitesh9 | 0 | 5,010,391,045 | 20% | ||
| fancybrothers | 0 | 2,921,817,255 | 6% | ||
| churchboy | 0 | 3,597,629,035 | 20% | ||
| himal | 0 | 1,541,806,422 | 20% | ||
| abigail-dantes | 0 | 324,673,897,489 | 20% | ||
| suravsingh | 0 | 265,182,589 | 20% | ||
| g0nr0gue | 0 | 109,772,012 | 1.79% | ||
| planetenamek | 0 | 2,877,139,409 | 10% | ||
| alexzicky | 0 | 2,430,188,671 | 5% | ||
| mountain.phil28 | 0 | 3,605,815,384 | 25% | ||
| mountainwashere | 0 | 8,061,024,954 | 20% | ||
| tanyaschutte | 0 | 146,662,622 | 2% | ||
| zest | 0 | 5,210,999,468 | 14% | ||
| felixrodriguez | 0 | 546,725,328 | 10% | ||
| indy8phish | 0 | 337,388,603 | 1.79% | ||
| masterwriter | 0 | 739,839,998 | 20% | ||
| massivevibration | 0 | 2,200,997,154 | 5% | ||
| onartbali | 0 | 539,955,137 | 5% | ||
| kiriatjrb | 0 | 64,890,400 | 5% | ||
| laylahsophia | 0 | 6,159,233,335 | 20% | ||
| anna-mi | 0 | 154,864,548 | 1.79% | ||
| clweeks | 0 | 182,125,115 | 1.43% | ||
| torico | 0 | 356,561,114 | 0.21% | ||
| ksolymosi | 0 | 4,394,129,305 | 20% | ||
| simplifylife | 0 | 3,397,209,740 | 10% | ||
| damzxyno | 0 | 77,788,023 | 4% | ||
| espoem | 0 | 9,843,460,394 | 12% | ||
| thatterrioguy | 0 | 75,368,441 | 2.69% | ||
| birgitt | 0 | 133,077,960 | 3.59% | ||
| mayowadavid | 0 | 1,194,878,084 | 10% | ||
| imamalkimas | 0 | 106,448,991 | 3.59% | ||
| zeeshan003 | 0 | 245,235,278 | 20% | ||
| peaceandwar | 0 | 486,779,166 | 1.79% | ||
| enzor | 0 | 341,889,679 | 10% | ||
| carloserp-2000 | 0 | 4,503,660,672 | 20% | ||
| rachelsmantra | 0 | 858,236,329 | 20% | ||
| gra | 0 | 7,014,767,059 | 20% | ||
| utopian-io | 0 | 9,133,935,184,341 | 6% | ||
| tfcoates | 0 | 392,301,225 | 5% | ||
| sci-guy | 0 | 53,921,493 | 20% | ||
| vinxy | 0 | 95,100,901 | 20% | ||
| astromaniak | 0 | 6,668,623,007 | 30% | ||
| physics.benjamin | 0 | 463,729,715 | 20% | ||
| kenadis | 0 | 5,658,180,448 | 20% | ||
| amavi | 0 | 3,123,437,227 | 4% | ||
| florae | 0 | 973,071,535 | 20% | ||
| robotics101 | 0 | 922,596,918 | 16% | ||
| hatsekidee | 0 | 413,864,653 | 1.79% | ||
| tristan-muller | 0 | 130,053,037 | 20% | ||
| joeycrack | 0 | 221,871,204 | 10% | ||
| fejiro | 0 | 211,408,298 | 10% | ||
| aamin | 0 | 389,939,738 | 10% | ||
| sco | 0 | 1,648,714,204 | 4% | ||
| adetola | 0 | 1,200,825,476 | 20% | ||
| rharphelle | 0 | 1,427,312,833 | 25% | ||
| dysfunctional | 0 | 1,099,138,668 | 10% | ||
| rasamuel | 0 | 84,291,460 | 1.79% | ||
| stahlberg | 0 | 613,822,002 | 1.79% | ||
| shoganaii | 0 | 950,499,065 | 10% | ||
| mathowl | 0 | 10,380,211,716 | 100% | ||
| whileponderin | 0 | 1,296,453,626 | 20% | ||
| jlmol7 | 0 | 87,880,481 | 20% | ||
| mittymartz | 0 | 417,669,575 | 20% | ||
| hadji | 0 | 976,256,842 | 20% | ||
| sakura1012 | 0 | 792,721,104 | 20% | ||
| fidelpoet | 0 | 105,725,753 | 3.59% | ||
| terrylovejoy | 0 | 36,305,270,266 | 100% | ||
| rbm | 0 | 116,178,248 | 6% | ||
| saunter-pl | 0 | 360,081,575 | 20% | ||
| real2josh | 0 | 161,315,381 | 10% | ||
| iamfo | 0 | 166,791,077 | 1.79% | ||
| steepup | 0 | 253,856,852 | 8% | ||
| debbietiyan | 0 | 110,416,224 | 1.79% | ||
| rionpistorius | 0 | 149,459,040 | 10% | ||
| steem-hikers | 0 | 376,869,647 | 20% | ||
| deutsch-boost | 0 | 455,163,476 | 20% | ||
| kingabesh | 0 | 438,007,081 | 10% | ||
| didic | 0 | 496,246,529 | 1.79% | ||
| kelos | 0 | 317,524,017 | 10% | ||
| dexterdev | 0 | 1,803,633,363 | 20% | ||
| ugonma | 0 | 778,866,479 | 20% | ||
| bianconero | 0 | 609,648,052 | 100% | ||
| mindscapephotos | 0 | 105,921,942 | 1.25% | ||
| ajpacheco1610 | 0 | 175,336,826 | 10% | ||
| alexdory | 0 | 5,023,864,871 | 20% | ||
| benleemusic | 0 | 1,446,600,137 | 0.35% | ||
| lianaakobian | 0 | 4,164,580,451 | 16% | ||
| jbrrd | 0 | 124,666,905 | 20% | ||
| christianunger | 0 | 103,694,365 | 1.79% | ||
| chimtivers96 | 0 | 185,974,045 | 3.59% | ||
| amirdesaingrafis | 0 | 83,567,455 | 1.79% | ||
| joelagbo | 0 | 372,462,194 | 20% | ||
| anyes2013 | 0 | 215,206,823 | 10% | ||
| spederson | 0 | 348,595,105 | 18% | ||
| effofex | 0 | 293,563,007 | 10% | ||
| mrbreeziewrites | 0 | 807,307,306 | 20% | ||
| ihalf2p | 0 | 135,371,566 | 100% | ||
| de-stem | 0 | 7,970,548,934 | 18% | ||
| serylt | 0 | 3,306,561,906 | 16% | ||
| yann85 | 0 | 311,630,483 | 10% | ||
| ari16 | 0 | 95,840,689 | 10% | ||
| event-horizon | 0 | 202,069,105 | 20% | ||
| chloroform | 0 | 2,973,733,318 | 20% | ||
| vanessahampton | 0 | 1,147,394,079 | 10% | ||
| thesteemmustflow | 0 | 138,686,442 | 0.71% | ||
| temitayo-pelumi | 0 | 1,166,123,102 | 20% | ||
| qberryfarms | 0 | 97,475,532 | 1.79% | ||
| shookriya | 0 | 104,140,189 | 0.71% | ||
| marcuz | 0 | 98,930,189 | 1.79% | ||
| beetlevc | 0 | 479,937,087 | 2% | ||
| romanleopold | 0 | 421,559,828 | 1.79% | ||
| niouton | 0 | 259,125,158 | 0.71% | ||
| beautyinscience | 0 | 61,251,219 | 10% | ||
| star-vc | 0 | 471,616,100 | 20% | ||
| medicnet | 0 | 94,937,434 | 20% | ||
| communityisyou | 0 | 91,874,936 | 20% | ||
| photonenblende | 0 | 609,779,593 | 100% | ||
| techupdate | 0 | 104,193,145 | 1.79% | ||
| biomimi | 0 | 220,267,082 | 40% | ||
| mahmudulhassan | 0 | 75,125,776 | 1.79% | ||
| pursercomet | 0 | 594,689,090 | 100% | ||
| hansmast | 0 | 337,108,838 | 1.79% | ||
| rgkmb-unofficial | 0 | 2,171,106,901 | 100% | ||
| rgkmb | 0 | 298,194,219 | 100% | ||
| osariemen | 0 | 77,157,067 | 10% | ||
| testomilian | 0 | 67,230,509 | 10.8% | ||
| astromaniac | 0 | 234,707,594 | 100% | ||
| mr-hades | 0 | 553,588,408 | 100% |
Go here https://steemit.com/@a-a-a to get your post resteemed to over 72,000 followers.
| author | a-0-1 |
|---|---|
| permlink | re-astrophotokevin-basic-astrophotography-image-processing-with-pixinsight-part-3-20180611t094455434z |
| category | steemstem |
| json_metadata | {"tags":["steemstem"],"links":["https://steemit.com/@a-a-a"],"app":"steemit/0.1"} |
| created | 2018-06-11 09:44:54 |
| last_update | 2018-06-11 09:44:54 |
| depth | 1 |
| children | 0 |
| last_payout | 2018-06-18 09:44:54 |
| cashout_time | 1969-12-31 23:59:59 |
| total_payout_value | 0.000 HBD |
| curator_payout_value | 0.000 HBD |
| pending_payout_value | 0.000 HBD |
| promoted | 0.000 HBD |
| body_length | 87 |
| author_reputation | -1,593,356,047,755 |
| root_title | "Basic astrophotography image processing with PixInsight - Part 3" |
| beneficiaries | [] |
| max_accepted_payout | 1,000,000.000 HBD |
| percent_hbd | 10,000 |
| post_id | 60,269,642 |
| net_rshares | 0 |
Very good series Kevin!
| author | photonenblende |
|---|---|
| permlink | re-astrophotokevin-basic-astrophotography-image-processing-with-pixinsight-part-3-20180611t162914901z |
| category | steemstem |
| json_metadata | {"tags":["steemstem"],"community":"steempeak","app":"steempeak"} |
| created | 2018-06-11 16:29:18 |
| last_update | 2018-06-11 16:29:18 |
| depth | 1 |
| children | 1 |
| last_payout | 2018-06-18 16:29:18 |
| cashout_time | 1969-12-31 23:59:59 |
| total_payout_value | 0.022 HBD |
| curator_payout_value | 0.006 HBD |
| pending_payout_value | 0.000 HBD |
| promoted | 0.000 HBD |
| body_length | 23 |
| author_reputation | 374,387,969,360 |
| root_title | "Basic astrophotography image processing with PixInsight - Part 3" |
| beneficiaries | [] |
| max_accepted_payout | 1,000,000.000 HBD |
| percent_hbd | 10,000 |
| post_id | 60,320,079 |
| net_rshares | 11,441,035,178 |
| author_curate_reward | "" |
| voter | weight | wgt% | rshares | pct | time |
|---|---|---|---|---|---|
| astrophoto.kevin | 0 | 11,441,035,178 | 100% |
Thank you very much David 😊
| author | astrophoto.kevin |
|---|---|
| permlink | re-photonenblende-re-astrophotokevin-basic-astrophotography-image-processing-with-pixinsight-part-3-20180611t174626973z |
| category | steemstem |
| json_metadata | {"tags":["steemstem"],"app":"steemit/0.1"} |
| created | 2018-06-11 17:46:27 |
| last_update | 2018-06-11 17:46:27 |
| depth | 2 |
| children | 0 |
| last_payout | 2018-06-18 17:46:27 |
| cashout_time | 1969-12-31 23:59:59 |
| total_payout_value | 0.000 HBD |
| curator_payout_value | 0.000 HBD |
| pending_payout_value | 0.000 HBD |
| promoted | 0.000 HBD |
| body_length | 27 |
| author_reputation | 86,277,108,443,159 |
| root_title | "Basic astrophotography image processing with PixInsight - Part 3" |
| beneficiaries | [] |
| max_accepted_payout | 1,000,000.000 HBD |
| percent_hbd | 10,000 |
| post_id | 60,329,849 |
| net_rshares | 0 |
Good Kevin! Can you do your flat calibration prior to converting to color in Pixinsight?
| author | terrylovejoy |
|---|---|
| permlink | re-astrophotokevin-basic-astrophotography-image-processing-with-pixinsight-part-3-20180611t095500517z |
| category | steemstem |
| json_metadata | {"tags":["steemstem"],"app":"steemit/0.1"} |
| created | 2018-06-11 09:55:03 |
| last_update | 2018-06-11 09:57:06 |
| depth | 1 |
| children | 3 |
| last_payout | 2018-06-18 09:55:03 |
| cashout_time | 1969-12-31 23:59:59 |
| total_payout_value | 0.319 HBD |
| curator_payout_value | 0.104 HBD |
| pending_payout_value | 0.000 HBD |
| promoted | 0.000 HBD |
| body_length | 88 |
| author_reputation | 15,797,973,031,321 |
| root_title | "Basic astrophotography image processing with PixInsight - Part 3" |
| beneficiaries | [] |
| max_accepted_payout | 1,000,000.000 HBD |
| percent_hbd | 10,000 |
| post_id | 60,270,768 |
| net_rshares | 162,128,333,926 |
| author_curate_reward | "" |
| voter | weight | wgt% | rshares | pct | time |
|---|---|---|---|---|---|
| shaka | 0 | 150,688,147,361 | 5% | ||
| astrophoto.kevin | 0 | 11,440,186,565 | 100% |
Thanks Terry 😊
In PixInsight all calibrations are done before debayering, so they are correcting the pure RAW files.
| author | astrophoto.kevin |
|---|---|
| permlink | re-terrylovejoy-re-astrophotokevin-basic-astrophotography-image-processing-with-pixinsight-part-3-20180611t102914188z |
| category | steemstem |
| json_metadata | {"tags":["steemstem"],"app":"steemit/0.1"} |
| created | 2018-06-11 10:29:15 |
| last_update | 2018-06-11 10:29:15 |
| depth | 2 |
| children | 2 |
| last_payout | 2018-06-18 10:29:15 |
| cashout_time | 1969-12-31 23:59:59 |
| total_payout_value | 0.323 HBD |
| curator_payout_value | 0.105 HBD |
| pending_payout_value | 0.000 HBD |
| promoted | 0.000 HBD |
| body_length | 116 |
| author_reputation | 86,277,108,443,159 |
| root_title | "Basic astrophotography image processing with PixInsight - Part 3" |
| beneficiaries | [] |
| max_accepted_payout | 1,000,000.000 HBD |
| percent_hbd | 10,000 |
| post_id | 60,274,413 |
| net_rshares | 163,419,839,737 |
| author_curate_reward | "" |
| voter | weight | wgt% | rshares | pct | time |
|---|---|---|---|---|---|
| shaka | 0 | 150,688,147,361 | 5% | ||
| terrylovejoy | 0 | 12,731,692,376 | 35% |
I assumed it would.

This is always the recommended way of doing the calibration because 1) you need to ensure the images are converted the same way to color (otherwise calibration mightn't work) 2). it's a lot kinder on the computer with file sizes 1/3 the size.
| author | terrylovejoy |
|---|---|
| permlink | re-astrophotokevin-re-terrylovejoy-re-astrophotokevin-basic-astrophotography-image-processing-with-pixinsight-part-3-20180612t030602466z |
| category | steemstem |
| json_metadata | {"tags":["steemstem"],"app":"steemit/0.1"} |
| created | 2018-06-12 03:06:03 |
| last_update | 2018-06-12 03:06:03 |
| depth | 3 |
| children | 1 |
| last_payout | 2018-06-19 03:06:03 |
| cashout_time | 1969-12-31 23:59:59 |
| total_payout_value | 0.022 HBD |
| curator_payout_value | 0.006 HBD |
| pending_payout_value | 0.000 HBD |
| promoted | 0.000 HBD |
| body_length | 264 |
| author_reputation | 15,797,973,031,321 |
| root_title | "Basic astrophotography image processing with PixInsight - Part 3" |
| beneficiaries | [] |
| max_accepted_payout | 1,000,000.000 HBD |
| percent_hbd | 10,000 |
| post_id | 60,386,187 |
| net_rshares | 11,640,524,399 |
| author_curate_reward | "" |
| voter | weight | wgt% | rshares | pct | time |
|---|---|---|---|---|---|
| astrophoto.kevin | 0 | 11,640,524,399 | 100% |
#### Hi @astrophoto.kevin!

Your post was upvoted by utopian.io in cooperation with steemstem - supporting knowledge, innovation and technological advancement on the Steem Blockchain.

#### Contribute to Open Source with utopian.io
Learn how to contribute on <a href="https://join.utopian.io">our website</a> and join the new open source economy.

**Want to chat? Join the Utopian Community on Discord https://discord.gg/h52nFrV**
| author | utopian-io |
|---|---|
| permlink | 20180612t195646020z |
| category | steemstem |
| json_metadata | {"tags":["utopian.tip"],"app":"utopian-io"} |
| created | 2018-06-12 19:56:45 |
| last_update | 2018-06-12 19:56:45 |
| depth | 1 |
| children | 0 |
| last_payout | 2018-06-19 19:56:45 |
| cashout_time | 1969-12-31 23:59:59 |
| total_payout_value | 0.023 HBD |
| curator_payout_value | 0.006 HBD |
| pending_payout_value | 0.000 HBD |
| promoted | 0.000 HBD |
| body_length | 430 |
| author_reputation | 152,955,367,999,756 |
| root_title | "Basic astrophotography image processing with PixInsight - Part 3" |
| beneficiaries | [] |
| max_accepted_payout | 1,000,000.000 HBD |
| percent_hbd | 10,000 |
| post_id | 60,490,111 |
| net_rshares | 12,332,156,706 |
| author_curate_reward | "" |
| voter | weight | wgt% | rshares | pct | time |
|---|---|---|---|---|---|
| astrophoto.kevin | 0 | 12,332,156,706 | 100% |