# Calibrating the Servos
Hey Steemit,
Welcome to Part 1 of my first series. Today we will be building a MeArm robotic arm, controlled by an Arduino microcontroller. For those of you unfamiliar with these terms, allow me to explain.
Arduino - 
>Arduino is an open source computer hardware and software company, project, and user community that designs and manufactures single-board microcontrollers and microcontroller kits for building digital devices and interactive objects that can sense and control objects in the physical world.
A microcontroller - 
>A microcontroller (or MCU for microcontroller unit) is a small computer on a single integrated circuit.
If you still have trouble understanding these terms, do some research on them and come back. However, understanding *what* they are is technically not necessary to completing this project - all you really have to know is what to do with them and how to use them.
Lets get started!
**Materials for this project:**
1 Arduino Uno R3 Board - get this kit as it comes with all extra materials. https://www.adafruit.com/product/68
2 MeArm - https://store.hackaday.com/products/mearm-pocket-sized-robot-arm
3 Arduino IDE Software - https://www.arduino.cc/en/Main/Software
4 A few extra MG90 servos as these are easily broken, if you get this product it comes with free replaceables (add square trade to cart for an extra 1.80) https://www.amazon.com/gp/product/B00M8SR0ZK/ref=oh_aui_detailpage_o03_s00?ie=UTF8&psc=1
**Step 1:** The very first step with this, right out of the box, is taking off the stickers on the plexiglass.
***MAKE SURE YOU DO THIS OR YOU WILL HAVE TO DISASSEMBLE THE ENTIRE ARM AND REBUILD!***
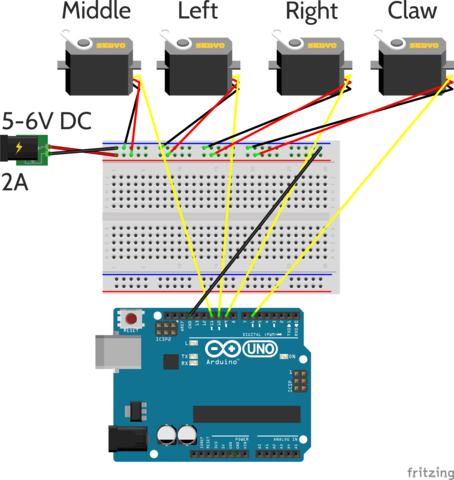
**Step 2:** After removing the stickers, unpack your servos. In this post I'll be discussing how to calibrate these servos.
What your going to want to do is attach your servos to the arduino and motherboard using jumpers in this configuration:
Now, if you haven't already, download the Arduino IDE software, and install. Then, connect your arduino to your computer using the usb you were provided. Once the application loads, plug this code into it to calibrate all of your servos.
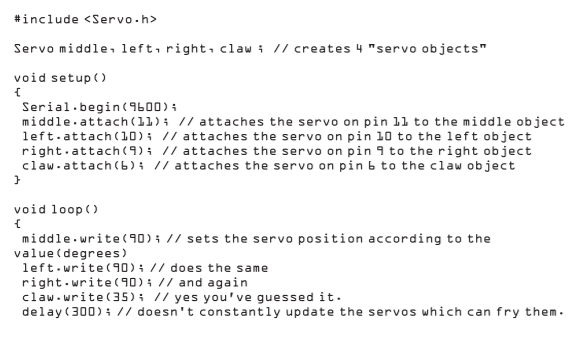
In the top left corner, you should see a button that says "verify", press that and make sure your code works. After that, press the upload button and the code will run on your servos. Now they are calibrated!
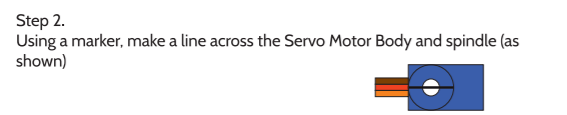
After that, please follow this step below.
Great! Now we can move onto assembly of the arm itself, which I will show in the next post.
Until next time,
~Max