Muy buenas tardes, familia creativas que formamos, esta hermosa y muy creativa comunidad Hivediy, ante de todo reciban un saludo virtual deseandoles que se encuentren muy bien, que es lo mas importante, salud y muchas bendiciones para todos. El dia de hoy quiero traerles este divertido y muy creativo paso a paso, se trata de elaborar unos bonitos, practicos y decorativos dispensadores con botellas plasticas de uso reciclable, ahora con bastante creatividad podemos elaborar muchas cosas con materiales reciclables. Estos bonitos, practicos y decorativos dispensadores son ideales para almacenar cafe, azucal, sal tambien podemos decorar nuestra cocina. Ahora sin mas nada que decir vamos a comenzar con este divertido paso a paso, les sera de mucha utilidad. >Good afternoon creative family that we form this beautiful and very creative Hivediy community, first of all receive a virtual greeting wishing you are very well which is the most important thing, health and many blessings for all. Today I want to bring you this fun and very creative step by step, it is about making beautiful, practical and decorative dispensers with recyclable plastic bottles, now with a lot of creativity we can do many things with recyclable materials. These beautiful, practical and decorative dispensers are ideal for storing coffee, sugar, salt, we can also decorate our kitchen. Now without further ado we are going to start with this fun step by step, it will be very useful for you. <center>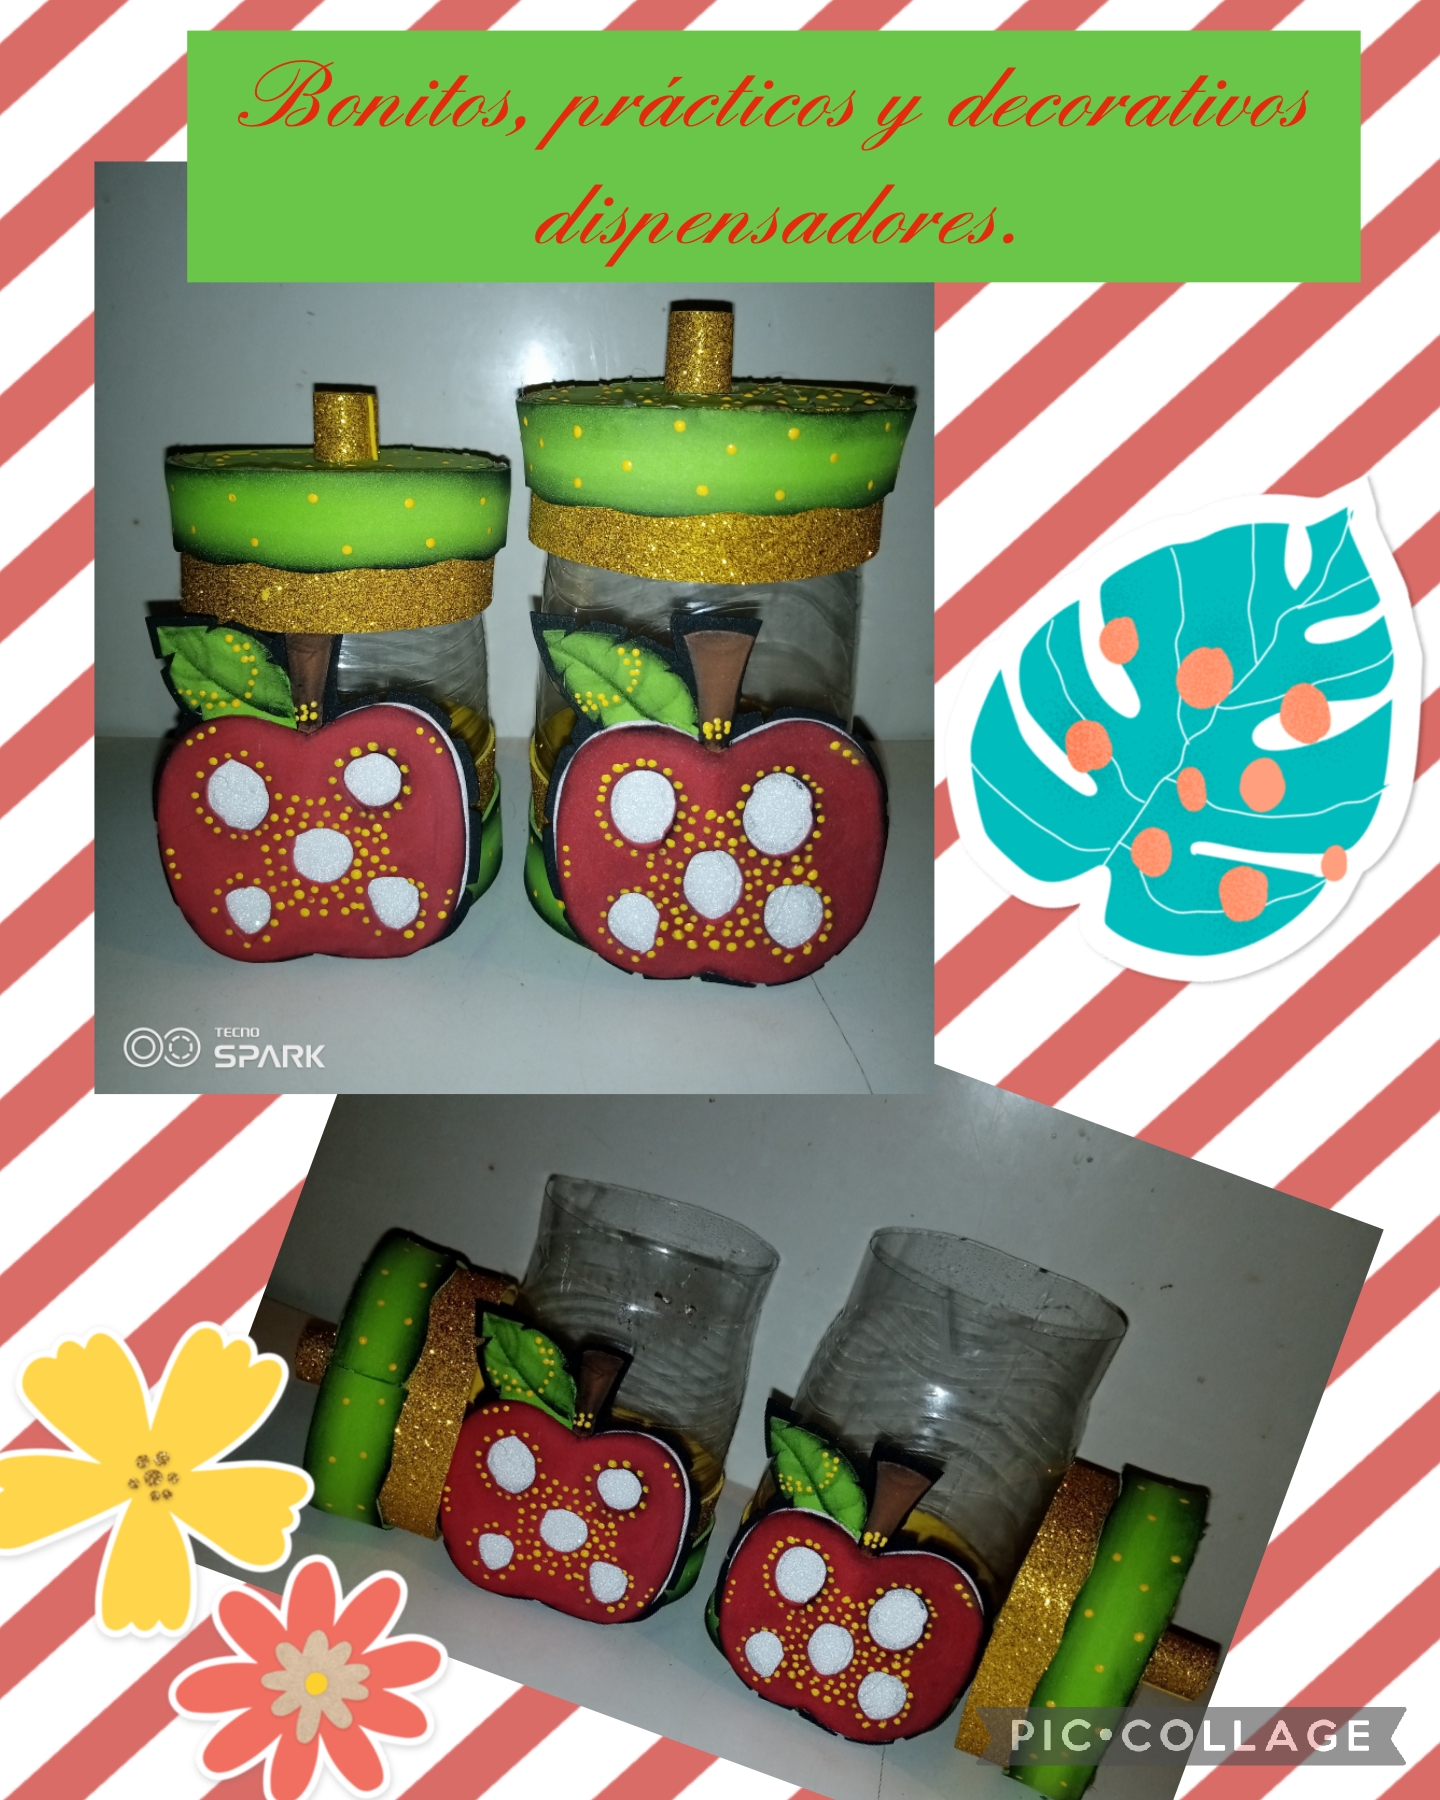</center> Vamos a utilizar los siguientes materiales y herramientas para elaborar estos bonitos, prácticos y decorativos dispensadores, decorados con la temática de unas manzanas. *2 botellas plásticas de utilización reciclable. *Foamis de varios colores y diferentes tipos de texturas. *1 tijera. *1 regla métrica. *1 cutter. *1 lápiz. *Pinturas y pinceles. *Silicona líquida. *Pistola de silicona caliente. >We are going to use the following materials and tools to make these beautiful, practical and decorative dispensers, decorated with the theme of apples. >*2 recyclable plastic bottles. >*Foams of various colors and different types of textures. >*1 scissors. >*1 metric ruler. >*1 cutter. >*1 pencil. >*Paints and brushes. >*Liquid silicone. >*Hot silicone gun. <center>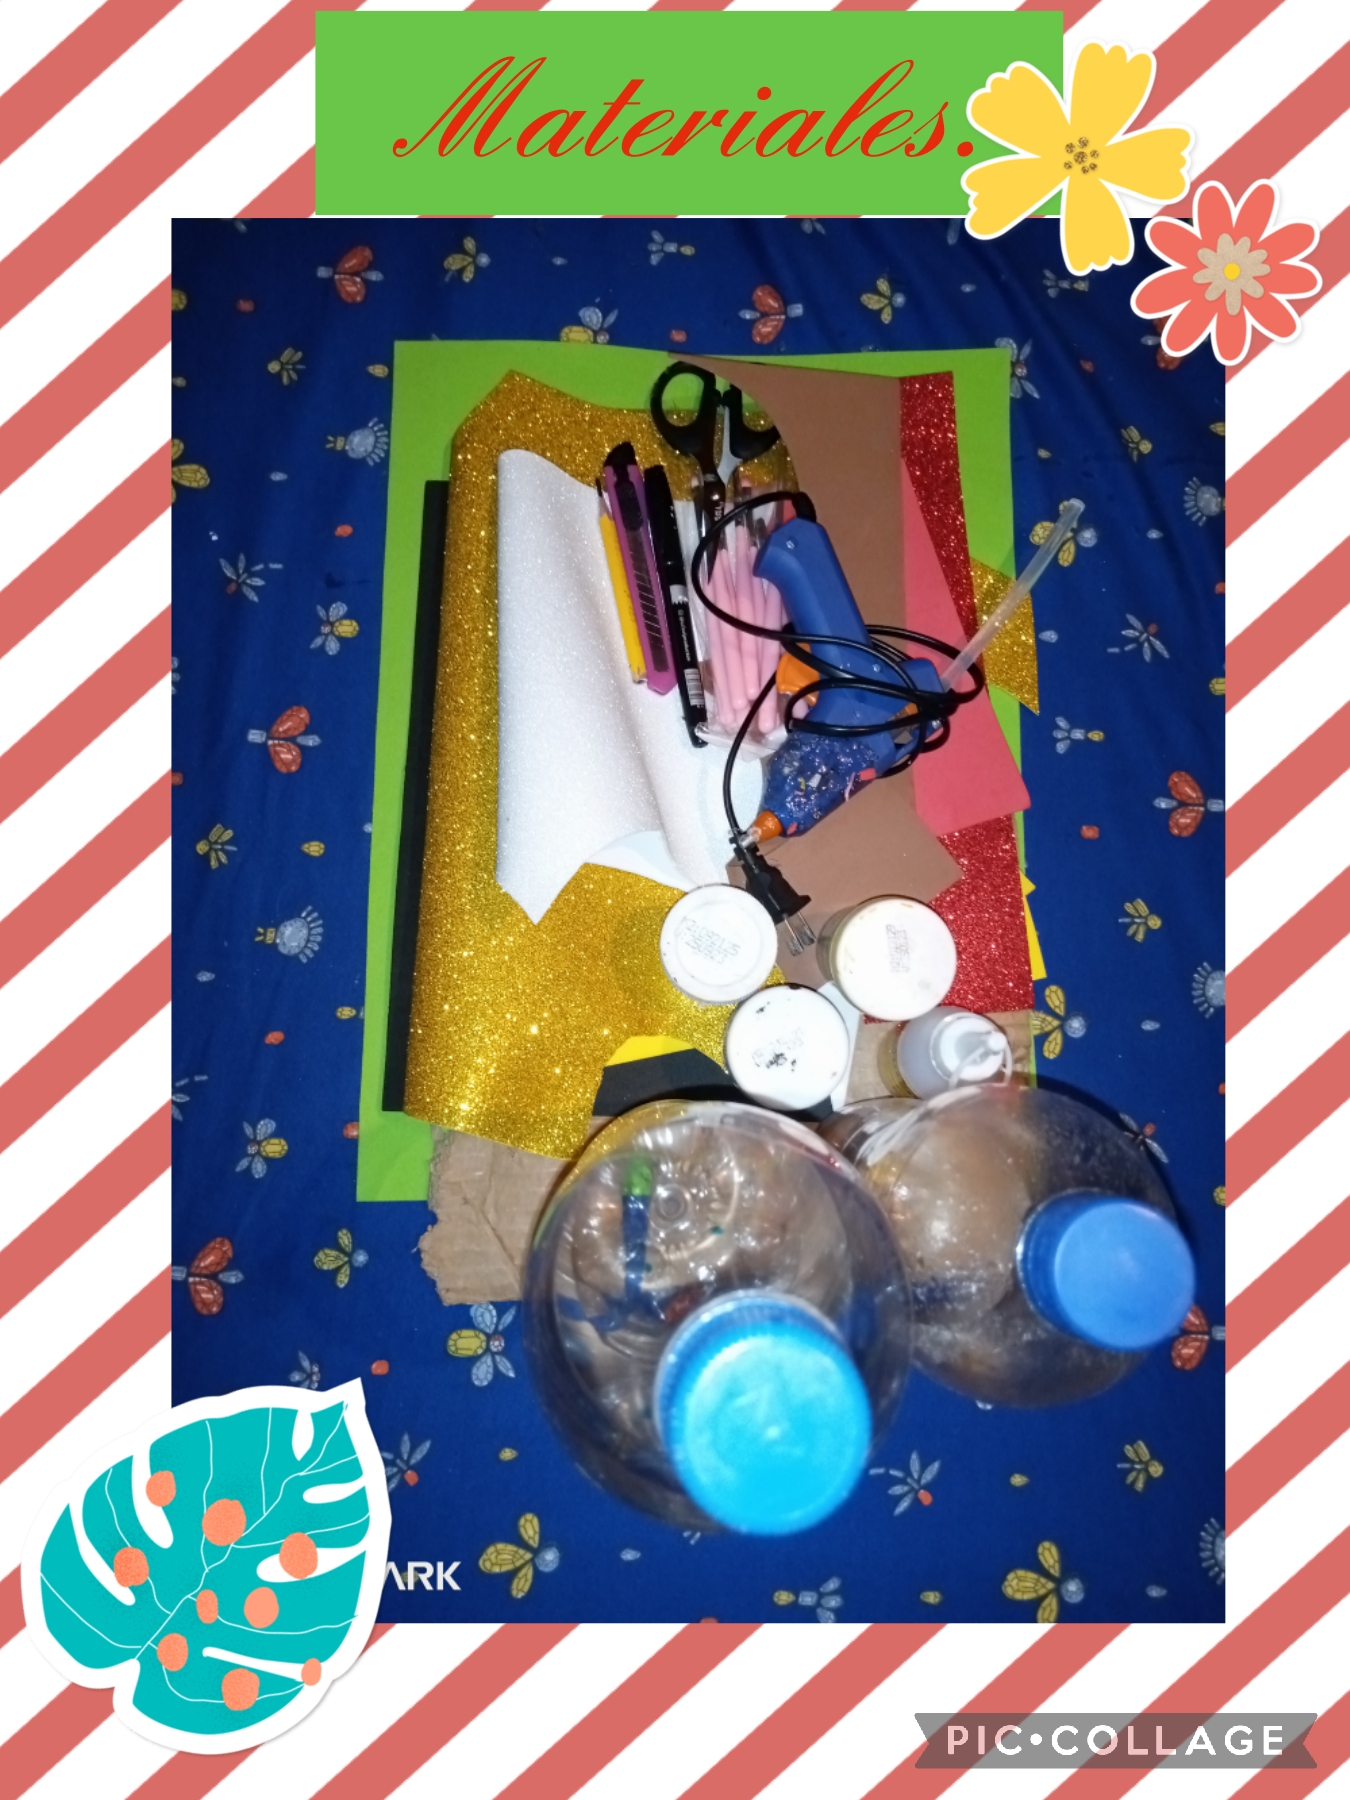</center> <center> Comenzamos con el paso a paso.</center> ><center> We start with the step by step.</center> <center>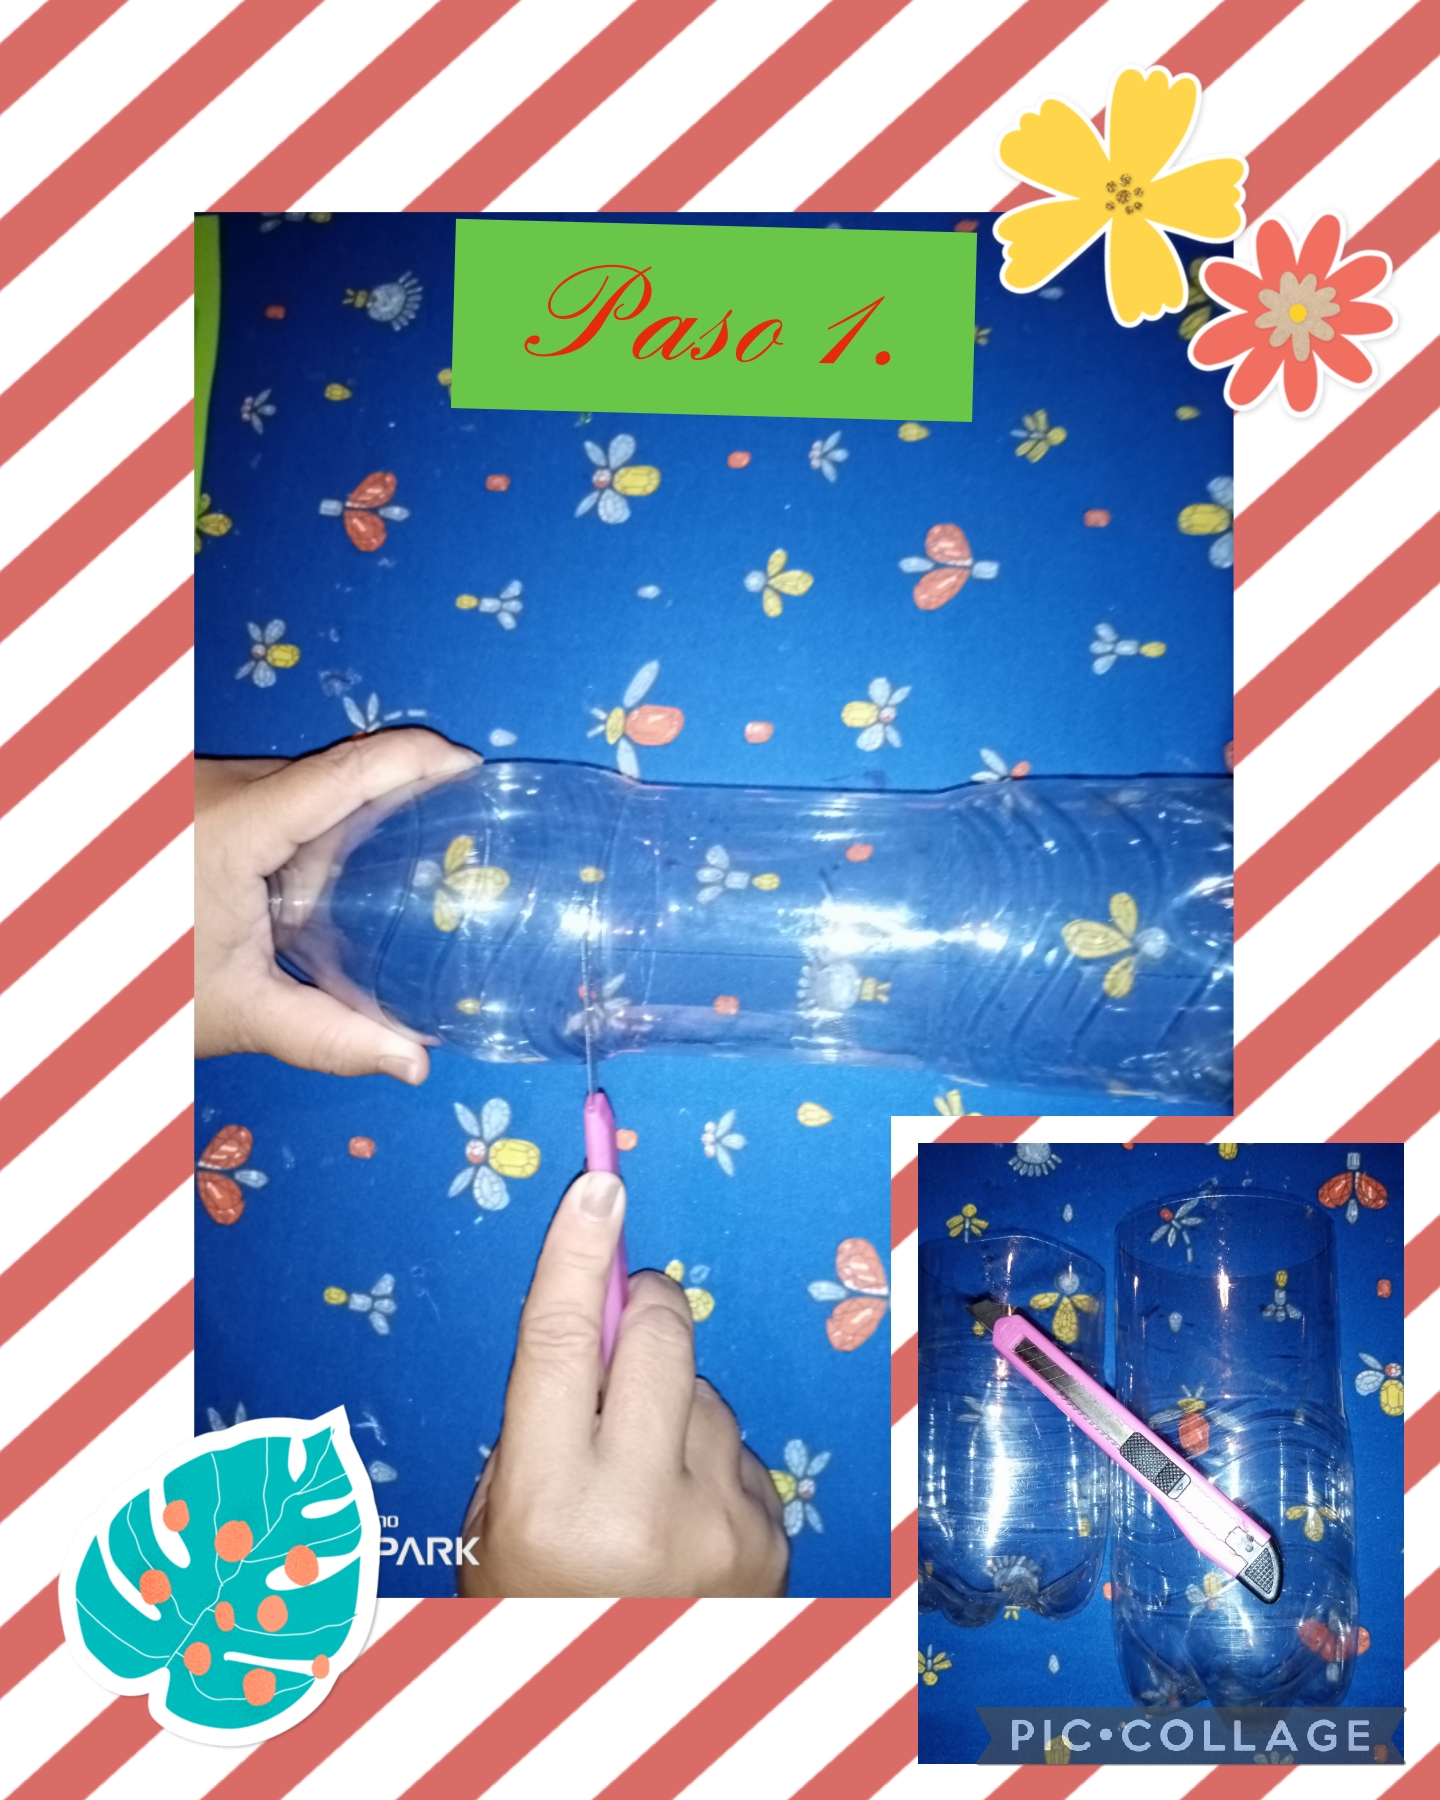</center> <center> Paso 1. Para comenzar a elaborar estos bonitos, prácticos y decorativos dispensadores, decorados con la temática de unas manzanas, lo primero que vamos a hacer es, marcar las botellas plásticas y con ayuda de un cutter cortarlas a las medidas deseadas, vea las imágenes.</center> ><center> Step 1. To start making these beautiful, practical and decorative dispensers, decorated with the theme of apples, the first thing we are going to do is mark the plastic bottles and with the help of a cutter cut them to the desired measurements, see the images.</center> <center>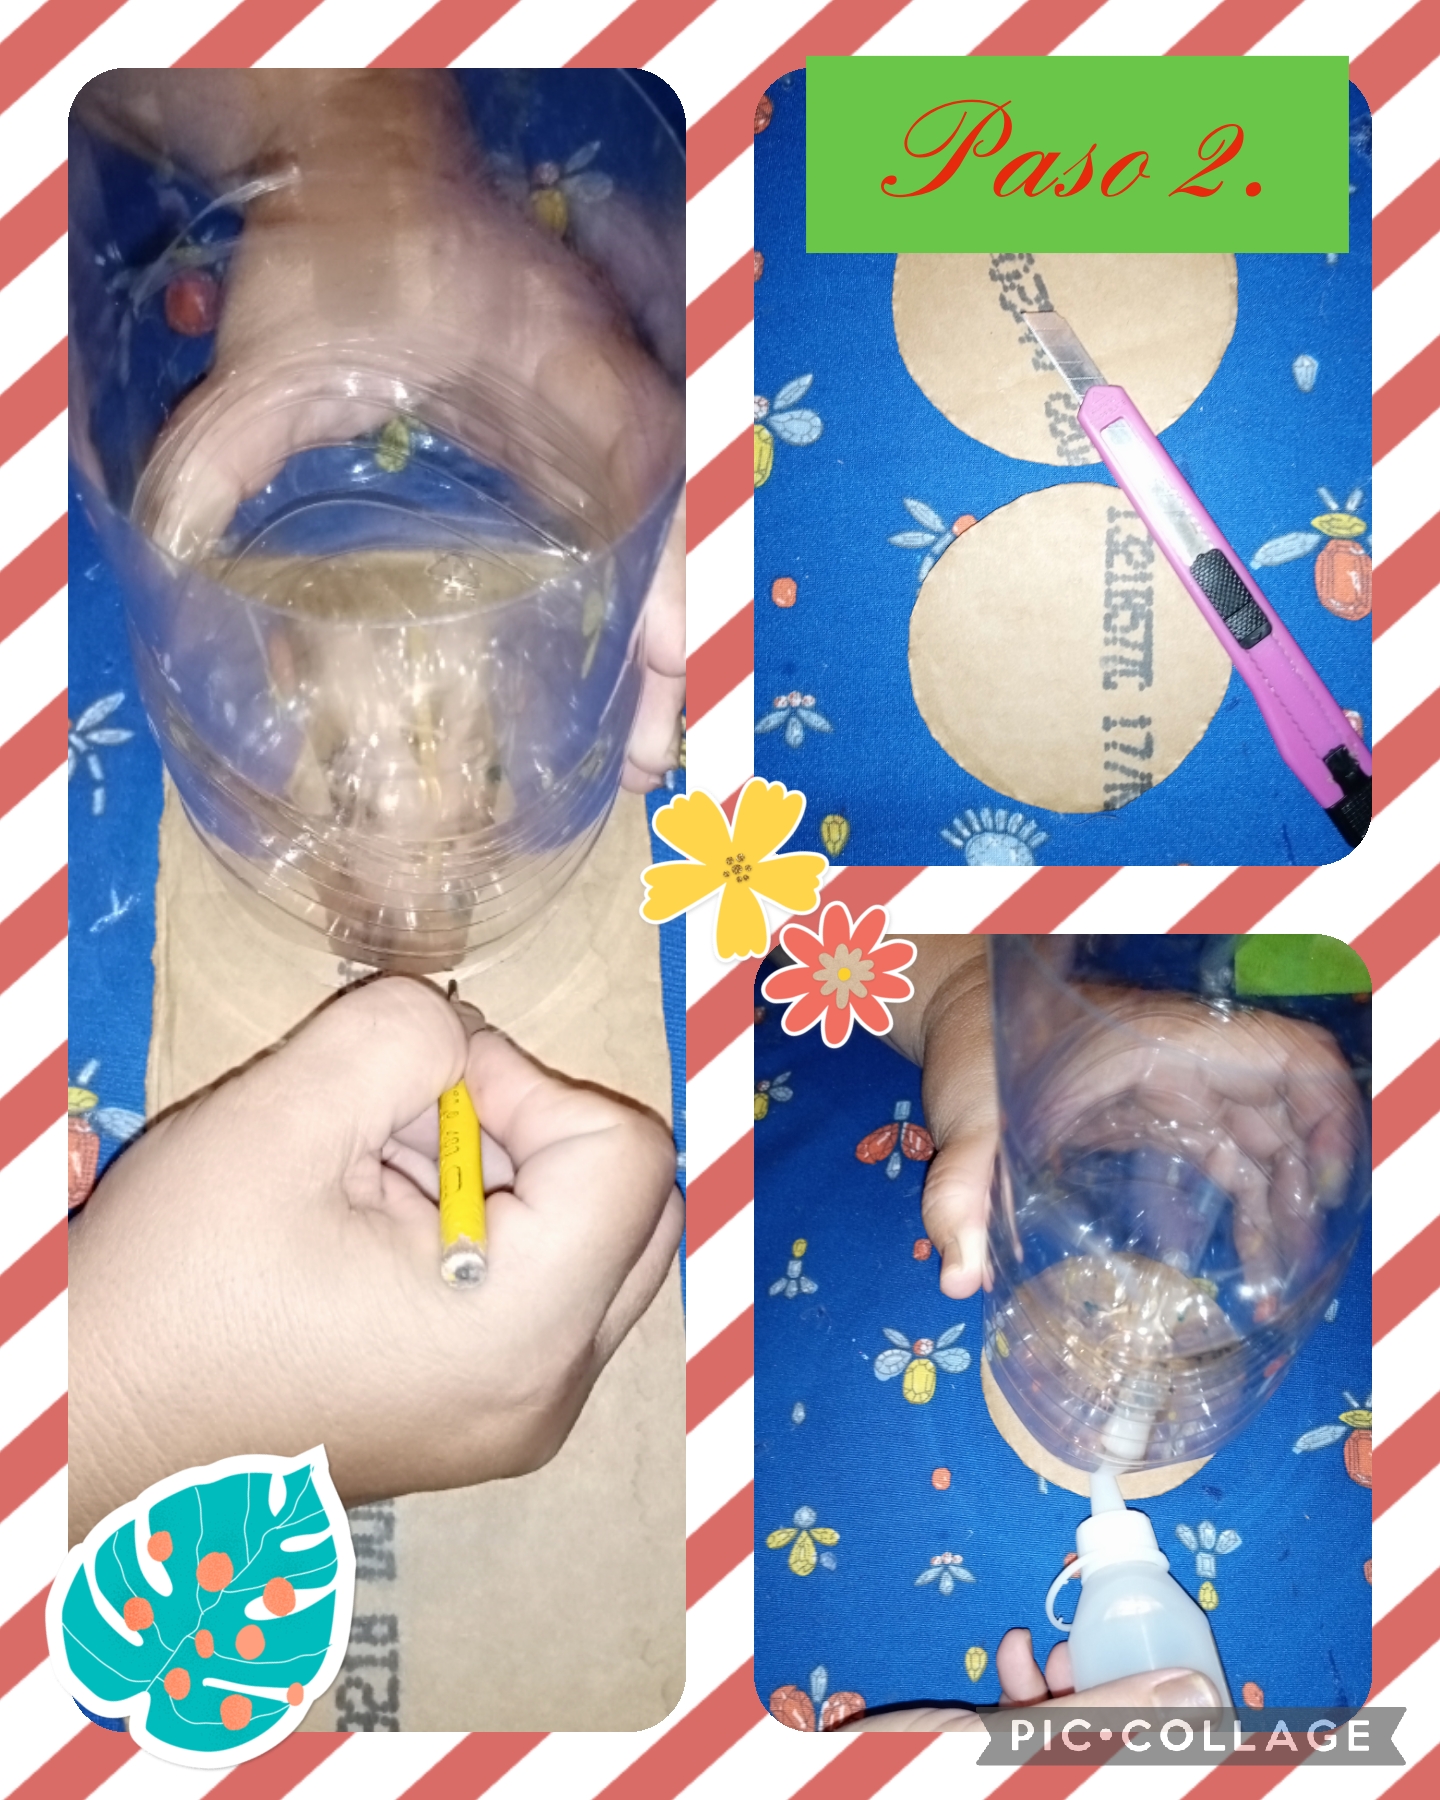</center> <center> Paso 2. Después de cortar las botellas plásticas, tomamos un pedazo de cartón de uso reciclable y marcamos unos círculos y luego los cortamos con ayuda de un cutter y para finalizar con silicona líquida pegamos los círculos en la parte de abajo de las botellas, vea las imágenes.</center> ><center> Step 2. After cutting the plastic bottles, we take a piece of recyclable cardboard and we mark some circles and then we cut them with the help of a cutter and to finish with liquid silicone we stick the circles on the bottom of the bottles bottles, see photos.</center> <center>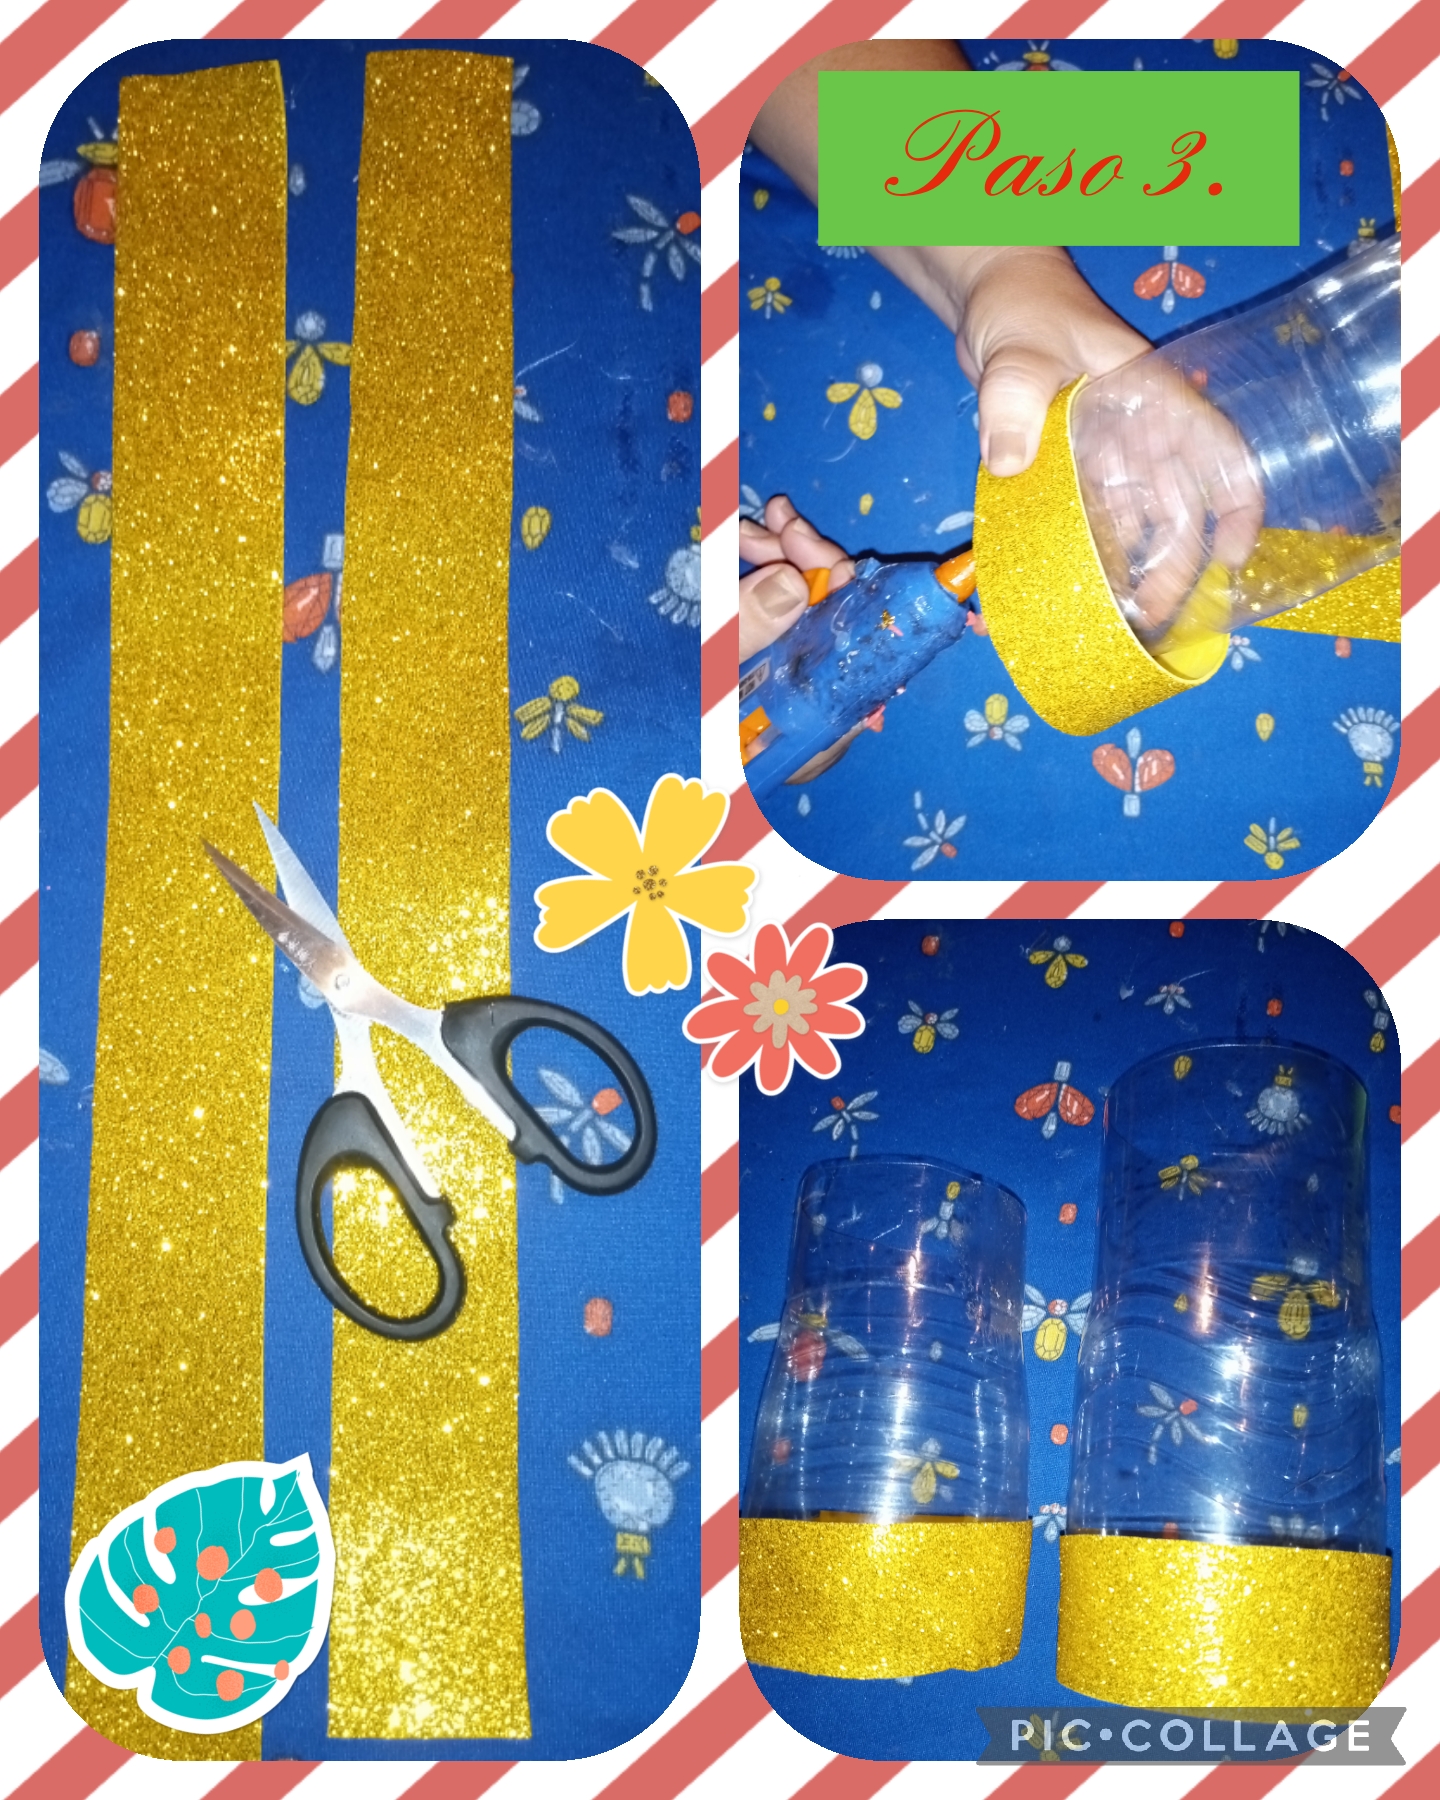</center> <center> Paso 3. En este paso tomamos una regla métrica, y marcamos tiras gruesas de medidas de 4 cm de ancho, en foami color dorado diamantado, y con ayuda de la pistola de silicona caliente pegamos las tiras de foamis en la parte de abajo en el borde del cartón, que pegamos anteriormente.</center> ><center> Step 3. In this step we take a metric ruler, and we mark thick strips measuring 4cm wide, in diamond gold colored foami, and with the help of the hot glue gun we glue the foamis strips to the bottom on the edge of the cardboard, which we glued earlier.</center> <center>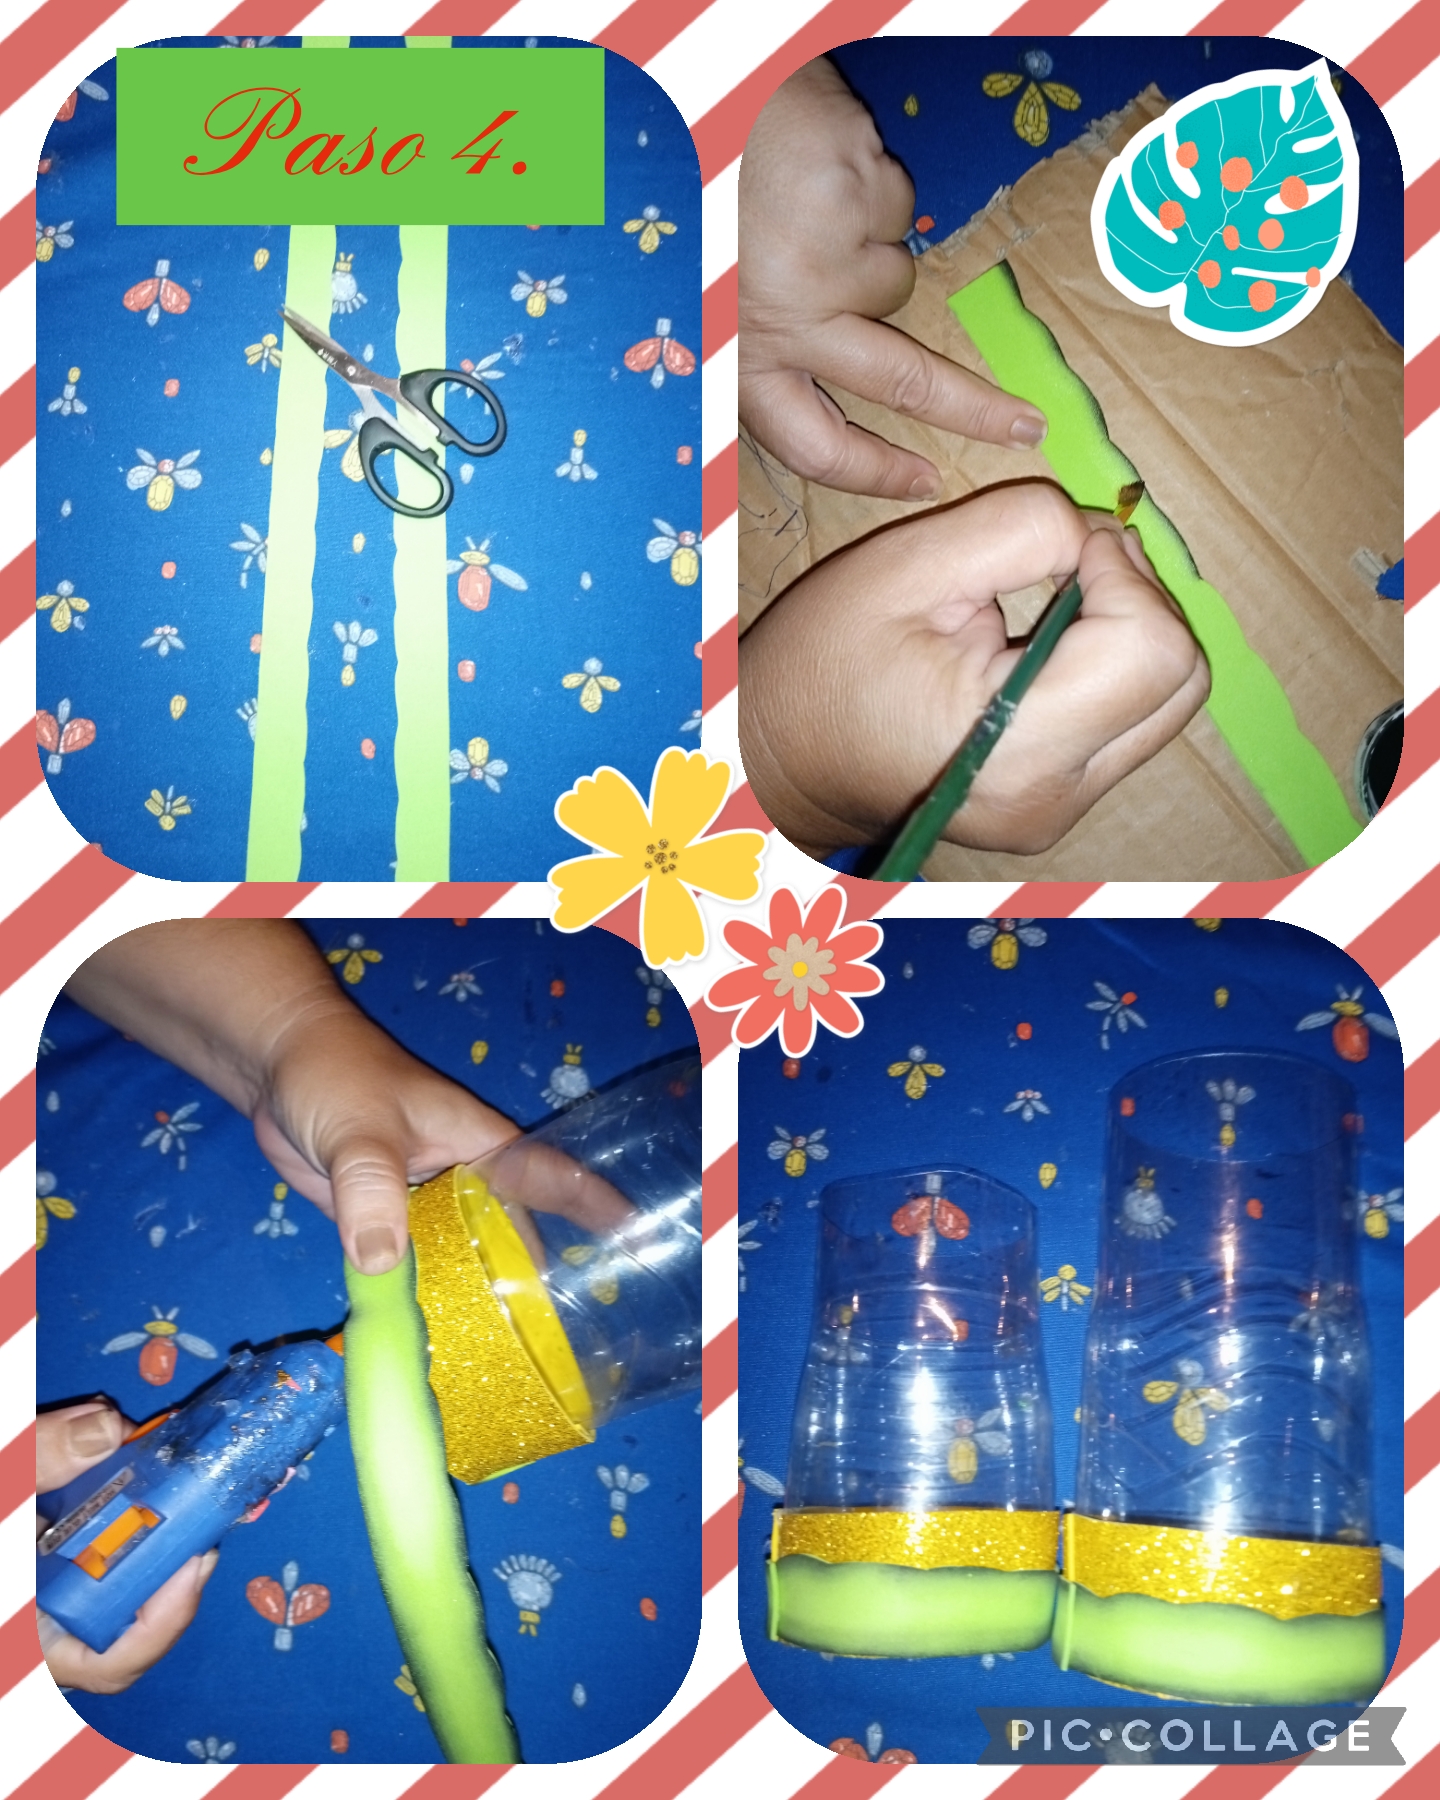</center> <center> Paso 4. Seguidamente, seguimos marcando y recortando tiras más delgadas con las medidas de 2,5 cm de ancho de foami de textura lisa, color verde, luego con pintura al frío color negra y un pincel angular, difuminamos los bordes de las tiras, después con silicona caliente pegamos las tiras encima de la de color dorada, vea las imágenes.</center> ><center> Step 4. Next we continue marking and cutting finer strips of 2.5cm wide from foami with a smooth texture, green, then with black cold paint and an angular brush, we blur the edges of the strips, then with hot silicone We glue the strips on top of the gold, see the images.</center> <center>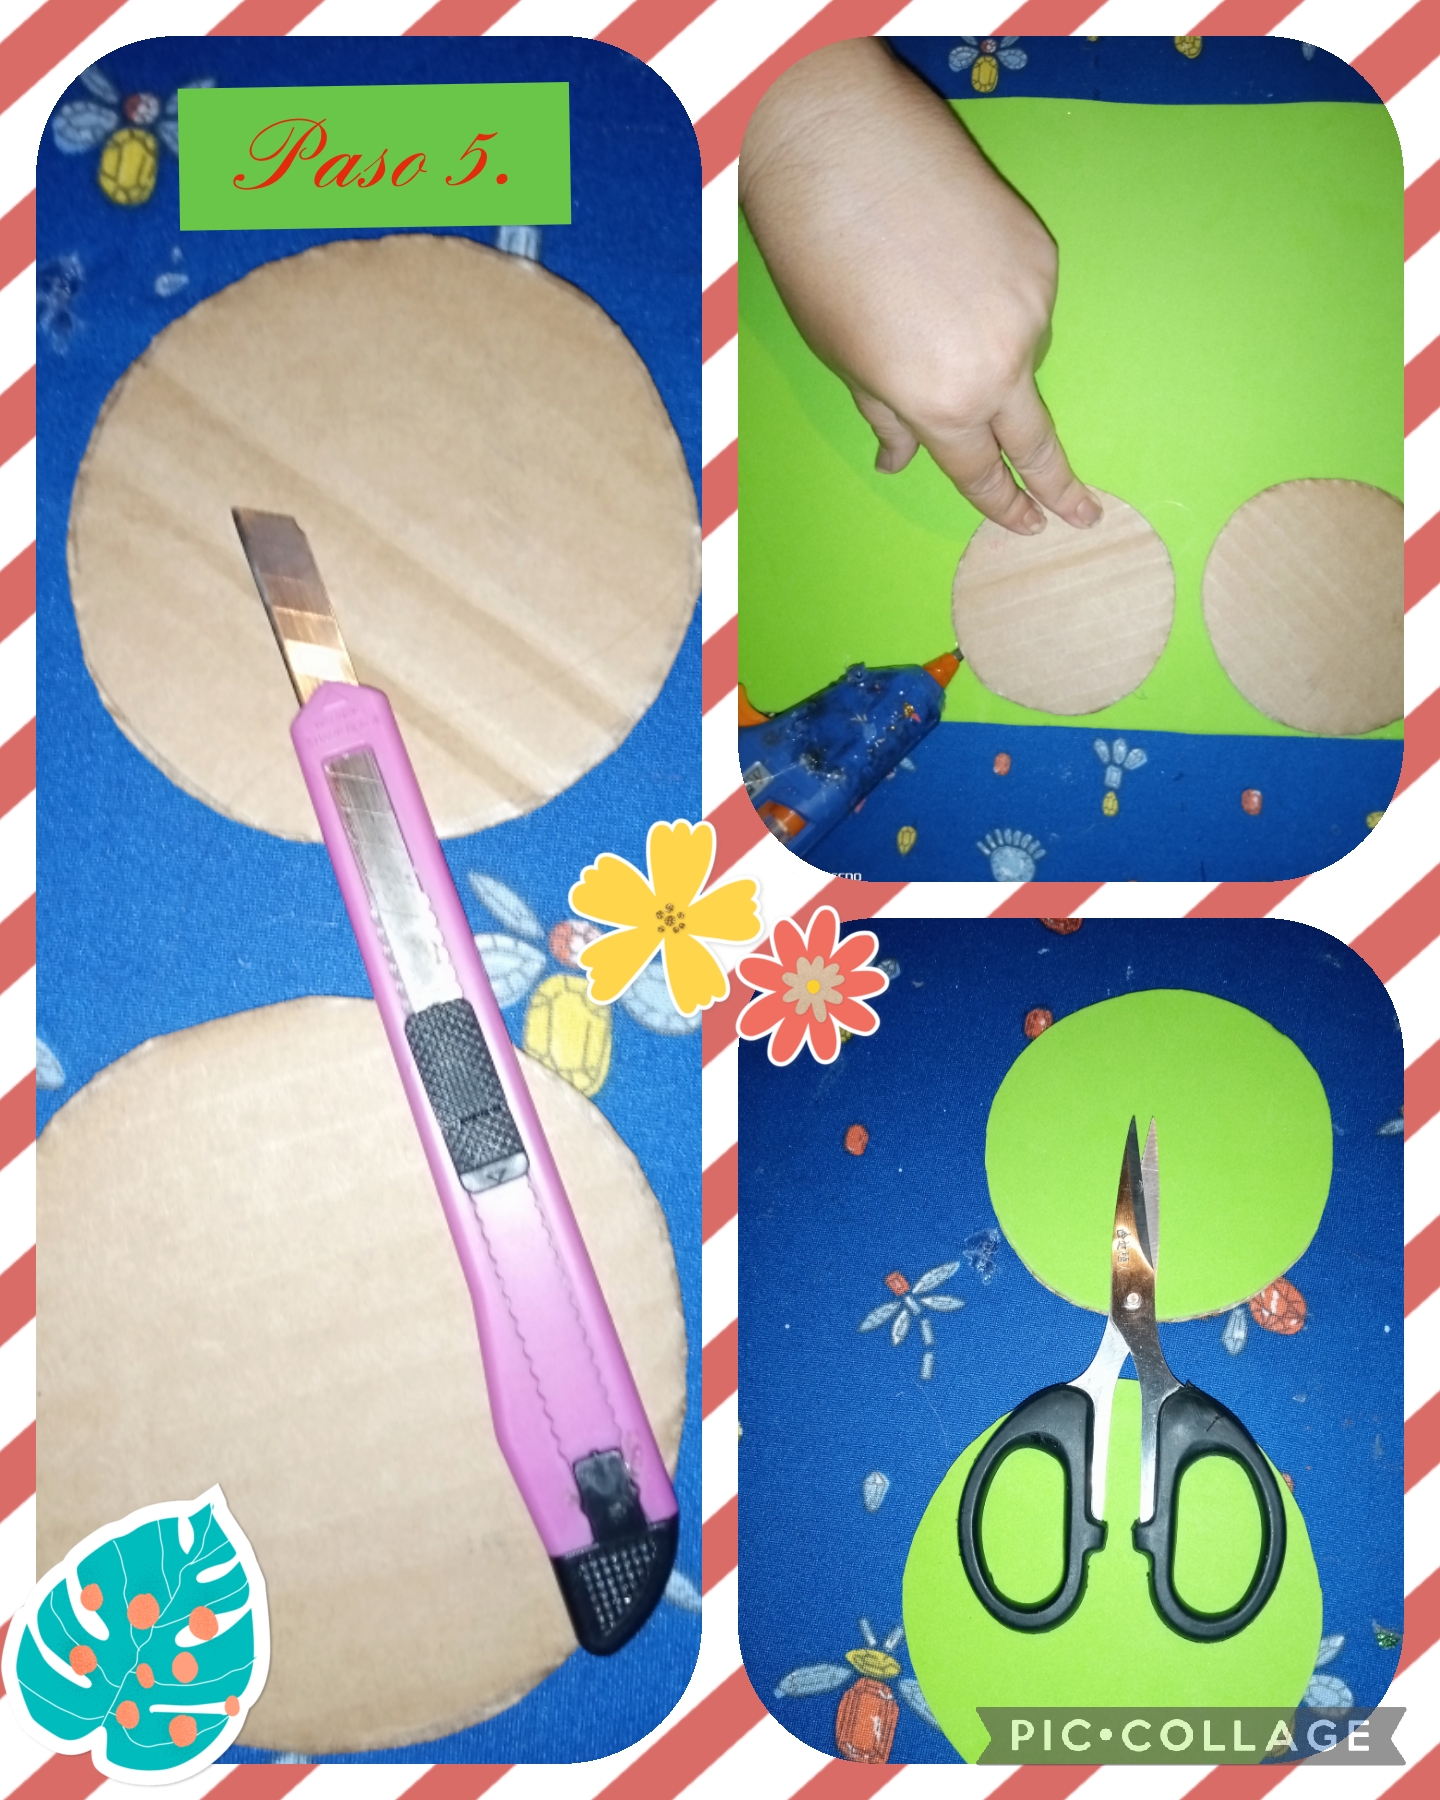</center> <center> Paso 5. En este paso vamos a elaborar las tapas, para formar los dispensadores y lo vamos a hacer de la siguiente manera, marcamos dos círculos y con ayuda de un cutter los cortamos, seguidamente los pegamos con silicona caliente en un foami de textura lisa, color verde y finalmente los recortamos con la tijera, vea las imágenes.</center> ><center> Step 5. In this step we are going to make the lids, to form the dispensers and we are going to do it in the following way, we mark two circles and with the help of a cutter we cut them, then we stick them with hot silicone in a foami with a soft texture, green color and finally we cut them with scissors, see the images.</center> <center>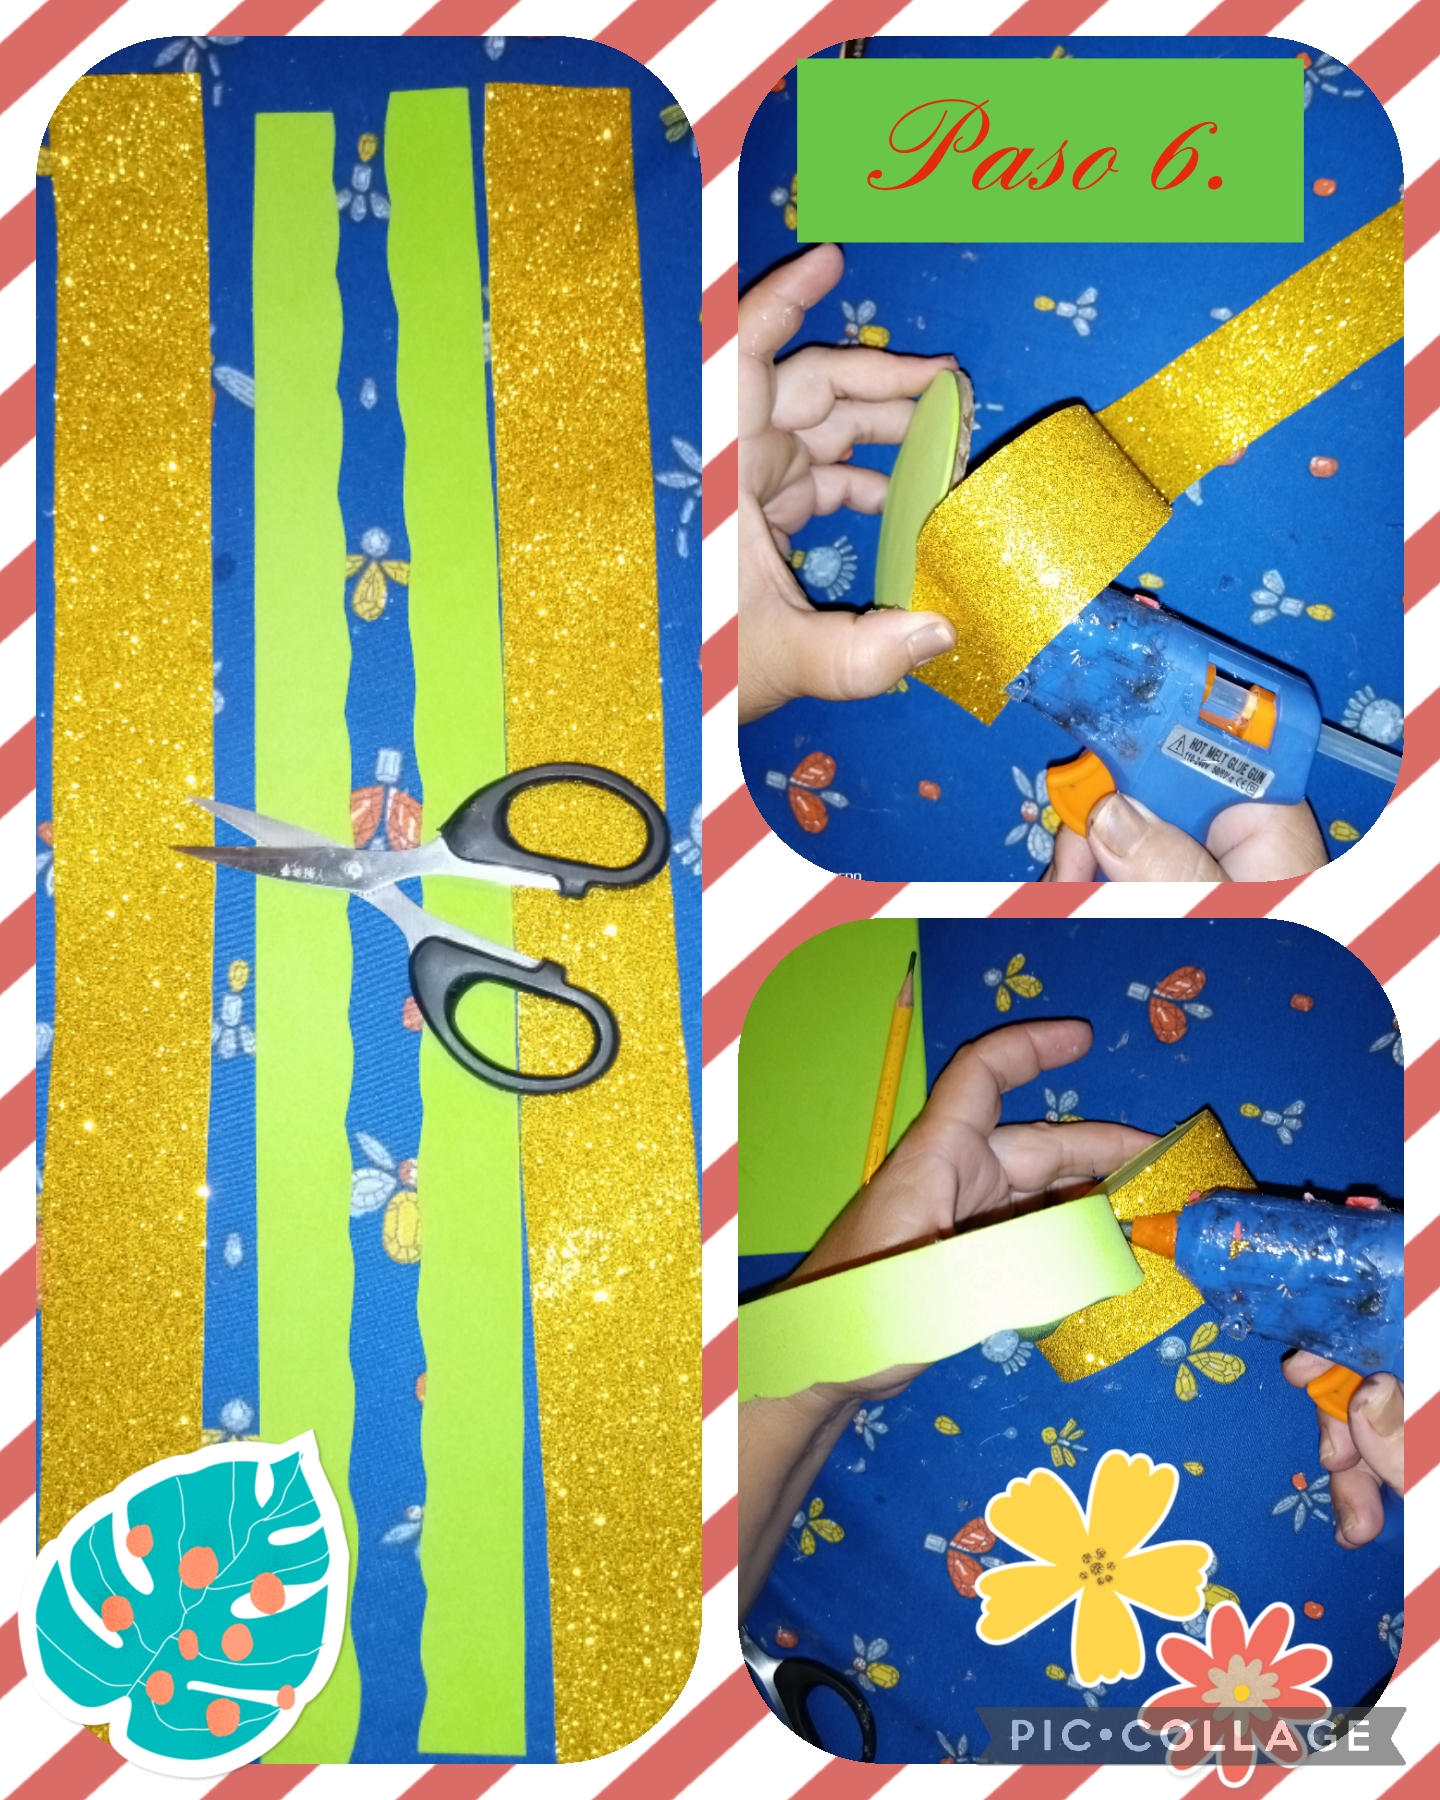</center> <center> Paso 6. En este paso vamos a marcar tiras gruesas y delgadas de foamis colores dorado diamantado y verde de textura lisa, seguidamente con la pistola de silicona caliente, pegamos las tiras en los bordes de los círculos para formar las tapas de los dispensadores, les muestro las imágenes.</center> ><center> Step 6. In this step we are going to mark thick and thin strips of green and gold diamond foamis with a smooth texture, then with the hot glue gun we glue the strips on the edges of the circles to form the circle caps dispensers, I show you the images.</center> <center>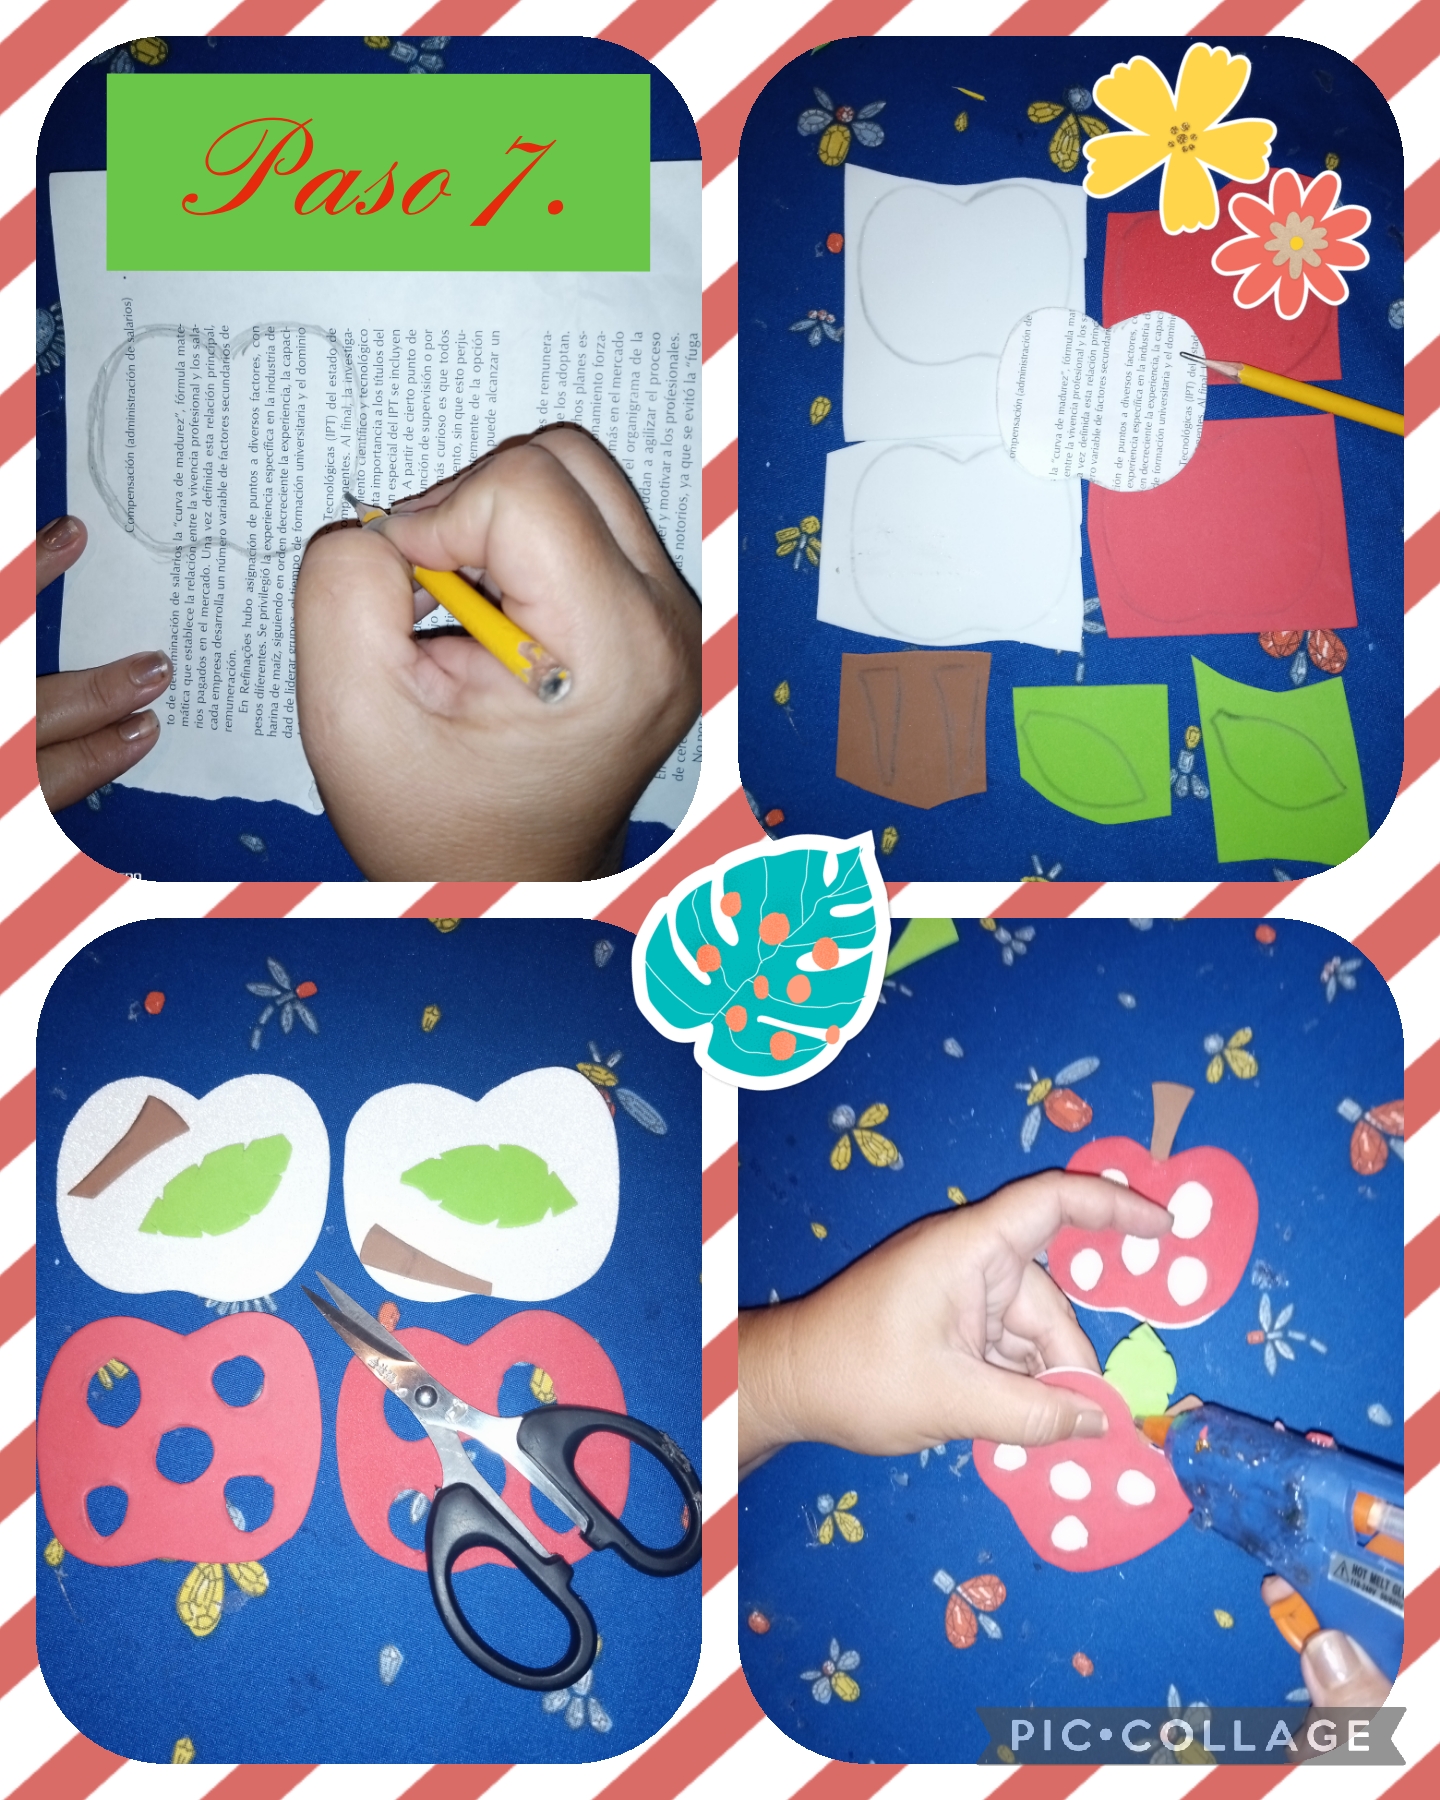</center> <center> Paso 7. En este paso, tomamos una hoja de papel de uso reciclable, dibujamos la figura de una manzana, luego marcamos todas las piezas en los foamis, en sus colores correspondientes, después con ayuda de la tijera los recortamos y finalmente comenzamos a unir todas las piezas para formar las figuras de las manzanas.</center> ><center> Step 7. In this step, we take a sheet of recyclable paper, we draw the figure of an apple, then we mark all the pieces on the foamis, in their corresponding colors, then with the help of scissors we cut them and finally we begin to join all the pieces to form the figures of the apples.</center> <center>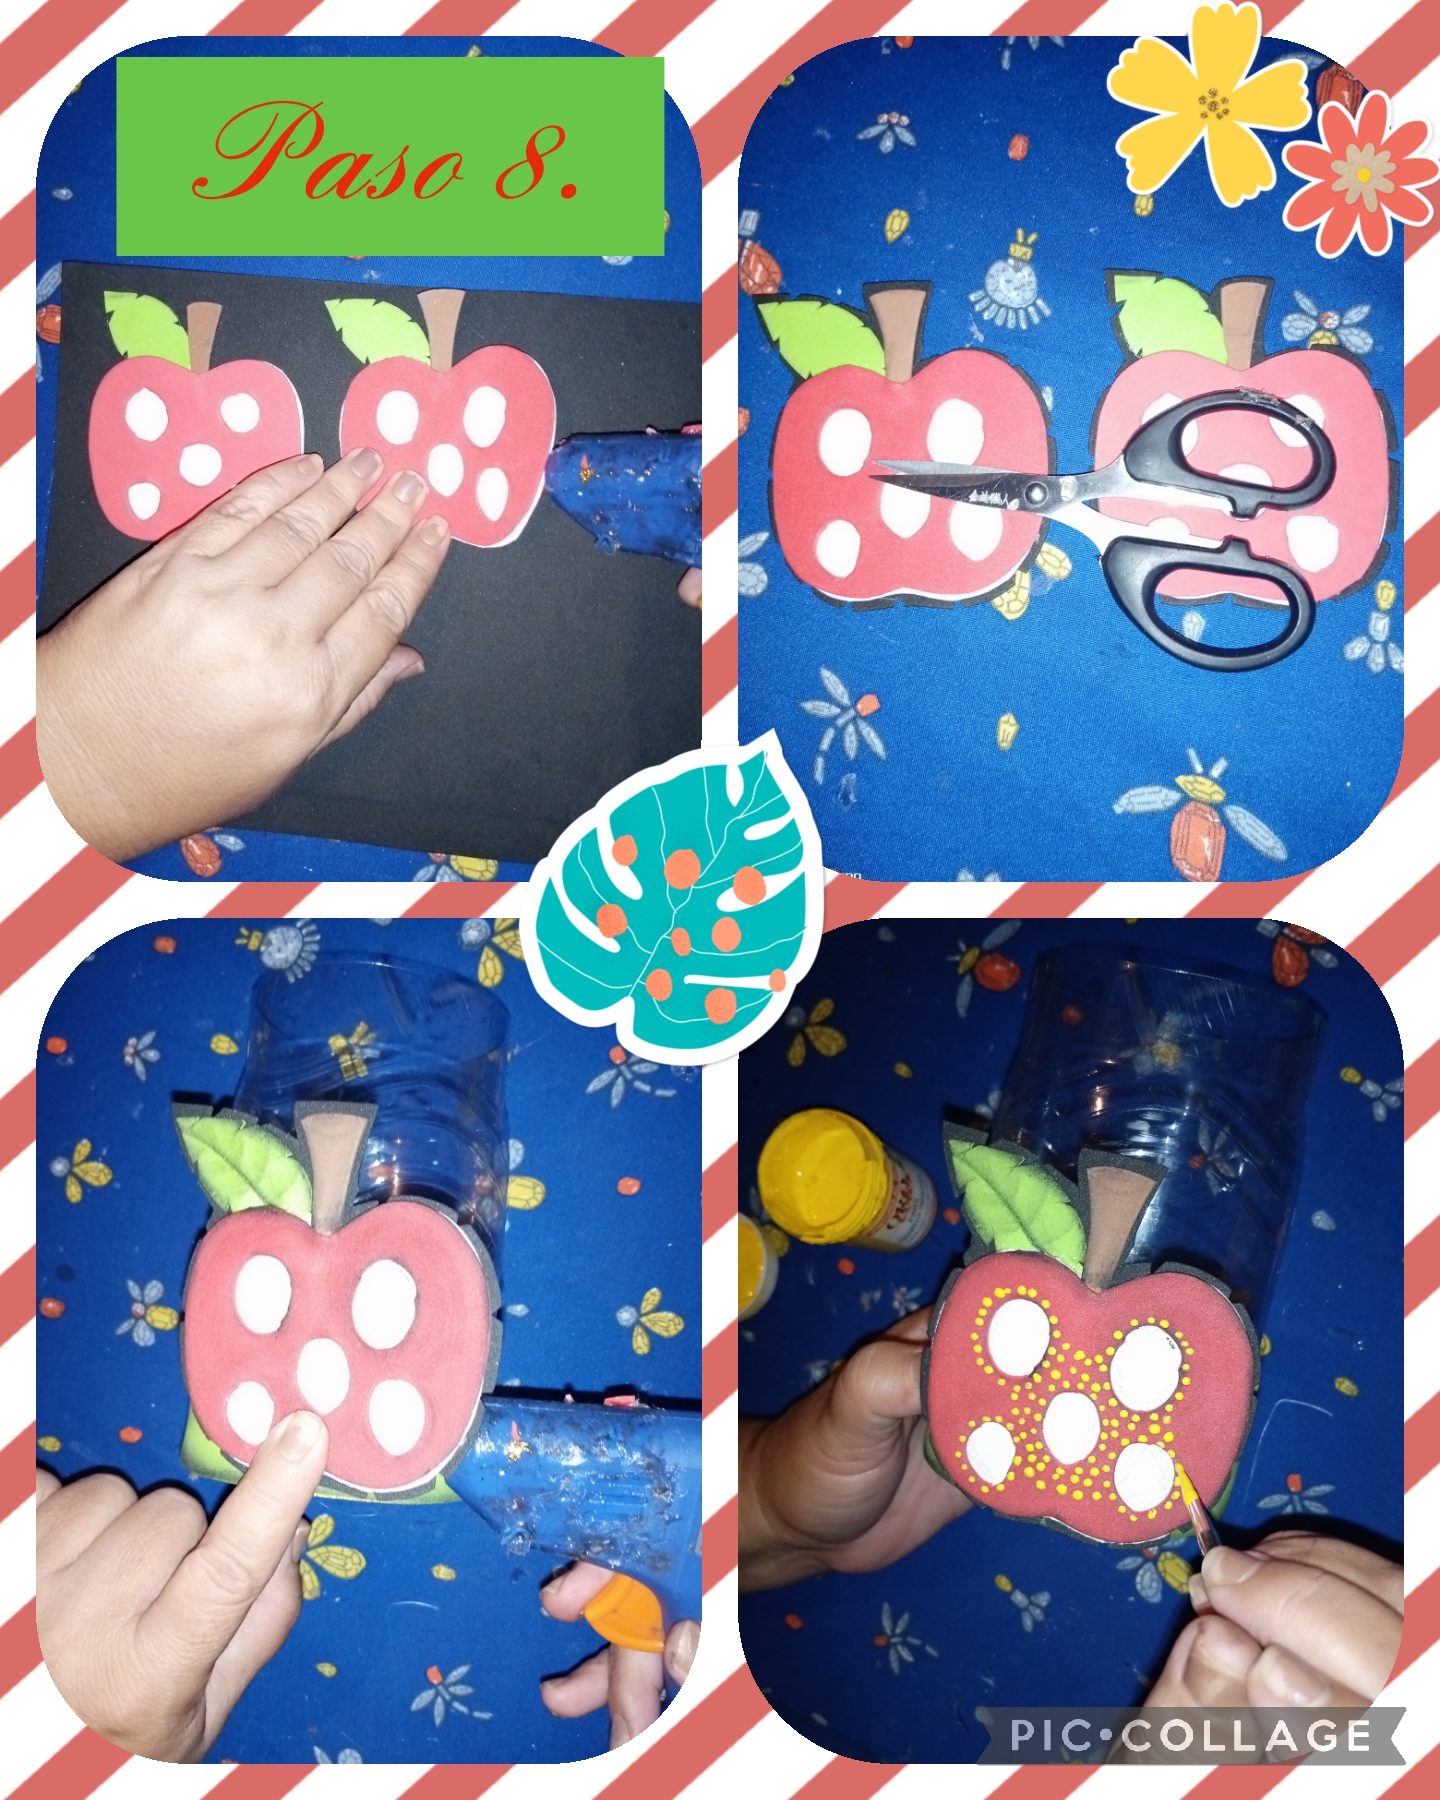</center> <center> Paso 8. En este paso, para casi finalizar todos los pasos, tomamos un foami color negro de textura lisa, y con silicona caliente pegamos las figuras de las manzanas, luego recortamos por todo el borde, dejando medio centímetro de distancia en el borde, y con la punta de l tijera sacamos flecos en todo el borde de las figuras de las manzanas, con silicona caliente unimos las piezas de las manzanas y las botellas y con pintura al frío color amarilla y una puntilla de metal, decoramos con puntos, vea las imágenes.</center> ><center> Step 8. In this step, to almost finish all the steps, we take a black foami with a smooth texture, and with hot silicone we glue the figures of the apples, then we cut along the entire edge, leaving half a centimeter of distance in the edge, and with the tip of the scissors we remove fringes around the edge of the figures of the apples, with hot silicone we join the pieces of the apples and the bottles and with cold yellow paint and a metal lace, we decorate with points, see the images.</center> <center>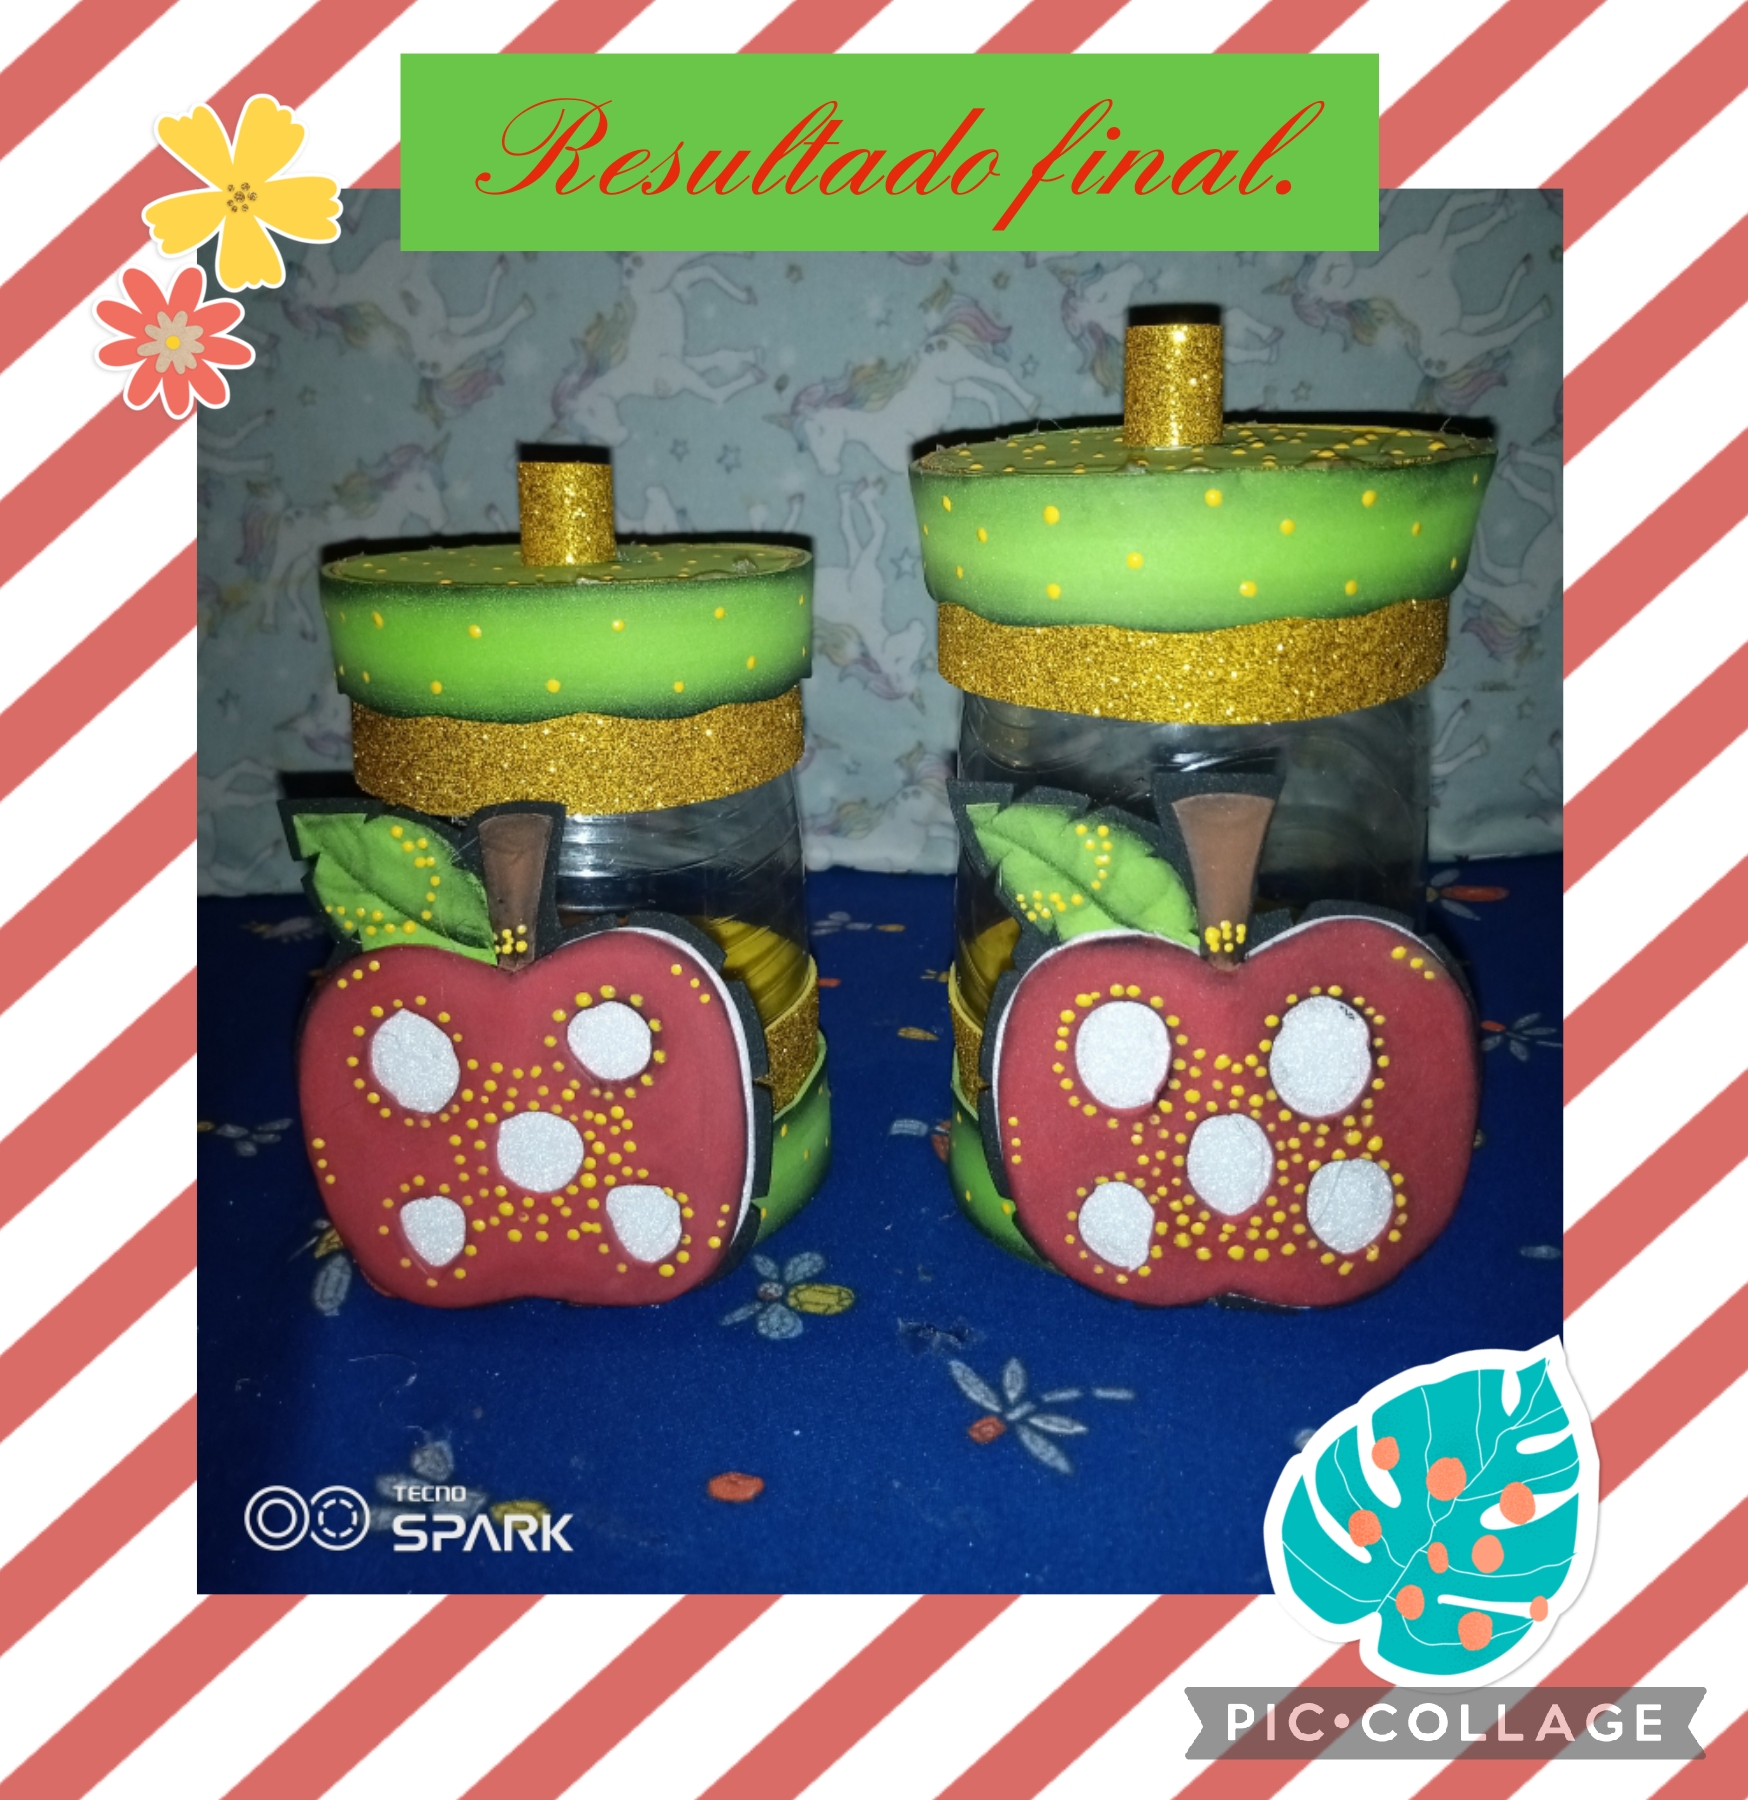</center> <center> Hemos llegado al final de todos los pasos, este es el resultado final, unos bonitos, practicos y decorativos dispensadores, decorados con la tematica de manzanas, ideal para guardar lo que a ustedes les sea necesario y tambien podemos decorar nuestra cocina, o cualquier lugar de su preferencia, gracias por visitar mi blog, nos vemos pronto con otro idea creativa, Dios los bendiga a todos.</center> ><center> We have reached the end of all the steps, this is the final result, some beautiful, practical and decorative dispensers, decorated with the theme of apples, ideal for storing what you need and we can also decorate our kitchen, or any place of your choice, thanks for visiting my blog, see you soon with another creative idea, God bless you all.</center> Las fotos son tomadas con mi telefono androide TECNO SPARK 6GO y editadas con la aplicacion PIC-COLLAGE. >The photos are taken with my android phone TECNO SPARK 6GO and edited with the PIC-COLLAGE application.
| author | cruzjimenez01 | ||||||||||||
|---|---|---|---|---|---|---|---|---|---|---|---|---|---|
| permlink | tutorial-les-muestro-como-elaborar-unos-bonitos-practicos-y-decorativos-dispensadores-manualidad-paso-a-paso-tutorial-i-show-you | ||||||||||||
| category | hive-130560 | ||||||||||||
| json_metadata | {"tags":["hive-130560","spanish","cervantes","manualidad","tutorial","craft","handmade","buildit"],"image":["https://images.hive.blog/DQmNPYxnijXrHQZVkaPTyvQb8ksESC3ZYUzpGdCeivyvpNQ/Collage_2022-08-11_12_26_07.jpg","https://images.hive.blog/DQmdTS4Bg59AyGpFYDAaQdjsRW3Pdw3nKjyLRMiHsQj4VRz/Collage_2022-08-11_09_04_11.jpg","https://images.hive.blog/DQmPM5jnKqpP7JKJ1R5Ui2n76ZqSBuTGxuH6RvoSZb8qsTD/Collage_2022-08-11_09_08_30.jpg","https://images.hive.blog/DQmc2StbnZzE4bfptzEuoGcbYgVXHy2js3EFq6S2sG9wpJB/Collage_2022-08-11_09_46_36.jpg","https://images.hive.blog/DQmVGuQnsyW8aU8Bbp2qK41y7niBHSu71CVLJ24MpY4iEfu/Collage_2022-08-11_09_49_42.jpg","https://images.hive.blog/DQmRP6cDpve6KPa3aZJ8WUW441LArKBNdJkr5U9TcRpuLWx/Collage_2022-08-11_09_52_13.jpg","https://images.hive.blog/DQmYLN1tEnqwsKYXU1kh3gFihbb3zWoajtqtA5GaVfbQQcb/Collage_2022-08-11_10_30_07.jpg","https://images.hive.blog/DQmXUXeYju1cMGCYywbKRZkBoFAkDRaXNHfhQXbVGyfKrZr/Collage_2022-08-11_10_32_44.jpg","https://images.hive.blog/DQmULuEk8FgBjtwXjt5tVWNBtP3WFRzHQqACX58FJQDkKAY/Collage_2022-08-11_10_36_32.jpg","https://images.hive.blog/DQmTVo7cYLS3DwGcVS7YvfnvCiUCgJdHrP4J3poTPiCkEtv/Collage_2022-08-11_10_38_56.jpg","https://images.hive.blog/DQmY2ApyYgFfCCQcKKohPBjNW7Umx24qKLDxqZHRxXgt5xt/Collage_2022-08-11_10_42_12.jpg"],"app":"hiveblog/0.1","format":"markdown"} | ||||||||||||
| created | 2022-08-11 18:16:51 | ||||||||||||
| last_update | 2022-08-11 18:16:51 | ||||||||||||
| depth | 0 | ||||||||||||
| children | 5 | ||||||||||||
| last_payout | 2022-08-18 18:16:51 | ||||||||||||
| cashout_time | 1969-12-31 23:59:59 | ||||||||||||
| total_payout_value | 4.801 HBD | ||||||||||||
| curator_payout_value | 4.844 HBD | ||||||||||||
| pending_payout_value | 0.000 HBD | ||||||||||||
| promoted | 0.000 HBD | ||||||||||||
| body_length | 10,479 | ||||||||||||
| author_reputation | 55,218,837,580,914 | ||||||||||||
| root_title | "Tutorial: Les muestro como elaborar unos bonitos, practicos y decorativos dispensadores. Manualidad paso a paso.//Tutorial: I show you how to make beautiful, practical and decorative dispensers. Step by step craft." | ||||||||||||
| beneficiaries |
| ||||||||||||
| max_accepted_payout | 1,000,000.000 HBD | ||||||||||||
| percent_hbd | 10,000 | ||||||||||||
| post_id | 115,638,659 | ||||||||||||
| net_rshares | 12,801,971,753,762 | ||||||||||||
| author_curate_reward | "" |
| voter | weight | wgt% | rshares | pct | time |
|---|---|---|---|---|---|
| pharesim | 0 | 89,632,606,451 | 9.57% | ||
| roelandp | 0 | 20,009,513,295 | 2.39% | ||
| gikitiki | 0 | 3,019,690,024 | 4.78% | ||
| sunshine | 0 | 25,768,728,576 | 4.78% | ||
| moisesmcardona | 0 | 95,210,541,872 | 50% | ||
| abh12345 | 0 | 13,017,114,981 | 0.47% | ||
| frankches | 0 | 1,888,682,634 | 40% | ||
| justinw | 0 | 13,263,432,113 | 3.15% | ||
| nogriv | 0 | 763,881,126 | 50% | ||
| coincentrado | 0 | 1,467,246,511 | 50% | ||
| sustainablyyours | 0 | 3,902,751,655 | 4.78% | ||
| dandesign86 | 0 | 14,456,331,691 | 8% | ||
| techken | 0 | 3,538,998,093 | 4.78% | ||
| diabolika | 0 | 1,403,470,322 | 4.78% | ||
| diegoameerali | 0 | 815,320,428 | 2.87% | ||
| lenasveganliving | 0 | 2,797,442,302 | 4.78% | ||
| adriuff | 0 | 3,434,760,798 | 25% | ||
| finanzasid | 0 | 939,060,312 | 50% | ||
| samic | 0 | 5,508,854,263 | 30% | ||
| jlsplatts | 0 | 21,276,838,930 | 2% | ||
| danielvehe | 0 | 261,431,148,099 | 100% | ||
| enmy | 0 | 214,322,095,829 | 100% | ||
| dorada | 0 | 1,271,159,441 | 100% | ||
| karii | 0 | 10,117,580,112 | 100% | ||
| vaneaventuras | 0 | 12,524,990,891 | 50% | ||
| malvyconejero | 0 | 505,136,786 | 50% | ||
| auleo | 0 | 872,828,915 | 1.91% | ||
| sco | 0 | 1,463,535,241 | 5.74% | ||
| yorlyscott | 0 | 10,104,383,607 | 100% | ||
| ronpurteetv | 0 | 896,541,381 | 4.78% | ||
| leticiapereira | 0 | 2,431,429,314 | 100% | ||
| angelik | 0 | 4,835,523,715 | 50% | ||
| leonellaforever | 0 | 1,943,235,625 | 50% | ||
| cherryng | 0 | 1,183,586,455 | 1.91% | ||
| lemony-cricket | 0 | 23,154,515,521 | 4.78% | ||
| rutablockchain | 0 | 524,531,704,344 | 100% | ||
| marynessc | 0 | 1,399,216,644 | 100% | ||
| bellarulox | 0 | 821,122,664 | 50% | ||
| fmbs25 | 0 | 17,006,447,297 | 49% | ||
| bertrayo | 0 | 3,316,288,773 | 4.78% | ||
| vidayaventura | 0 | 530,767,174 | 50% | ||
| kimberlynv | 0 | 538,974,079 | 100% | ||
| antoniarhuiz | 0 | 18,027,523,718 | 50% | ||
| chrismartinez | 0 | 1,707,943,601 | 100% | ||
| azircon | 0 | 1,539,087,911,091 | 8.13% | ||
| outlinez | 0 | 1,621,471,714 | 3.82% | ||
| elvigia | 0 | 4,321,978,050 | 20% | ||
| louis88 | 0 | 50,562,901,994 | 2.87% | ||
| koenau | 0 | 2,201,564,447 | 4.78% | ||
| greddyforce | 0 | 444,007,188 | 2.87% | ||
| obsesija | 0 | 824,429,958 | 1.91% | ||
| tijntje | 0 | 1,036,997,724 | 4.78% | ||
| taldor | 0 | 573,912,210 | 2.87% | ||
| yisusgtr | 0 | 1,190,541,650 | 50% | ||
| saboin | 0 | 31,208,338,191 | 3.15% | ||
| jesscbrl | 0 | 598,112,809 | 50% | ||
| yenncanela | 0 | 778,742,224 | 50% | ||
| coloneljethro | 0 | 3,784,230,584 | 4.78% | ||
| eleazarvo | 0 | 28,593,923,075 | 80% | ||
| aliriera | 0 | 11,707,511,979 | 50% | ||
| doctor-cog-diss | 0 | 4,355,927,221 | 5.74% | ||
| bdmillergallery | 0 | 46,910,363,346 | 5% | ||
| pialejoana | 0 | 578,340,533 | 4.78% | ||
| cooltivar | 0 | 3,178,940,528 | 7.17% | ||
| purrix | 0 | 11,640,732,572 | 50% | ||
| remotehorst23 | 0 | 3,405,493,001 | 9.57% | ||
| cmplxty | 0 | 55,091,962,287 | 7.17% | ||
| filler | 0 | 699,400,183 | 4.78% | ||
| gerdtrudroepke | 0 | 10,483,933,730 | 4.78% | ||
| nancybmp | 0 | 860,085,547 | 4.3% | ||
| artmedina | 0 | 1,069,607,314 | 4.78% | ||
| voxmortis | 0 | 1,623,382,557 | 0.95% | ||
| nsfw-power | 0 | 14,162,315,810 | 9.57% | ||
| thelittlebank | 0 | 28,050,545,065 | 4.78% | ||
| yeceniacarolina | 0 | 10,959,314,938 | 100% | ||
| naty16 | 0 | 2,117,141,271 | 5% | ||
| thevil | 0 | 43,987,795,071 | 4.78% | ||
| milky-concrete | 0 | 7,680,356,704 | 4.78% | ||
| jjmarquez | 0 | 1,082,807,027 | 30% | ||
| adalger | 0 | 493,284,274 | 0.95% | ||
| keisy | 0 | 3,883,951,070 | 100% | ||
| robmojo | 0 | 1,543,156,367 | 2.87% | ||
| maleidamarcano | 0 | 7,255,519,239 | 50% | ||
| equipodelta | 0 | 215,350,060,837 | 80% | ||
| alex-hm | 0 | 790,979,587 | 30% | ||
| lionsaturbix | 0 | 17,487,410,605 | 80% | ||
| dawnoner | 0 | 3,684,673,314 | 1.43% | ||
| epicdice | 0 | 6,784,690,532 | 2.87% | ||
| yiobri | 0 | 646,732,625 | 4.78% | ||
| ssiena | 0 | 1,923,725,789 | 7.17% | ||
| babytarazkp | 0 | 839,972,430 | 10% | ||
| jesus68 | 0 | 4,590,601,216 | 50% | ||
| curangel | 0 | 7,302,742,242,112 | 9.57% | ||
| mister.reatard | 0 | 718,022,728 | 4.78% | ||
| ang.spc | 0 | 886,822,216 | 80% | ||
| delilhavores | 0 | 1,921,777,649 | 10% | ||
| nerdvana | 0 | 15,550,877,770 | 50% | ||
| dpend.active | 0 | 682,656,710 | 1.91% | ||
| berlissanoja | 0 | 5,672,486,839 | 50% | ||
| x9ed1732b | 0 | 2,046,642,080 | 4.3% | ||
| shimozurdogames | 0 | 572,027,513 | 4.78% | ||
| rodrikun17 | 0 | 12,813,073,164 | 100% | ||
| angelescats | 0 | 25,228,562,891 | 100% | ||
| hernleon74 | 0 | 815,362,115 | 10% | ||
| jennynas | 0 | 21,015,250,996 | 100% | ||
| ambarvegas | 0 | 25,011,981,451 | 100% | ||
| jossavendano | 0 | 53,530,014,157 | 100% | ||
| yolimarag | 0 | 54,576,361,928 | 50% | ||
| kattyart | 0 | 31,648,494,575 | 50% | ||
| rosa4r | 0 | 36,835,936,175 | 100% | ||
| aguilaazul7777 | 0 | 41,495,840,601 | 100% | ||
| jtkl12 | 0 | 3,385,872,252 | 50% | ||
| kenialorena | 0 | 4,871,861,661 | 100% | ||
| machf | 0 | 5,140,725,658 | 100% | ||
| alejandria12 | 0 | 37,867,914,006 | 100% | ||
| freddybri | 0 | 2,235,202,951 | 50% | ||
| reymoya95 | 0 | 90,433,108,903 | 100% | ||
| dorisp | 0 | 4,230,250,418 | 50% | ||
| alejandroxg | 0 | 15,204,242,685 | 50% | ||
| gabygonz | 0 | 25,868,166,722 | 50% | ||
| issymarie2 | 0 | 1,118,160,114 | 4.78% | ||
| aricaroo | 0 | 1,274,780,127 | 100% | ||
| crealeniels | 0 | 1,281,845,226 | 80% | ||
| quijotezco | 0 | 29,194,710,433 | 100% | ||
| tibaire | 0 | 77,922,044,802 | 40% | ||
| care1869 | 0 | 21,541,922,220 | 100% | ||
| izzieperez | 0 | 28,158,564,423 | 100% | ||
| leonelysmb | 0 | 5,613,058,400 | 100% | ||
| isaale | 0 | 2,165,150,322 | 100% | ||
| davideazul | 0 | 939,021,597 | 9.57% | ||
| altleft | 0 | 202,410,064,808 | 0.47% | ||
| olusiu | 0 | 1,552,196,166 | 3.82% | ||
| paolazun | 0 | 5,006,863,198 | 50% | ||
| yohadice | 0 | 2,730,070,527 | 100% | ||
| meritocracy | 0 | 523,306,831,942 | 4.78% | ||
| andrastia | 0 | 1,391,030,764 | 1.91% | ||
| strangex | 0 | 5,459,819,438 | 100% | ||
| solymi | 0 | 1,264,187,767 | 3.18% | ||
| traderhive | 0 | 8,672,943,952 | 9.57% | ||
| milamarkn | 0 | 14,906,856,114 | 100% | ||
| duneskya | 0 | 7,133,980,200 | 100% | ||
| jomarbym | 0 | 75,887,182,086 | 100% | ||
| robvector | 0 | 6,289,791,233 | 4.78% | ||
| ayleenr | 0 | 45,307,011,511 | 100% | ||
| emybaby | 0 | 406,715,793 | 9.57% | ||
| dilianny20 | 0 | 3,236,713,937 | 100% | ||
| yosoyada | 0 | 10,865,362,515 | 100% | ||
| janettbrito76 | 0 | 63,131,096,149 | 100% | ||
| alvaradofran | 0 | 22,118,971,085 | 100% | ||
| makeup.byidy | 0 | 35,581,589,641 | 100% | ||
| marian5pacheco | 0 | 6,976,504,683 | 100% | ||
| lunasilver73 | 0 | 2,364,671,633 | 50% | ||
| cruzjimenez01 | 0 | 5,190,904,388 | 100% | ||
| carlitazulay | 0 | 33,344,206,413 | 50% | ||
| wito7 | 0 | 1,524,633,102 | 40% | ||
| floramarela | 0 | 3,623,755,662 | 100% | ||
| gabstar | 0 | 3,049,385,873 | 100% | ||
| yllentv | 0 | 7,449,907,452 | 100% | ||
| yusma21 | 0 | 3,738,154,620 | 40% | ||
| victor8 | 0 | 1,422,750,702 | 40% | ||
| darguin3 | 0 | 1,432,705,436 | 40% | ||
| bleuclair | 0 | 7,439,288,849 | 100% | ||
| ivycrafts | 0 | 12,831,807,764 | 50% | ||
| amaillo | 0 | 1,283,872,883 | 10% | ||
| dlmmqb | 0 | 7,207,443,806 | 10% | ||
| wendy0520 | 0 | 702,703,825 | 8.61% | ||
| daboba | 0 | 3,228,681,303 | 9.57% | ||
| fairyberry | 0 | 1,783,596,986 | 4.78% | ||
| alizmarpaola | 0 | 12,891,023,724 | 100% | ||
| yaziris | 0 | 8,228,829,380 | 9.57% | ||
| lukasbachofner | 0 | 1,245,496,452 | 4.78% | ||
| pavelmundo | 0 | 1,273,308,796 | 50% | ||
| dominicano | 0 | 1,269,217,890 | 50% | ||
| dayanita2 | 0 | 4,700,814,927 | 100% | ||
| sadia7 | 0 | 306,866,471 | 100% | ||
| lileisabel | 0 | 8,688,991,160 | 100% | ||
| employ | 0 | 843,129,394 | 50% | ||
| mdriart | 0 | 256,061,691 | 100% |
Saludos, que preciosos han quedado estos dispensadores y una forma ideal para reciclar, dando otra vista y un toque decorativo a la zona de la cocina..
| author | alizmarpaola |
|---|---|
| permlink | re-cruzjimenez01-2022811t18272962z |
| category | hive-130560 |
| json_metadata | {"tags":["hive-130560","spanish","cervantes","manualidad","tutorial","craft","handmade","buildit"],"app":"ecency/3.0.32-mobile","format":"markdown+html"} |
| created | 2022-08-11 22:27:30 |
| last_update | 2022-08-11 22:27:30 |
| depth | 1 |
| children | 0 |
| last_payout | 2022-08-18 22:27:30 |
| cashout_time | 1969-12-31 23:59:59 |
| total_payout_value | 0.000 HBD |
| curator_payout_value | 0.000 HBD |
| pending_payout_value | 0.000 HBD |
| promoted | 0.000 HBD |
| body_length | 152 |
| author_reputation | 205,709,568,085,876 |
| root_title | "Tutorial: Les muestro como elaborar unos bonitos, practicos y decorativos dispensadores. Manualidad paso a paso.//Tutorial: I show you how to make beautiful, practical and decorative dispensers. Step by step craft." |
| beneficiaries | [] |
| max_accepted_payout | 1,000,000.000 HBD |
| percent_hbd | 10,000 |
| post_id | 115,644,062 |
| net_rshares | 0 |
Que lindo decorativo amiga quedó espectacular
| author | bleuclair |
|---|---|
| permlink | re-cruzjimenez01-rgj81i |
| category | hive-130560 |
| json_metadata | {"tags":["hive-130560"],"app":"peakd/2022.07.1"} |
| created | 2022-08-13 02:24:54 |
| last_update | 2022-08-13 02:24:54 |
| depth | 1 |
| children | 0 |
| last_payout | 2022-08-20 02:24:54 |
| cashout_time | 1969-12-31 23:59:59 |
| total_payout_value | 0.000 HBD |
| curator_payout_value | 0.000 HBD |
| pending_payout_value | 0.000 HBD |
| promoted | 0.000 HBD |
| body_length | 46 |
| author_reputation | 18,209,403,455,238 |
| root_title | "Tutorial: Les muestro como elaborar unos bonitos, practicos y decorativos dispensadores. Manualidad paso a paso.//Tutorial: I show you how to make beautiful, practical and decorative dispensers. Step by step craft." |
| beneficiaries | [] |
| max_accepted_payout | 1,000,000.000 HBD |
| percent_hbd | 10,000 |
| post_id | 115,675,873 |
| net_rshares | 0 |
Que bonito trabajo amiga ✨
| author | dilianny20 |
|---|---|
| permlink | re-cruzjimenez01-2022812t142350246z |
| category | hive-130560 |
| json_metadata | {"tags":["hive-130560","spanish","cervantes","manualidad","tutorial","craft","handmade","buildit"],"app":"ecency/3.0.32-mobile","format":"markdown+html"} |
| created | 2022-08-12 18:23:54 |
| last_update | 2022-08-12 18:23:54 |
| depth | 1 |
| children | 0 |
| last_payout | 2022-08-19 18:23:54 |
| cashout_time | 1969-12-31 23:59:59 |
| total_payout_value | 0.000 HBD |
| curator_payout_value | 0.000 HBD |
| pending_payout_value | 0.000 HBD |
| promoted | 0.000 HBD |
| body_length | 26 |
| author_reputation | 12,309,735,648,190 |
| root_title | "Tutorial: Les muestro como elaborar unos bonitos, practicos y decorativos dispensadores. Manualidad paso a paso.//Tutorial: I show you how to make beautiful, practical and decorative dispensers. Step by step craft." |
| beneficiaries | [] |
| max_accepted_payout | 1,000,000.000 HBD |
| percent_hbd | 10,000 |
| post_id | 115,666,199 |
| net_rshares | 0 |
Te quedó tan linda y practica esta manualidad, me encanta reciclar
| author | leslieq78 |
|---|---|
| permlink | re-cruzjimenez01-rgikuc |
| category | hive-130560 |
| json_metadata | {"tags":["hive-130560"],"app":"peakd/2022.07.1"} |
| created | 2022-08-12 18:04:42 |
| last_update | 2022-08-12 18:04:42 |
| depth | 1 |
| children | 0 |
| last_payout | 2022-08-19 18:04:42 |
| cashout_time | 1969-12-31 23:59:59 |
| total_payout_value | 0.000 HBD |
| curator_payout_value | 0.000 HBD |
| pending_payout_value | 0.000 HBD |
| promoted | 0.000 HBD |
| body_length | 66 |
| author_reputation | 32,610,378,781,666 |
| root_title | "Tutorial: Les muestro como elaborar unos bonitos, practicos y decorativos dispensadores. Manualidad paso a paso.//Tutorial: I show you how to make beautiful, practical and decorative dispensers. Step by step craft." |
| beneficiaries | [] |
| max_accepted_payout | 1,000,000.000 HBD |
| percent_hbd | 10,000 |
| post_id | 115,665,854 |
| net_rshares | 0 |
https://i.imgur.com/wu6B5TK.gifw2
| author | rutablockchain |
|---|---|
| permlink | re-cruzjimenez01-rghg37 |
| category | hive-130560 |
| json_metadata | {"tags":["hive-130560"],"app":"peakd/2022.07.1"} |
| created | 2022-08-12 03:23:39 |
| last_update | 2022-08-12 03:23:39 |
| depth | 1 |
| children | 0 |
| last_payout | 2022-08-19 03:23:39 |
| cashout_time | 1969-12-31 23:59:59 |
| total_payout_value | 0.000 HBD |
| curator_payout_value | 0.000 HBD |
| pending_payout_value | 0.000 HBD |
| promoted | 0.000 HBD |
| body_length | 33 |
| author_reputation | 158,592,617,166,554 |
| root_title | "Tutorial: Les muestro como elaborar unos bonitos, practicos y decorativos dispensadores. Manualidad paso a paso.//Tutorial: I show you how to make beautiful, practical and decorative dispensers. Step by step craft." |
| beneficiaries | [] |
| max_accepted_payout | 1,000,000.000 HBD |
| percent_hbd | 10,000 |
| post_id | 115,649,061 |
| net_rshares | 0 |