create account

[ESP- ENG] Un Hermoso Matero Realizado con Revistas/Beautiful Vase Made with Magazines by dorada

View this thread on: hive.blogpeakd.comecency.com
· @dorada · (edited)
$12.09
[ESP- ENG] Un Hermoso Matero Realizado con Revistas/Beautiful Vase Made with Magazines
# Hola amigos, reciban un cordial saludo.
Tengo días reciclando revistas, cada vez que hago algo con ellas lo disfruto más, realmente es innumerable las manualidades que podemos hacer a partir de una hoja de revista. En esta oportunidad he elaborado un hermoso matero el cual da un toque distinto y alegra nuestro hogar,  realmente es un hermoso detalle de líneas simples pero hace la diferencia. Espero que les guste.


![IMG_20210618_004404.jpg](https://images.hive.blog/DQmbY6uWsC76KVb14M9EKmJfpBUJGFkwq9aG5Hn17wEMZGW/IMG_20210618_004404.jpg)


![Separadores-35-768x129.png](https://images.hive.blog/DQmUs1MQZ6btmMHuTDQaDBcQS3hhqCxfZxyGuLkkqb9u3ML/Separadores-35-768x129.png)


# Materiales: 
Revistas
 pegamento blanco
 silicon
 tijera 
una varita o palito de brochetas 
un pincel 
envejecedor al agua 
cartón

![IMG_20210617_211850.jpg](https://images.hive.blog/DQmfH6mERsjiY66po71Gowqs7QJ16yduvvKHcqG2Uzd4C1E/IMG_20210617_211850.jpg)

![Separadores-35-768x129.png](https://images.hive.blog/DQmUs1MQZ6btmMHuTDQaDBcQS3hhqCxfZxyGuLkkqb9u3ML/Separadores-35-768x129.png)

# Elaboración Paso a Paso
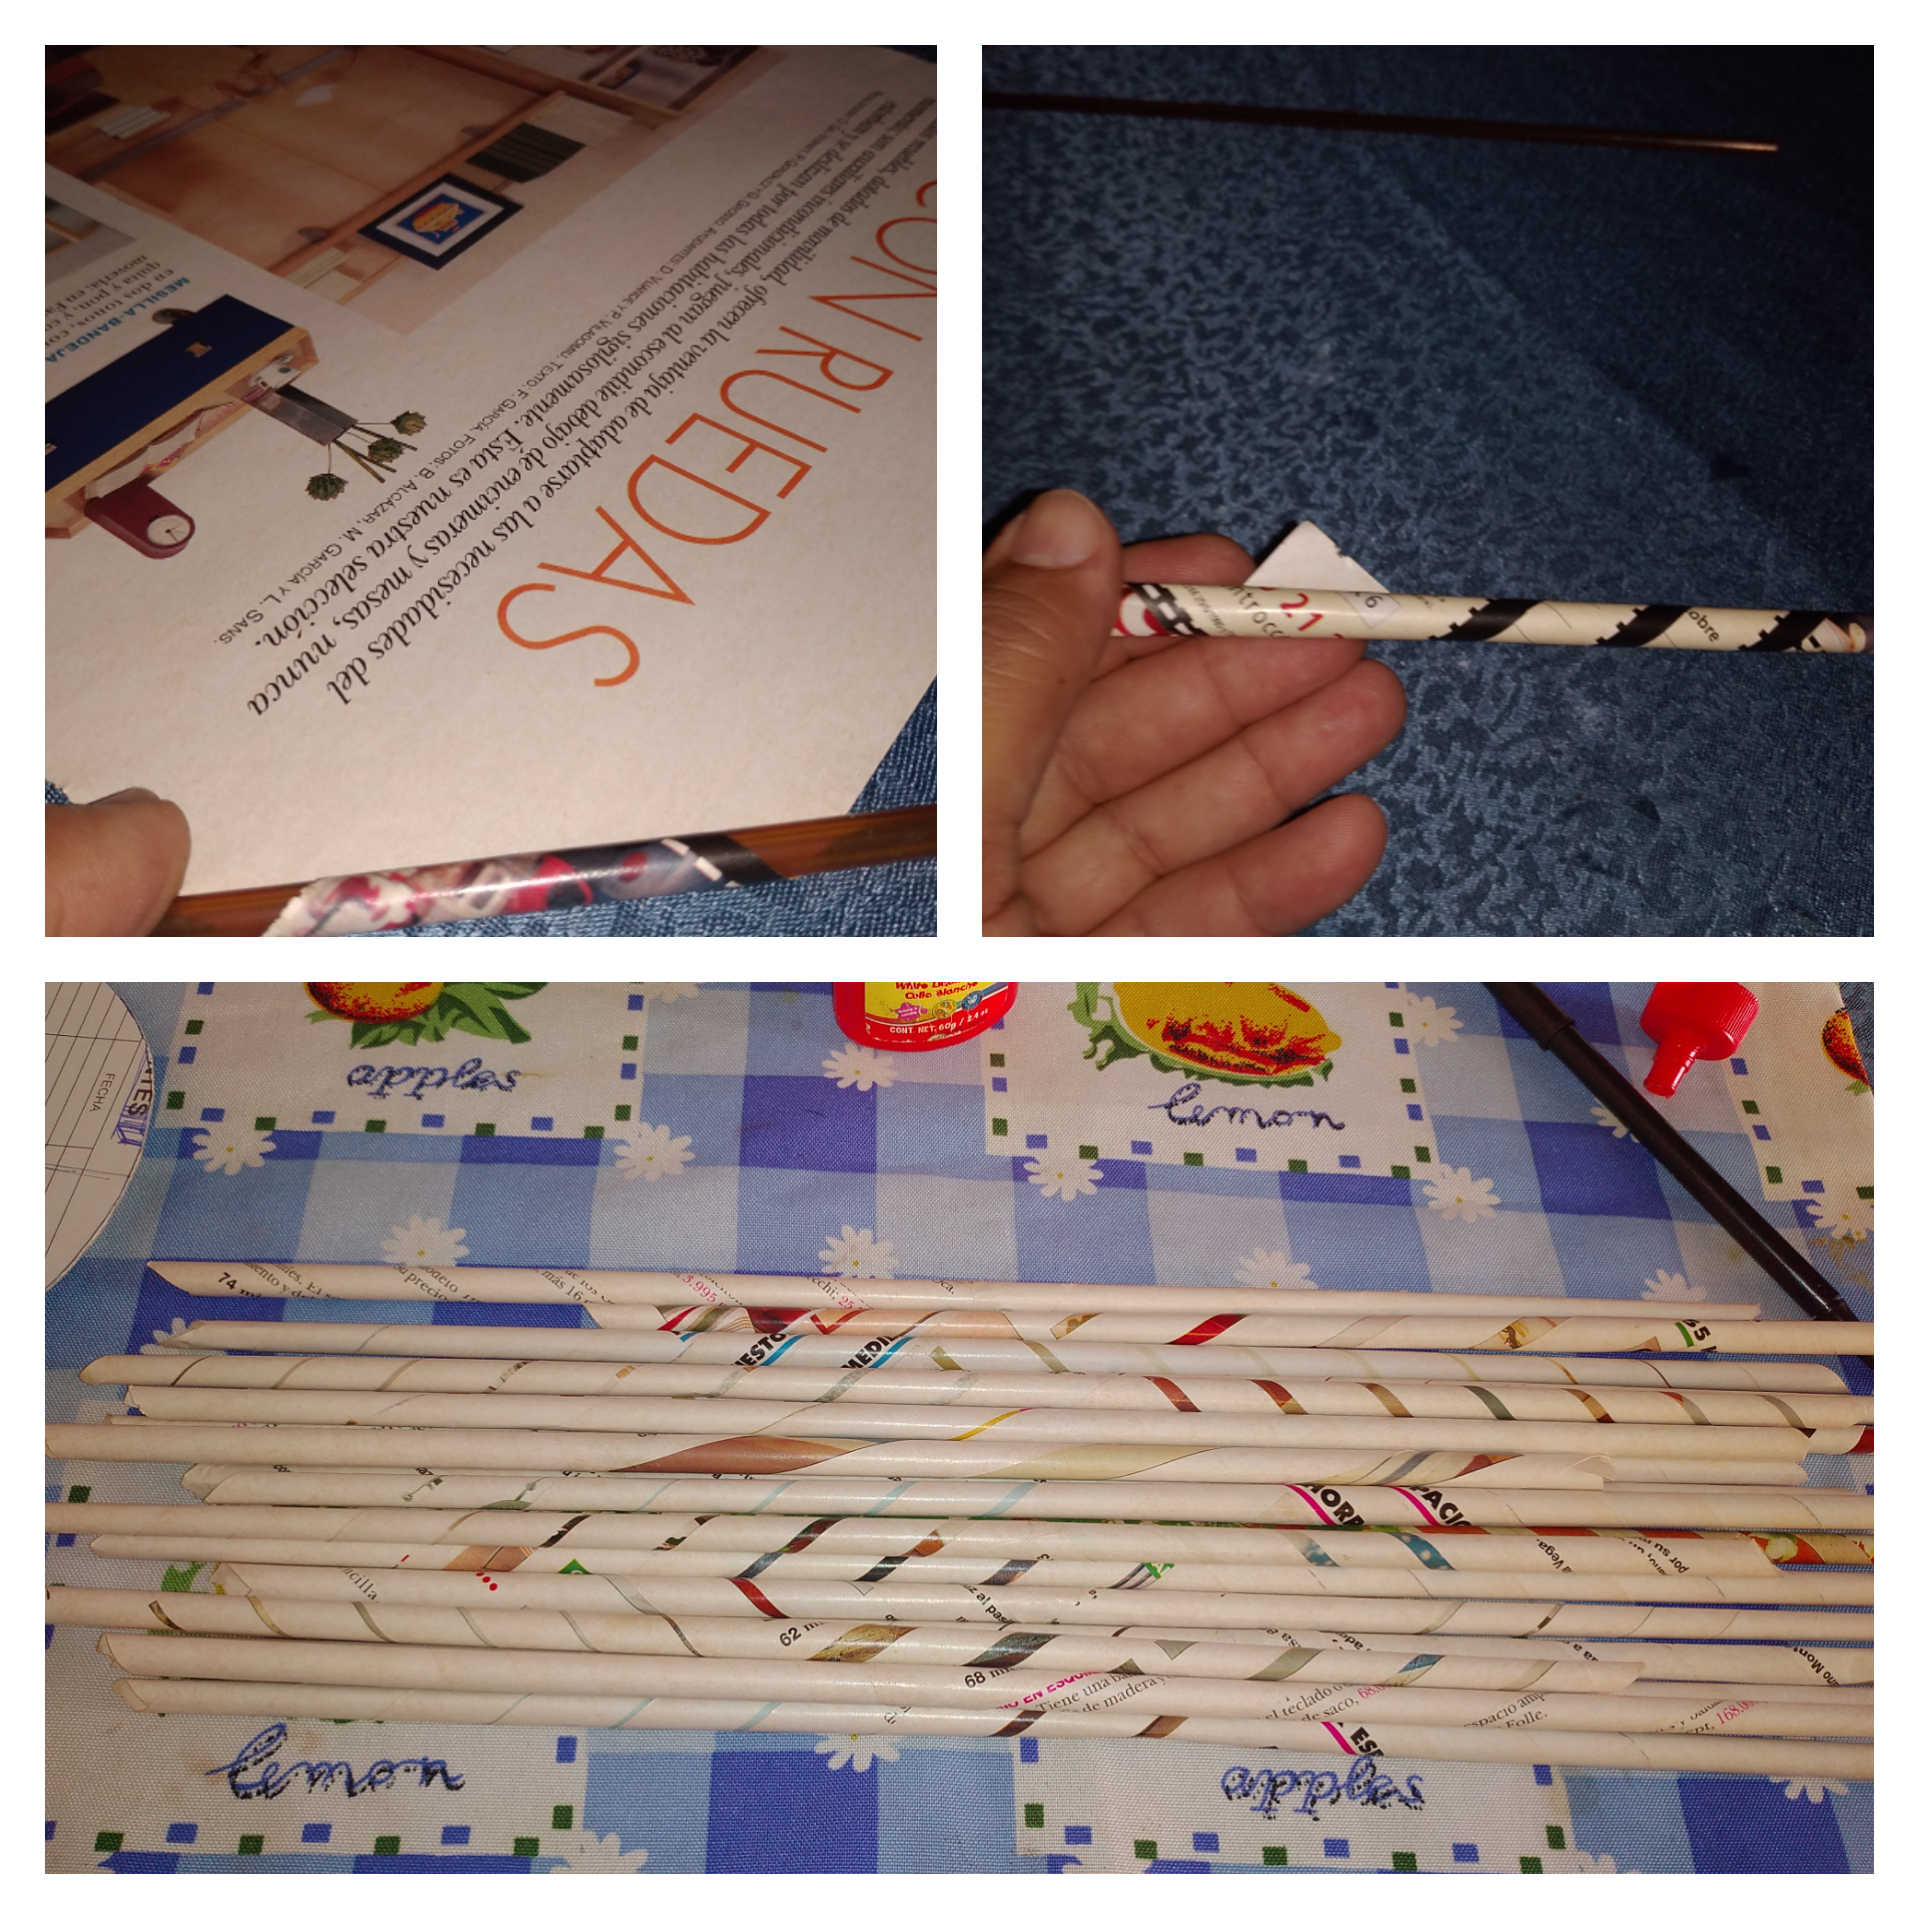
# Paso 1.
Lo primero que realizo son las varitas de papel, para ello utilicé una varita plástica,  no es nada especial sólo que la encontré y me gustó para este trabajo,  también se puede utilizar una varita de metal o  los palitos de que se usan para las brochetas. Primero se fija el extremo de la hoja en la varita para que no se salga,  la envolvemos y al llegar al final se fija con un punto de pegamento blanco, así repetimos el procedimiento hasta obtener una cantidad adecuada. La cantidad a utilizar dependerá del  diámetro de la base del florero en este caso  utilicé un total de 19 varitas.
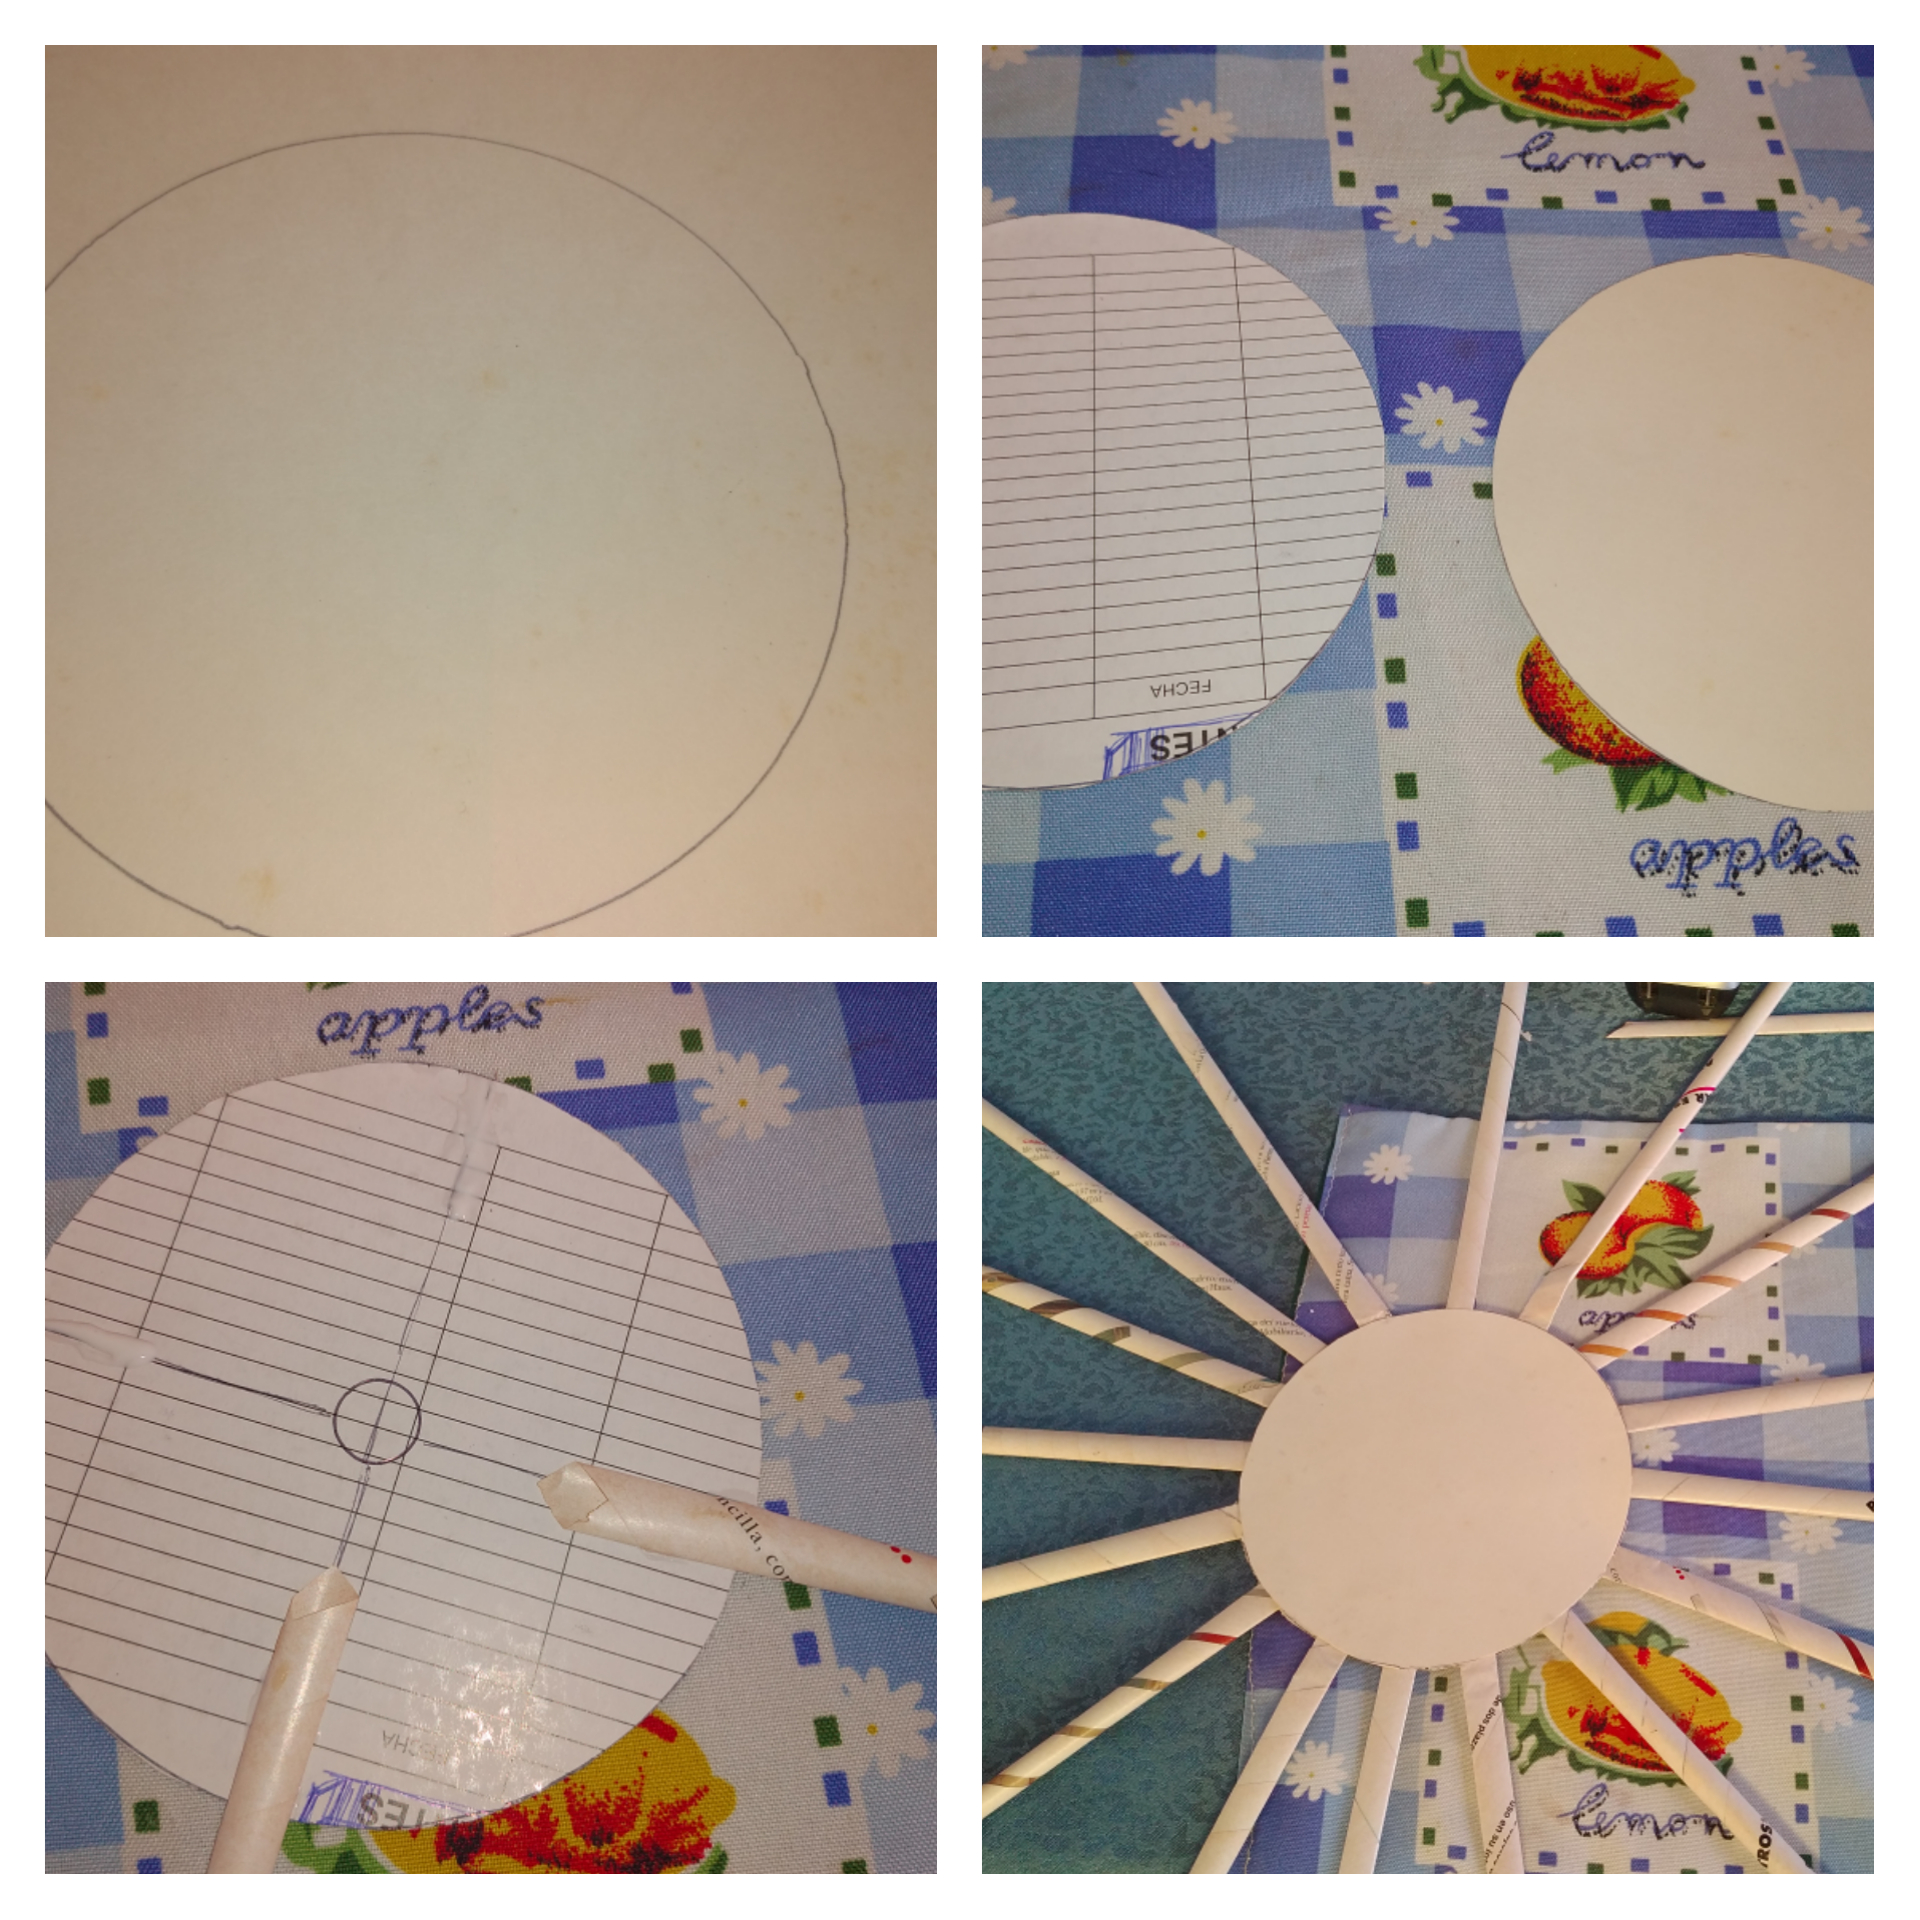
![CollageMaker_20210617_212205699.jpg](https://images.hive.blog/DQmbwvznq68CJFXYZMoqWuEpNTWegJ4Cq5dqwQXtsh3HrEW/CollageMaker_20210617_212205699.jpg)

![Separadores-35-768x129.png](https://images.hive.blog/DQmUs1MQZ6btmMHuTDQaDBcQS3hhqCxfZxyGuLkkqb9u3ML/Separadores-35-768x129.png)


# Paso 2.
Recorté dos círculos de cartón,  utilicé cartones de diferente grosor , en la parte inferior  utilicé un cartón un poco más fuerte o  resistente,  en  la parte superior  un cartón un  poco más suave. Luego  procedí a pegar las varitas sobre el cartón utilizando pegamento blanco, para lograr que las varitas queden de  manera equidistante,  dividí  la circunferencia en cuatro partes para que sirva como punto de referencia. Luego de pegar todas las varitas las cubrí con la otra circunferencia de cartón, le coloqué pegamento blanco y la fijé.
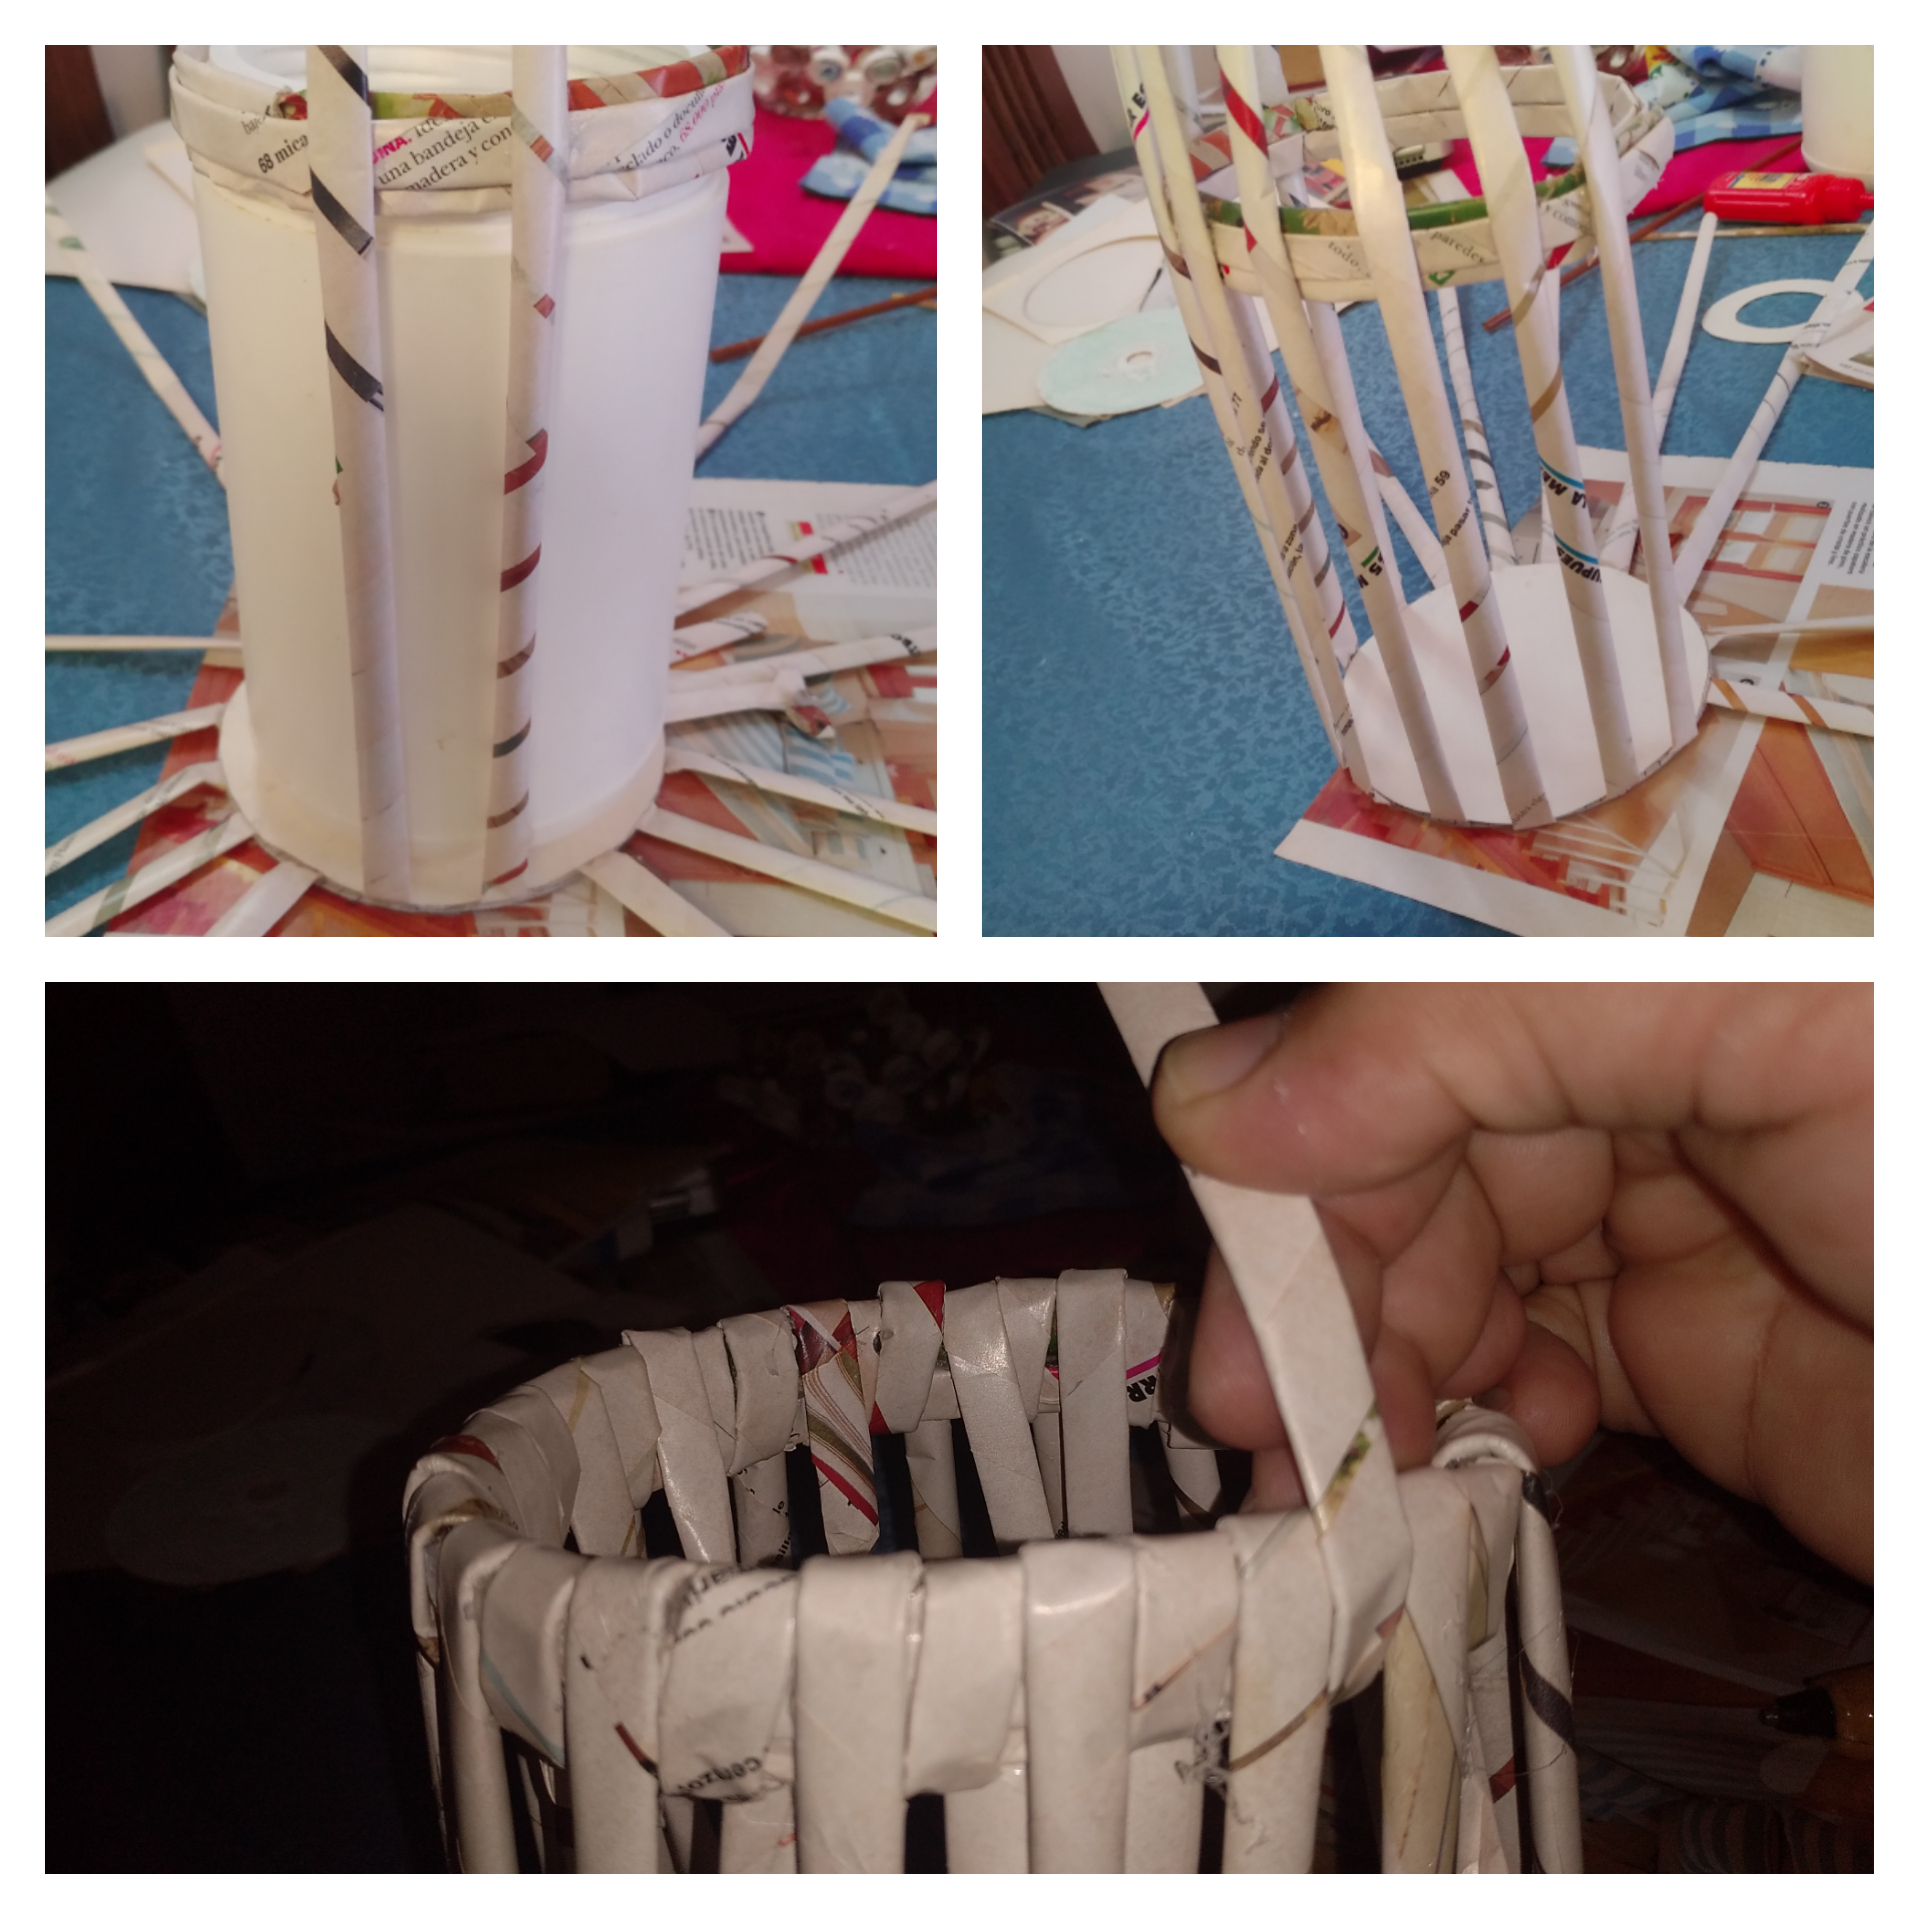
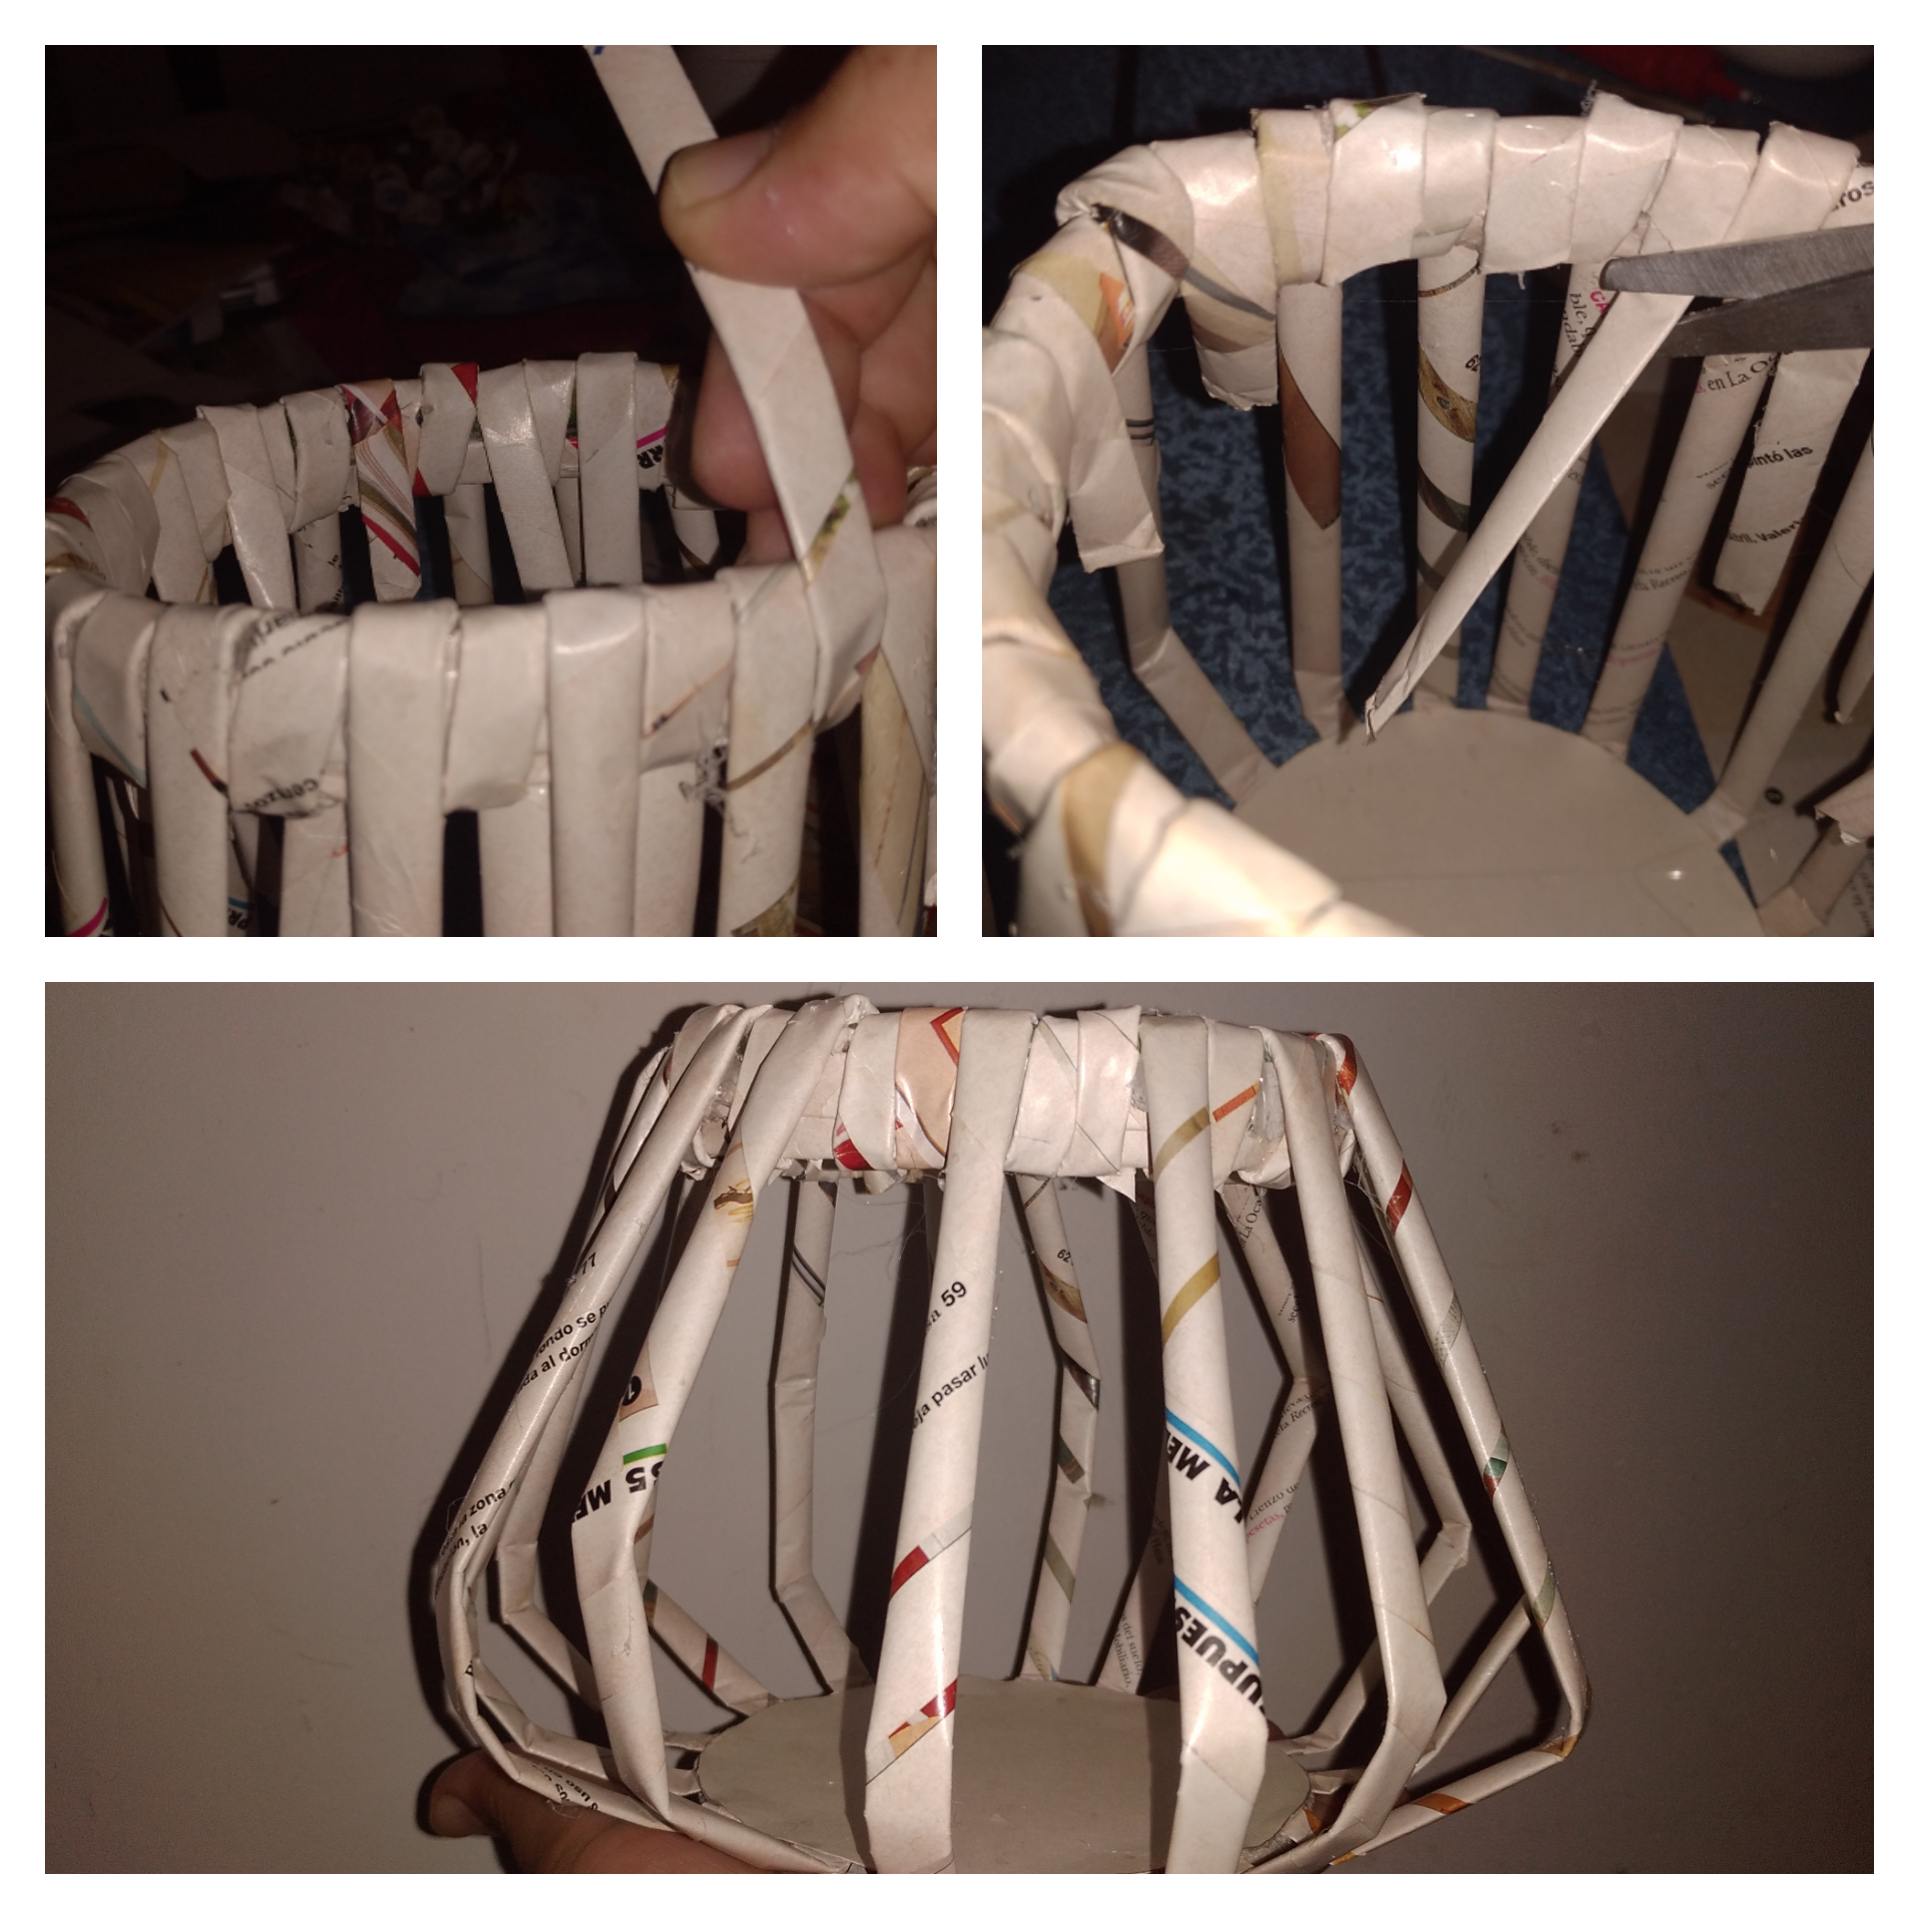
![CollageMaker_20210617_212242369.jpg](https://images.hive.blog/DQmSDSx8EQMBdxYhxrM8m9gKDBLjeWne6qAx11ucKBoDvGX/CollageMaker_20210617_212242369.jpg)

![Separadores-35-768x129.png](https://images.hive.blog/DQmUs1MQZ6btmMHuTDQaDBcQS3hhqCxfZxyGuLkkqb9u3ML/Separadores-35-768x129.png)

# Paso 3.
En este paso pegué tres varitas de papel y hice  una circunferencia con el diámetro de un envase plástico que utilicé para lograr una forma uniforme. Luego comencé a pegar las varitas, al pegar la mitad de las varitas retiré el envase, luego fui rematando las puntas de las varitas, doblando hacia adentro y pegando los extremos.

![CollageMaker_20210617_212335505.jpg](https://images.hive.blog/DQmTPkwiZQ9xswky41LiKQ2BGth7uvGnaicutbq6KxzZzwu/CollageMaker_20210617_212335505.jpg)

![Separadores-35-768x129.png](https://images.hive.blog/DQmUs1MQZ6btmMHuTDQaDBcQS3hhqCxfZxyGuLkkqb9u3ML/Separadores-35-768x129.png)
# Paso 4.
En este paso  recorté las puntas de las varitas y luego le di forma al florero.
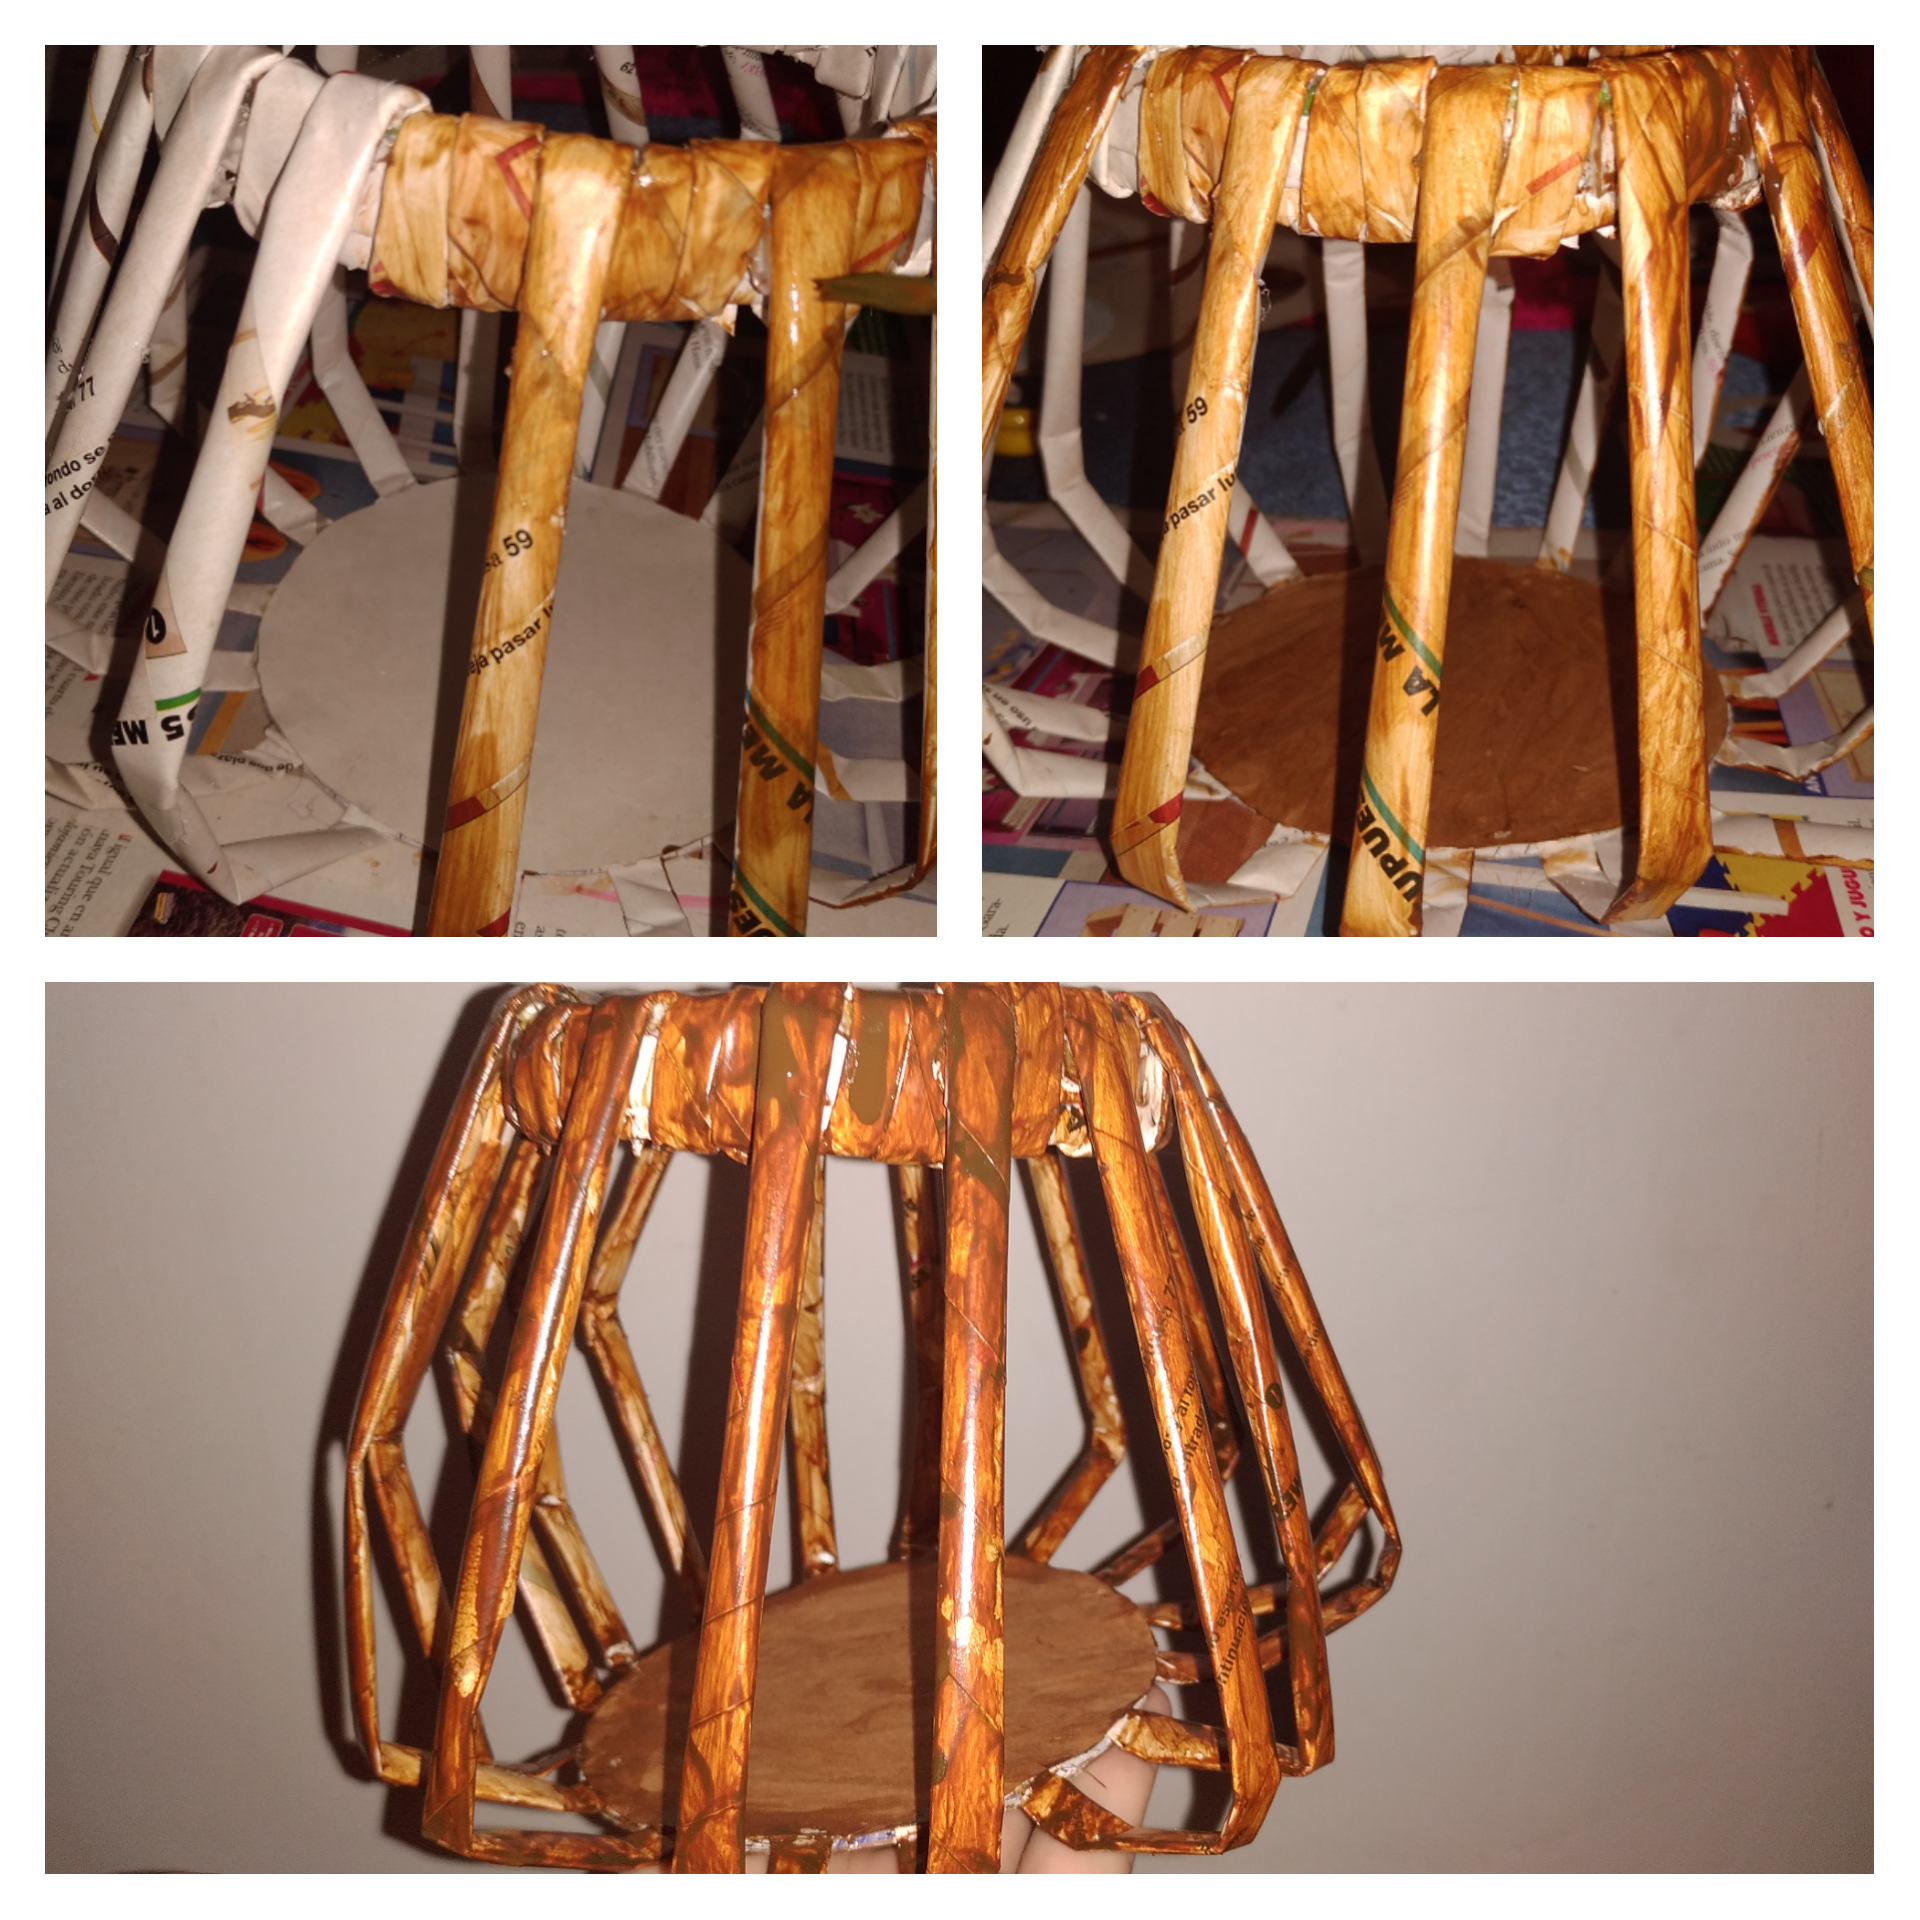
![CollageMaker_20210617_212408919.jpg](https://images.hive.blog/DQmREEJsemAK1vdtVyn2hz1ksMdSPfQ4N2hvtb4iWom4WQG/CollageMaker_20210617_212408919.jpg)


![Separadores-35-768x129.png](https://images.hive.blog/DQmUs1MQZ6btmMHuTDQaDBcQS3hhqCxfZxyGuLkkqb9u3ML/Separadores-35-768x129.png)
# Paso 5.

En este momento procedí a pintar el florero, para ello utilicé envejecedor al agua. Apliqué una capa cubriendo por dentro y por fuera, luego de secar le di unos retoques.
![CollageMaker_20210617_212443866.jpg](https://images.hive.blog/DQmZgY8NETxX4RvnCNqRJNAneqw7P8xxKt2fiPPK4aZnBpd/CollageMaker_20210617_212443866.jpg)


![Separadores-35-768x129.png](https://images.hive.blog/DQmUs1MQZ6btmMHuTDQaDBcQS3hhqCxfZxyGuLkkqb9u3ML/Separadores-35-768x129.png)

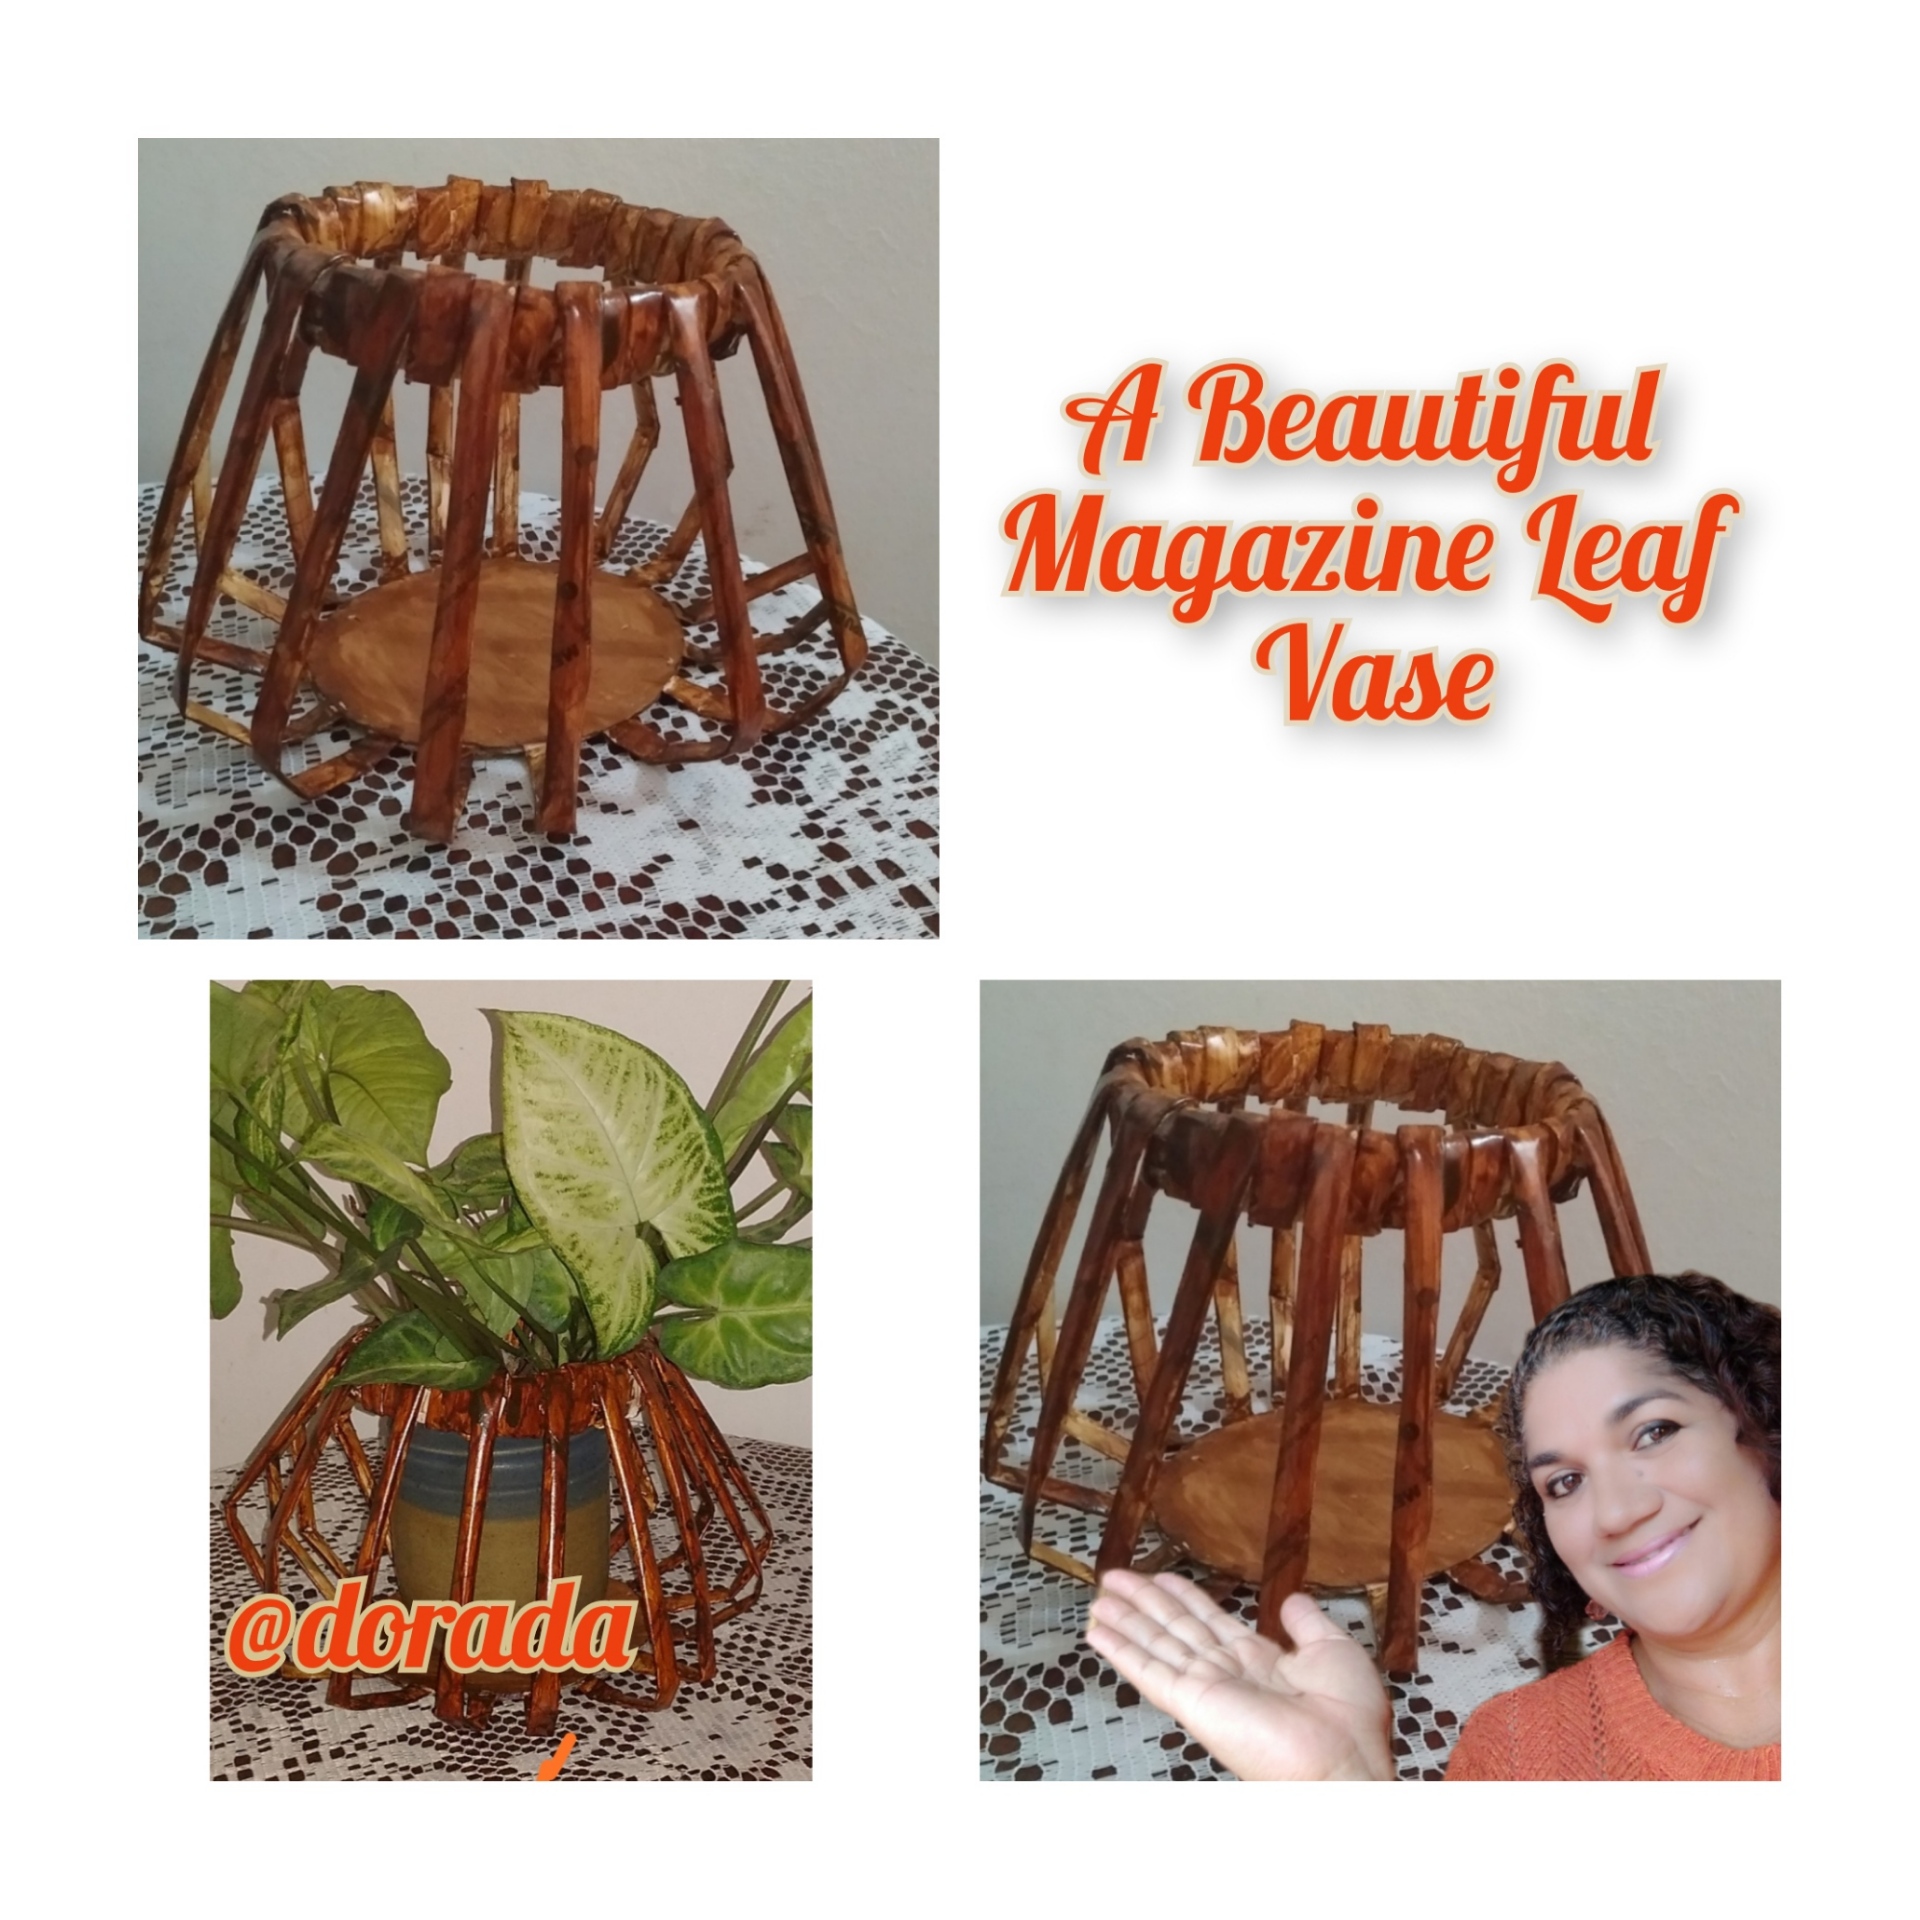
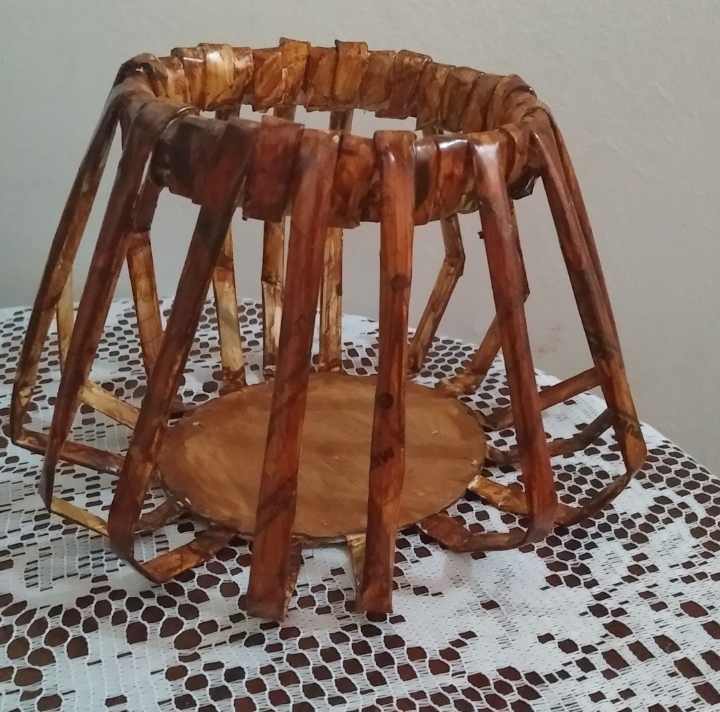
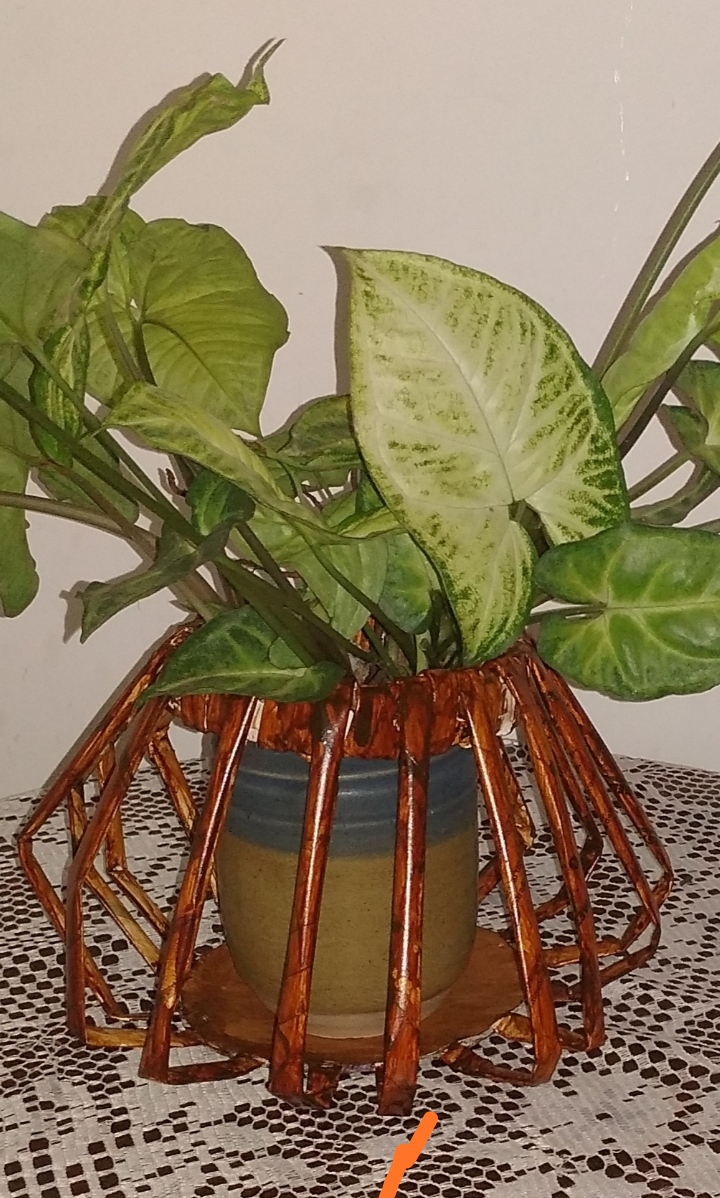
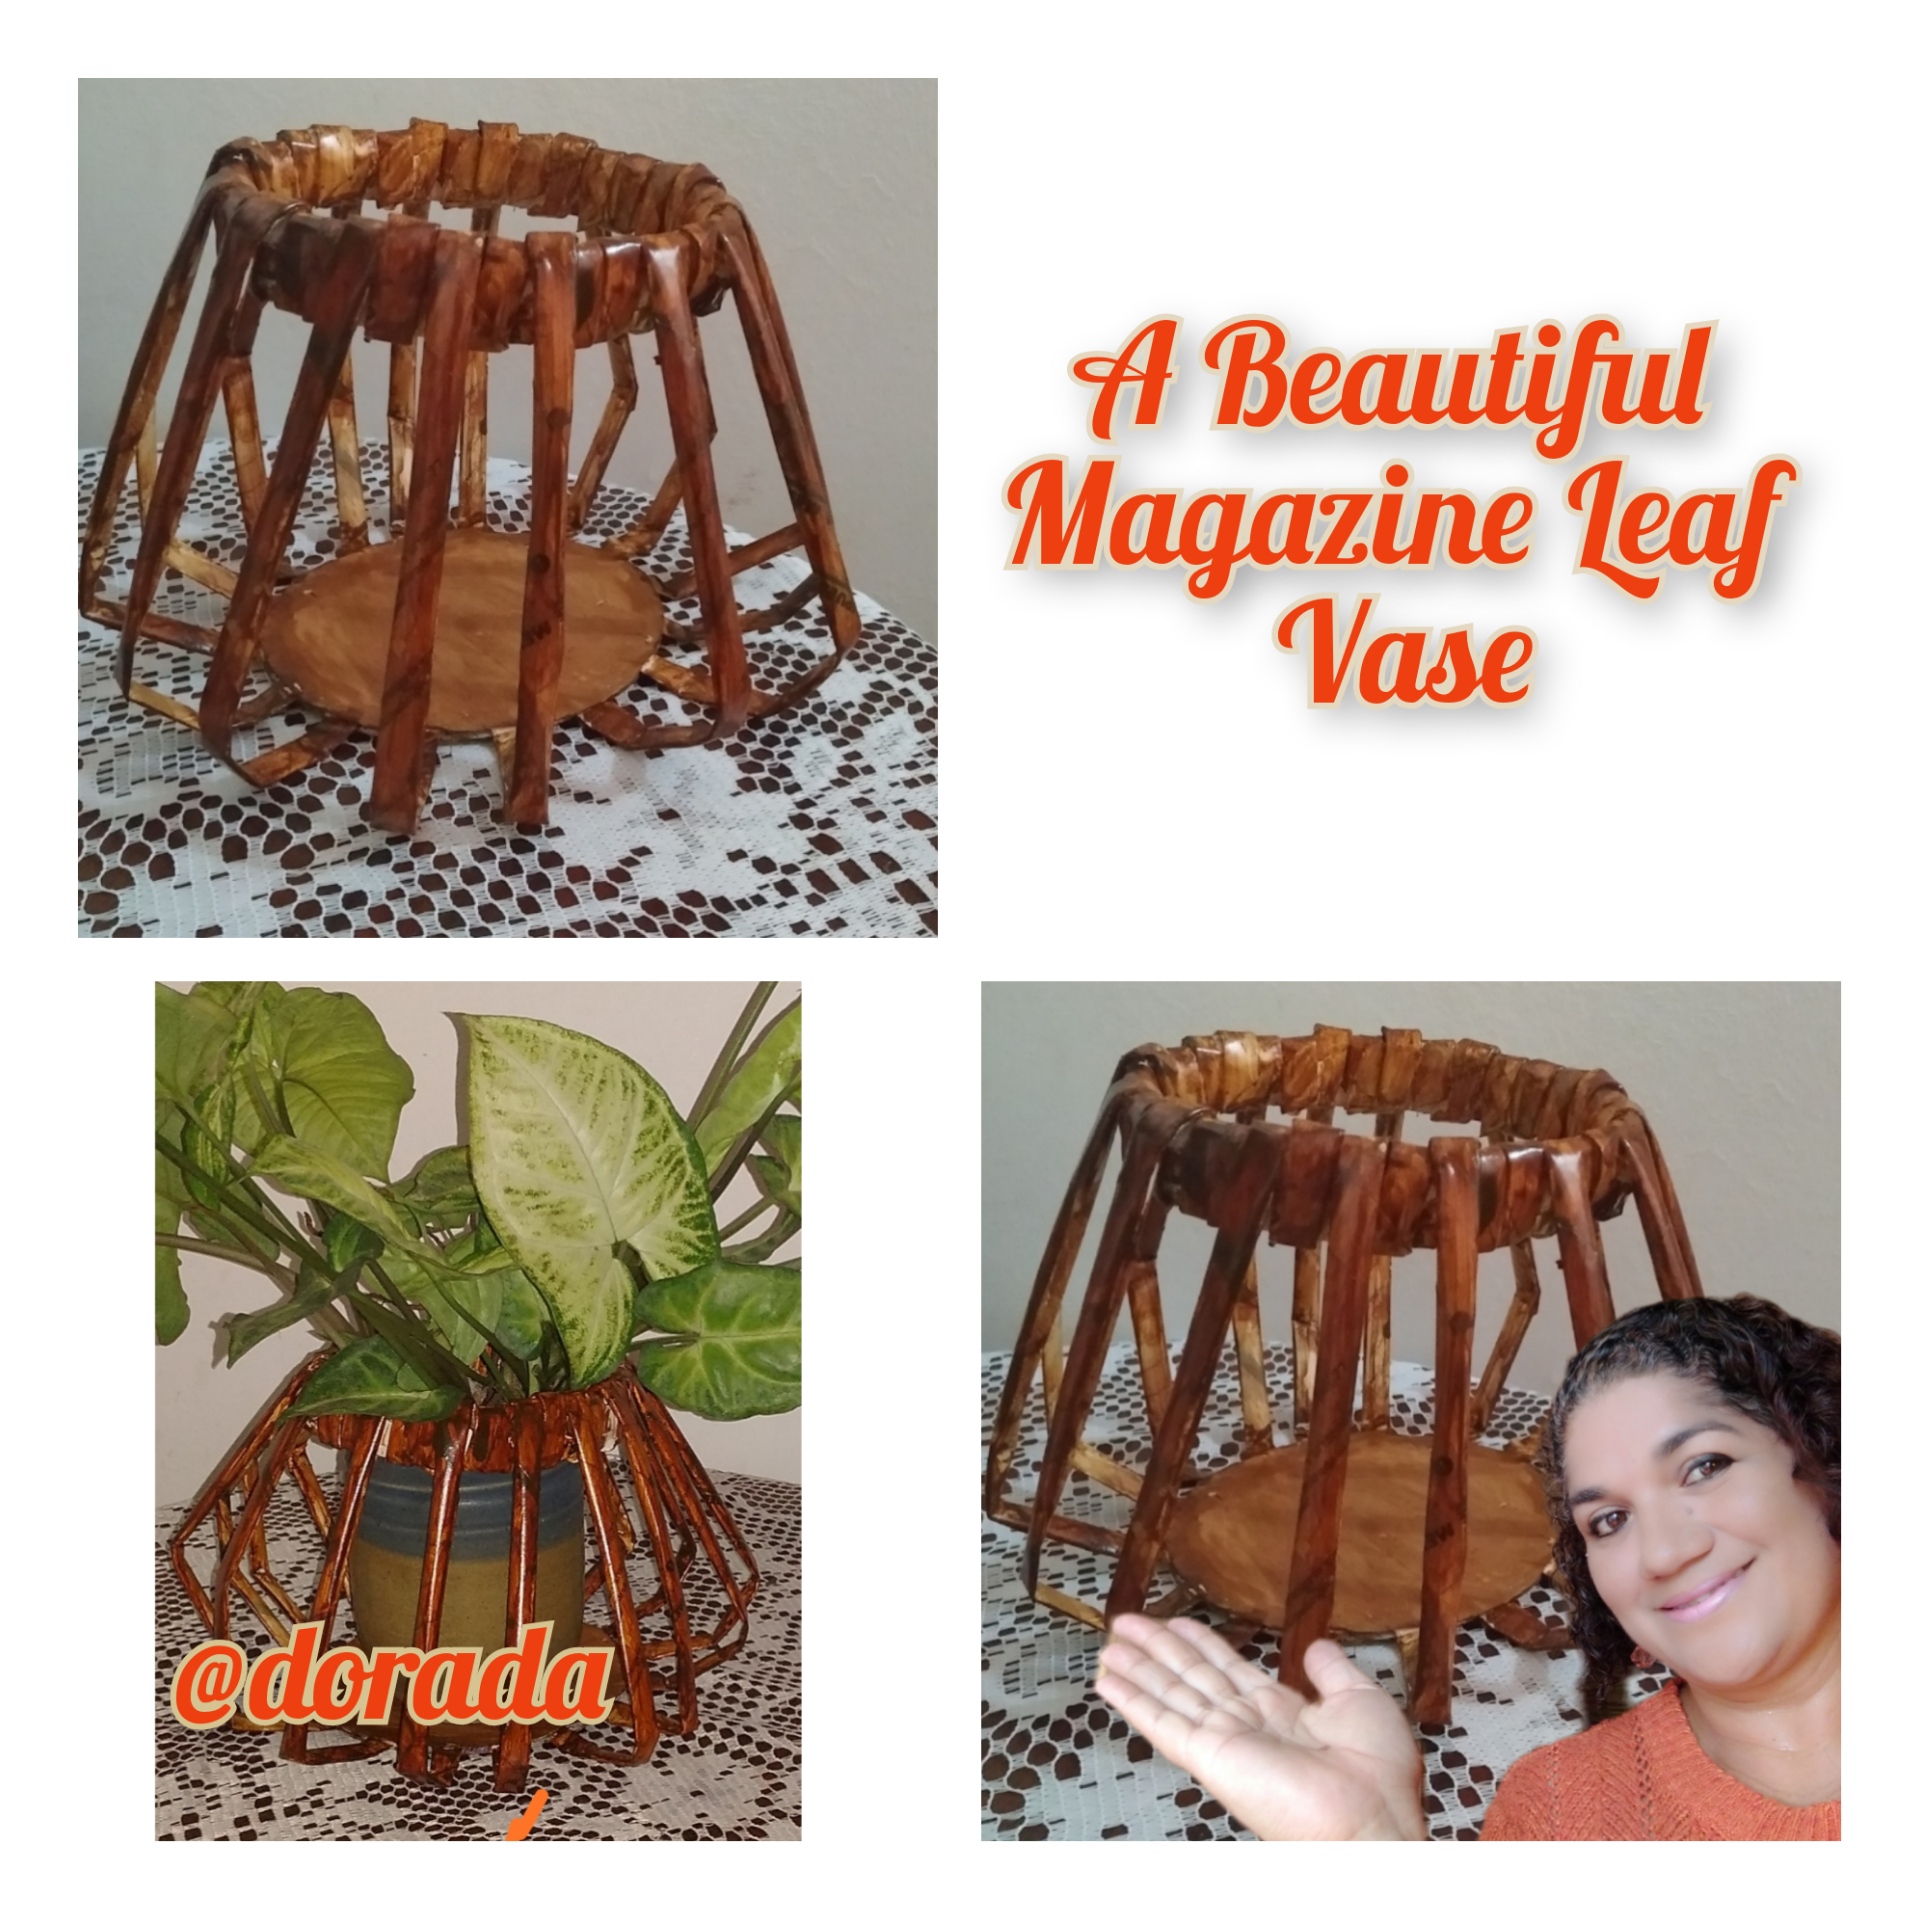
# Aquí pueden ver culminado mi  hermoso florero.


![IMG_20210617_203350.jpg](https://images.hive.blog/DQmbQaPqix75PoqZ7Bt2svZYFmN2Uu8weYNKeBnrJGHoMA7/IMG_20210617_203350.jpg)

![IMG_20210617_214606.jpg](https://images.hive.blog/DQmdJSCanmx7fidwmyfFi7Qv3sHnJZ5fMZbzt2KpCHcoXCR/IMG_20210617_214606.jpg)

![Separadores-35-768x129.png](https://images.hive.blog/DQmUs1MQZ6btmMHuTDQaDBcQS3hhqCxfZxyGuLkkqb9u3ML/Separadores-35-768x129.png)

# La Vida es Arte...
## Gracias por leerme! Nos encontraremos en el próximo Post @dorada.

Nota: fotos de mi autoría capturadas con dispositivo móvil Redmi 8.


# English Versión


# Hello friends, receive a warm greeting.
I have been recycling magazines for days, every time I do something with them I enjoy it more, it really is countless the crafts that we can do from a sheet of magazine. This time I have made a beautiful matero which gives a different touch and brightens our home, it really is a beautiful detail of simple lines but makes a difference. I hope you like it.</center>.

![IMG_20210617_221018.jpg](https://images.hive.blog/DQmcS6NwJN8SpQKFa69YLAFxK4VYo4VEkWwu7SA82n7hYD8/IMG_20210617_221018.jpg)


![Dividers-35-768x129.png](https://images.hive.blog/DQmUs1MQZ6btmMHuTDQaDBcQS3hhqCxfZxyGuLkkqb9u3ML/Separadores-35-768x129.png)


# Materials: 
Magazines
  white glue
  silicone
  scissors 
a stick or a skewer stick 
a paintbrush 
water-based antiquing agent 
cardboard

![IMG_20210617_211850.jpg](https://images.hive.blog/DQmfH6mERsjiY66po71Gowqs7QJ16yduvvKHcqG2Uzd4C1E/IMG_20210617_211850.jpg)

![Separators-35-768x129.png](https://images.hive.blog/DQmUs1MQZ6btmMHuTDQaDBcQS3hhqCxfZxyGuLkkqb9u3ML/Separadores-35-768x129.png)

# Step by Step
# Step 1.
The first thing I do are the paper sticks, for this I used a plastic wand, it is nothing special just that I found it and I liked it for this work, you can also use a metal wand or the sticks that are used for skewers. First fix the end of the leaf on the wand so that it does not come off, wrap it and when you reach the end, fix it with a dot of white glue, and repeat the procedure until you get the right amount. The amount to use will depend on the diameter of the base of the vase, in this case I used a total of 19 sticks.

![CollageMaker_20210617_212205699.jpg](https://images.hive.blog/DQmbwvznq68CJFXYZMoqWuEpNTWegJ4Cq5dqwQXtsh3HrEW/CollageMaker_20210617_212205699.jpg)

![Separators-35-768x129.png](https://images.hive.blog/DQmUs1MQZ6btmMHuTDQaDBcQS3hhqCxfZxyGuLkkqb9u3ML/Separadores-35-768x129.png)


# Step 2.
I cut out two cardboard circles, I used cardboard of different thicknesses , at the bottom I used a slightly stronger or sturdy cardboard, at the top a slightly softer cardboard. Then I proceeded to glue the wands on the cardboard using white glue, to achieve that the wands are equidistant, I divided the circumference into four parts to serve as a reference point. After gluing all the wands I covered them with the other circumference of cardboard, put white glue on it and fixed it.
![CollageMaker_20210617_212242369.jpg](https://images.hive.blog/DQmSDSx8EQMBdxYhxrM8m9gKDBLjeWne6qAx11ucKBoDvGX/CollageMaker_20210617_212242369.jpg)

![Dividers-35-768x129.png](https://images.hive.blog/DQmUs1MQZ6btmMHuTDQaDBcQS3hhqCxfZxyGuLkkqb9u3ML/Separadores-35-768x129.png)

# Step 3.
In this step I glued three paper sticks together and made a circumference with the diameter of a plastic container that I used to achieve a uniform shape. Then I began to glue the wands, when I glued half of the wands I removed the container, then I was finishing off the ends of the wands, folding inward and gluing the ends.

![CollageMaker_20210617_212335505.jpg](https://images.hive.blog/DQmTPkwiZQ9xswky41LiKQ2BGth7uvGnaicutbq6KxzZzwu/CollageMaker_20210617_212335505.jpg)

![Separators-35-768x129.png](https://images.hive.blog/DQmUs1MQZ6btmMHuTDQaDBcQS3hhqCxfZxyGuLkkqb9u3ML/Separadores-35-768x129.png)
# Step 4.
In this step I cut out the ends of the wands and then shaped the vase.
![CollageMaker_20210617_212408919.jpg](https://images.hive.blog/DQmREEJsemAK1vdtVyn2hz1ksMdSPfQ4N2hvtb4iWom4WQG/CollageMaker_20210617_212408919.jpg)


![Separators-35-768x129.png](https://images.hive.blog/DQmUs1MQZ6btmMHuTDQaDBcQS3hhqCxfZxyGuLkkqb9u3ML/Separadores-35-768x129.png)
# Step 5.

At this point I proceeded to paint the vase, for this I used water-based antiquing. I applied a coat covering the inside and outside, after drying I gave it a few touches.
![CollageMaker_20210617_212443866.jpg](https://images.hive.blog/DQmZgY8NETxX4RvnCNqRJNAneqw7P8xxKt2fiPPK4aZnBpd/CollageMaker_20210617_212443866.jpg)


![Dividers-35-768x129.png](https://images.hive.blog/DQmUs1MQZ6btmMHuTDQaDBcQS3hhqCxfZxyGuLkkqb9u3ML/Separadores-35-768x129.png)

# Here you can see my beautiful vase finished.


![IMG_20210617_203350.jpg](https://images.hive.blog/DQmbQaPqix75PoqZ7Bt2svZYFmN2Uu8weYNKeBnrJGHoMA7/IMG_20210617_203350.jpg)

![IMG_20210617_214606.jpg](https://images.hive.blog/DQmdJSCanmx7fidwmyfFi7Qv3sHnJZ5fMZbzt2KpCHcoXCR/IMG_20210617_214606.jpg)


![Separadores-35-768x129.png](https://images.hive.blog/DQmUs1MQZ6btmMHuTDQaDBcQS3hhqCxfZxyGuLkkqb9u3ML/Separadores-35-768x129.png)


# Life is Art..
## Thanks for reading me! See you in the next Post @dorada.

Note: photos of my authorship captured with Redmi 8 mobile device.
👍  , , , , , , , , , , , , , , , , , , , , , , , , , , , ,
properties (23)
authordorada
permlinkesp-eng-un-hermoso-matero-realizado-con-revistas-beautiful-vase-made-with-magazines
categoryhive-148441
json_metadata{"tags":["diyhub","build-it","crafts","created","spanish","ocd","tutorial"],"users":["dorada"],"image":["https://images.hive.blog/DQmbY6uWsC76KVb14M9EKmJfpBUJGFkwq9aG5Hn17wEMZGW/IMG_20210618_004404.jpg","https://images.hive.blog/DQmUs1MQZ6btmMHuTDQaDBcQS3hhqCxfZxyGuLkkqb9u3ML/Separadores-35-768x129.png","https://images.hive.blog/DQmfH6mERsjiY66po71Gowqs7QJ16yduvvKHcqG2Uzd4C1E/IMG_20210617_211850.jpg","https://images.hive.blog/DQmbwvznq68CJFXYZMoqWuEpNTWegJ4Cq5dqwQXtsh3HrEW/CollageMaker_20210617_212205699.jpg","https://images.hive.blog/DQmSDSx8EQMBdxYhxrM8m9gKDBLjeWne6qAx11ucKBoDvGX/CollageMaker_20210617_212242369.jpg","https://images.hive.blog/DQmTPkwiZQ9xswky41LiKQ2BGth7uvGnaicutbq6KxzZzwu/CollageMaker_20210617_212335505.jpg","https://images.hive.blog/DQmREEJsemAK1vdtVyn2hz1ksMdSPfQ4N2hvtb4iWom4WQG/CollageMaker_20210617_212408919.jpg","https://images.hive.blog/DQmZgY8NETxX4RvnCNqRJNAneqw7P8xxKt2fiPPK4aZnBpd/CollageMaker_20210617_212443866.jpg","https://images.hive.blog/DQmbQaPqix75PoqZ7Bt2svZYFmN2Uu8weYNKeBnrJGHoMA7/IMG_20210617_203350.jpg","https://images.hive.blog/DQmdJSCanmx7fidwmyfFi7Qv3sHnJZ5fMZbzt2KpCHcoXCR/IMG_20210617_214606.jpg","https://images.hive.blog/DQmcS6NwJN8SpQKFa69YLAFxK4VYo4VEkWwu7SA82n7hYD8/IMG_20210617_221018.jpg"],"app":"hiveblog/0.1","format":"markdown"}
created2021-06-18 04:42:21
last_update2021-06-19 01:23:21
depth0
children0
last_payout2021-06-25 04:42:21
cashout_time1969-12-31 23:59:59
total_payout_value6.048 HBD
curator_payout_value6.045 HBD
pending_payout_value0.000 HBD
promoted0.000 HBD
body_length9,601
author_reputation70,836,935,215,529
root_title"[ESP- ENG] Un Hermoso Matero Realizado con Revistas/Beautiful Vase Made with Magazines"
beneficiaries[]
max_accepted_payout1,000,000.000 HBD
percent_hbd10,000
post_id104,401,429
net_rshares28,527,230,632,967
author_curate_reward""
vote details (29)