#### Repository
- https://github.com/oclif/oclif
- https://github.com/webpack-contrib/webpack-serve
- https://github.com/sveltejs/svelte-loader
#### What Will I Learn?
- building custom CLI using [oclif][]
- using and configuring [webpack-serve][]
- using [Svelte][svelte] to serve incomplete HTML file. The purpose is to make the end-user think that they "just need to write HTML like file to serve the application"
#### Requirements
- Basic understanding of HTML and Typescript
- Basic understanding of Webpack configuration
- Some knowledge about CLI best practice
- Install [npm](https://www.npmjs.com/get-npm) or [yarn](https://yarnpkg.com/en/docs/install)
- Install some code-editor/IDE (VSCode or alike)
- A web browser that supports HTML5 and WebComponent
#### Difficulty
- Intermediate
#### Tutorial Contents
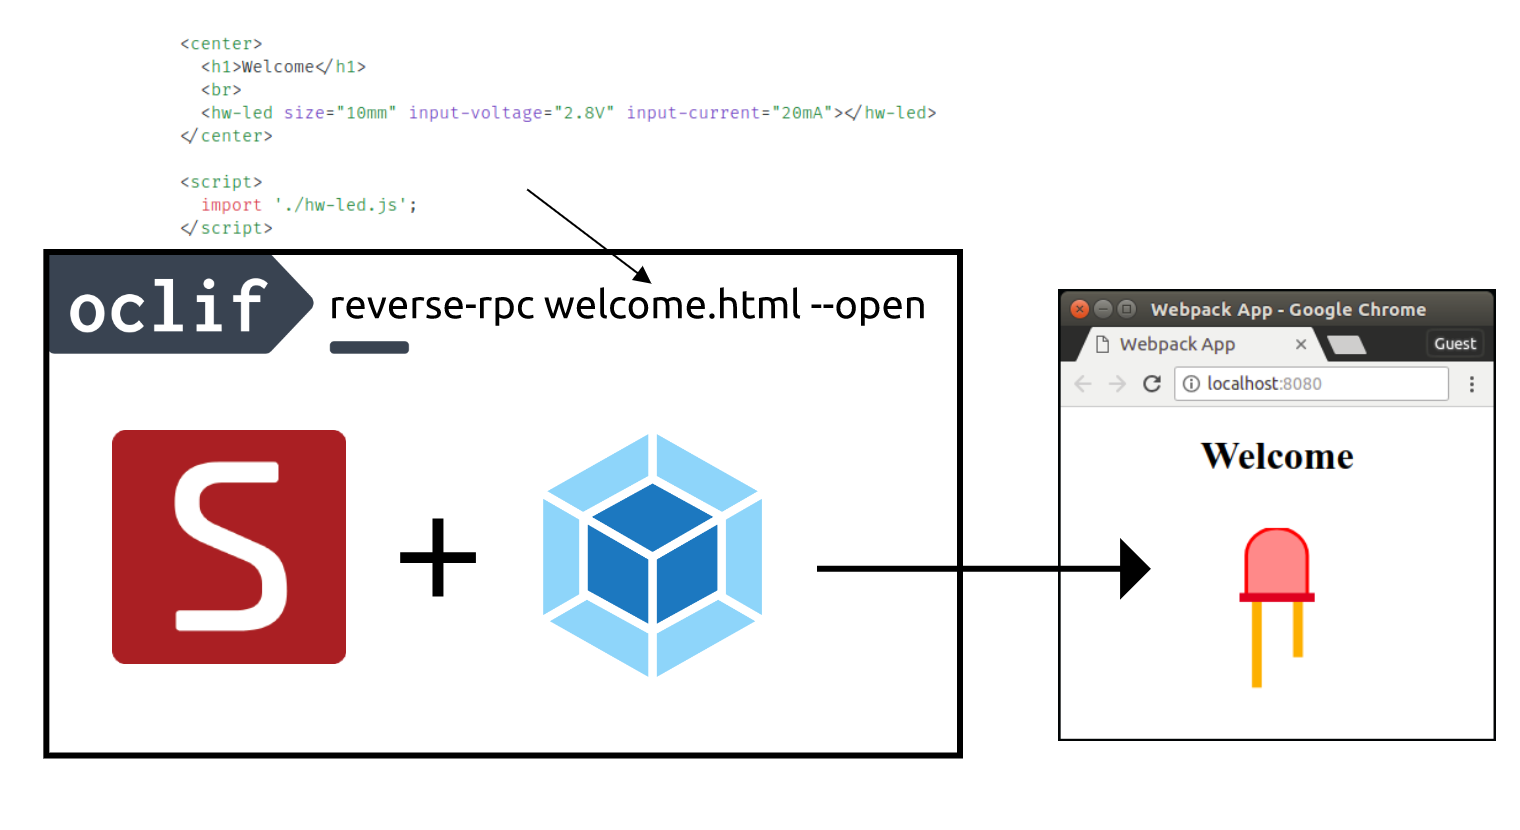
This tutorial series is about creating CLI app that can serve HTML like file and communicate via RPC with the difference that the caller is from the server. In other words, the user who uses the CLI app we are going to build can specify the RPC endpoints inside an HTML like file that the user wants to serve (this is why the title contain "Creating RPC Server on Web Browser"). In this first part we are going to create a custom CLI similar to [webpack][] that can serve part of incomplete HTML file (which transformed into a reactive Javascript created by [Svelte][svelte] compiler) using [oclif][], [webpack-serve][], and [svelte-loader][].
##### 🎉 Preparation
[Oclif][oclif] is an open source framework for building a command line interface (CLI) in Node.js. It provides a structure for simple to advanced CLIs, including documentation, testing, and plugins for adding new commands. With [oclif][] you can get up and running with your command line interface quickly, and focus on the implementation of the commands themselves<sup>[[1]][heroku oclif]</sup>. There are 2 different CLI types you can create with [oclif][], single-command and multi-command. In this tutorial, we will build single-command type CLI with the usage as shown below.
```console
$ reverse-rpc example/demo.html --open --cdn https://unpkg.com/vue
content `demo.html` is being served
$ reverse-rpc example
content in folder `example` is being served
```
Based on the above example usage, we name our CLI app `reverse-rpc` that can serve HTML file by providing either a folder that contains HTML file or provided the full path of HTML file we want to serve as arguments. Notice that it also have optional flags `--open` for opening the web browser and `--cdn` to inject javascript file from CDN url. If you have installed [oclif][] globally in your file system, you can start scaffolding the CLI app as shown below.
<div><sub><a href="https://oclif.io/docs/single.html">Setup Single-command CLI in oclif</a></sub><blockquote>
```console
oclif single example-rpcserver-on-browser
```
<sup>Step 1. tell oclif to generate project for Single-command CLI</sup>
```console
_-----_ ╭──────────────────────────╮
| | │ Time to build a │
|--(o)--| │ single-command CLI with │
`---------´ │ oclif! Version: 1.8.5 │
( _´U`_ ) ╰──────────────────────────╯
/___A___\ /
| ~ |
__'.___.'__
´ ` |° ´ Y `
? npm package name (reverse-rpc)
? command bin name the CLI will export (reverse-rpc)
? description (PoC for changing behaviour of front-end application via CLI)
? author (yourname)
? version 0.0.0
? license MIT
? node version supported >=8.0.0
? github owner of repository (https://github.com/OWNER/repo) (yourname)
? github name of repository (https://github.com/owner/REPO) (example-rpcserver-on-browser)
? optional components to include
◉ yarn (npm alternative)
◯ mocha (testing framework)
◉ typescript (static typing for javascript)
◉ tslint (static analysis tool for typescript)
◯ semantic-release (automated version management)
```
<sup>Step 2. filling yeoman generator prompt</sup>
```console
sudo npm link
sudo rm package-lock.json
```
<sup>Step 3. link command to the file system</sup>
</blockquote></div><br/>
Under the hood, `oclif` subcommand `single` will execute [yeoman][] generator to scaffold our app (the strange ASCII art is [yeoman][] mascot). After, the [yeoman][] generator kicks in, it will give a set of questions of how we want to scaffold the project. In this case, we want to have and use `yarn`, `typescript`, and `tslint` in our project toolchain. Notice that we remove `package-lock.json` because executing `npm link` will also generate package-lock.json and that file is not needed since we choose `yarn` as the alternative.
<center><img src="https://cdn.steemitimages.com/DQmYGAuq4choPfZjP99A4fJ8QcFpsTTivHr8LJmUgxu97Nk/Figure%201.gif"/></center><center><sub>Figure 1 - executing generated Single-command CLI by oclif</sub></center>
Figure 1 demonstrates how the end-user can operate our CLI app. Actually under the hood, executing `npm link` will create [symlink][] of `./bin/run` to the filesystem so that we can execute it like when we execute CLI app installed from the package manager (see Code Change 1.2). After we have done generating our project using `oclif` CLI, we can begin to define the usage of the CLI app that we are going to build. Write the description, flags/options, and arguments as shown in Code Change 1.
<div><sub><a href="https://github.com/DrSensor/example-rpcserver-on-browser/commit/deab0deec5aa13734c82227744d7650b46181a59?diff=unified#diff-f41e9d04a45c83f3b6f6e630f10117fe">Code Change 1</a> - defining flags/options and arguments</sub><blockquote>
```ts
class ReverseRpc extends Command {
static description = 'Reverse RPC that can control webapp behavior'
static flags = {
cdn: flags.string({char: 'c', description: 'inject script tag of URL of the external script (CDN)', multiple: true}),
open: flags.boolean({description: 'open browser on start'})
}
static args = [
{
name: 'content',
description: '.html file or directory that contain .html component that want to be served.' +
'\nDefault is `index.html` if it\'s directory',
required: true,
}
]
async run() {
const {args, flags} = this.parse(ReverseRpc)
}
}
```
<sup>1. defining description, flags, and args in <a href="https://github.com/DrSensor/example-rpcserver-on-browser/blob/deab0deec5aa13734c82227744d7650b46181a59/src/index.ts">./src/index.ts</a></sup>
<img src="https://cdn.steemitimages.com/DQmYfYhgXSzSmSFnNgjfAASh8t7K7PFRYm2bVWKudaB8Pi2/Code%20Change%201.gif" alt="result" /><br/>
<sup>2. how the cli will look like when using `--help`</sup>
</blockquote></div><br/>
In Code Change 1.1, we give our CLI app a summary about description, [arguments][oclif args], and also all available [options][oclif flags] that end-user can set (the result are shown in Code Change 1.2). Here we give the end-user 2 available options they can set, namely `--cdn` (with shorthand `-c`) and `--open`. We also make flag `--cdn` can be declared more than once (`multiple: true`) in case the end-user wants to inject multiple CDN (e.g https://unpkg.com/vue + https://unpkg.com/react). Notice that we can also test it by executing `./bin/run` as shown in Code Change 1.2 in case you don't want to use `npm link`.
##### 🚸 Integrating [webpack-serve][] with [Oclif][oclif]
When doing web development in old-school ways, we need to make HTML file first (normally the filename is `index.html`) and link all our javascript code to there via `<script>` tag. Also, when we made a change we need to refresh our web browser manually (or restart it if you use any *web-server* like [nginx][] or [http-serve][]). To solve this problem, we can use [webpack-serve][] to serve our application.
[Webpack-serve][webpack-serve] is a development server specifically for running and serving a project via [webpack][]. Some said [webpack-serve][] is the continuation of [webpack-dev-server][] because of the architectural problem it has<sup>[[2]][webpack-serve whoop-ass]</sup>. With [webpack-serve][] (with other plugins and loaders), we don't have to create `index.html` file and refresh the browser when there is a change (thanks to [hot reload][hmr] feature).
<div>Todo this, we need to install webpack, webpack-serve, and some plugin with its typescript declaration via this command:
```console
yarn add webpack-serve webpack html-webpack-plugin
yarn add @types/webpack @types/webpack-serve @types/html-webpack-plugin --dev
```
<div><br/>
Notice that we also install [html-webpack-plugin][] so that we don't need to create `index.html`. Since [webpack-serve][] also provide the javascript API, we can integrate it with [oclif][] framework in our application. To make this work, we also need to declare the default webpack config and set the entry point as shown in Code Change 2.
<div><sub><a href="https://github.com/DrSensor/example-rpcserver-on-browser/commit/3fd49d758a4b584be951a20fc9da8e9ae778130a?diff=split">Code Change 2</a> - integrating `webpack-serve` to `oclif`</sub><blockquote>
```js
document.body.innerHTML = "<h1>It Works 🎉</h1>"
```
<sup>1. <a href="https://github.com/DrSensor/example-rpcserver-on-browser/blob/3fd49d758a4b584be951a20fc9da8e9ae778130a/public/index.js">./public/index.js</a> as the entry point</sup>
```ts
import path = require('path')
import webpack = require('webpack')
import HtmlWebpackPlugin = require('html-webpack-plugin')
export default {
mode: 'development',
entry: path.resolve(__dirname, '../public/index.js'),
plugins: [
new HtmlWebpackPlugin()
]
} as webpack.Configuration
```
<sup>2. <a href="https://github.com/DrSensor/example-rpcserver-on-browser/blob/3fd49d758a4b584be951a20fc9da8e9ae778130a/src/webpack.config.ts">./src/webpack.config.ts</a> as the default webpack config</sup>
```ts
import serve = require('webpack-serve')
import config from './webpack.config'
.️
.
.
async run() {
const {args, flags} = this.parse(ReverseRpc)
serve({
config,
open: flags.open
})
}
```
<sup>3. in <a href="https://github.com/DrSensor/example-rpcserver-on-browser/commit/3fd49d758a4b584be951a20fc9da8e9ae778130a?diff=split#diff-f41e9d04a45c83f3b6f6e630f10117fe">./src/index.ts</a>, run webpack-serve with the default webpack config</sup>
</blockquote></div><br/>
In Code Change 2.1, we create a dummy javascript file as the entry point for [webpack][] to be bundled and served by specifying it in the default webpack config as shown on Code Change 1.2. An [entry point][webpack entry] indicates which module webpack should use to begin building out its internal dependency graph, webpack will figure out which other modules and libraries that entry point depends on (directly and indirectly). **Without entry point, [webpack-serve][] will not run**.
[HtmlWebpackPlugin][] is a [webpack][] plugin to simplifies creation of HTML files to serve your webpack bundles. The plugin will generate an HTML5 file for you that includes all your webpack bundles in the body using `script` tags. That's why we need to inject `html-webpack-plugin` in our default webpack config as shown in Code Change 2.2.
In Code Change 2.3, we call `webpack-serve` in function `async run()` so that when the CLI app is called, the `webpack-serve` will also get executed. We also need to assign the default webpack `config` (Code Change 2.2) to the `webpack-serve`. Notice that here we begin to utilize `flags.open` to make our CLI app automatically open as shown in Figure 2.
<center><img src="https://cdn.steemitimages.com/DQmYFqurxFkqRhooQoi5Ejrmm2ZTyfLwb89wuNSd81pynSH/Figure%202.gif" alt="Code Change 2 result"/></center><center><sub>Figure 2 - result of Code Change 2</sub></center><br/>
##### ✨ Serving HTML like file
[Svelte][svelte] is a compiler that works behind the scenes to turn component files into reactive and optimized JavaScript, either for SPA or SSR. Like Vue, [svelte][] promotes the concept of single-file components which is just a `.html` file. This way we can write components using HTML, CSS, and JavaScript like we write normal static HTML page without a framework. With this uniqueness, we can trick the end-user so that they "just write HTML like file to serve the application" 🤥. Since we use [webpack-serve][] which accept webpack config, we can use a webpack loader for [svelte][] called [svelte-loader][] that we can install and use as shown in Code Change 3.
<div><sub><a href="https://github.com/DrSensor/example-rpcserver-on-browser/commit/91524675ec62a8b2572af0f6ed7865dcbc9744df?diff=split">Code Change 3</a> - installing and using svelte-loader</sub>
<blockquote>
```console
yarn add svelte svelte-loader
```
<sup>1. installing svelte-loader</sup>
```ts
module: {
rules: [{
test: /\.html$/,
use: [{
loader: 'svelte-loader',
options: {hotReload: true}
}]
}]
},
```
<sup>2. using svelte-loader in the default webpack config</sup>
</blockquote></div><br/>
A [loader][webpack loader] is a node module that exports a function which called when a resource should be transformed. In Code Change 3, [svelte-loader][] is called when a file with extension `.html` should be transformed into reactive Javascript by [svelte][] compiler. Notice that we need to enable `hotReload` option in [svelte-loader][] so that it only updates an element that we change it's properties as shown in Figure 4. This feature will save the development time for end-users.
<div><sub><a href="https://github.com/DrSensor/example-rpcserver-on-browser/commit/863a5f1086d01128745f609fbe19c28635e783dd?diff=split">Code Change 4</a> - implementing argument CONTENT</sub>
<blockquote>
```js
const createApp = App => new App({ target: document.querySelector('body') });
if (args.content.IS_FILE)
createApp(require(args.content.FILE).default)
else {
const importAll = r => r.keys().forEach(key => createApp(r(key).default));
importAll(require.context('@/', true, /\.html$/));
}
```
<sup>1. dynamic <a href="https://github.com/DrSensor/example-rpcserver-on-browser/commit/863a5f1086d01128745f609fbe19c28635e783dd?diff=split#diff-c5e5c9f7d2ea648faea28f338649ca97">entry point</a> based on if CONTENT is file or folder</sup>
```ts
resolve: {
modules: [path.resolve(__dirname, '../node_modules')]
},
```
<sup>2. in <a href="https://github.com/DrSensor/example-rpcserver-on-browser/commit/863a5f1086d01128745f609fbe19c28635e783dd?diff=split#diff-a1381e4ae5753b98670679b3fa8e780c">default webpack config></a>, assign default value for path for where to seek the installed npm packages</sup>
```ts
import WebpackConfigure from './dynamic-config'
import config from './webpack.config'
.
.
.
async run() {
const {args, flags} = this.parse(ReverseRpc)
const webpack = new WebpackConfigure(config)
webpack.changeContext(args.content)
serve({
config: webpack.config,
open: flags.open
})
}
```
<sup>3. In <a href="https://github.com/DrSensor/example-rpcserver-on-browser/commit/863a5f1086d01128745f609fbe19c28635e783dd?diff=split#diff-f41e9d04a45c83f3b6f6e630f10117fe">`.src/index.ts`</a>, define the usage of helper class that do dynamic webpack configuration</sup>
</blockquote></div><br/>
In Code Change 4, we begin to implement argument CONTENT so that the users can explicitly define which file or folder they want to serve. Because argument CONTENT accepts either file or folder, we need a mechanism to instantiate the component (`.html` file) that the user has to write which depend on if the argument CONTENT is a file or a folder as shown in Code Change 4.1. [Webpack][] has a feature called [dynamic require][] and [dynamic loading][] which can import/require certain module based on certain condition or parameter. We use global constant `args.content.IS_FILE` to determine if we should use `require(args.content.FILE)` (dynamic require) if it's file or `require.context('@/', true, /\.html$/)` (dynamic loading) if it's a folder. After that, we attach the component (svelte `.html`) into tag `<body>` using helper function `createApp(App: svelte.Component)` (see [Svelte Guide][understanding svelte] for more info).
In Code Change 4.3, we change the webpack config that used by `webpack-serve` from the default config into dynamic one based on arguments and flags we provide. Before we implement the helper class that does the dynamic configuration, in Code Change 4.2, we first set the default path where the webpack should look for the node packages. After defining the usage (Code Change 4.3), we can now implement helper class for configuring webpack dynamically as shown in Code Change 5.
<div><sub><a href="https://github.com/DrSensor/example-rpcserver-on-browser/blob/863a5f1086d01128745f609fbe19c28635e783dd/src/dynamic-config.ts">Code Change 5</a> - implement arguments CONTENT</sub>
<blockquote>
```ts
export default class WebpackConfigurator {
private _config: webpack.Configuration = {}
get config() {return this._config}
constructor(config: webpack.Configuration) {this._config = config}
```
<sup>📋 1. mechanism to copy default config into local context</sup>
```ts
changeContext(content: string) {
const {resolve, dirname, basename} = path
let contentDir = resolve(content)
const globalConstant = {
'args.content.IS_FILE': check(content).isFile(),
'args.content.FILE': '"@/index.html"'
}
```
<sup>🐣 2. initialize default value for webpack.context and its global constant</sup>
```ts
if (check(content).isFile()) {
contentDir = dirname(resolve(content))
globalConstant['args.content.FILE'] = `"@/${basename(content)}"`
} else {
const node_modules = resolve(contentDir, 'node_modules')
this._config.resolve!.modules!.push(node_modules)
}
```
<sup>🌿 3. change config value based on if CONTENT is file or folder</sup>
```ts
this._config.plugins!.push(new webpack.DefinePlugin(globalConstant))
this._config.resolve!.alias = {'@': contentDir}
this._config.context = contentDir
}
}
```
<sup>🐥 4. assign the final value into the real webpack config</sup>
</blockquote></div><br/>
In Code Change 5, we begin to implement a helper class called `WebpackConfigurator` that does the dynamic configuration for [webpack][]. First, we set a constructor with an argument that accepts webpack config format then copy it to the local context (`private _config`). We also create a getter for the `_config` to make it accessible but read-only. After we build a mechanism to copy the default config into a local context, we create a function called `changeContext(content: string)` with the purpose to change [webpack context][] so that the configuration is independent of CWD (current working directory). [Webpack context][webpack context] is the base directory (the default is CWD) for resolving entry points and loaders from the configuration.
To implement `changeContext` function, first, we need to define the default value for webpack context (buffered in `contentDir`) and the global constant we want to use at the entry point (Code Change 4.1). In this case, the default value for `args.content.FILE` is `"@/index.html"`. Notice that we need to add a quotation mark (`"`) because when the entry point got transpiled, the global constant will be replaced as it's (no automatic string conversion). After that, we can define the webpack context based on if the argument CONTENT is a file or not as shown in Code Change 5.3. Then in Code Change 5.4, we assign that value into the `private _config`. Notice that we also need to define the alias to trick webpack so that we can traverse a file in the content folder using `require.context` as shown in Code Change 4.1. Finally, we can get the result as shown in Figure 3.
<center><img src="https://cdn.steemitimages.com/DQmdNaf93NqGjMSN2PFUxyXaDd16kDtvTpomP5bUeNkx9uc/Figure%203.gif" alt="demo"/></center><center><sub>Figure 3 - serving HTML like file (Svelte component) with hot-reload enable</sub></center><br/>
##### 📦 Injecting script from CDN url (`--cdn`)
In some case when we want to use webcomponent, we need to use some external script to make the webcomponent work. Take an example from [my other tutorial][] which compile Vue SFC (single file component) file into webcomponent, we need `Vue` being globally available on the page which means we need inject Vue from CDN url into `<head>` or `<body>`. To automate this, we can use [html-webpack-externals-plugin][] to inject external Javascript into `<head>` or `<body>` as shown in Code Change 6.
<div><sub><a href="https://github.com/DrSensor/example-rpcserver-on-browser/commit/14f90e317a1a8d776c100700a153478b514da5e1?diff=unified#diff-32915c724f97a7faa3d68b940dff1f79">Code Change 6</a> - implement helper function for injecting external Javascript</sub>
<blockquote>
```console
yarn add html-webpack-externals-plugin
```
<sup>1. installing 'html-webpack-externals-plugin'</sup>
```ts
import HtmlWebpackExternalsPlugin = require('html-webpack-externals-plugin')
.
.
.
addCDNPlugin(urlList: string[]) {
const {parse} = path
const cdnName = (url: string) => parse(url).name.substr(0, parse(url).name.indexOf('.'))
const externalScriptPlugin = new HtmlWebpackExternalsPlugin({
externals: urlList.map(
url => ({
module: cdnName(url),
entry: {
path: url,
type: 'js'
}
} as HtmlWebpackExternalsPlugin.External)
)
})
this._config.plugins!.push(externalScriptPlugin)
}
```
<sup>2. implement `addCDNPlugin` function</sup>
```ts
webpack.changeContext(args.content)
webpack.addCDNPlugin(flags.cdn)
serve({
config: webpack.config,
open: flags.open
})
```
<sup>3. using `addCDNPlugin` function</sup>
</blockquote></div><br/>
In Code Change 6, we begin to implement helper function which inject multiple `<script src="cdnUrl">` tags to the `<body>` using `html-webpack-externals-plugin`. We create the helper function called `addCDNPlugin` which accept a list of url as the argument (because the CLI accept multiple `--cdn` flags). Because there is a possibility that the url provided by the end-user doesn't contain `.js` extension (e.g https://unpkg.com/vue), we need to specify it explicitly in the `entry.type` as shown Code Change 6.2. Finally, we can use `addCDNPlugin` function as shown in Code Change 6.3.
<div><sub><a href="https://github.com/DrSensor/example-rpcserver-on-browser/tree/14f90e317a1a8d776c100700a153478b514da5e1/example/led-webcomponent">Example 1</a> - example usage for serving a project that use webcomponent</sub>
<blockquote>
```html
<h1>hw-led demo</h1>
<center>
<hw-led size="10mm" input-voltage="2.8V" input-current="20mA"></hw-led>
</center>
<script>
import './hw-led.js';
</script>
```
<sup>1. demo.html</sup>
```path
example/
└── led-webcomponent
├── demo.html
├── hw-led.js ⬅️ webcomponent for <hw-led>
└── hw-led.0.js ⬅️ webassembly to compute led brightness
```
<sup>2. project structure</sup>
```console
reverse-rpc example/led-webcomponent --open --cdn https://unpkg.com/vue
```
<sup>3. serve using the CLI</sup>
</blockquote></div><br/>
After we have finished implementing a feature to inject external script from CDN url (`--cdn`), we can begin writing example application that we want to serve as shown in Example 1. In this case, we serve an application that uses webcomponent generated by [my other tutorial][] which illustrating how real LED works. Because this webcomponent relies on `Vue` being globally available on the page, we need to provide CDN url for Vue using `--cdn` flag as shown in Example 1.3. The result can be seen in Figure 4.
<center><img src="https://cdn.steemitimages.com/DQmXJpXmaocn1MsreKxt5UToV7sGmQn8xGmRuwizeguT9vn/Figure%204.gif" alt="demo"/></center><center><sub>Figure 4 - example usage for serving a project that use "hw-led" webcomponent</sub></center><br/>
##### Conclusion
In summary, we are able to create a custom CLI that can serve an incomplete HTML file (thanks to [Svelte][svelte] compiler). There are some use cases that I can think of this recipe useful for:
1. Creating a parser for XML configuration file (e.g [railML](https://en.wikipedia.org/wiki/RailML) or maybe infrastructure as a code in XML format) that can be visualized in the Web Browser. To achieve this we need to create WebComponent collection correspond to the predefined format.
2. Creating a parser for XML configuration file that is programmable. The syntax could be:
```xml
<aws-instance name="russian-roulette deep-learning infrastructure">
<ec2-t2 model="nano" count="{random(20,100)}"/>
{#if ec2.t2['nano'].count == 20}
<ec2-p2 model="16xlarge" count="{ec2.t2.count * 5}"/>
{:else}
<ec2-p2 model="xlarge" count="{ec2.t2.count / 10}"/>
{/if}
</aws-instance>
```
--------------------------------------------------------------------
<p><sub>
###### Parting words
This series of tutorials are more like PoC that I do in my spare time for my personal project to create a definition file for hardware schematics. Since I occasionally contracted to work on web development and realize how much difference the development tools between JS and other languages, I decided to use some tools that already available in web development process, like using [webpack][]. I estimate that this series will consist of 4 parts:
| | Topic | Goal | Progress |
| ------ | ------------------------------------------------------------------ | ------------------------------------------------------------------------------ | ------------------------------- |
| part 1 | more focus on how to utilize oclif, webpack, and svelte | create custom CLI to serve incomplete HTML like file | complete |
| part 2 | focus on how Tab Browser event works | listen Tab Browser activity in the server | example code & diagram is ready |
| part 3 | begin to enter the main topic "Creating RPC Server on Web Browser" | create reverse RPC through WebSocket | example code is ready |
| part 4 | focus on how to create a proxy that bridge between Unix Socket and WebSocket | end-user can create Rust program to control the HTML like file via Unix Socket | scratching my head 😆 |
</sub></p>
#### References
1. [Heroku - Open Sourcing oclif, the CLI Framework that Powers Our CLIs][heroku oclif]
2. [webpack-serve Up a Side of Whoop-Ass][webpack-serve whoop-ass]
3. [Understanding Svelte Components][understanding svelte]
[understanding svelte]: https://svelte.technology/guide#understanding-svelte-components
[heroku oclif]: https://blog.heroku.com/open-cli-framework
[webpack-serve whoop-ass]: https://medium.com/@shellscape/webpack-serve-up-a-side-of-whoop-ass-42a838b351a2
[dynamic require]: https://github.com/webpack/docs/wiki/context#dynamic-requires
[dynamic loading]: https://survivejs.com/webpack/techniques/dynamic-loading/
[ws handleUpgrade]: https://stackoverflow.com/a/46797200
#### Curriculum
- Related Tutorials
- [Create Vue Component based on Real Hardware #LED - part 3: use Rust as the computational layer][my other tutorial]
<blockquote>
This is the first part of this series, next part will be:
"Creating RPC Server on Web Browser - part 2: Listen browser Tab activity on the server side"
</blockquote>
[my other tutorial]: https://steemit.com/utopian-io/@drsensor/create-vue-component-based-on-real-hardware-led-part-3-use-rust-as-the-computational-layer
#### Proof of Work
https://github.com/DrSensor/example-rpcserver-on-browser
[vue webcomponent]: https://cli.vuejs.org/guide/build-targets.html#web-component
[webpack loader]: https://webpack.js.org/contribute/writing-a-loader/
[webpack context]: https://webpack.js.org/configuration/entry-context/#context
[webpack entry]: https://webpack.js.org/concepts/#entry
[oclif args]: https://oclif.io/docs/args.html
[oclif flags]: https://oclif.io/docs/flags.html
[hmr]: https://webpack.js.org/concepts/hot-module-replacement/
[symlink]: https://en.wikipedia.org/wiki/Symbolic_link
[svelte]: https://svelte.technology
[svelte-loader]: https://www.npmjs.com/package/svelte-loader
[oclif]: https://oclif.io/
[yeoman]: http://yeoman.io/
[http-serve]: https://www.npmjs.com/package/http-server
[nginx]: https://www.nginx.com
[webpack]: https://webpack.js.org/
[webpack-serve]: https://github.com/webpack-contrib/webpack-serve
[webpack-dev-server]: https://github.com/webpack/webpack-dev-server#project-in-maintenance
[html-webpack-plugin]: https://github.com/jantimon/html-webpack-plugin
[html-webpack-externals-plugin]: https://www.npmjs.com/package/html-webpack-externals-plugin
[HtmlWebpackPlugin]: https://webpack.js.org/plugins/html-webpack-plugin/