#### Repository
https://github.com/python
#### What Will I Learn?
- Login system
- Use session to manage user data
#### Requirements
- Basic Python
- Install Python 3
- Install Flask
#### Resources
- Python - https://www.python.org/
- Flask - http://flask.pocoo.org/
- Peewee http://docs.peewee-orm.com/en/latest/
- Sqlitebrowser https://sqlitebrowser.org/
#### Difficulty
Basic
### Tutorial Content
Hi everyone, I will continue the tutorial series on creating social media applications using Flask. In the previous tutorial, I made a register and base layout feature for our application. in this tutorial, I will continue to make new features in this tutorial. I will make the login feature and page layout, as a reminder we have made us have a ***User, Message, and Relationship*** database.
### Login feature
I will add a new feature, namely the login function in the application. for that, we need to create new pages in our application. In the previous [tutorial](https://steemit.com/utopian-io/@duski.harahap/make-social-media-applications-with-flask-3-register-user-and-store-data-in-sqlite-base-layout-1548251533384) we created a base layout for each of our pages.
- **Login layout**
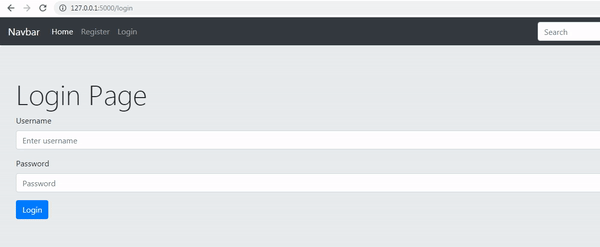
I will make the login feature for that I will make the page first, the page is not much different from the *register page*. for more details, we can see the code below:
**login.html**
```
{%extends "layout.html" %} // extend the base layout
{% block body %} // start of block base layout
<div class="jumbotron">
<h1 class="display-4">Login Page</h1>
<form action="{{url_for('loginPage')}}" method="POST" autocomplete="off"> // We will post data in function loginPage
<div class="form-group">
<label for="username">Username</label>
<input type="text" class="form-control" id="username" name="username" aria-describedby="emailHelp" placeholder="Enter username">
</div>
<div class="form-group">
<label for="password">Password</label>
<input type="password" class="form-control" id="password" name="password" placeholder="Password">
</div>
<button type="submit" class="btn btn-primary">Login</button>
</form>
</div>
{% endblock %} // end of block base layout
```
- On the login page I will create a login form that will be directed to the action ```action="{{url_for('loginPage')}}"```. We haven't created the ```loginPage()``` function. The templating system in the flask is very tight. This page will also have an ***error*** function that has been used but has not been made, for that we just go to **app.py** to make routing.
<br>
- **Add login function in base layout**
We will also use the ```loginPage()``` function on the base layout page. we have created the navbar now we need to direct the URL to the **loginPage** function.
**app.py**
```
<div class="collapse navbar-collapse" id="navbarSupportedContent">
<ul class="navbar-nav mr-auto">
<li class="nav-item active">
<a class="nav-link" href="{{url_for('showHomePage')}}">Home <span class="sr-only">(current)</span></a> // Home route
</li>
<li class="nav-item">
<a class="nav-link" href="{{url_for('registerPage')}}">Register</a> // Register Route
</li>
<li class="nav-item">
<a class="nav-link" href="{{url_for('loginPage')}}">Login</a> // Login route
</li>
</ul>
<form class="form-inline my-2 my-lg-0">
<input class="form-control mr-sm-2" type="search" placeholder="Search" aria-label="Search">
<button class="btn btn-outline-success my-2 my-sm-0" type="submit">Search</button>
</form>
</div>
```
- In the previous tutorial, we have two routing, namely ***home*** ```url_for('showHomePage')``` and ***register*** ```url_for('registerPage')```. Now we will add new routing, namely routing logins with the ```loginPage()``` function.
<br>
- **Create a login system**
At the top, we have created a login page and in that page, we use the ```loginPage()``` function in this section we will create a login system, For more details, we can see the code below:
**app.py**
```
@app.route('/login', methods =['GET', 'POST']) // Define route and methods
def loginPage(): // the function that will be run is routing /login
return render_template('login.html') // render template login.html
```
- In the ```loginPage()``` function only to render the login page, I have not entered other functions. I will test whether the ***loginPage*** function is working properly. the following results:
to run the application we can run the ```flask run``` or for more details, we can see in the picture taken.

And the following is the result of the login page that we have created
<br>
### User Login
In this section I will create a login system in this application, what we have to pay attention to is in this login system I will use a ***session*** to detect the user who is logged in. to use the session function we need to import it first and use the secret key. For more details, we can see this code:
**Import Session and Use secret key**
```
import datetime
from flask import Flask, render_template, request, url_for, redirect, session // import session
from peewee import *
from hashlib import md5
app = Flask(__name__)
app.secret_key = 'so_secret_123456789' // Create you own secret key
```
The ```app.secret_key``` that we create is a collection of random strings that are useful for session hashing systems.
<br>
Now we will start creating the login system. We will receive a post from the username and password and then hashing the password that the user typed. The following is the complete code:
**app.py**
```
@app.route('/login', methods =['GET', 'POST']) // Define routing and methods
def loginPage(): // the function that we will use in routing '/login'
if request.method == 'POST' and request.form['username']:
try:
hashed_pass = md5(request.form['password'].encode('utf-8')).hexdigest()
user = User.get(
(User.username == request.form['username']) &
(User.password == hashed_pass)
)
except User.DoesNotExist:
return 'User doesnt Exist'
else:
auth_user(user)
return redirect(url_for('showHomePage'))
return render_template('login.html')
```
- First, we have to filter whether the method used by the user is POST ```request.method == 'POST'``` and we will also see if the user enters the username ``` request.form['username']```. If it's ***true*** then we will enter the login process.
- **Hashing password:** If you followed the previous [tutorial](https://steemit.com/utopian-io/@duski.harahap/make-social-media-applications-with-flask-3-register-user-and-store-data-in-sqlite-base-layout-1548251533384) then you would know below when registering in our application, we have to hash the user password, so likewise when we want to login we have to do the password typed by the user.
- **Try and Exception:** I will use the try and exception functions to log in, in the try section we will check whether the user has registered or not. We have made an abstraction from our user model, so to get data in the user table we can use the ```get()``` function, but we need to pass two parameters to make sure the user is valid.
```
User.get(
(User.username == request.form['username']) &
(User.password == hashed_pass)
)
```
- If it turns out the user is invalid then we can get a response in the ***Exception*** section and return ```return 'User doesn't Exist'```.
```
except User.DoesNotExist:
return 'User doesnt Exist'
```
- ```username``` and ```password``` are key columns that exist in the user table that we created in the previous tutorial. We can look back at the user of the model:

- And if the user is valid then the next step is I will start the session, I will create a function ```auth_user(user)``` that sets the session using the function.
<br>
- **Create ```auth_user ()``` function**
Now we will create a function to handle the session when the user is logged in, This function I will pass the result parameter from ```User.get()``` so that we can get information about the user who is logged in.
**app.py**
```
def auth_user(user):
session['logged_in'] = True
session['user_id'] = user.id
session['username'] = user.username
```
- In this section I will define the variables of the session that we will save, I will save the session variable ```['logged_in'] = True```, So we can detect whether the user is logged_in with **true** value.
- ```session['user_id'] = user.id``` and ```session['username'] = user.username``` I will save the user_id variable based on the user that we get in ```User.get()```.
<br>
- **Create ```get_current_user ()``` function**
Then I will create a function to detect and get the data of the user who is logged in.
```
def get_current_user():
if session.get('logged_in'):
return User.get(User.id == session['user_id'])
```
- What I did for the first time in this function was to check whether the user was logged in, we could check it based on the variable that we saved in the session that is ***logged_in*** and if the results are correct we will take the user data again ```return User.get(User.id == session['user_id'])```.
- Then we use the function after the ```auth_user()```:
```
auth_user(user)
current_user = get_current_user()
return redirect(url_for('showHomePage', user = current_user.username))
```
- And then we pass the username to the showHomePage function so we can print out the username on the homepage ```url_for('showHomePage', user = current_user.username)```.
- Then because we will pass the username on showHomePage we need to change the ```showHomePage() ```function in order to accept the parameters, we will change it like this.
```
@app.route('/<user>')
def showHomePage(user):
return render_template('index.html', user = user)
```
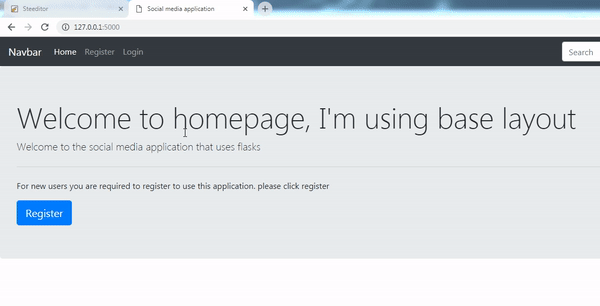
```showHomePage()``` function will accept ***user*** parameters. we will also change our template to print out user data in the **index.html**.
**index.html**
```
{%extends "layout.html" %}
{% block body %}
<div class="jumbotron">
<h1 class="display-4">Welcome to homepage {{user}}, I'm using base layout</h1> // Print out the username
<p class="lead">Welcome to the social media application that uses flasks</p>
<hr class="my-4">
<p>For new users you are required to register to use this application. please click register</p>
<a class="btn btn-primary btn-lg" href="{{url_for('registerPage')}}" role="button">Register</a>
</div>
{% endblock %}
```
If there is no error, I will demonstrate the results as follows:
.gif)
As we have seen in the picture above, we managed to create a login system using sessions on the flask and we also managed to retrieve user data and detect users who were logged in, just a few of my tutorials this time, hopefully, you will be useful.
#### Curriculum
- **Web development with flask**
[Web developement with python #1 : Flask initialization and Routing system](https://steemit.com/utopian-io/@duski.harahap/web-developement-with-python-1-flask-initialization-and-routing-system-1542726589553)
[Web development with python #6 : Use flash message and combine it with framework boostrap](
https://steemit.com/utopian-io/@duski.harahap/web-development-with-python-6-use-flash-message-and-combine-it-with-framework-boostrap-1544447442022)
<br>
- **File in python**
[File in python #1 : Read file and Write file and Modes file](https://steemit.com/utopian-io/@duski.harahap/file-in-python-1-read-file-and-write-file-and-modes-file-1545409995736)
<br>
- **Class-based views**
[Tutorial Django - Class based views #1 : Installation and configuration Django, Using a template system](https://steemit.com/utopian-io/@duski.harahap/django-tutorial-class-based-view-1-installation-and-configuration-django-using-a-template-system-1545837443632)
<br>
**Create Aplication social media with flask**
[Make social media applications with Flask #1: Design database and initial structure, Following and follower functions](
https://steemit.com/utopian-io/@duski.harahap/make-social-media-applications-with-flask-1-desaign-database-and-initial-structure-following-and-follower-functions-1547568096688)
[Make social media applications with Flask #2: System routing and Templating, Make user register](https://steemit.com/utopian-io/@duski.harahap/make-social-media-applications-with-flask-2-system-routing-and-templating-make-user-register-1547816234338)
[Make social media applications with Flask #3: Register user and Store data in SQLite, Base Layout](https://steemit.com/utopian-io/@duski.harahap/make-social-media-applications-with-flask-3-register-user-and-store-data-in-sqlite-base-layout-1548251533384)
#### Proof of work done
https://github.com/milleaduski/python-web-app