This guide is outdated unless you want to do it manually. You can use the Ark-Deployer for easier launching of your own Ark based chain now:
<https://blog.ark.io/ark-deployer-setup-guide-c10825ebb0e4>
This guide is to help you get setup with your own ARK bridgechain. It will focus on launching your own ARK clone…
blog.ark.io
This guide will explain you how to launch your own clone chain while avoiding all customization and extra steps.
The following topics are NOT included in this guide:
- Github Repository and it’s handling
- Customization of the blockchain parameters
- Adding extra delegate nodes
- Explorer Setup
- Desktop Client Setup
Please check other tutorials for the different elements to launch your own chain for real. This guide just intends to get a running own network to have a starting base for a project.
The entire guide assumes that we will create a new clone named jark. If you want to name it differently you will have to replace jark with your own name for the chain or user on each occurrence.
All the following lines mean commands that should be entered in the command line:
```
command
```
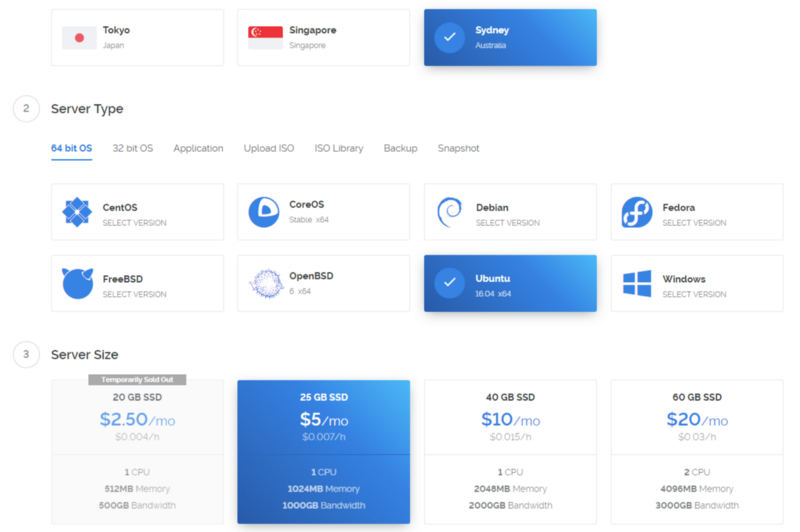
## Step 1: Create Virtual Private Server (VPS)
Create a new VPS from the provider of your choice.
Example: <http://www.vultr.com>
What you need is any Ubuntu 16.04 low specification VPS.
The deployment of the VPS server should only take a couple of minutes.
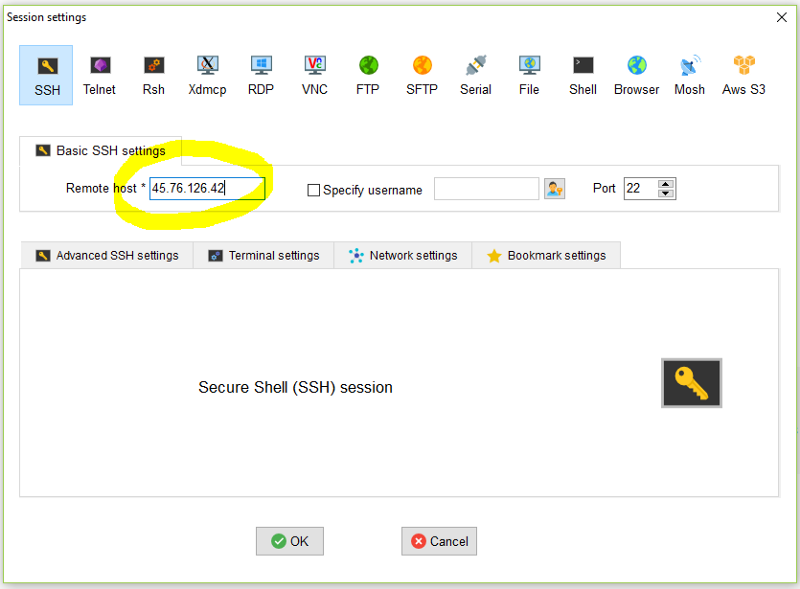
While the deployment is running you can install a Terminal of your choice.
I like MobaXterm. It is available for free.
MobaXterm free Xserver and tabbed SSH client for Windows
Free X server for Windows with tabbed SSH terminal, telnet, RDP, VNC, Xdmcp, Mosh and X11-forwarding. Portable or…
mobaxterm.mobatek.net
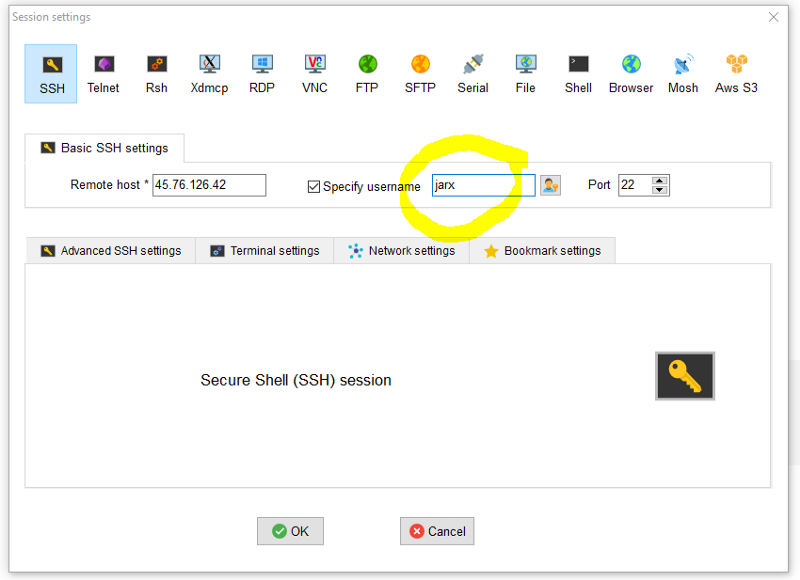
Once you can see the IP address on vultr you can prepare a new SSH session in MobaXterm.
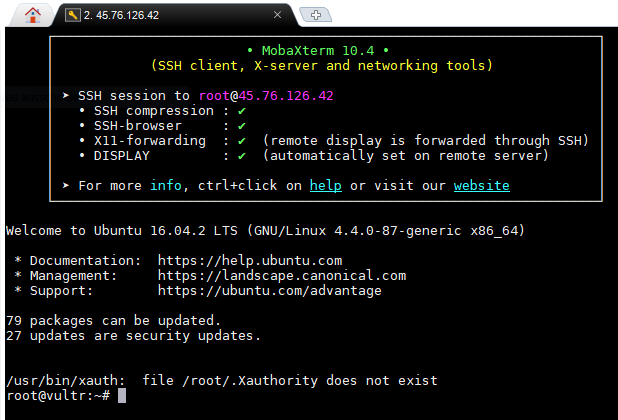
## Step 2: Create your own User
Now your VPS should be ready and you can login with root and the password from Vultr.
Now you can create a new user.
```
adduser jark
```
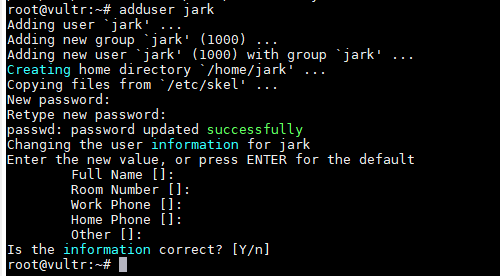
Grant the user sudo access rights:
```
usermod -a -G sudo jark
```
Logout:
```
exit
```
Now we login again with the new user.
## Step 3 Update ubuntu and install ark-node
We will now go through a series of commands to install an ark-node. If you are asked if you really want to do it please enter a Y.
Update:
```
sudo apt-get update && sudo apt-get dist-upgrade
```
Install required packages:
```
sudo apt-get install postgresql postgresql-contrib libpq-dev build-essential python git curl jq libtool autoconf locales automake locate zip unzip htop nmon iftop
```
Create a DB:
```
sudo -u postgres psql -c "CREATE USER $USER WITH PASSWORD 'password' CREATEDB;" >&- 2>&-
```
```
createdb ark_jark
```
Install the ark-node manually:
```
git clone https://github.com/ArkEcosystem/ark-node.git 2>/dev/null
cd ark-node
curl -o- https://raw.githubusercontent.com/creationix/nvm/v0.32.0/install.sh 2>/dev/null | bash
export NVM_DIR="$HOME/.nvm"
[ -s "$NVM_DIR/nvm.sh" ] && . "$NVM_DIR/nvm.sh"
nvm install 6.9.5 >>install.log
nvm use 6.9.5 >>install.log
nvm alias default 6.9.5
npm install -g npm
npm install forever -g
npm install grunt-cli -g
npm install libpq
npm install secp256k1
npm install bindings
npm install
```
Now you got an ark-node installed.
## Step 4: Create your own network
Open networks.json in an editor:
```
cd
cd ark-node
nano networks.json
```
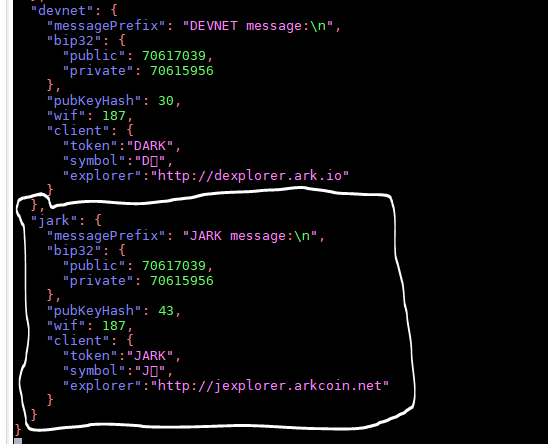
Add the following entry at the end of the file as shown above:
```
},
"jark": {
"messagePrefix": "JARK message:\n",
"bip32": {
"public": 70617039,
"private": 70615956
},
"pubKeyHash": 43,
"wif": 187,
"client": {
"token":"JARK",
"symbol":"JѦ",
"explorer":"http://jexplorer.arkcoin.net"
}
}
```
The commas are important and the brackets have to be correct as well.
Close and save:
```
Ctrl+X
Y
```
## Step 5: Adapt the config file creation script
Now we have to adapt the config generation file to launch our own chain.
```
cd
cd ark-node/tasks
nano createGenesisBlock.js
```
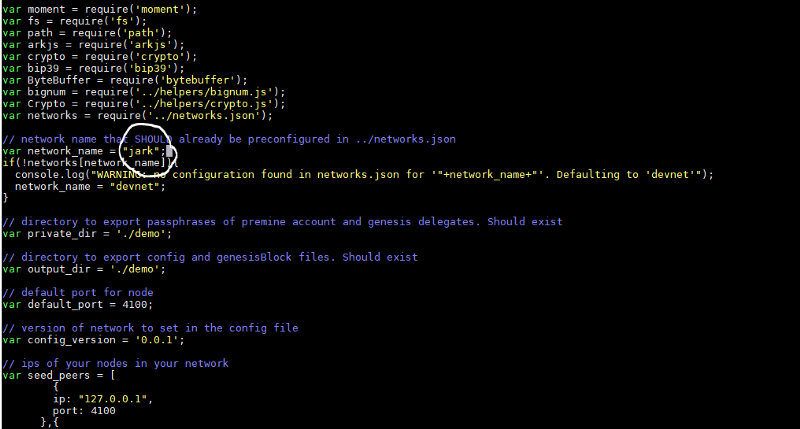
Replace the network name in order that it reads:
var network_name = “jark”;
Save the file:
```
Ctrl+X
Y
```
Create a directory “demo”:
```
mkdir demo
```
## Step 6: Create the new config files
Now it is time to create the new config files:
```
cd
cd ark-node/tasks
node createGenesisBlock.js
```

You can ignore the warning.
Now you can check the generated files in the demo folder:
```
cd demo
ls
```

## Step 7: Prepare Launching
Now we have to copy the config files for launching to our node directory:
```
cd ~/ark-node/tasks/demo
cp config.jark.autoforging.json ~/ark-node
cp config.jark.json ~/ark-node
cp genesisBlock.jark.json ~/ark-node
```
## Step 8: Launch our new chain
Launching is simple:
```
cd
cd ark-node
forever start app.js --config config.jark.autoforging.json --genesis genesisBlock.jark.json
```
Check if it is running:
```
forever list
```

You have a running blockchain now.
## Step 9: Check API of your new node
You can now access your blockchain on your ip:
<http://45.76.126.42:4100/api/peers/version>
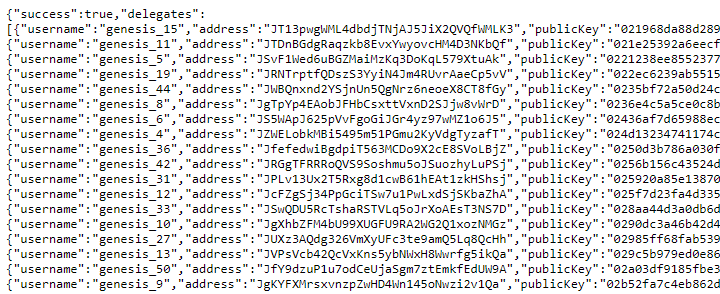
You can also list the genesis delegates which run your chain:
<http://45.76.126.42:4100/api/delegates>
If you want to access other information you can read the API documentation and try yourself:
<https://ark.brianfaust.me/>
If you want to get the passphrases and config files you can all find them here:
```
cd ~/ark-node/tasks/demo
ls
```
Launching an own chain is really simple.
## Additional things to try out
Here are some things you can do next:
- Create your own fork of ark-node and adapt it:
<https://github.com/ArkEcosystem/ark-node>
- Customization of the blockchain parameters:
<https://github.com/ArkEcosystem/ark-node/blob/development/helpers/constants.js>
- Adding extra delegate nodes to your network
- Setup an explorer to browse your chain:
<https://github.com/ArkEcosystem/old-ark-explorer>
- Add a new network to your desktop client and create transactions.
The passphrase of the wallet with 21MM is in the demo folder.
- Adapt the clone creation script to your needs:
<https://github.com/ArkEcosystem/ark-node/blob/development/tasks/createGenesisBlock.js>
## Final words
I hope I could help you with this guide.
The short version can be found here:
<https://github.com/Jarunik/ark-node-guide>
That is it. You made it to the end.
Jarunik
<https://arkcoin.net>| author | jarunik |
|---|---|
| permlink | launch-your-own-ark-clone-chain |
| category | crypto |
| json_metadata | {"tags":["crypto","cryptocurrency","blockchain","technology","ark"],"image":["https://steemitimages.com/DQmXWdLg6a4yNoJbqVXuJDPG91xvKxac7zuj27mqBTcZL4k/lyoc-01.png","https://steemitimages.com/DQmUp3HuSga5iKwnLWY632hzUgEnDq86ewMUoLwu2vLCEWf/lyoc-02.png","https://steemitimages.com/DQmZJGzb2uKtvNPxozFGXLgui6csLR1t8GWEme7jXj5WPv3/lyoc-03.png","https://steemitimages.com/DQmedzyopLKJm9NPHWEEJQKpbVnrF7Uic4vor4h9d6J2Hor/lyoc-04.png","https://steemitimages.com/DQmSbzWAmzJac97wwBHvf35vfrYo41t34pAnXAhw6JLdYgD/lyoc-05.png","https://steemitimages.com/DQmVrqGtdx4vNQUUx9v8eXFqmrVaVPewkeeedbzmJMVyign/lyoc-06.png","https://steemitimages.com/DQmQ7vt2tYmhGDi2t8nz9JyLWPC7KBWgyC7eTgkPyPtmBYU/lyoc-07.png","https://steemitimages.com/DQmcNXL1gKKYgLusZteYxifZaJPdmdZjD9RRmarWb9i6bGe/lyoc-08.png","https://steemitimages.com/DQmczCidysGqCerfXDcveRjAPa6cAsxNDCEhV2ZS7qsiNJK/lyoc-09.png","https://steemitimages.com/DQmdYw1pF66b1umixy7Hr9LZD4eu6UeX4e9SVojXv4j7AQF/lyoc-10.png","https://steemitimages.com/DQmS5D5xFqGwZ45KH8NzCg58aszh9H5QBmVdR6LzS87f5ea/lyoc-11.png","https://steemitimages.com/DQmeHRxrtcywjhzSEqQ9EoJpMmH4Ppp88JcTLyqqBC7RDym/lyoc-12.png"],"links":["https://blog.ark.io/ark-deployer-setup-guide-c10825ebb0e4","http://www.vultr.com","http://45.76.126.42:4100/api/peers/version","http://45.76.126.42:4100/api/delegates","https://ark.brianfaust.me/","https://github.com/ArkEcosystem/ark-node","https://github.com/ArkEcosystem/ark-node/blob/development/helpers/constants.js","https://github.com/ArkEcosystem/old-ark-explorer","https://github.com/ArkEcosystem/ark-node/blob/development/tasks/createGenesisBlock.js","https://github.com/Jarunik/ark-node-guide","https://arkcoin.net"],"app":"steemit/0.1","format":"markdown"} |
| created | 2018-04-16 19:36:21 |
| last_update | 2018-04-16 19:36:21 |
| depth | 0 |
| children | 0 |
| last_payout | 2018-04-23 19:36:21 |
| cashout_time | 1969-12-31 23:59:59 |
| total_payout_value | 0.000 HBD |
| curator_payout_value | 0.000 HBD |
| pending_payout_value | 0.000 HBD |
| promoted | 0.000 HBD |
| body_length | 7,579 |
| author_reputation | 16,657,654,981,962 |
| root_title | "Launch your own Ark clone chain" |
| beneficiaries | [] |
| max_accepted_payout | 1,000,000.000 HBD |
| percent_hbd | 10,000 |
| post_id | 50,437,188 |
| net_rshares | 1,239,686,613 |
| author_curate_reward | "" |
| voter | weight | wgt% | rshares | pct | time |
|---|---|---|---|---|---|
| jarunik | 0 | 513,110,661 | 100% | ||
| tkachenko | 0 | 58,656,175 | 100% | ||
| bocha | 0 | 72,787,728 | 100% | ||
| kabanchik | 0 | 52,176,535 | 100% | ||
| kayukinasash | 0 | 51,206,880 | 100% | ||
| dementevnikitaov | 0 | 57,397,329 | 100% | ||
| pakhomovegorakr | 0 | 64,120,237 | 100% | ||
| vikysik1305 | 0 | 370,231,068 | 100% |