<div class="text-justify">
<div align="Justify">
<div class="pull-right">https://files.peakd.com/file/peakd-hive/javiss/AK9PBqfRoGxo7h7LjbiYApSZmf9WJp2r2ge3BXnfJcCvKdrRPyw4NvSR7Tvvtji.png</div>
# Introduction:
Hello Splinterlands friends and family! 👋
This week, as part of the [Splinterlands Social Media Challenge](https://peakd.com/hive-13323/@splinterlands/splinterlands-social-media-challenge-skqc1b), I wanted to talk about one of the strongest battle strategies out there that might not be known to everyone yet. 🤫 It's not an everyday spam strategy since it requires certain rulesets or units to make it work.
I also bring two battles as examples where I used this strategy successfully, and we can review them together. 💪 I think both battles are pretty cool and really showcase how powerful this strategy can be! 🎯

## The Power of Triage and Double Strike Combo ⚔️💉
As the title points out, in this post, we are going to talk about the [Triage](https://splintercards.com/abilities.php?ab=26) + [Double Strike](https://splintercards.com/abilities.php?ab=17) combo. 💥 This is technically a fairly new interaction that we haven't seen before, and it can also work with other abilities like Repair (with Elias). 🛠️
<div class="pull-right">
https://images.hive.blog/200x0/https://files.peakd.com/file/peakd-hive/javiss/23tvcMb2sxyEYUqttxex2a7cLG7KyKSMCfYZTBxdYD6eqEw26mwYz81fcBcpdhdVjtYWs.png
</div>
<div class="pull-left">
https://images.hive.blog/200x0/https://files.peakd.com/file/peakd-hive/javiss/23uFHG84PqEZArwTiCMnrK51NBNT1q7va2hooLNX9VR9Dwoe2oKtTvTXwnD2cCGDwFwZH.png
</div>
Currently, the only way to make this strategy work is by using [Tofu](https://splintercards.com/rebellion_core_eternal-tofu) + any monster with the Double Strike ability. ⚔️ So far, I've found success using Drybone Raider and Grund, but you can certainly use any other Double Strike monster available for the life, earth, or neutral splinters. 🌿⚔️ The upcoming promo monster Delya is a good example! 👀
---
## Why This Combo Is So Powerful 💪
So, why is this strategy actually so powerful? 🤔
To answer this question, let's first understand what both abilities actually do:
| Ability | Description |
| --- | --- |
|  <br> | Heals the friendly back-line unit that has taken the most damage by one-third of its max health (rounded down, with a minimum of 2 HP). 💉 |
|  <br> | This unit attacks twice each round. ⚔️ |
<div class="pull-left">
https://files.peakd.com/file/peakd-hive/javiss/23zkjuRCux9GQHd2SA3JTaoo9ewdBvhwUoeNNRyivdojmm2MnyjZUv4rht5XA4roo9AQP.png
</div>
### Synergy: The Healing Power of Triage 💚
Triage and Double Strike synergize really well because Triage can *proc* twice in the same round since the unit attacks twice each round. That's an *insane* amount of healing per turn! 💯
Triage is a valuable ability that keeps your backline alive, and the units with Triage are generally support units that don’t carry a lot of damage. This dynamic changes when you use the summoner Tofu to give Triage to a big damage dealer, essentially turning that unit into a support/tank/damage dealer hybrid beast. 🛡️💥
---
## Strategy Considerations 🧠
<div class="pull-center">
It's important to notice that both units I used to test this strategy—Drybone Raider and Grund—are melee https://files.peakd.com/file/peakd-hive/saydie/23u65BPKcVCB11xhoEYJeWqzyFaFbEFyYqwk7944bmDKimFnAoNqWX5t6xp4ArWTf3iyD.png units meaning they can take damage from abilities like Thorns. 🌵 Remember that this strategy only works with Tofu as your Summoner, so its very likely your opponent will use Tofu as well. However, this isn't too much of a concern since your unit will heal back most of the damage taken from Thorns due to the Triage ability. 🔄💚
</div>
<br>
<br>
<div class="pull-left">
<img src="https://files.peakd.com/file/peakd-hive/javiss/23xKp7jZWrJ7owezEnYYwecTDSsCuudKkZZernXTaTKF8qajRzV95FyBG37GqqgTQ8N8a.png" alt="$1">
</div>
### The Scavenger Advantage 🏋️♂️
Lastly, but certainly not least, let’s remember that Tofu also grants [Scavenger](https://splintercards.com/abilities.php?ab=37) to the selected unit. Scavenger increases the unit’s health pool by 1 each time any unit dies. 💀➡️❤️
---
## Why This Combo Works Perfectly 🌟
All these factors combine to create an incredible synergy! 🔥
- You buff a heavy damage dealer with *double healing* (Triage) for both themselves and their team. 💉💪
- Scavenger makes the unit more tanky, increasing its health with every death on the battlefield. 🛡️📈
- As turns go by, your unit's health pool grows, meaning Triage will heal *more* with each passing turn. 🌀❤️
In short, this combo turns a high-damage monster into a nearly unkillable support/tank hybrid with increasing healing potential as the battle progresses! 🏆💯

## When Should We Use This Strategy? 🤔
Lastly, I want to talk a little bit about when this strategy will work best. As I pointed out in the introduction, this is not a "spam and win" strategy, but rather an amazing strategy when certain conditions are met. ✅
Mainly, there are **two key requirements** that need to happen for this strategy to be viable:
### 1. High Mana Match 💥
First, we need a high mana match. Since this strategy relies on using very strong damage dealers like Grund or Drybone Raider, which cost 9 and 12 mana respectively, we’ll need a match with at least **40 mana** to make this work efficiently. 💪⚔️
### 2. Specific Rulesets 📜
Secondly, we're going to need **one of four possible rulesets** to make this strategy work. Since the only monsters with Double Strike are melee monsters, this strategy can only be used when a ruleset allows melee monsters to attack from the backline. 🛡️⚔️
Currently, there are four possible rulesets where you can use this strategy effectively:
| Ability | Description |
|------------------|--------------------------------------------------------------------------------------------------|
|  | **Super Sneak**: All melee units gain the Sneak ability, allowing them to attack from the backline. 🦶💥 |
|  | **Equal Opportunity**: All units gain Opportunity, enabling them to target the enemy unit with the lowest health. 🎯 |
|  | **Melee Mayhem**: Melee units can attack from any position, making your Double Strike monsters more versatile. ⚔️🌪️ |
|  | **Maneuvers**: Melee units gain the Reach ability (Sneak and Opportunity override Reach). 🏹⚔️ |
---
By ensuring these two conditions are met—**high mana** and one of these **rulesets**—you can unleash the full potential of the Triage + Double Strike combo, turning the tide of the battle in your favor! 🎯🏆
Keep in mind that I mention Maneuvers as a viable option but in reality is the least viable option. If your tank dies fast your triage monster will just step to the first position and wont heal himself anymore. So, be mindful and use some sort of taunt in the backline and try to keep your main tank alive.

## Battle Examples 🛡️⚔️
Lastly, I'm going to present two matches that show exactly what I've been talking about. One will feature Grund, and the other will feature Drybone Raider:
### [Grund Battle](https://splinterlands.com?p=battle&id=sl_187f9df541b135a2e903843b1b96ea1d&ref=javiss)
<img src="https://files.peakd.com/file/peakd-hive/javiss/23tbRGGMZZW8i2A1MsSpoFkoTQsVCWRNUMmJCuibmccRRjraVAdm8zixYGyCcaNUFKxUG.png" alt="$1">
I'm not going to dive into a deep match analysis because the fun part starts right away, with Grund attacking twice and healing twice each turn! 💥 As I explained before, it was expected that the enemy would also use Tofu, meaning my Grund would take a lot of thorns damage. But it didn’t really matter because he healed each turn thanks to the Triage effect. 💉
Let's review the rulesets:
<br>
|| |
| --- | --- |
|<br><sup>Equal Opportunity</sup>|Opportunity is key. Without it, our strategy wouldn't work. In this case, giving Opportunity to Grund allowed him to attack from the backline and deal insane amounts of damage per turn. 🏹|
|<br><sup>Blood And Sunder</sup>|All units gain [Corrosive Ward](https://splintercards.com/abilities.php?ab=102). This ruleset is interesting for this fight since it also nullifies one of Tofu’s greatest abilities. By giving Triage and Scavenger to Grund, we leveraged the best possible combination. 🛡️|
|<br><sup>Stampede</sup>|Trample retriggers infinitely as long as the trampling unit keeps killing other units. Grund excels here because he has [Trample](https://splintercards.com/abilities.php?ab=58) built-in! 🐘|
<br>
You can watch the battle directly from the link above, but I’d like to highlight the best moments:
<img src="https://files.peakd.com/file/peakd-hive/javiss/23tbRgiYRSHMPaDAgQmdporwYVu5Ag5qVh2KbqG9paSC2aCHadCs2jX4vnMgVe5sHhHXj.gif" alt="$1">
### [Drybone Raider Battle](https://splinterlands.com/?p=battle&id=sl_0336200c5cd7d9808825c7bbbf1aa41b)
<img src="https://files.peakd.com/file/peakd-hive/javiss/23tbiXPAndatwxtC3iqGFPg1GfBksHaJCDgMwFqCA1zaLMAzgJdeM61vrFvW38auBs8SD.png" alt="$1">
This fight is similar to the last one but with a few key differences. Once again, it was expected for the enemy to use Tofu, and this time, Drybone Raider took a lot of damage from thorns but survived thanks to Triage proccing twice each turn. 💪
<br>
Let's review the rulesets:
|| |
| --- | --- |
|<br><sup>Super Sneak</sup>|We need a ruleset that allows melee monsters to hit from the backline. Without it, our strategy wouldn’t work. Sneak allowed Drybone Raider to attack from the backline and deal massive damage each turn. ⚔️|
|<br><sup>Five Alive</sup>|Up to five units can be used. This ruleset limits your team creation but makes this strategy possible in lower mana matches. 💡|
|<br><sup>Shades of Gray</sup>|Only Neutral Units may be used in battles. This is one of the most hated rulesets out there since it really messes up with your card pool and limits your team creation. ⚔️|
In this fight, the decision to give Drybone Raider *Triage* and *Scavenger* wasn’t as straightforward as before. I had two options: either buff my main damage dealer as I initially planned, or distribute *Corrosive Ward* to my weaker units to handle the enemy's Mantaroth armor. I decided to stick with my original plan and buff Drybone Raider, while my opponent opted for a different approach, granting their units *Divine Shield* and *Corrosive Ward*. 🛡️
<img src="https://files.peakd.com/file/peakd-hive/javiss/23tm9TmF4pAu5WSGvuEXP7S6BGttMTtYZqNGYYcWqR4uTv6vmzpfcBK8g2873s9FhK2qd.png" alt="$1">
At first, things didn’t look good. Hitting the enemy tank, Coeurl Lurker, proved to be tough—it was a slippery kill. By the time I finally breached the frontline, both my front and backlines were pretty much destroyed.
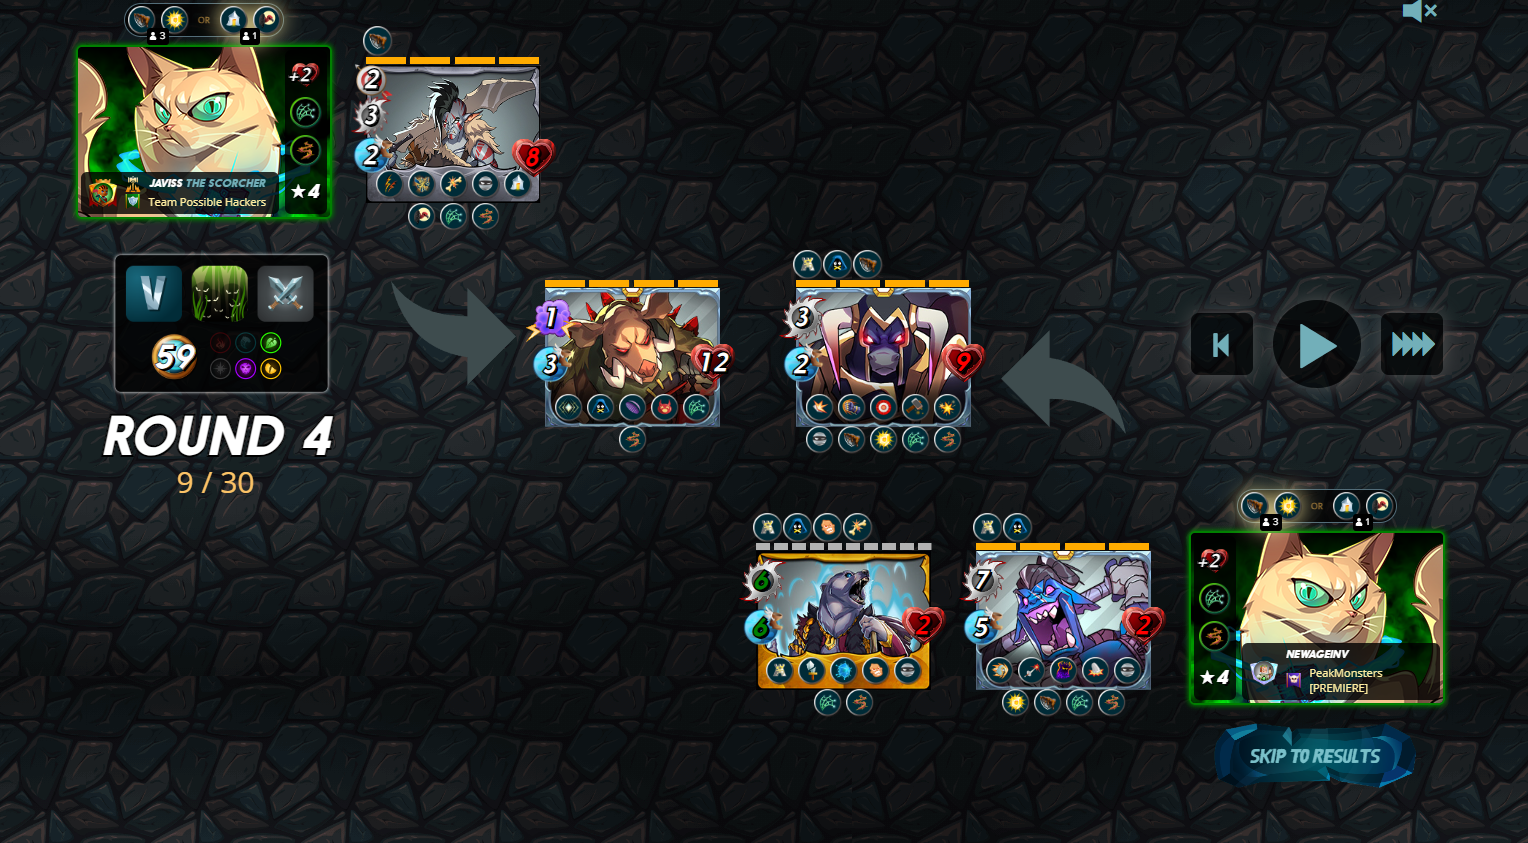
This is how the fight looked by Turn 3:
<img src="https://files.peakd.com/file/peakd-hive/javiss/23tkmzJS7Q6bUQpLibxEFa6V84X67xVDy3q3cJpimNEYyZt6BxvDK6nKce8VkiSguoMHq.png" alt="$1">
Luckily, my Runi was resurrected, but I was still left with only three monsters. Nalara Geinek wasn’t strong enough to make a big difference, and Runi, though revived, had already died once and had very little health left. Its purpose was mainly to debuff enemy magic attacks and land stuns, but unfortunately, the enemy didn’t pack any magic, and the stuns only triggered once. ⚡
By Turn 4, this was the battlefield:

As you can see, the enemy had more units left, but mine had more health. That was entirely due to Drybone Raider, who was healing my team nonstop. By the end of the fight, Drybone Raider was healing itself for 5 or 6 health points *twice* per turn! That’s 10 health recovered each turn—far more than most teams can deal in damage per turn. 💉💪
In both fights, mana wasn’t a limiting factor since they were high-mana matches.

## Conclusion 🎯🏆
<div class="pull-right">
https://files.peakd.com/file/peakd-hive/javiss/23zGcRrCTY9SpUcjsocxatQERYKTcompy5t5VUzPk2UYgmkufMoK1aa53A8YnXcmH8zbg.png
</div>
The synergy between **Triage** and **Double Strike** brings a unique twist to Splinterlands' strategy. By combining massive damage output with relentless healing, you're essentially turning a hard-hitting melee monster into a self-sustaining tank. 🛡️💥 This combination, made possible by **Tofu**, not only provides backline healing but also adds **Scavenger**, allowing your monster to grow stronger and tougher with each enemy's fall. 💪💉
However, this strategy isn't a one-size-fits-all. It shines in high-mana matches and when specific rulesets like **Super Sneak**, **Opportunity**, or **Melee Mayhem** are active. These conditions allow your melee units to attack from the backline, maximizing the value of **Double Strike** and **Triage**. ⚔️🌟
In the battles I shared, you saw how both **Grund** and **Drybone Raider** thrived, shrugging off damage while delivering crushing blows to the enemy. Even when faced with challenging rulesets, the healing and scaling capabilities of **Triage** and **Scavenger** turned the tide. If you're looking to dominate high-mana melees and outlast your opponent, this combo is a game-changer! 🔥⚡
Give it a try and watch your backline turn into an unstoppable force! 🏆💯
You can also check out more of my content [here](https://peakd.com/@javiss).* 😊
---
### Previous Posts </center> </div>
<center> <div align="center">
| | | |
| --- | --- | --- |
| [](https://peakd.com/hive-13323/@javiss/ultimate-new-players-guide-how-to-make-a-profit-in-the-splinterlands-ecosystem-22)|[](https://peakd.com/@javiss/tpg-challenge-a-yabapmatt-inspired-summoner-sir-matt-rosen-arises)| [](https://peakd.com/@javiss/splinterlands-community-engagement-challenge-featuring-elanor-a-card-you-need)|
---
https://files.peakd.com/file/peakd-hive/javiss/23xyhX6YTGCG1x7xVB9dc1ifnvMQMAhX6UoJh7p9mESMYREG4Kxx2FgsJp9Rg4XPkdX9Y.jpg
| [SPLINTERLANDS.COM - Referral Link](https://splinterlands.com?ref=javiss) | [SPLINTERSHARDS (SPS)](https://sps.splinterlands.com/) | [BLOG](https://peakd.com/@splinterlands) | [DISCORD](https://discord.com/invite/splinterlands) | [TELEGRAM](https://t.me/splinterlandsHQ) |
#splinterlands #play2earn #socialmediachallenge
 hiveblocks