In this post I will be showing how this Bird Mask is made. =D <center>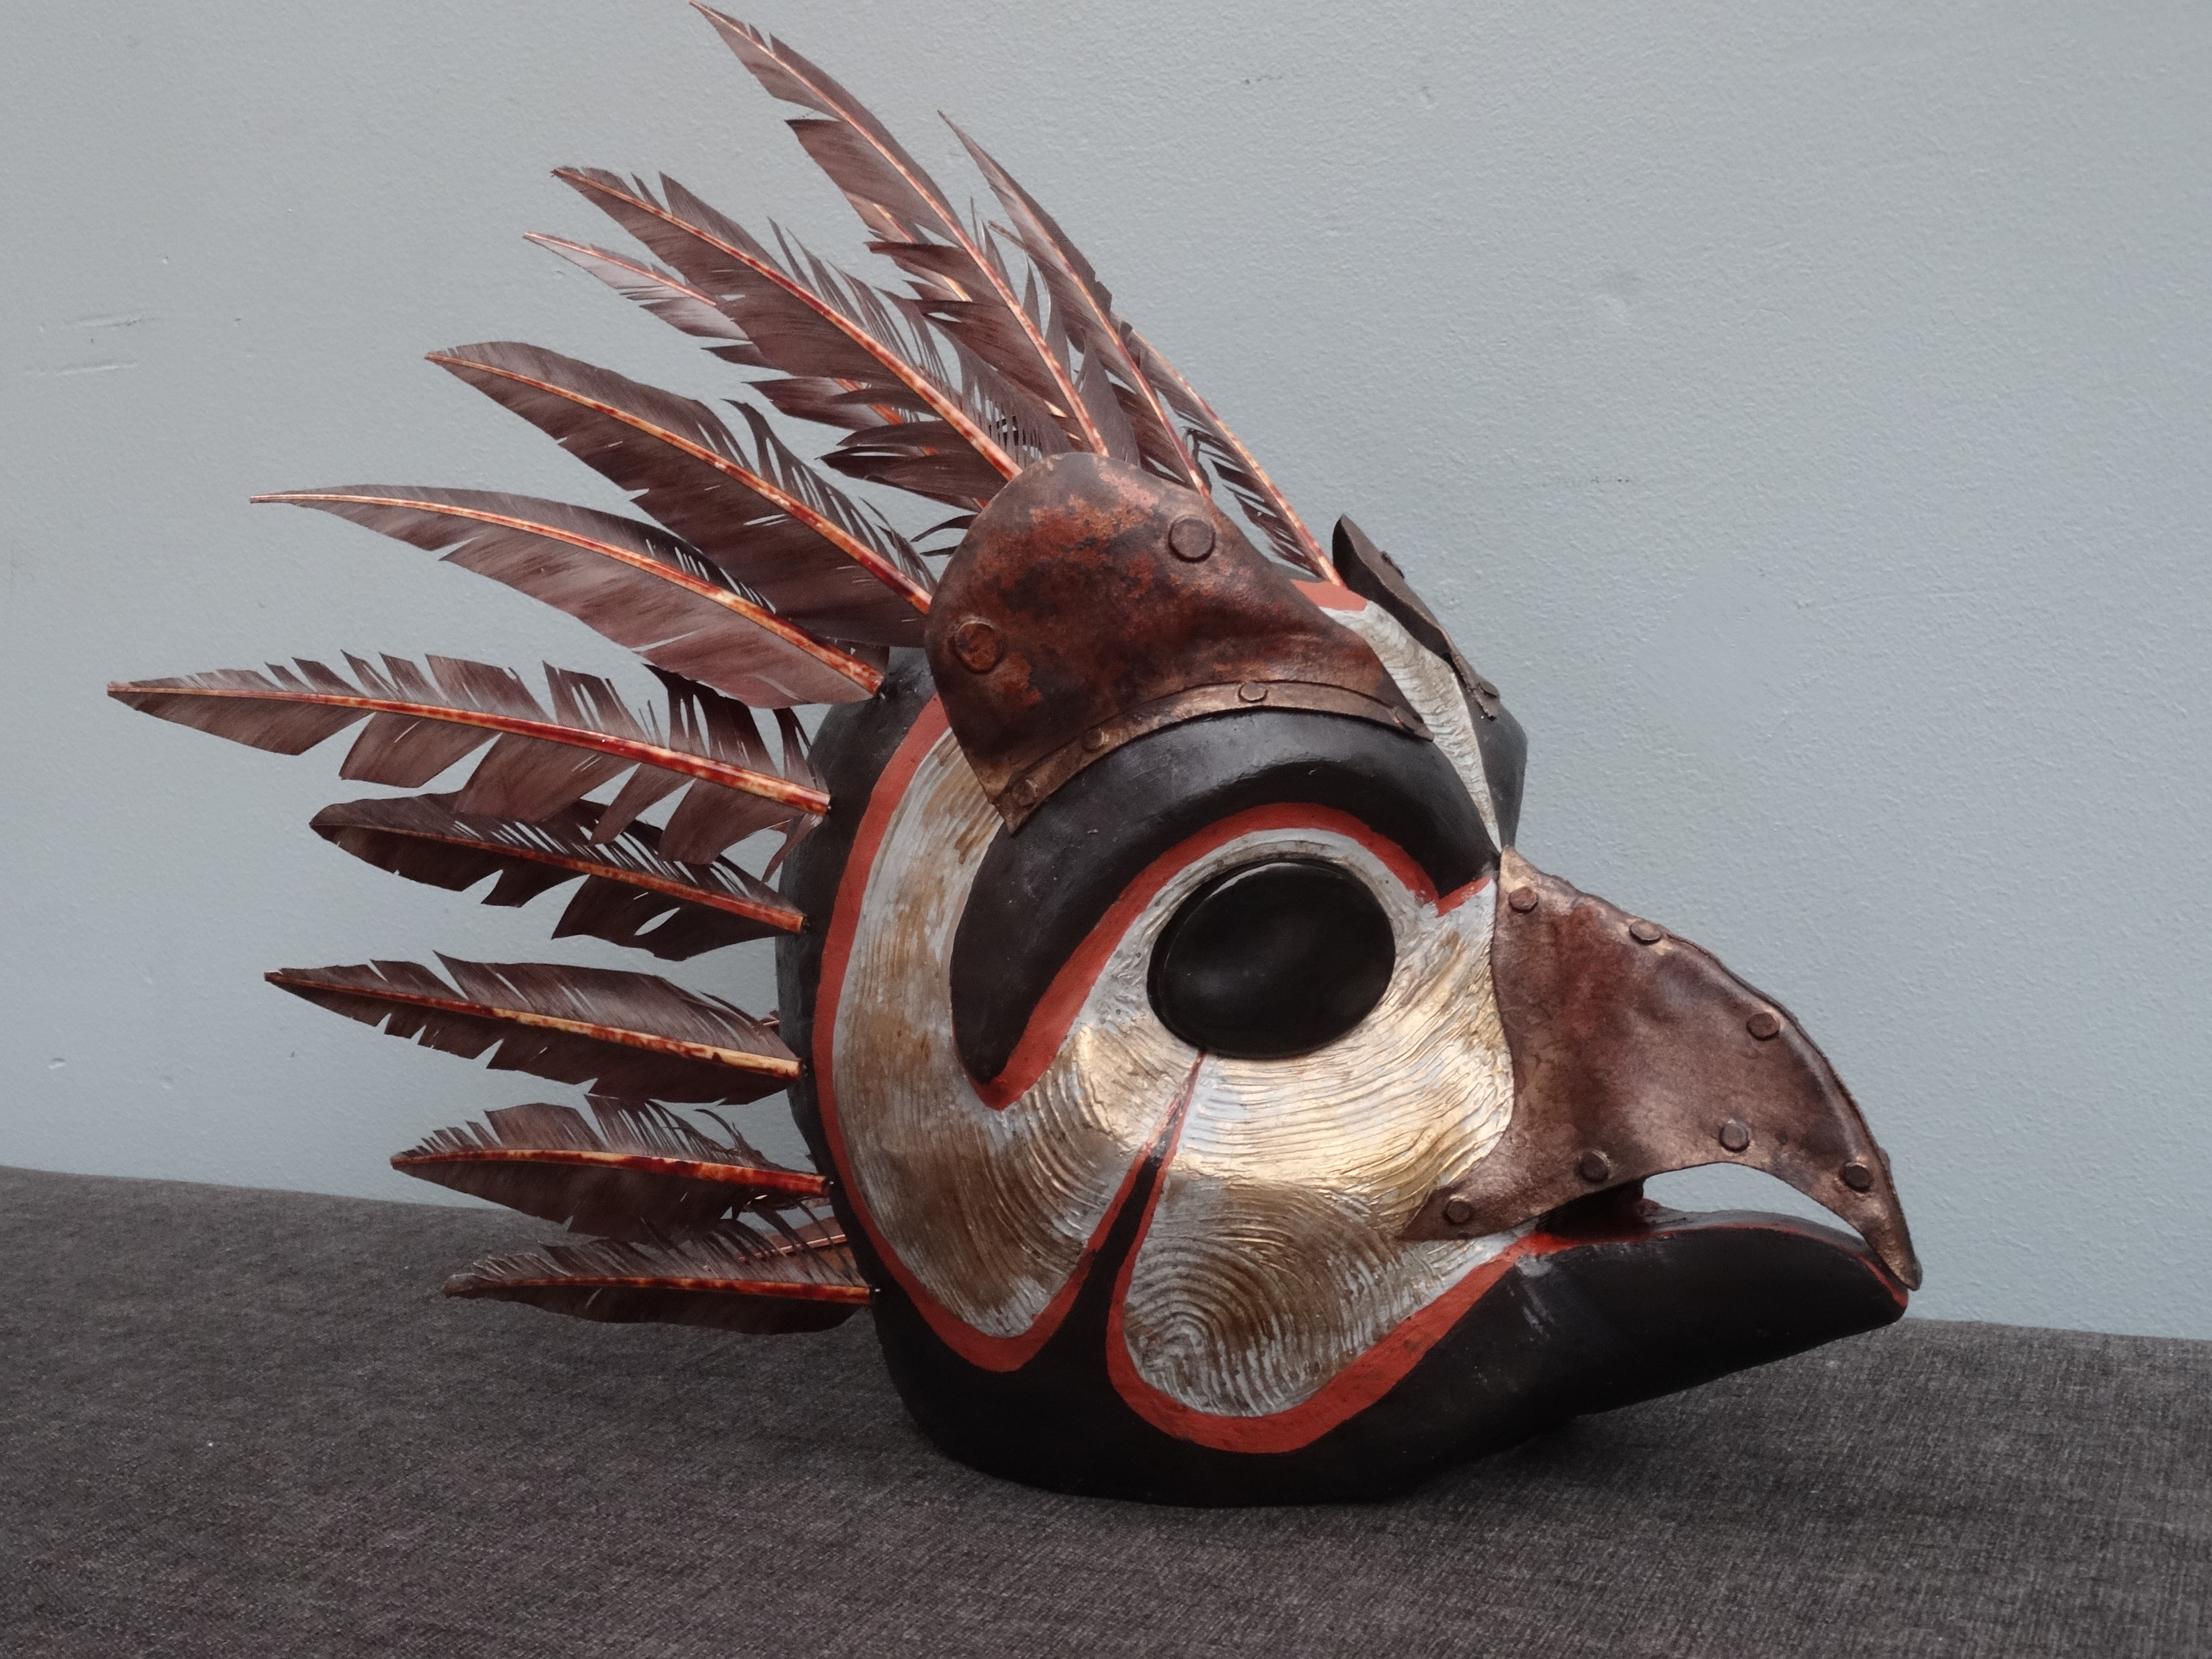 </center> **Materials:** Person's face cast Resin (+ thickener) Clay (I used Mac’s Mud Co Brick Red clay) Fiberglass Worbla (black and transparent) MDF Brown Ipoly dye Turkey quills Brown and black shoe polish Wide elastic Thin wire Bike helmet straps Thick elastic Foam Kote Contact adhesive Paints + paint primer (spray) # Step 1: Create a base shape for the mask on the person's face cast # <center>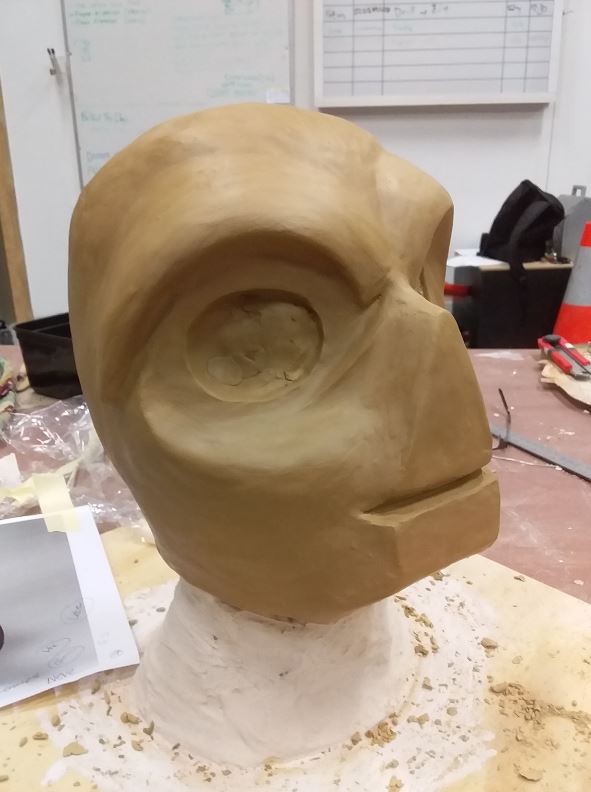 </center> To begin I built up the shape I wanted the mask to be minus some of the detailing (I'd be making the beak, feathers, eye ridges, etc later). I spent a long time on this part since I wanted to ensure I got the proportions how I wanted them and the details as symmetrical on each side as possible # Step 2: Make the mask base with resin # <center>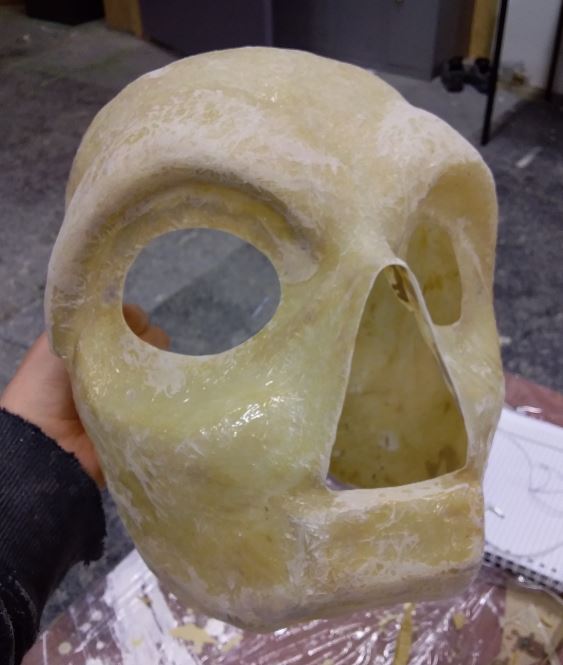 </center> Once the sculpt was done I covered the whole thing with fiberglass (minus an area on the back for putting it on later, the eyes and the top beak), and resin, going over it a 2nd time once set with a thickened resin. After everything was dry I had to carefully scrape the clay out from underneath to get the resin off the sculpt. The clay didn't really stick, but it's dampness caused it to suck onto the resin a bit till pried lose. Sadly this meant the sculpt was a 1 time only use. Next I started sanding the whole thing, cleaning up the edges and bulk parts with a dremel tool while getting some sandpaper for a few smaller bits. To finish it off I drilled in holes where the feathers would go later. # Step 3: Making the Beak/Eye Ridges # <center>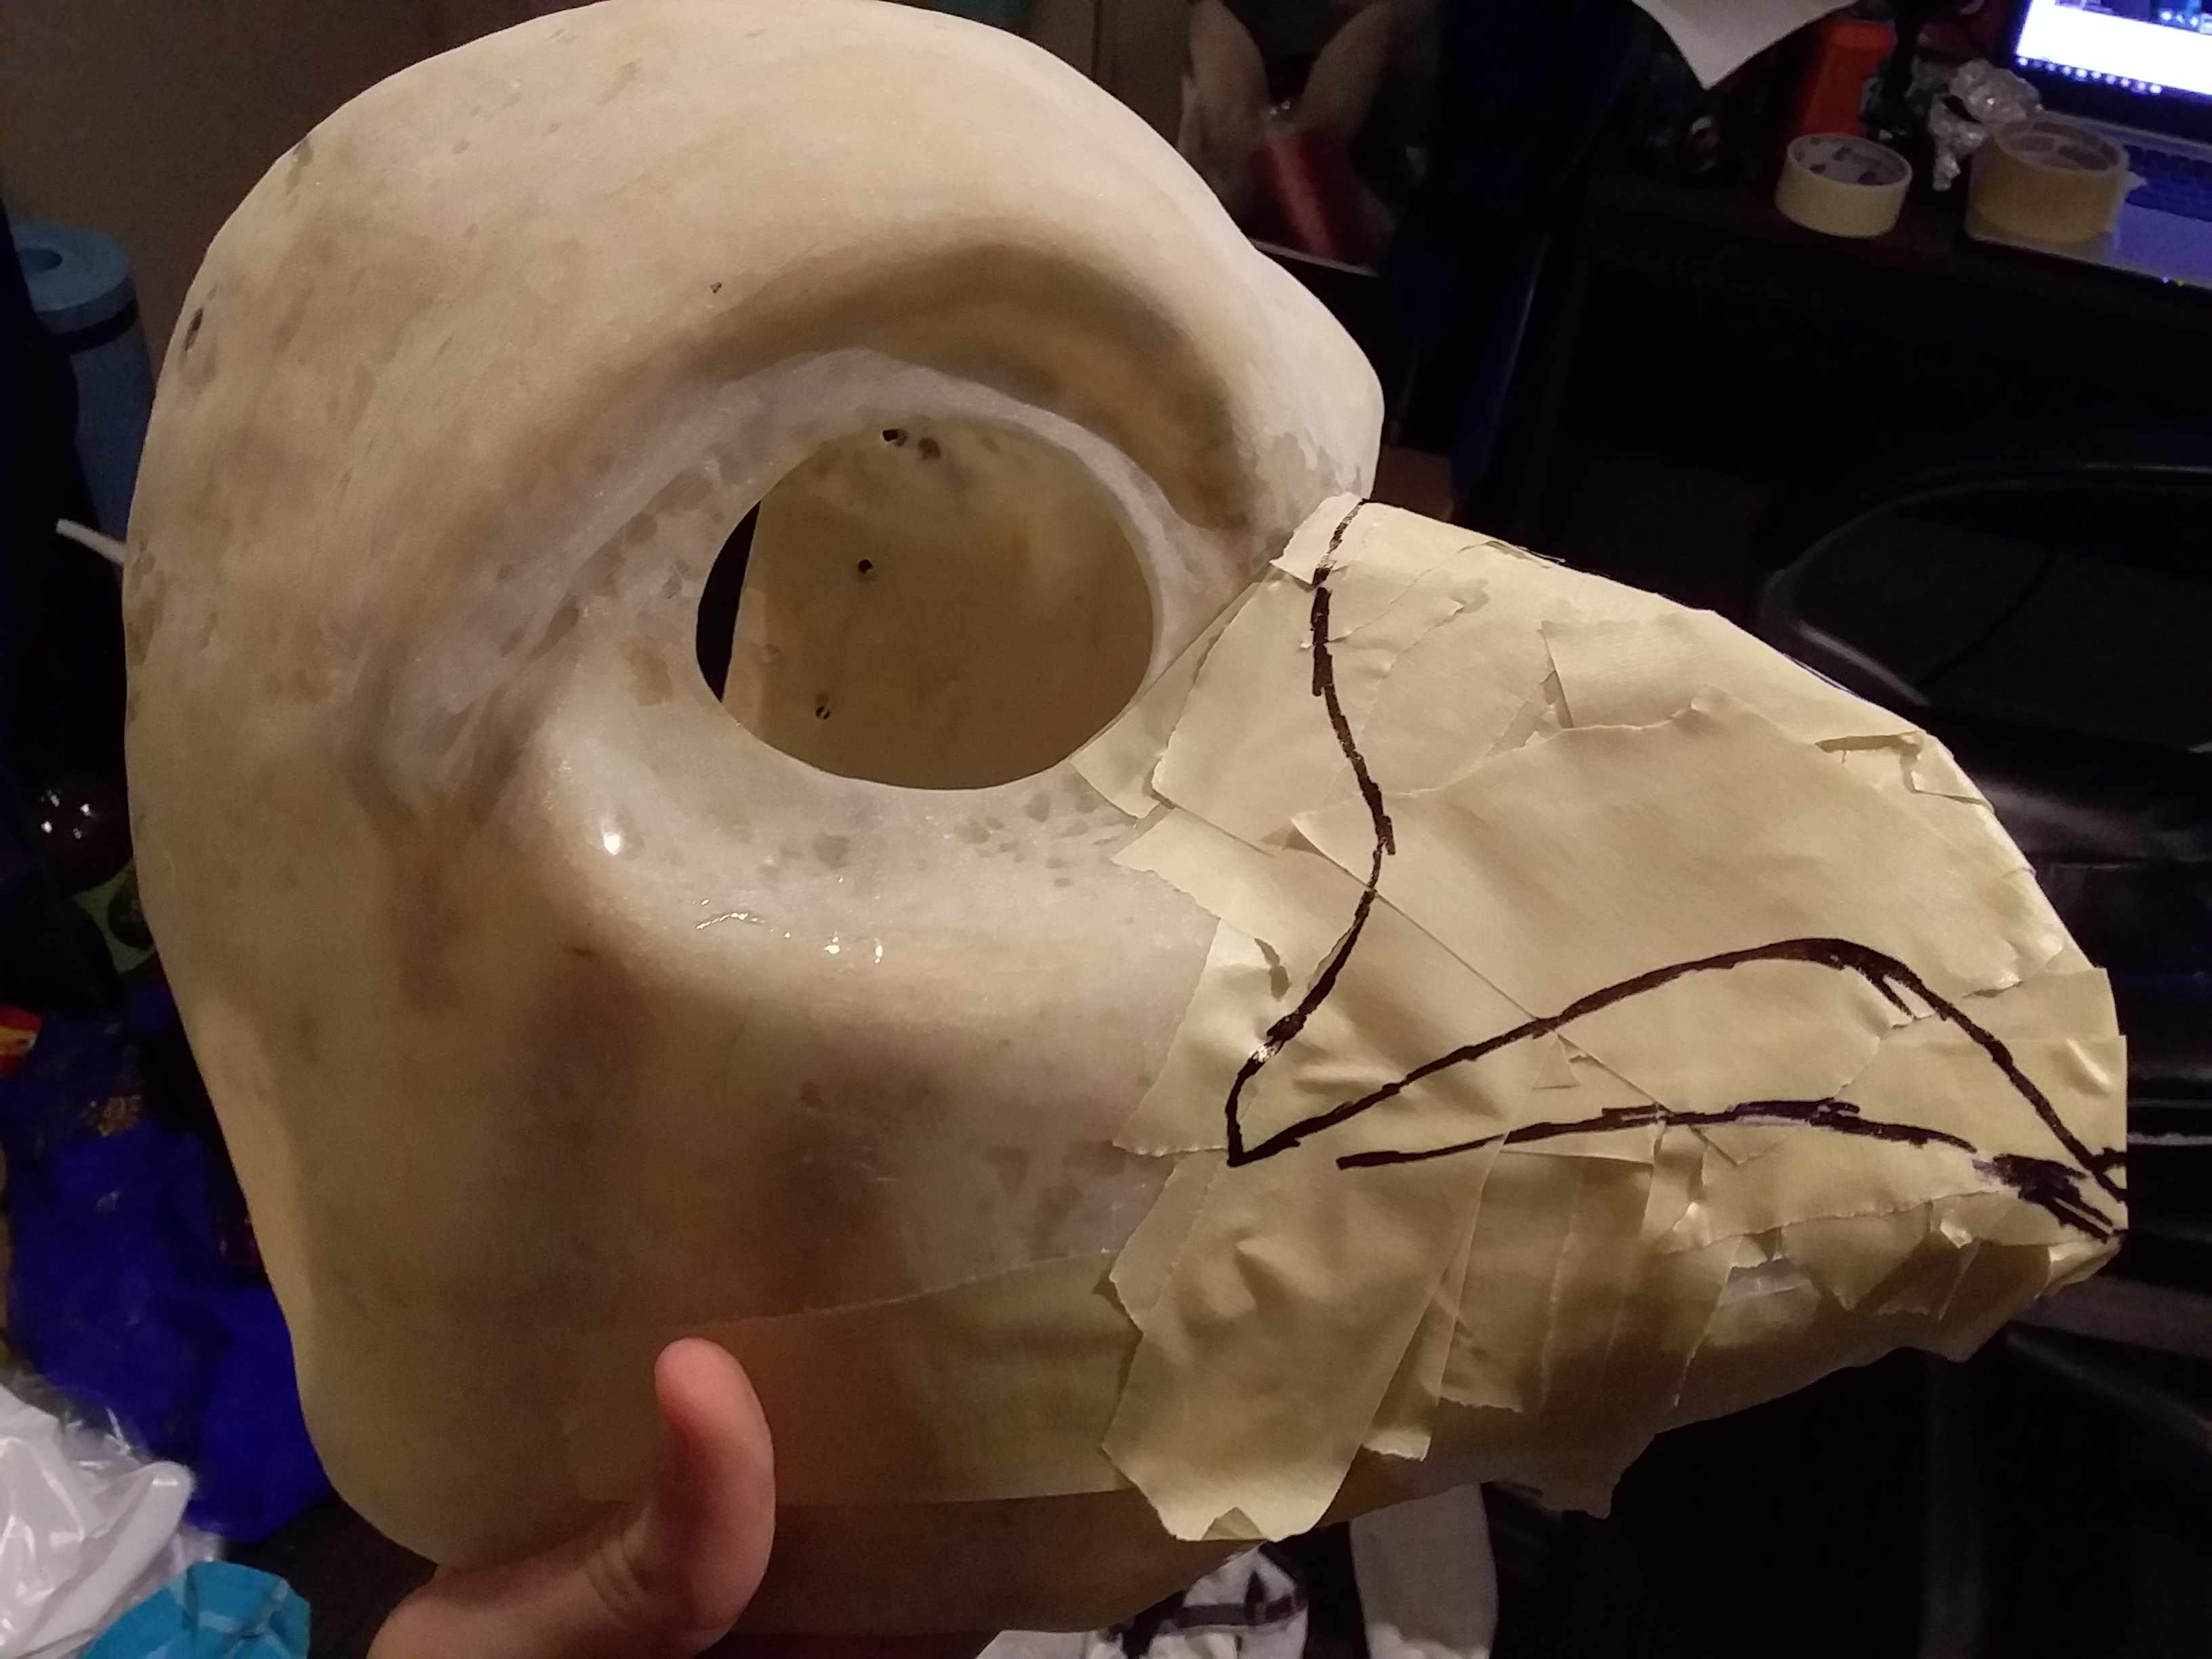 </center> To make the beak I started with the bottom beak and sculpted it's approximate shape out of polystyrene. I then attached it to the mask using latex glue and covered it in builders bog before sanding it to it's finished shape with a dremel. For the top beak I first made a pattern using plastic wrap, tin foil, and masking tape, which I then covered into black Worbla. When attaching the two halves of the worbla beak together I purposely made the lines messy since it was like this in the original mask too. <center> </center> To finish it off structure wise I cut some tiny worbla circles and stuck these on as little bolt heads. For the eye ridges I repeated the same process basically. I'll cover painting a bit later. # Step 4: Making the Feathers # <center> </center> For the feathers I got some white turkey quills I still had, cut them to a more pointed shape, chopped off any excess shaft, and stained them all brown with shoe polish. I did also try other staining methods and looked into brown feathers but the results weren't what I wanted. Coffee staining made them more a golden brown, paint made them look fake rather than old, and just brown feathers would both take too long to get here and didn't look worn either so I'd have to treat them again anyway. <center> </center> Once the feathers were all stained I attached a piece of wire using contact adhesive and set them aside for now. # Step 5: Adding straps # <center> </center> To keep the helmet attached to the dancer's heads I broke down an old bike helmet for it's straps and attached these to the inside using contact adhesive and superglue. This also made it adjustable for the two heads it would need to fit on. Later when the mask was finished I had to add on another strap at the back of the mask since it was sliding forward a bit when worn for extended periods. For this I got a wide white elastic I had, coloured it brown with the shoe polish, and added on some darker spots using black shoe polish before sticking it into the mask with superglue. # Step 6: Making the Eyes # <center>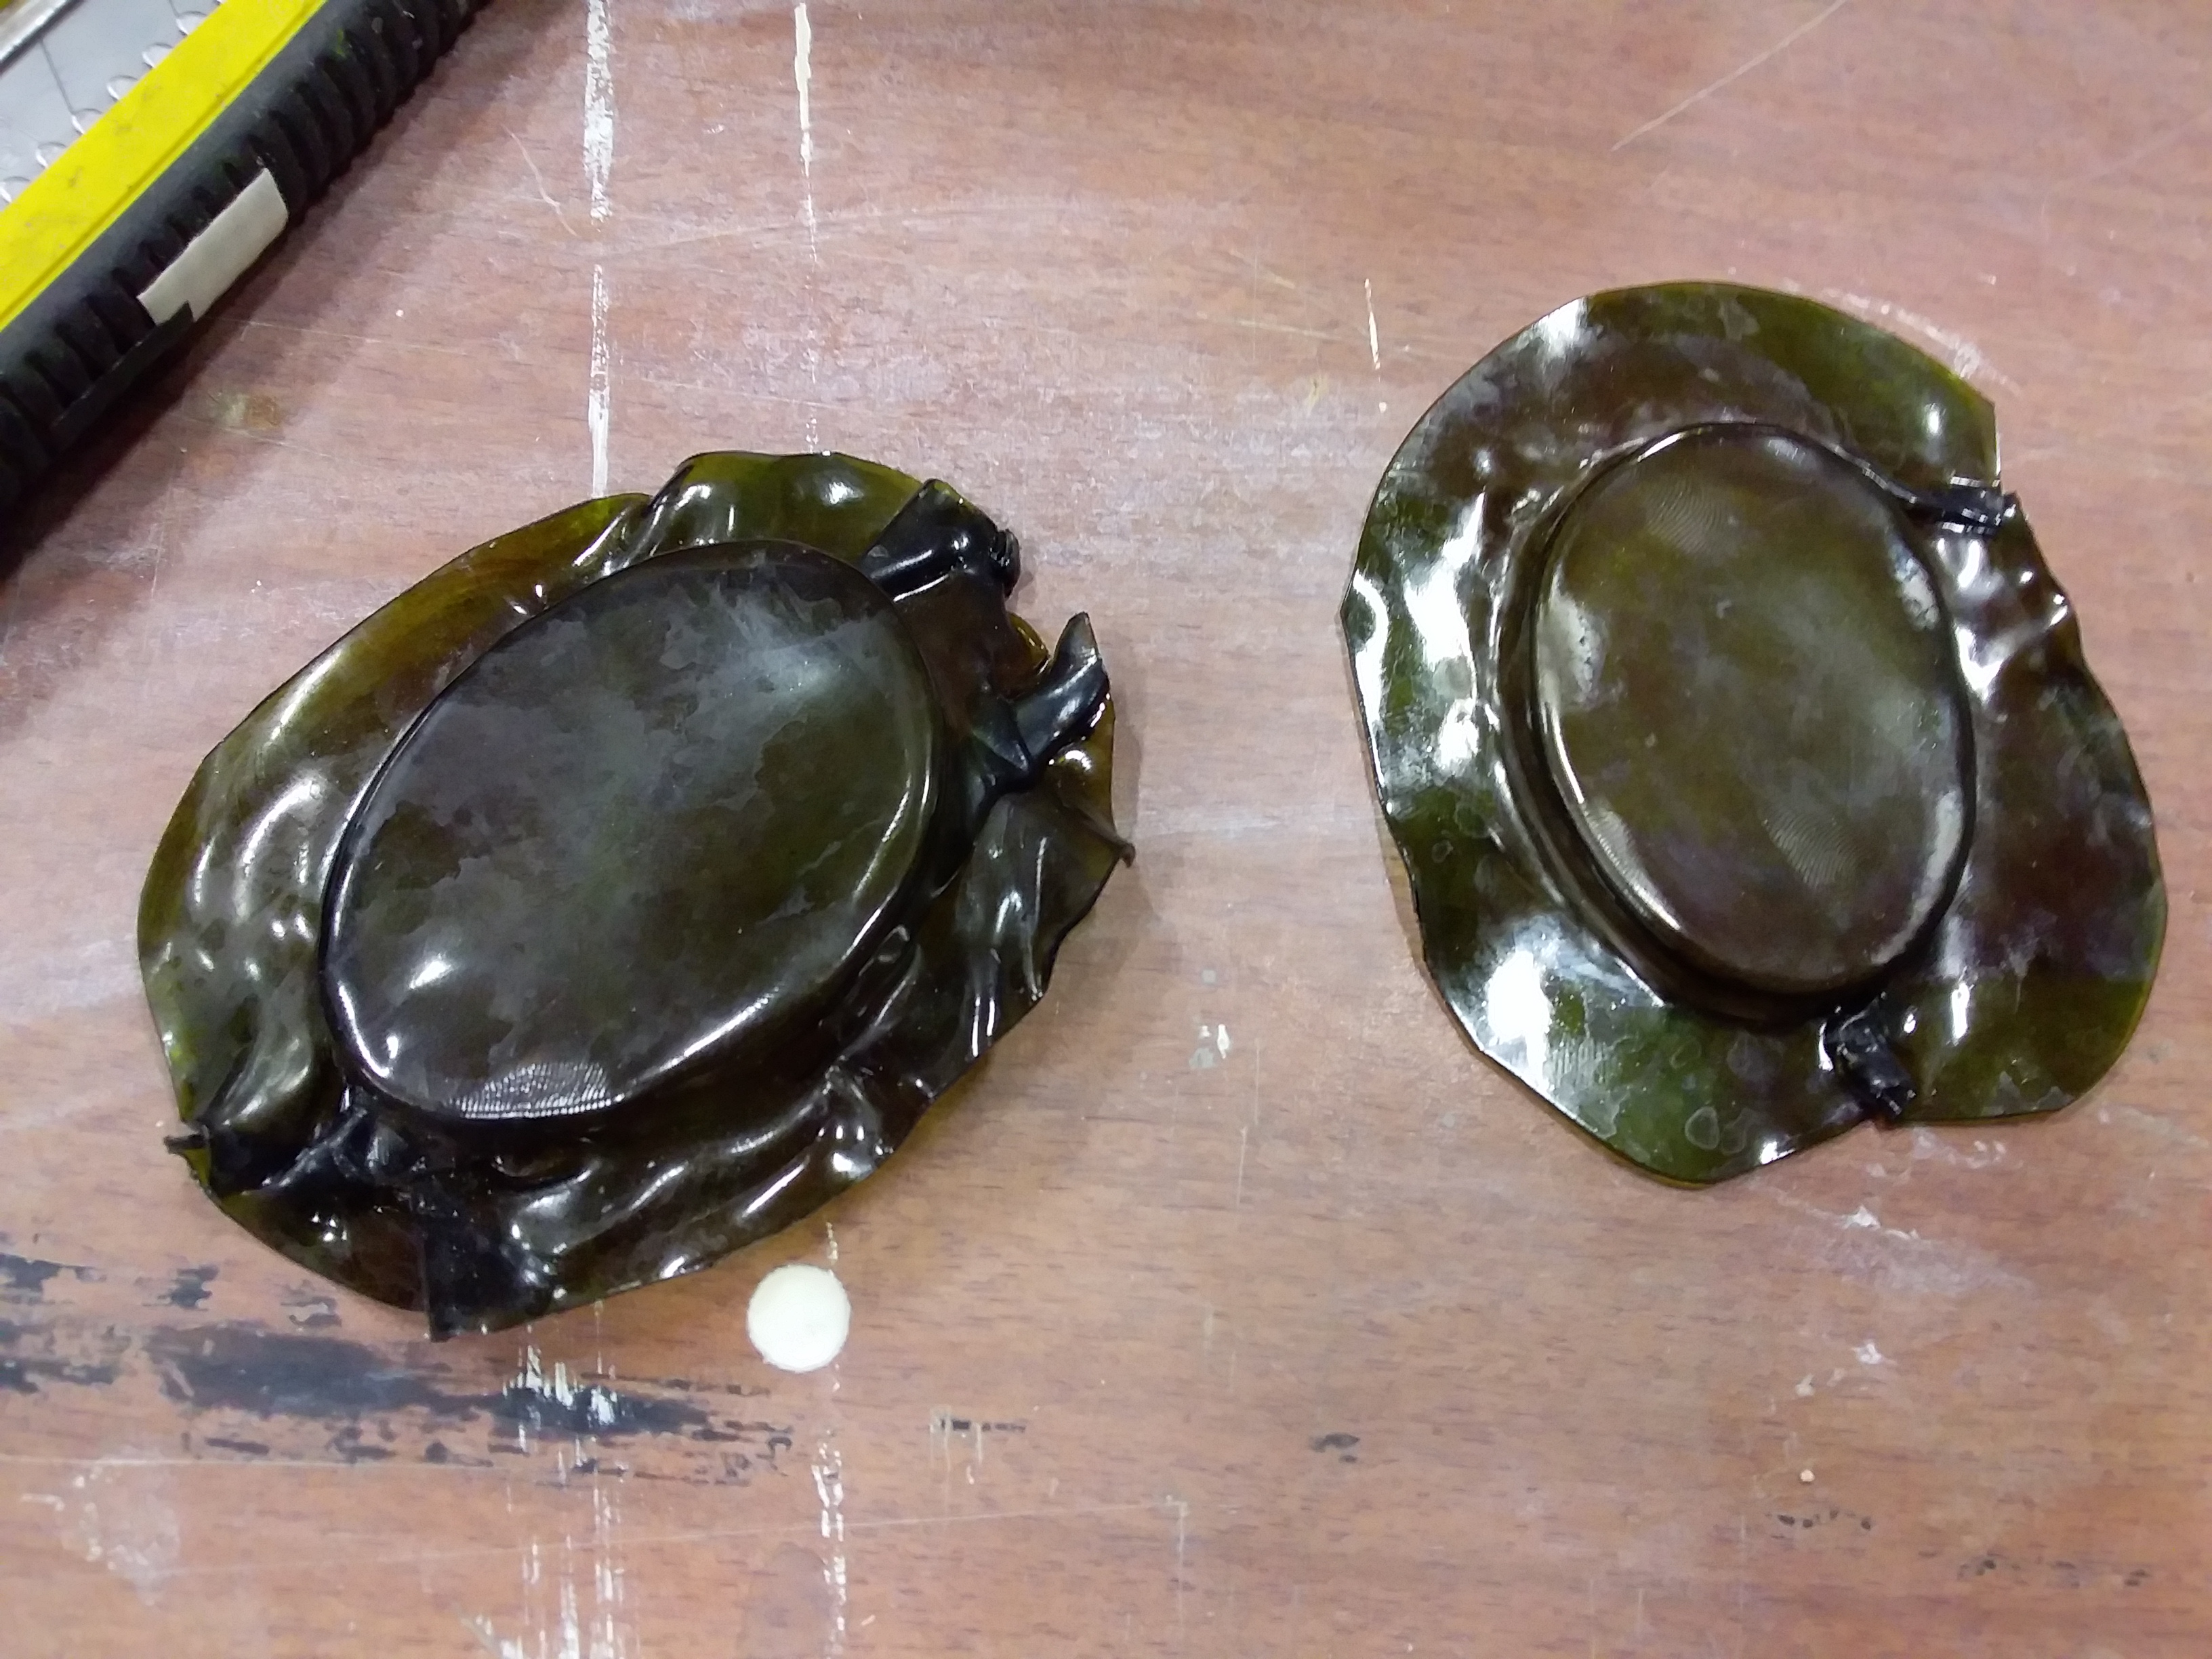 </center> The eyes are made from transparent Worbla which have been coloured in an ipoly dye bath. The colour was meant to be dark brown but it turned into dark green for some reason. To shape the worbla I cut out some MDF ovals just smaller than the eye holes in the mask (to account for the plastic thickness), and using a heat gun shaped them over top of it. I left a ridge around the ovals for attaching them later. # Step 7: Adding face lines # <center>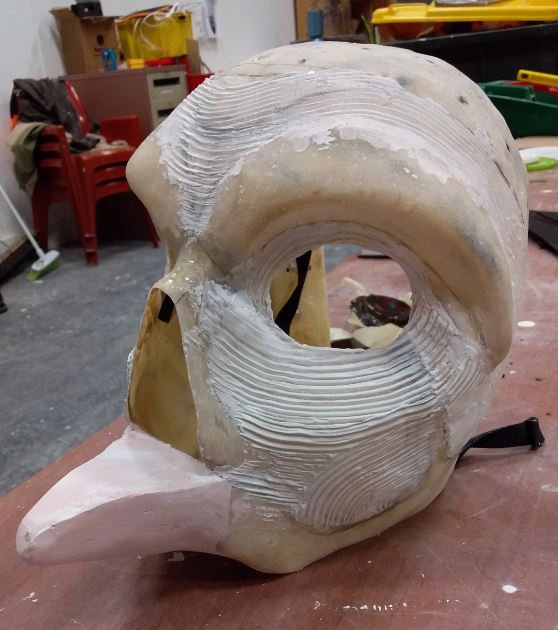</center> The bird mask had lines on it's light grey areas, and since these would take forever to paint I created them with Foam Kote instead. This stuff is basically like a paint/paste and after spreading it on the areas that needed it I went through it with a cardboard comb I'd made from a piece of scrap. Once dry I sanded it back to neat lines so there wouldn't be wobbly paint transitions. # Step 8: Painting # <center>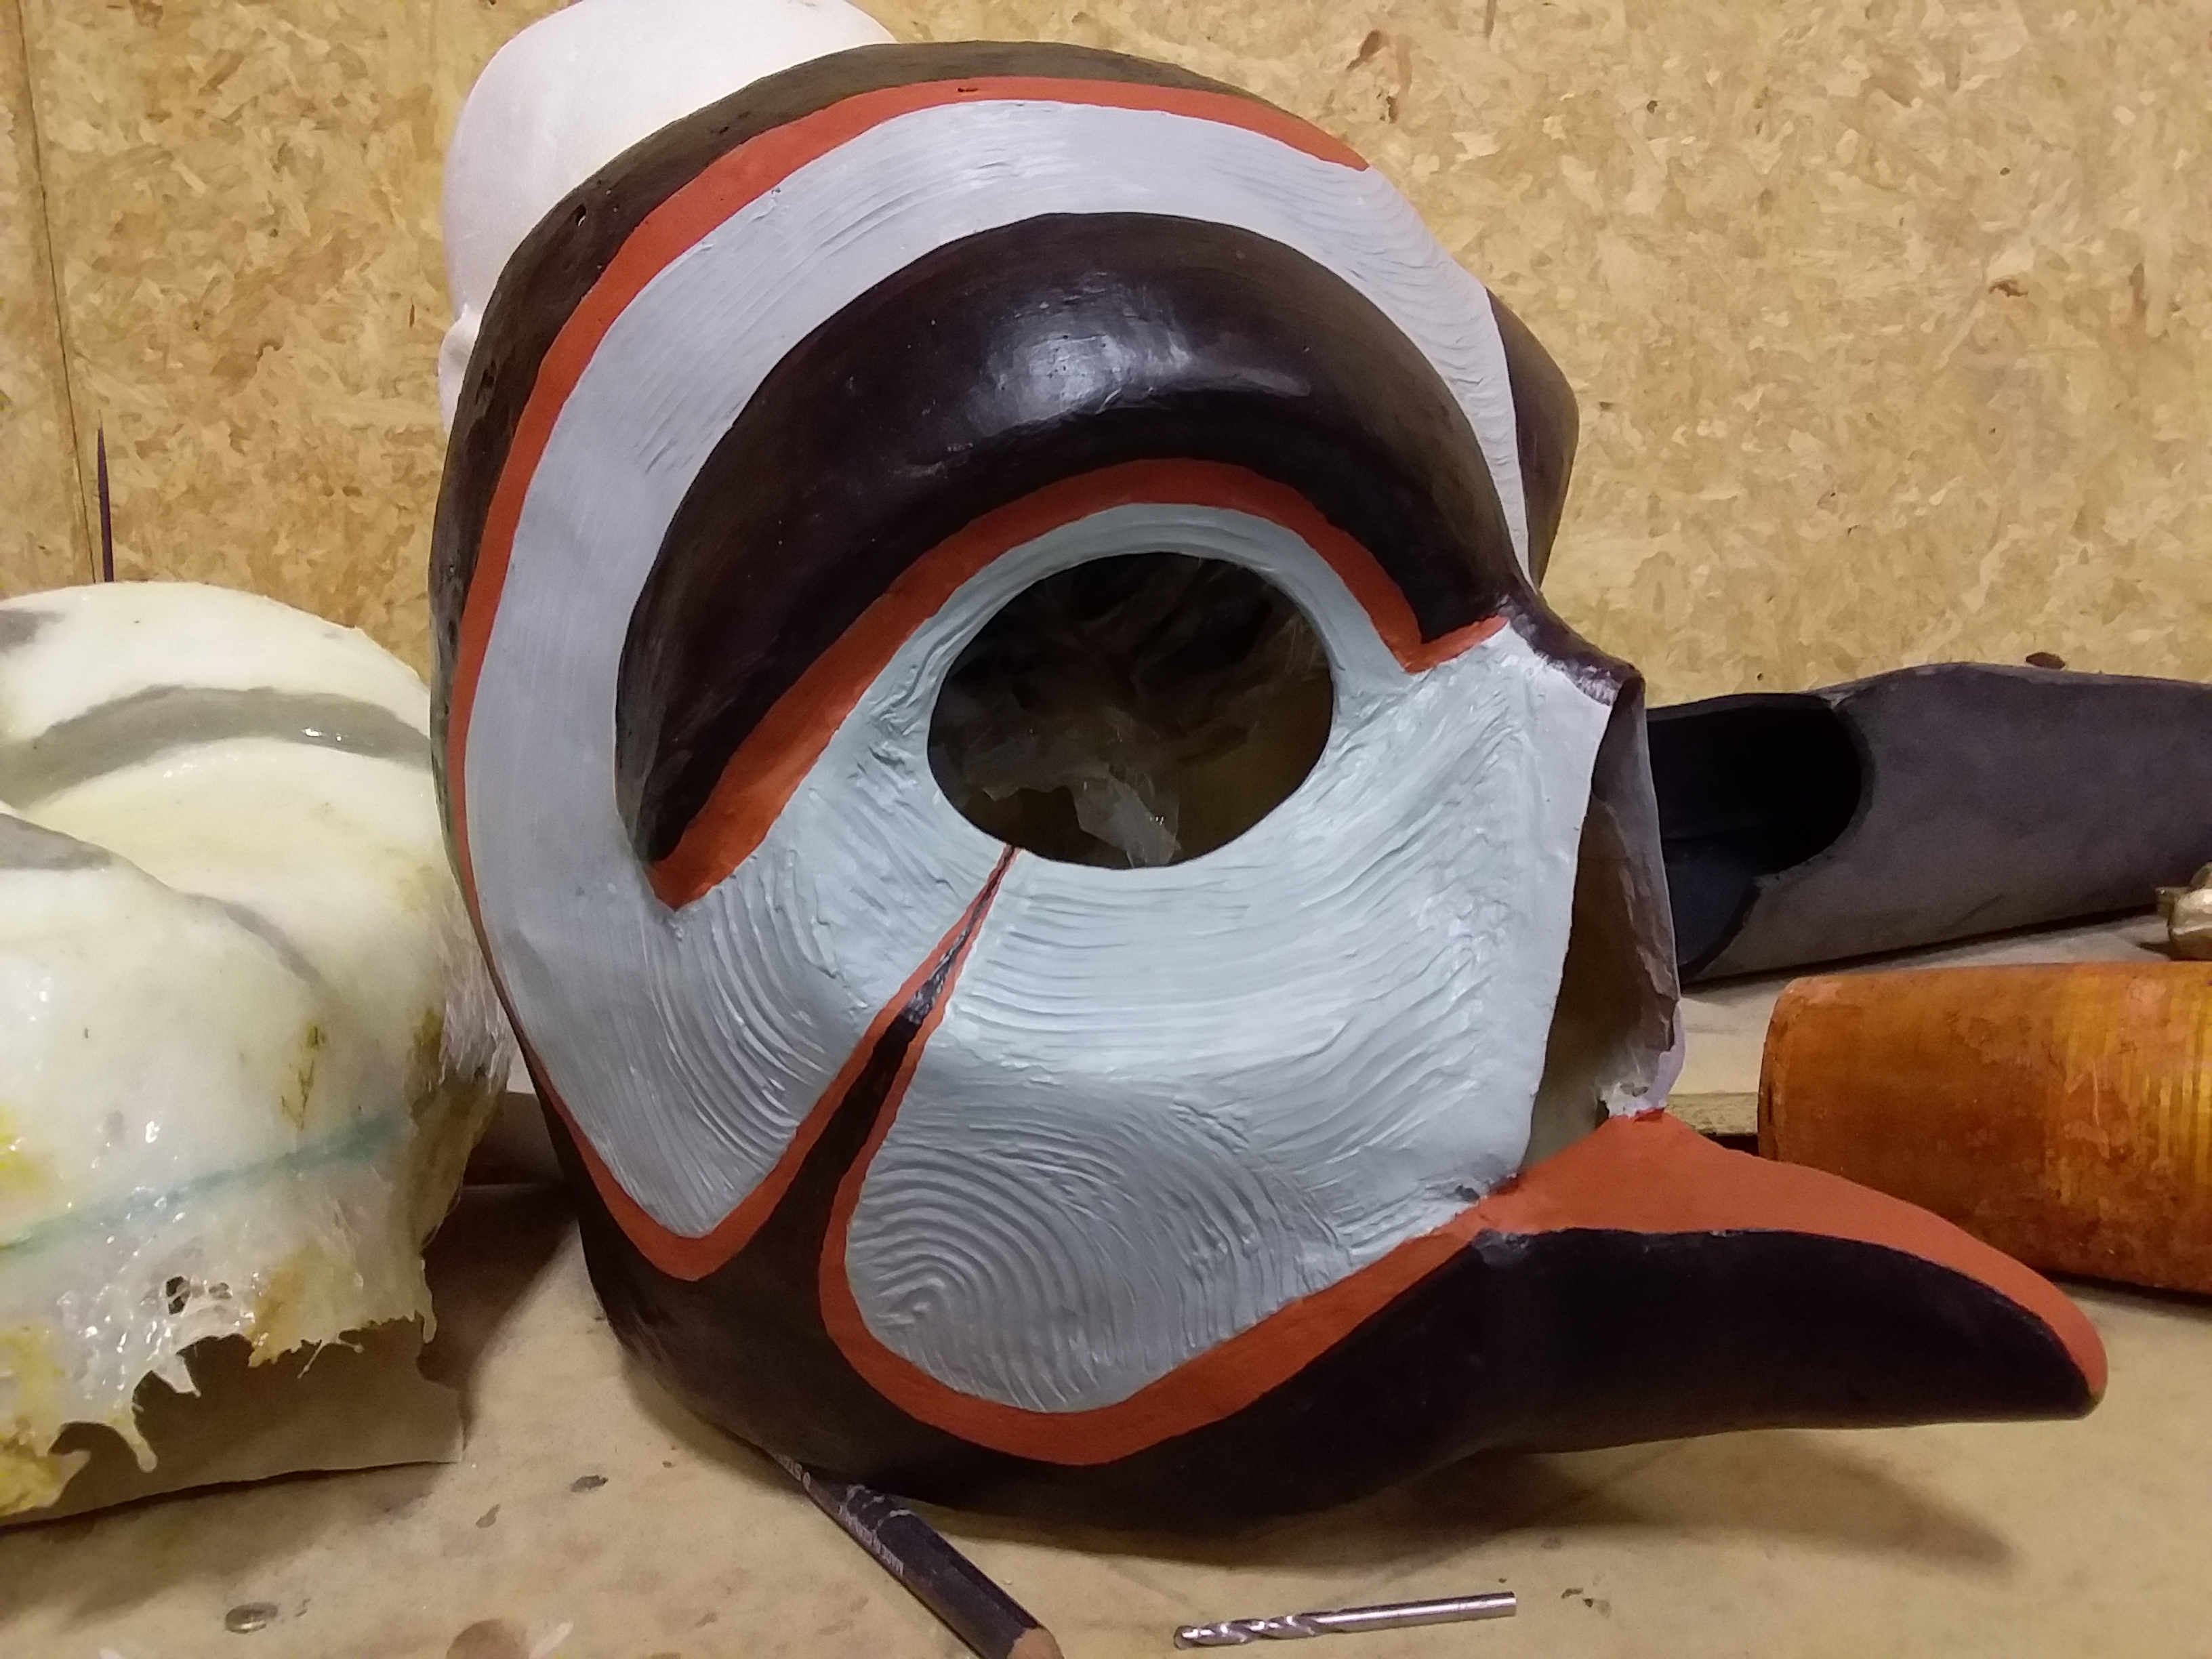</center> After priming the whole with a spray primer I started painting the grey area, moved onto orange once it was dry, and finished it with brown. I had to go over all the parts a couple of times to get the colour solid. To make it look older and get the gold tint I got an old cloth and brushed on some gold paint left over from a previous build (varnish with gold paint powder mixed in). <center>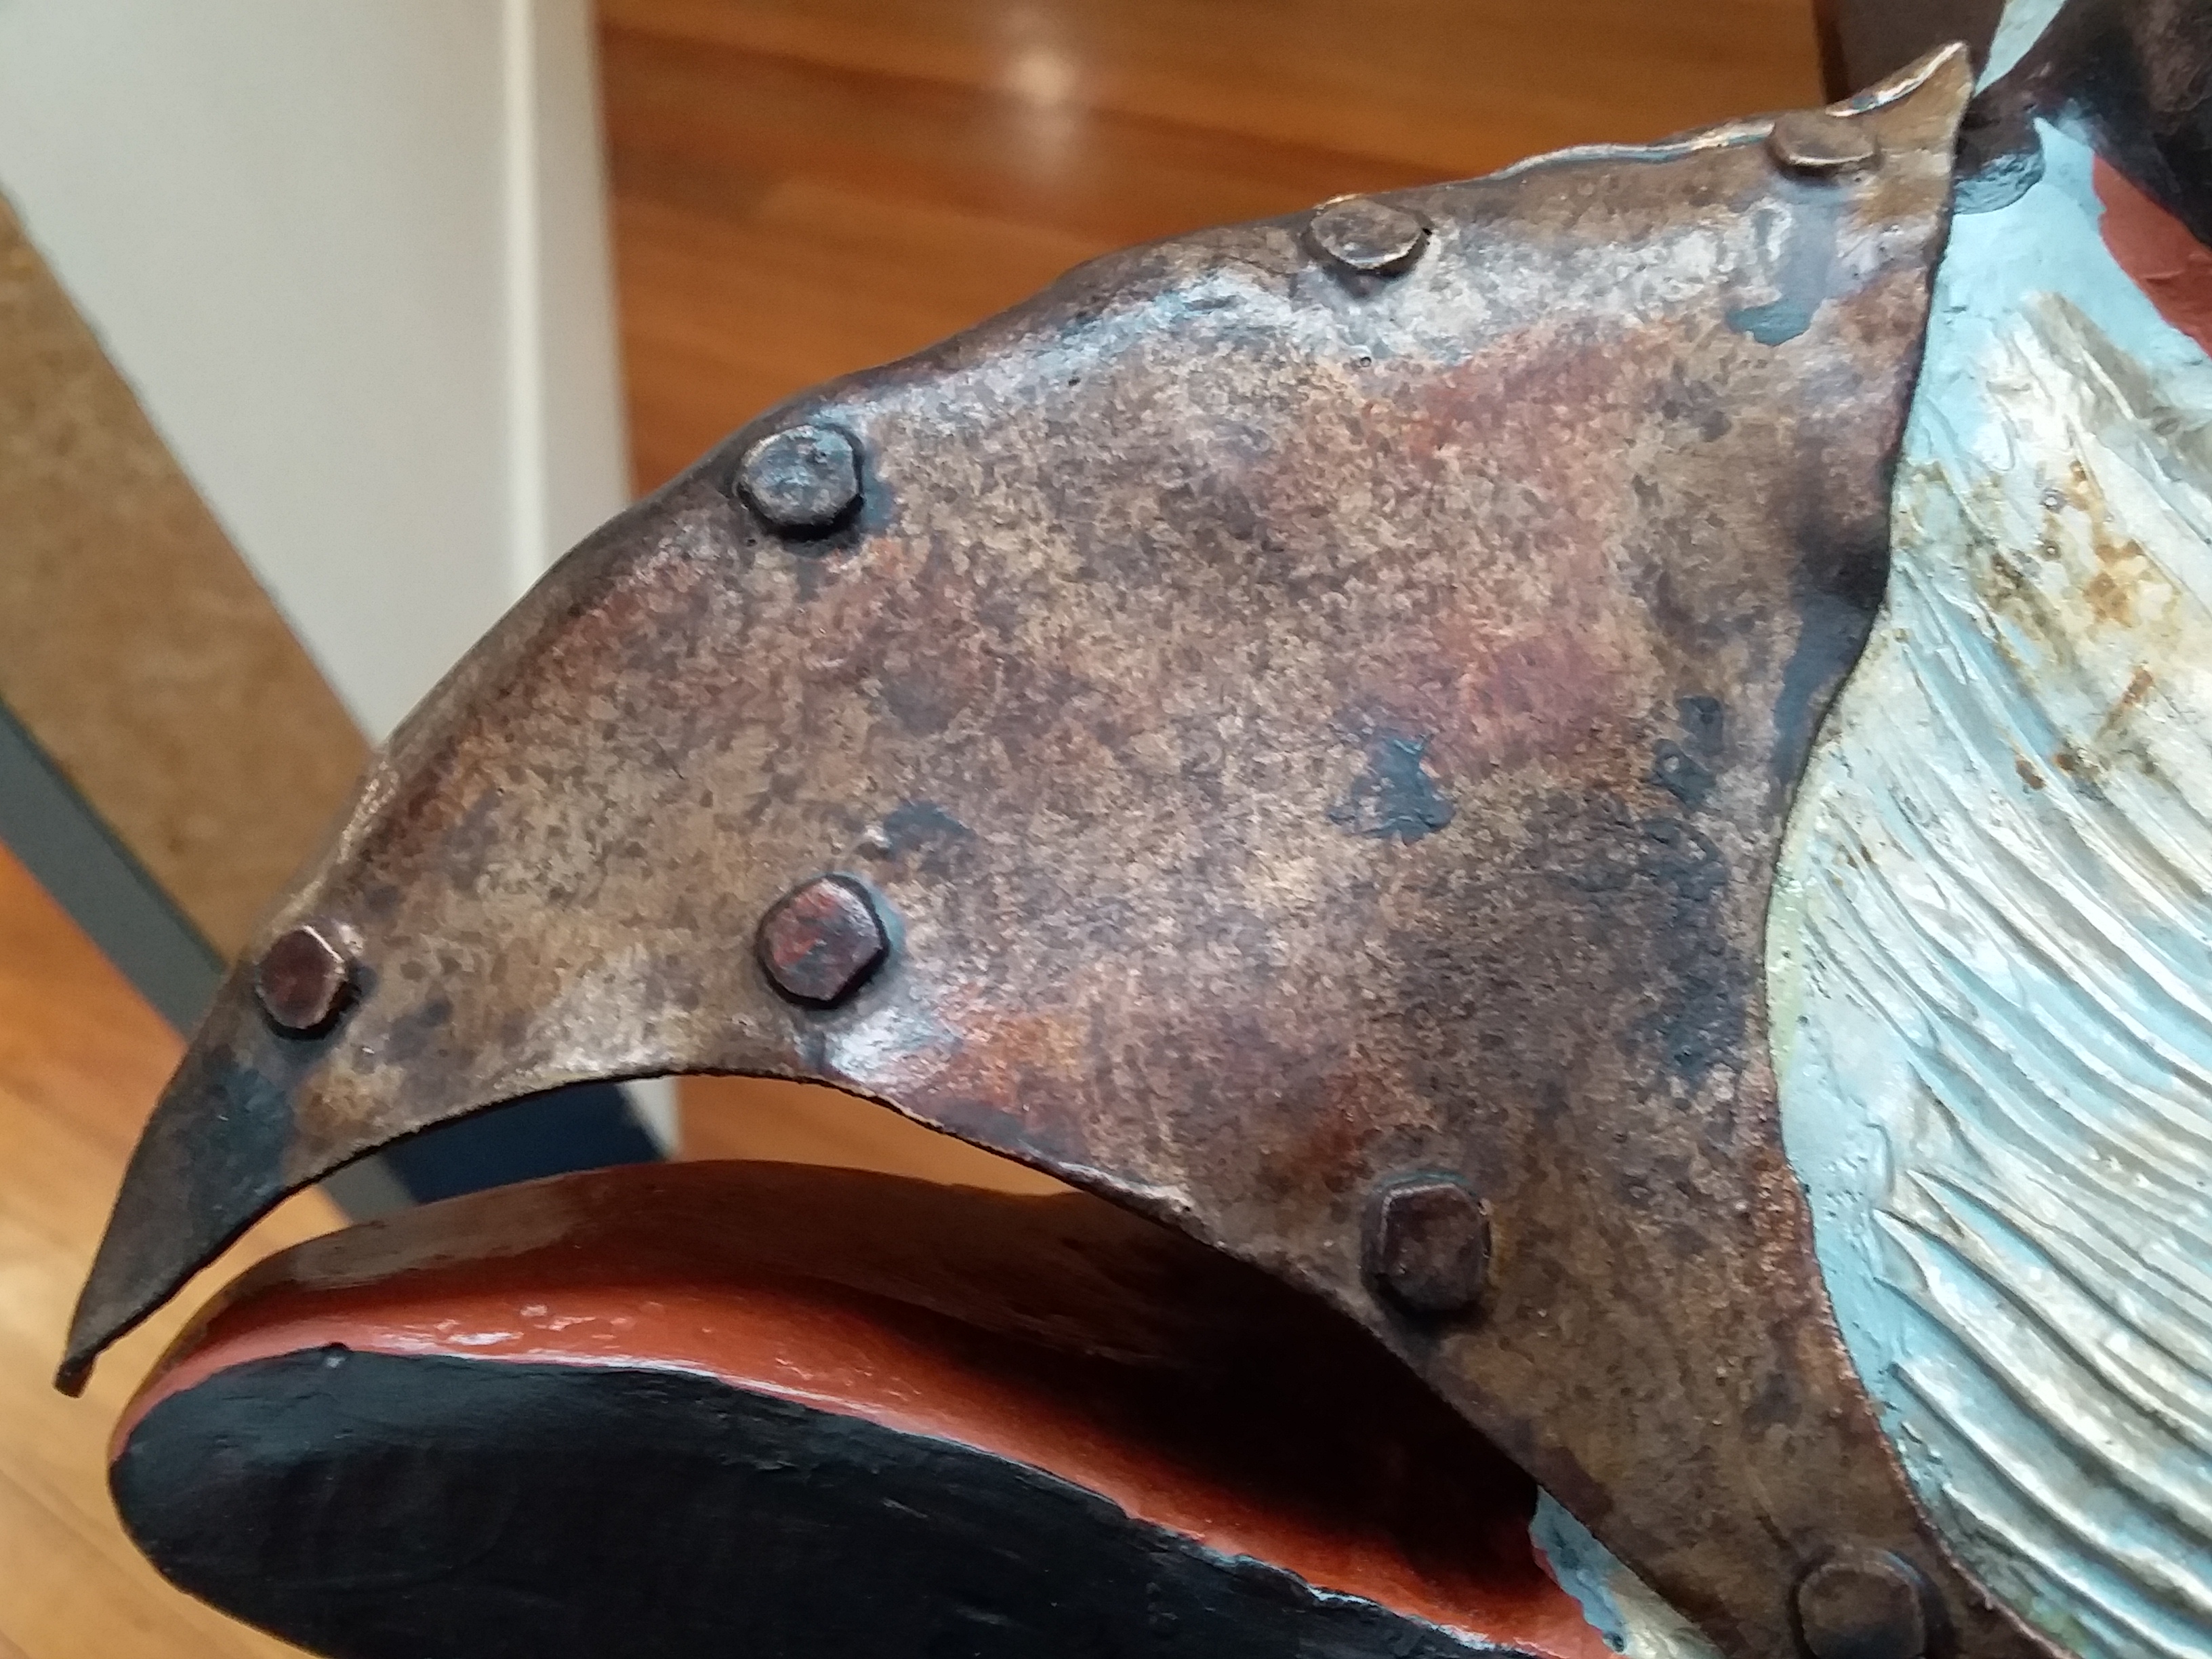</center> For the beak and eye ridges I started off with a layer of copper paint, followed by various layers of dabbling on brown shoe polish, black paint, and a dark brown wood stain. # Step 9: Finishing touches # <center>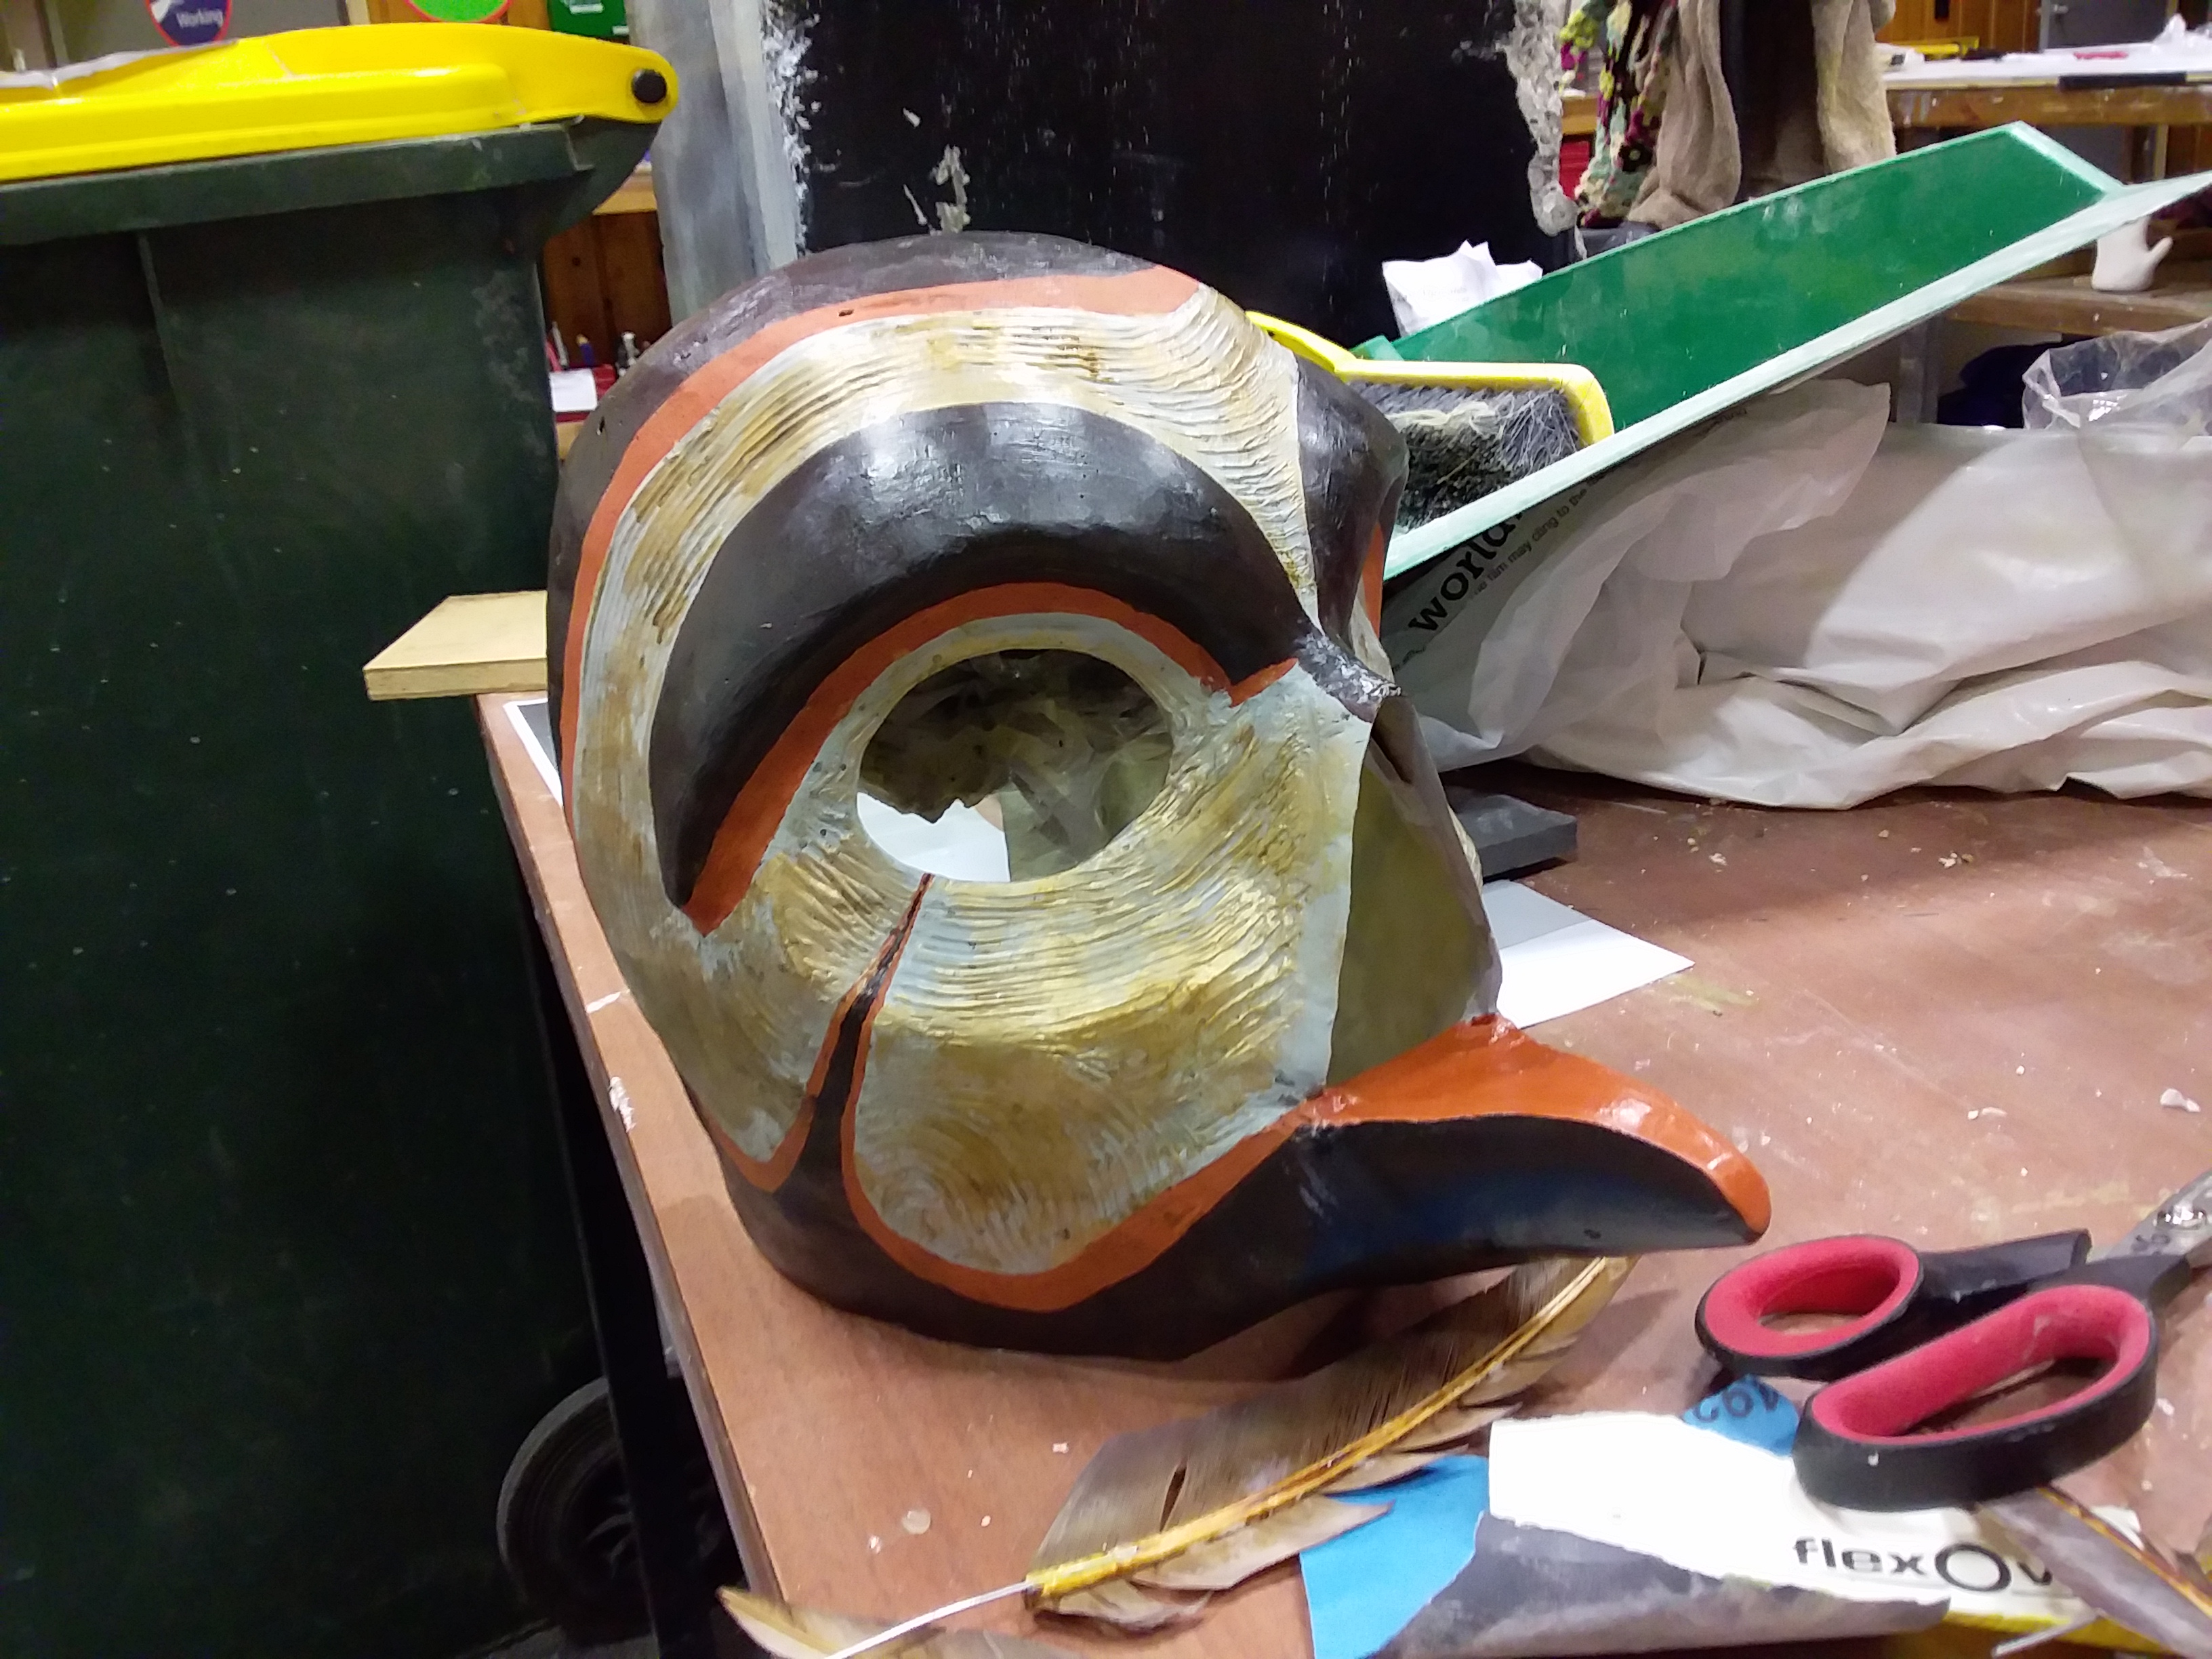</center> To finish off the mask I had to glue on all the pieces (eyes, beak, eye ridges) with contact adhesive, and attached the feathers by inserting the wire through the holes, twisting it, and gluing a piece of thin foam over top on the inside (this also immediately provided some padding). I also glued a piece of black mesh onto the inside of the upper beak to still allow it to function as a breathing hole but not obviously show the person wearing it. A bit more padding was added around the eye and nose area to make it more comfortable to wear and that was it! The mask was done! <center>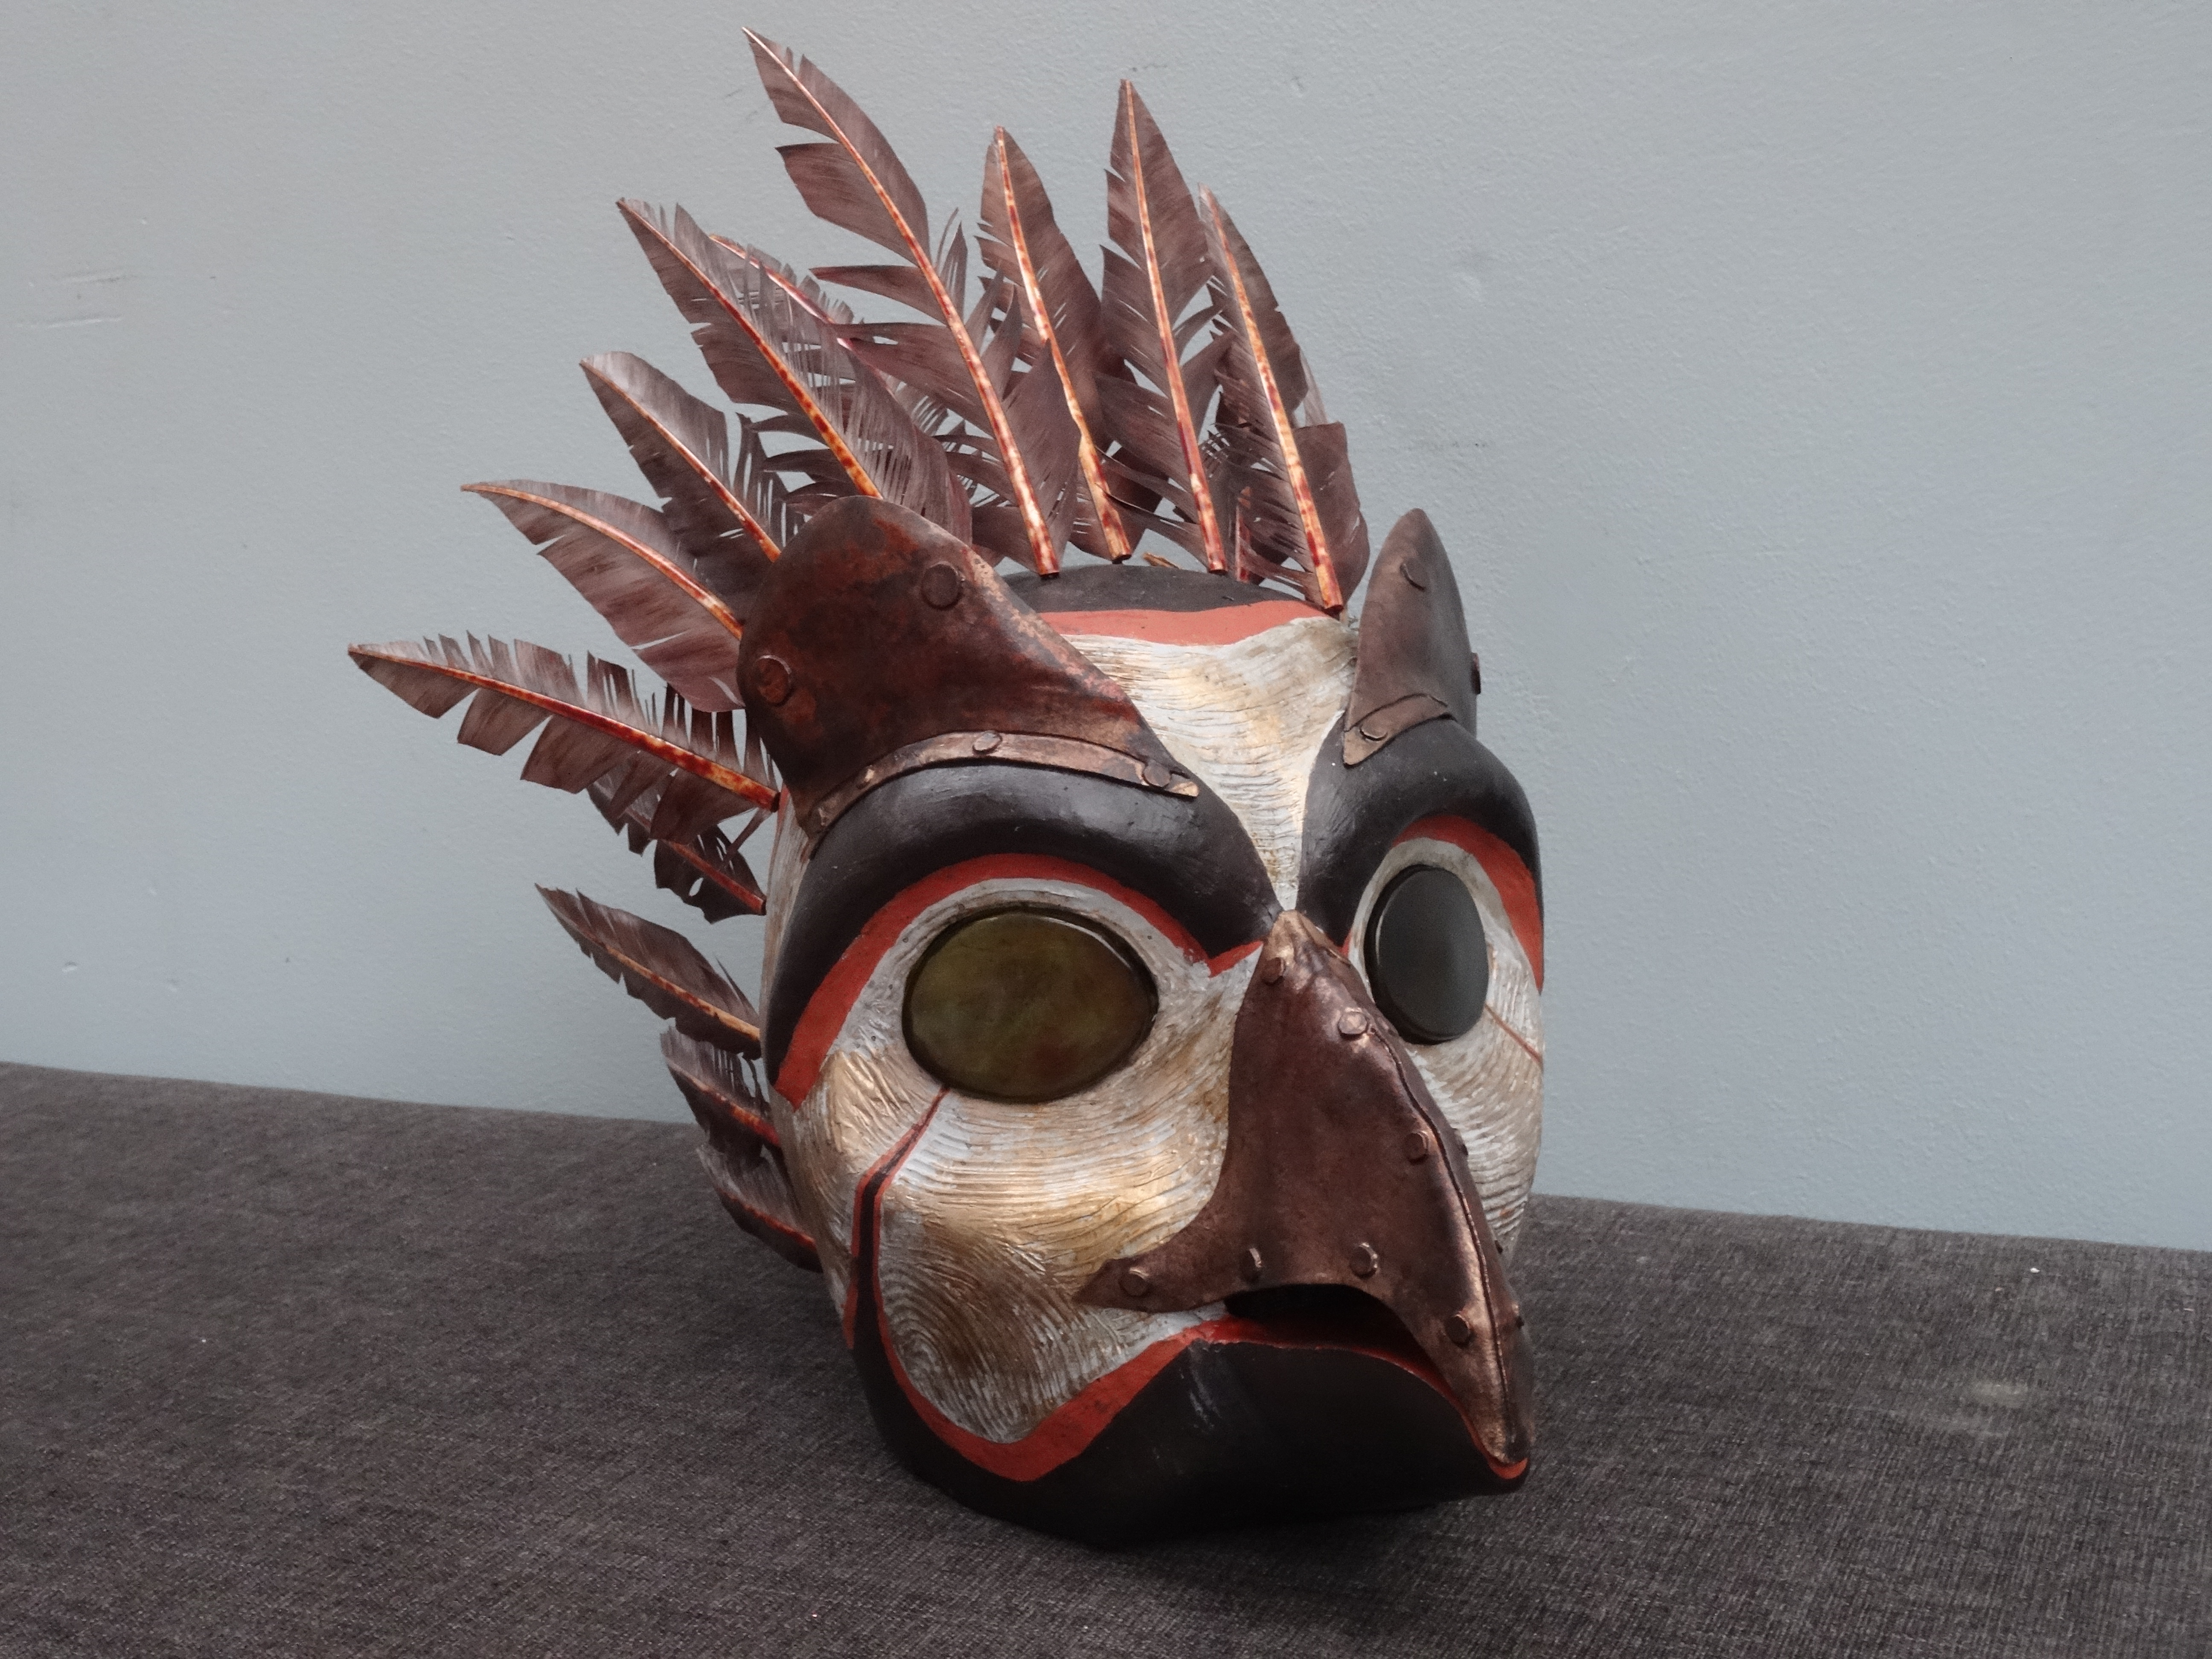</center> Anyway, I hope you enjoyed reading this post and found some of it useful. If you have any questions feel free to post them in the comments below. =D
| author | kimberprime |
|---|---|
| permlink | bird-mask-creation-process |
| category | creativity |
| json_metadata | {"tags":["creativity","anime","art","life","cosplay"],"image":["https://cdn.steemitimages.com/DQmb44GCiaRB1LGhyRcYxYu6yWK3vJe6mtNUHTypnFsRgXF/DSC04054.JPG","https://cdn.steemitimages.com/DQmR3mpsJnkB4C2m5McDyNDJryt4BKgZfm5s6rzb5rhhAZ2/1.JPG","https://cdn.steemitimages.com/DQmeYfEP9KS5aN6FS4UMAEwwhmbffo9j8Y8RiDQpFL4g9Ky/2.JPG","https://cdn.steemitimages.com/DQmfKZv8h9qd2SzPehR8KkEQqCnNMyfKCxk7LWAkhJXcdCZ/20180814_202350.jpg","https://cdn.steemitimages.com/DQmRT9xxwTkkQxXR3gcgoFFnTXLXn2JpctpAbJbRTWaidCg/20180816_154647.jpg","https://cdn.steemitimages.com/DQmPdTYv78wJJsWhC2ATn8ULap2gFJjSJRDXsP1GSvAdkAo/20180815_204326.jpg","https://cdn.steemitimages.com/DQmYSLgUEcvQK8AiwEMS6LcUTRZP1dkrG647g975Tv5Eny7/1.jpg","https://cdn.steemitimages.com/DQmbnWUQPCEg2xk9QjWjXW8gL9qpYJkPkhmwz6Gvu47rLSE/3.JPG","https://cdn.steemitimages.com/DQmS5ToFVQYq4AjMpD6SP7XNGppcKnNELu89dWqrjVbmxVT/20180816_112934.jpg","https://cdn.steemitimages.com/DQmSnq6fBL33VLUNyqQBQPBVmUbGWypgDAfqcAzmk8JVSBS/4.JPG","https://cdn.steemitimages.com/DQmT2dFTTKLie8MuQsmv65CEjTtJk47nyB74EHZUKAkV87B/20180817_163357.jpg","https://cdn.steemitimages.com/DQmSb5fdYnbjQBRpDkXm84p6quFiFHsnZzB41w5Du5fwAwh/20180820_135929.jpg","https://cdn.steemitimages.com/DQmecXHkMSKJ6eZonKJ7fXxRZgP58KqxfB1T4NV51mc43bz/20180817_172940.jpg","https://cdn.steemitimages.com/DQmUByRgxzkY4UqvwnzCHfbXrS1z9UaB5vmaQfMQQL4cHgR/DSC04055.JPG"],"app":"steemit/0.1","format":"markdown"} |
| created | 2018-10-02 08:37:24 |
| last_update | 2018-10-02 08:37:24 |
| depth | 0 |
| children | 5 |
| last_payout | 2018-10-09 08:37:24 |
| cashout_time | 1969-12-31 23:59:59 |
| total_payout_value | 4.993 HBD |
| curator_payout_value | 1.581 HBD |
| pending_payout_value | 0.000 HBD |
| promoted | 0.000 HBD |
| body_length | 7,549 |
| author_reputation | 1,246,230,434,382 |
| root_title | "Bird Mask Creation Process" |
| beneficiaries | [] |
| max_accepted_payout | 1,000,000.000 HBD |
| percent_hbd | 10,000 |
| post_id | 72,466,181 |
| net_rshares | 3,439,555,699,175 |
| author_curate_reward | "" |
| voter | weight | wgt% | rshares | pct | time |
|---|---|---|---|---|---|
| wackou | 0 | 93,208,085,531 | 1.5% | ||
| tuck-fheman | 0 | 3,961,360,147 | 2.5% | ||
| mindstabber | 0 | 0 | 100% | ||
| lola-carola | 0 | 284,205,933 | 2.5% | ||
| anwenbaumeister | 0 | 3,706,046,717 | 5% | ||
| raymondspeaks | 0 | 271,977,912 | 2.5% | ||
| liberosist | 0 | 15,513,522,746 | 5% | ||
| charlie777pt | 0 | 473,962,664 | 0.5% | ||
| lk666 | 0 | 526,700,967 | 2.5% | ||
| meerkat | 0 | 467,072,651 | 5% | ||
| curie | 0 | 188,759,350,898 | 5% | ||
| hendrikdegrote | 0 | 2,434,927,309,609 | 5% | ||
| vact | 0 | 95,503,949,481 | 5% | ||
| dashfit | 0 | 420,396,808 | 2.5% | ||
| sethroot | 0 | 152,001,712 | 0.5% | ||
| gangstayid | 0 | 120,307,347 | 2.5% | ||
| gmedley | 0 | 400,217,020 | 2.5% | ||
| davidfnck | 0 | 4,690,038,877 | 30% | ||
| pacokam8 | 0 | 297,635,638 | 2% | ||
| michelios | 0 | 147,831,774 | 0.75% | ||
| moksamol | 0 | 725,943,214 | 2.5% | ||
| getrichordie | 0 | 148,610,949 | 2.5% | ||
| thatsweeneyguy | 0 | 74,199,772 | 2.5% | ||
| choogirl | 0 | 9,146,029,139 | 5.86% | ||
| the-eliot | 0 | 312,861,887 | 2.5% | ||
| cryptocurator | 0 | 1,497,099,207 | 1% | ||
| dbzfan4awhile | 0 | 141,395,353 | 2.5% | ||
| misslasvegas | 0 | 887,487,209 | 2.5% | ||
| locikll | 0 | 2,529,431,664 | 10% | ||
| aboutyourbiz | 0 | 976,616,051 | 5% | ||
| jayna | 0 | 220,103,230 | 0.75% | ||
| rival | 0 | 4,121,353,478 | 2% | ||
| slickhustler007 | 0 | 200,255,411 | 2.5% | ||
| makrotheblack | 0 | 102,442,745 | 2.5% | ||
| neumannsalva | 0 | 490,698,810 | 2.5% | ||
| phogyan | 0 | 95,835,043 | 2.5% | ||
| misterakpan | 0 | 8,556,117,766 | 100% | ||
| g0nr0gue | 0 | 178,165,989 | 2.5% | ||
| tamacvet | 0 | 61,760,940,194 | 80% | ||
| felixrodriguez | 0 | 145,241,695 | 2.5% | ||
| tormiwah | 0 | 17,134,627,871 | 87% | ||
| cepul | 0 | 186,455,621 | 5.86% | ||
| honeysara | 0 | 215,021,568 | 1.25% | ||
| massivevibration | 0 | 3,700,278,273 | 5% | ||
| fbslo | 0 | 9,935,813,465 | 5% | ||
| anna-mi | 0 | 67,288,620 | 2.5% | ||
| clweeks | 0 | 259,071,517 | 3% | ||
| click3rs | 0 | 79,457,466 | 2.5% | ||
| buckydurddle | 0 | 303,253,956 | 1% | ||
| marialefleitas | 0 | 115,710,608 | 5.86% | ||
| gotgame | 0 | 145,342,485 | 2.5% | ||
| poodai | 0 | 171,665,410 | 2.5% | ||
| andywong31 | 0 | 53,749,985,908 | 100% | ||
| peaceandwar | 0 | 652,228,041 | 2.5% | ||
| enzor | 0 | 109,318,314 | 5% | ||
| dandays | 0 | 4,620,289,978 | 13% | ||
| daydreaming | 0 | 302,662,696 | 100% | ||
| papaudeme | 0 | 2,511,038,975 | 100% | ||
| puravidaville | 0 | 872,802,785 | 3% | ||
| janine-ariane | 0 | 254,603,559 | 5% | ||
| steemcommunity | 0 | 38,170,547,467 | 50% | ||
| drmake | 0 | 2,782,475,259 | 2.5% | ||
| yanga | 0 | 3,179,735,420 | 100% | ||
| awesomeabasiono | 0 | 355,142,381 | 50% | ||
| skycae | 0 | 586,426,498 | 5% | ||
| sireh | 0 | 149,203,683 | 0.5% | ||
| xanderslee | 0 | 238,917,079 | 5% | ||
| dronie | 0 | 824,587,620 | 100% | ||
| thescubageek | 0 | 286,032,808 | 2.5% | ||
| venalbe | 0 | 118,137,545 | 2.5% | ||
| anikekirsten | 0 | 593,475,933 | 5% | ||
| hidden84 | 0 | 7,526,985,531 | 50% | ||
| hkmoon | 0 | 306,127,791 | 2.5% | ||
| stahlberg | 0 | 796,670,975 | 2.5% | ||
| gabrielatravels | 0 | 79,700,070 | 1.25% | ||
| catalincernat | 0 | 542,496,530 | 5% | ||
| kimberprime | 0 | 1,630,899,324 | 100% | ||
| zlatkamrs | 0 | 166,421,932 | 4.75% | ||
| mangoish | 0 | 86,418,298 | 10% | ||
| hetty-rowan | 0 | 568,381,845 | 5.86% | ||
| laritheghost | 0 | 133,247,710 | 2.5% | ||
| lynncoyle1 | 0 | 6,065,916,503 | 20% | ||
| adamzi | 0 | 146,396,863 | 2.5% | ||
| wisewoof | 0 | 145,578,288 | 2.5% | ||
| giddyupngo | 0 | 339,841,933 | 2.5% | ||
| mrday | 0 | 111,679,758 | 2.5% | ||
| saikolola | 0 | 1,024,003,930 | 100% | ||
| mininthecity | 0 | 162,296,244 | 4% | ||
| randomwanderings | 0 | 445,611,911 | 11.72% | ||
| jazzhero | 0 | 36,212,271,363 | 100% | ||
| didic | 0 | 1,349,095,605 | 2.5% | ||
| operahoser | 0 | 216,687,481 | 0.6% | ||
| wdoutjah | 0 | 105,143,150 | 2.5% | ||
| oghie | 0 | 395,657,987 | 50% | ||
| ameliabartlett | 0 | 112,194,484 | 0.75% | ||
| vegan.niinja | 0 | 160,476,686 | 2.5% | ||
| benleemusic | 0 | 1,052,948,580 | 0.5% | ||
| ivan-g | 0 | 489,152,950 | 2.5% | ||
| elfranz | 0 | 106,069,813 | 5.86% | ||
| chimtivers96 | 0 | 255,185,411 | 5% | ||
| minnowlife | 0 | 500,715,398 | 100% | ||
| joelagbo | 0 | 89,137,528 | 2.5% | ||
| idkpdx | 0 | 66,395,744 | 2.5% | ||
| morbyjohn | 0 | 124,958,041 | 7% | ||
| simplymike | 0 | 88,033,449,959 | 70% | ||
| wanasoloben | 0 | 339,010,827 | 2.5% | ||
| hiddenblade | 0 | 410,866,333 | 5.86% | ||
| captainquenta | 0 | 170,407,498 | 50% | ||
| misia1979 | 0 | 373,369,273 | 2.5% | ||
| outtheshellvlog | 0 | 102,741,487 | 2.5% | ||
| kendallron | 0 | 99,819,389 | 5.86% | ||
| pgrab86 | 0 | 590,249,808 | 65% | ||
| lazybird | 0 | 72,583,285 | 20% | ||
| diabonua | 0 | 295,657,014 | 5% | ||
| aceaeterna | 0 | 1,739,011,127 | 50% | ||
| alexworld | 0 | 533,841,919 | 50% | ||
| blessedsteemer | 0 | 74,805,714 | 2.5% | ||
| romanleopold | 0 | 111,922,371 | 2.5% | ||
| niouton | 0 | 206,017,788 | 1% | ||
| mexa | 0 | 526,509,746 | 100% | ||
| sergiusgreat | 0 | 531,343,941 | 100% | ||
| alina34 | 0 | 530,249,726 | 100% | ||
| izydorjasiski | 0 | 530,898,658 | 100% | ||
| irinkasamoilova | 0 | 530,705,139 | 100% | ||
| council | 0 | 602,133,555 | 10% | ||
| felicjann | 0 | 530,465,050 | 100% | ||
| minasyandianna | 0 | 529,684,967 | 100% | ||
| suggestboron | 0 | 530,225,329 | 100% | ||
| bedbugsslim | 0 | 529,873,973 | 100% | ||
| gibic | 0 | 4,623,804,573 | 100% | ||
| banchick | 0 | 529,727,075 | 100% | ||
| pavlovdinar | 0 | 530,584,880 | 100% | ||
| hallbill94 | 0 | 530,363,112 | 100% | ||
| rdavis81 | 0 | 530,019,429 | 100% | ||
| esteliopadilla | 0 | 107,901,698 | 2.5% | ||
| backbonewriter | 0 | 530,089,394 | 100% | ||
| followmutable | 0 | 530,046,705 | 100% | ||
| weepyhorrified | 0 | 530,050,358 | 100% | ||
| pyroxenemogul | 0 | 530,449,832 | 100% | ||
| ringwormbasic | 0 | 530,183,051 | 100% | ||
| twistlumber | 0 | 530,250,462 | 100% | ||
| pastrytorn | 0 | 529,661,542 | 100% | ||
| buddingcaviar | 0 | 529,977,017 | 100% | ||
| call-me-howie | 0 | 904,081,674 | 2.5% | ||
| polyphemus | 0 | 18,793,504,671 | 100% | ||
| hansmast | 0 | 366,536,708 | 2.5% | ||
| deividluchi | 0 | 78,351,319 | 2.5% | ||
| wstanley226 | 0 | 387,325,195 | 50% | ||
| olgalestova | 0 | 530,446,400 | 100% | ||
| gannamuliar | 0 | 530,870,681 | 100% | ||
| crispysuperb | 0 | 530,489,893 | 100% | ||
| nasturtiumfatty | 0 | 531,266,410 | 100% | ||
| allennut | 0 | 531,191,889 | 100% | ||
| icingexpenses | 0 | 531,023,549 | 100% | ||
| batchjocular | 0 | 530,434,162 | 100% | ||
| danlipert | 0 | 77,664,843 | 2.5% | ||
| luppers | 0 | 634,041,346 | 2.5% | ||
| clement.poiret | 0 | 282,591,562 | 5% | ||
| mereflag | 0 | 531,022,393 | 100% | ||
| breadsplonk | 0 | 530,396,415 | 100% | ||
| kneadgit | 0 | 530,964,960 | 100% | ||
| fragiletalented | 0 | 531,295,329 | 100% | ||
| c-squared | 0 | 39,756,807,793 | 11.72% | ||
| daniannyveronica | 0 | 400,914,161 | 100% | ||
| c-cubed | 0 | 97,652,637,622 | 100% | ||
| annaabi | 0 | 308,684,132 | 2.5% | ||
| abraham10 | 0 | 215,723,034 | 82% | ||
| arkoseduration | 0 | 531,983,256 | 100% | ||
| joiningagitated | 0 | 532,567,449 | 100% | ||
| strandharness | 0 | 531,921,282 | 100% | ||
| plankkellogs | 0 | 531,684,614 | 100% | ||
| revealpipet | 0 | 532,046,032 | 100% | ||
| predict-crypto | 0 | 190,527,075 | 0.1% | ||
| javier.dejuan | 0 | 1,069,967,486 | 5% | ||
| dzhoshu | 0 | 533,100,268 | 100% | ||
| klintonm | 0 | 533,428,373 | 100% | ||
| kolesnikovev74 | 0 | 532,660,550 | 100% | ||
| semtroneum | 0 | 124,652,532 | 1.5% | ||
| nikfrol1983 | 0 | 532,417,995 | 100% | ||
| alom8 | 0 | 215,842,001 | 2.5% | ||
| nothingismagick | 0 | 92,758,404 | 2.5% | ||
| deadcountry | 0 | 83,820,869 | 2.5% | ||
| cherryandberry | 0 | 0 | 5% | ||
| steemitbuzz | 0 | 228,618,589 | 50% | ||
| motorwaysilt | 0 | 535,416,984 | 100% | ||
| sillyboast | 0 | 535,355,857 | 100% | ||
| branchanus | 0 | 535,411,422 | 100% | ||
| implorelot | 0 | 535,205,351 | 100% | ||
| triflesleepy | 0 | 535,313,966 | 100% | ||
| meteoroidtepid | 0 | 535,281,301 | 100% | ||
| artemka222 | 0 | 535,129,660 | 100% | ||
| viper777 | 0 | 535,262,070 | 100% | ||
| lico.ryka | 0 | 535,035,474 | 100% | ||
| stil1il4up | 0 | 522,684,689 | 100% | ||
| maftuna.bibikova | 0 | 535,037,086 | 100% | ||
| atogsersise | 0 | 534,866,327 | 100% | ||
| bangkidneys | 0 | 534,461,132 | 100% | ||
| gemgoosander | 0 | 534,467,015 | 100% | ||
| providetag | 0 | 534,701,481 | 100% | ||
| mustangpaddling | 0 | 534,904,497 | 100% | ||
| instinctgelatin | 0 | 535,215,891 | 100% | ||
| leafslurp | 0 | 535,356,547 | 100% | ||
| slitheradhesive | 0 | 535,087,292 | 100% | ||
| curlingcesty | 0 | 535,338,922 | 100% | ||
| germharmony | 0 | 534,785,222 | 100% | ||
| bubbishninks | 0 | 535,240,058 | 100% | ||
| smellbaryon | 0 | 535,185,860 | 100% | ||
| disksworthless | 0 | 534,855,582 | 100% | ||
| punhatdelighted | 0 | 535,155,048 | 100% | ||
| vicaroutlandish | 0 | 535,455,034 | 100% | ||
| blowfisheclogite | 0 | 535,336,218 | 100% | ||
| plaguedelta | 0 | 534,979,199 | 100% | ||
| weaponturkey | 0 | 535,107,455 | 100% | ||
| boatswainjick | 0 | 535,069,855 | 100% | ||
| makingcrackling | 0 | 535,396,902 | 100% | ||
| batmimabeme | 0 | 535,216,154 | 100% |
UPDATE: Hi @kimberprime this post has been featured in **Exponential! C² Featured Posts**, a daily publication of the @c-cubed blog. Check it out :)
https://steemit.com/curation/@c-cubed/20181002t225900882z
<div class="pull-left">https://cdn.steemitimages.com/DQmaSUWYsJ3AMUEMRqCSaoKJVNvtsbKm4fNAtmTidr8Uggc/C%20Squared%20Logo%20Transparency%20200px.png</div><br>This post was shared in the <a href="https://discord.gg/B8JFmJ4">Curation Collective Discord community</a> for curators, and upvoted and resteemed by the @c-squared community account after manual review.
| author | c-squared |
|---|---|
| permlink | 20181002t094425204z |
| category | creativity |
| json_metadata | {"tags":["creativity"],"users":["kimberprime","c-cubed","c-squared"],"image":["https://cdn.steemitimages.com/DQmaSUWYsJ3AMUEMRqCSaoKJVNvtsbKm4fNAtmTidr8Uggc/C%20Squared%20Logo%20Transparency%20200px.png"],"links":["https://steemit.com/curation/@c-cubed/20181002t225900882z","https://discord.gg/B8JFmJ4"],"app":"steemit/0.1"} |
| created | 2018-10-02 09:46:30 |
| last_update | 2018-10-04 05:31:54 |
| depth | 1 |
| children | 0 |
| last_payout | 2018-10-09 09:46:30 |
| cashout_time | 1969-12-31 23:59:59 |
| total_payout_value | 0.000 HBD |
| curator_payout_value | 0.000 HBD |
| pending_payout_value | 0.000 HBD |
| promoted | 0.000 HBD |
| body_length | 566 |
| author_reputation | 8,872,520,093,091 |
| root_title | "Bird Mask Creation Process" |
| beneficiaries | [] |
| max_accepted_payout | 1,000,000.000 HBD |
| percent_hbd | 10,000 |
| post_id | 72,469,058 |
| net_rshares | 1,597,304,683 |
| author_curate_reward | "" |
| voter | weight | wgt% | rshares | pct | time |
|---|---|---|---|---|---|
| kimberprime | 0 | 1,597,304,683 | 100% |
Amazing! Thank you for showing us how you did it!
| author | daniannyveronica |
|---|---|
| permlink | re-kimberprime-bird-mask-creation-process-20181004t001017194z |
| category | creativity |
| json_metadata | {"tags":["creativity"],"app":"steemit/0.1"} |
| created | 2018-10-04 00:10:18 |
| last_update | 2018-10-04 00:10:18 |
| depth | 1 |
| children | 1 |
| last_payout | 2018-10-11 00:10:18 |
| cashout_time | 1969-12-31 23:59:59 |
| total_payout_value | 0.000 HBD |
| curator_payout_value | 0.000 HBD |
| pending_payout_value | 0.000 HBD |
| promoted | 0.000 HBD |
| body_length | 49 |
| author_reputation | 345,757,035,412 |
| root_title | "Bird Mask Creation Process" |
| beneficiaries | [] |
| max_accepted_payout | 1,000,000.000 HBD |
| percent_hbd | 10,000 |
| post_id | 72,577,902 |
| net_rshares | 1,564,381,936 |
| author_curate_reward | "" |
| voter | weight | wgt% | rshares | pct | time |
|---|---|---|---|---|---|
| kimberprime | 0 | 1,564,381,936 | 100% |
Thanks! Glad you liked my overview. =D
| author | kimberprime |
|---|---|
| permlink | re-daniannyveronica-re-kimberprime-bird-mask-creation-process-20181005t003941044z |
| category | creativity |
| json_metadata | {"tags":["creativity"],"app":"steemit/0.1"} |
| created | 2018-10-05 00:39:42 |
| last_update | 2018-10-05 00:39:42 |
| depth | 2 |
| children | 0 |
| last_payout | 2018-10-12 00:39:42 |
| cashout_time | 1969-12-31 23:59:59 |
| total_payout_value | 0.000 HBD |
| curator_payout_value | 0.000 HBD |
| pending_payout_value | 0.000 HBD |
| promoted | 0.000 HBD |
| body_length | 38 |
| author_reputation | 1,246,230,434,382 |
| root_title | "Bird Mask Creation Process" |
| beneficiaries | [] |
| max_accepted_payout | 1,000,000.000 HBD |
| percent_hbd | 10,000 |
| post_id | 72,645,795 |
| net_rshares | 0 |
omg!! ineed this in my life <3 excellent!
| author | saikolola |
|---|---|
| permlink | re-kimberprime-bird-mask-creation-process-20181003t213451087z |
| category | creativity |
| json_metadata | {"tags":["creativity"],"app":"steemit/0.1"} |
| created | 2018-10-03 21:35:06 |
| last_update | 2018-10-03 21:35:06 |
| depth | 1 |
| children | 1 |
| last_payout | 2018-10-10 21:35:06 |
| cashout_time | 1969-12-31 23:59:59 |
| total_payout_value | 0.000 HBD |
| curator_payout_value | 0.000 HBD |
| pending_payout_value | 0.000 HBD |
| promoted | 0.000 HBD |
| body_length | 41 |
| author_reputation | 1,115,227,564,234 |
| root_title | "Bird Mask Creation Process" |
| beneficiaries | [] |
| max_accepted_payout | 1,000,000.000 HBD |
| percent_hbd | 10,000 |
| post_id | 72,571,954 |
| net_rshares | 1,630,899,324 |
| author_curate_reward | "" |
| voter | weight | wgt% | rshares | pct | time |
|---|---|---|---|---|---|
| kimberprime | 0 | 1,630,899,324 | 100% |
I'm glad you like it! =D
| author | kimberprime |
|---|---|
| permlink | re-saikolola-re-kimberprime-bird-mask-creation-process-20181005t003756913z |
| category | creativity |
| json_metadata | {"tags":["creativity"],"app":"steemit/0.1"} |
| created | 2018-10-05 00:37:57 |
| last_update | 2018-10-05 00:37:57 |
| depth | 2 |
| children | 0 |
| last_payout | 2018-10-12 00:37:57 |
| cashout_time | 1969-12-31 23:59:59 |
| total_payout_value | 0.000 HBD |
| curator_payout_value | 0.000 HBD |
| pending_payout_value | 0.000 HBD |
| promoted | 0.000 HBD |
| body_length | 24 |
| author_reputation | 1,246,230,434,382 |
| root_title | "Bird Mask Creation Process" |
| beneficiaries | [] |
| max_accepted_payout | 1,000,000.000 HBD |
| percent_hbd | 10,000 |
| post_id | 72,645,731 |
| net_rshares | 0 |