<div class=text-justify> <div class=pull-left> **¡Feliz Noche Amigos!** Hoy vengo a compartir una nueva idea para elaborar un lindo topper para el Día del Padre, es muy lindo, fácil y es ideal para regalar a esa persona especial. A continuación les detallo los materiales y los pasos para su realización, espero que les guste. </div> <div class=text-justify> <div class=pull-right> **¡Good night friends!** Today I come to share a new idea to make a nice topper for Father's Day, it is very cute, easy and it is ideal to give to that special person. Below I detail the materials and the steps for its realization, I hope you like it. </div> <center> </center> <center> <sub> **_Imagen editada en canva/Image edited in canva_** </sub> </center> <center> </center> <center><div class="phishy"><h1>Materiales || Materials</em></h1></div></center> <center> </center> <div class=text-justify> <div class=pull-left> - Foami escarchado dorado. - Foami escarchado azul rey. - Foami escarchado negro. - Cartulina escolar blanca. - Palito de altura. - Silicón. - Tijeras. - Hoja de papel. - Lápiz. </div> <div class=text-justify> <div class=pull-right> - Golden frosted foam. - King blue frosted foam. - Black frosted foam. - White school cardboard. - Height stick. - Silicone. - Pair of scissors. - Paper sheet. - Pencil. </div> <center> </center> <center><div class="phishy"><h1>Procedimiento || Process</em></h1></div></center> <center> </center> <div class=text-justify> <div class=pull-left> ❥ **PASO 1.** Lo primero que haremos serán los moldes en papel para posteriormente transferirlos al foami. </div> <div class=text-justify> <div class=pull-right> ❥ **STEP 1.** The first thing we will do will be the paper molds to later transfer them to the foam. </div> <center>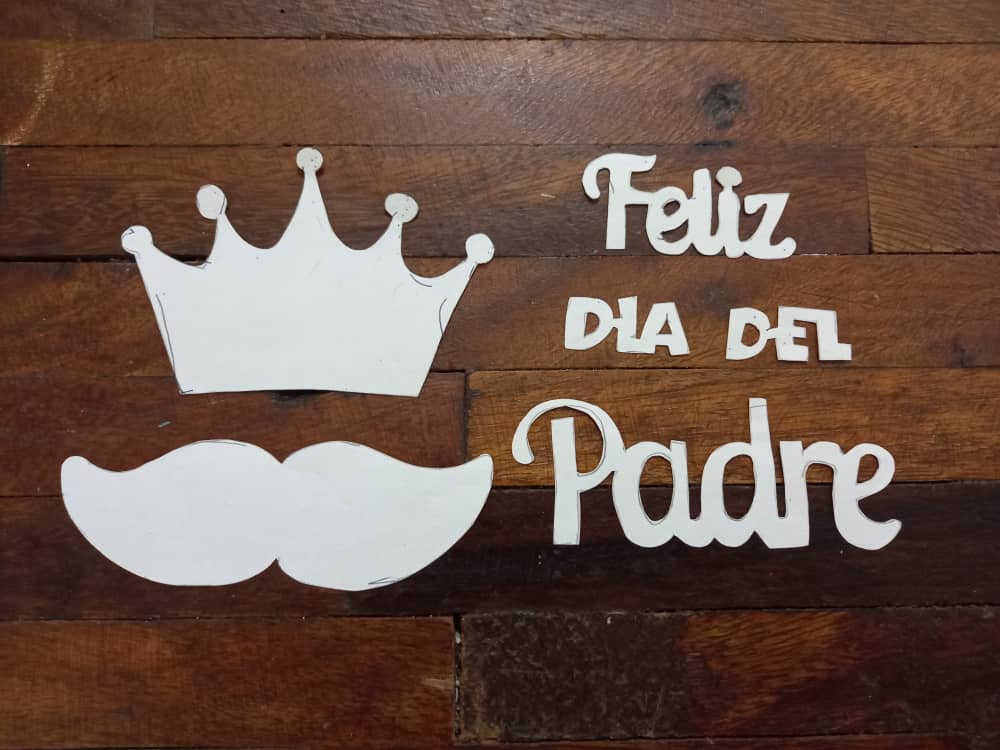 </center> <center> </center> <div class=text-justify> <div class=pull-left> ❥**PASO 2.** Comenzamos haciendo las letras en el foami azul rey escarchado y recortamos. </div> <div class=text-justify> <div class=pull-right> ❥ **STEP 2.** We start by making the letters in the frosted king blue foami and cut out. </div> <center> </center> <center> </center> <center> </center> <div class=text-justify> <div class=pull-left> ❥ **PASO 3.** Seguimos haciendo la corona en foami dorado escarchado y recortamos. </div> <div class=text-justify> <div class=pull-right> ❥ **STEP 3.** We continue making the crown in frosted golden foami and cut. </div> <center> </center> <center> </center> <center> </center> <div class=text-justify> <div class=pull-left> ❥ **PASO 4.** Por último hacemos el bigote en el foami negro escarchado y recortamos. </div> <div class=text-justify> <div class=pull-right> ❥ **STEP 4.** Finally we make the mustache in the frosted black foam and cut it. </div> <center> </center> <center></center> <center> </center> <div class=text-justify> <div class=pull-left> ❥ **PASO 5.** Aplicamos silicón en la parte trasera de la palabra “feliz” y la pegamos sobre la corona. </div> <div class=text-justify> <div class=pull-right> ❥ **STEP 5.** We apply silicone on the back of the word "happy" and stick it on the crown. </div> <center> </center> <center> </center> <center> </center> <div class=text-justify> <div class=pull-left> ❥ **PASO 6.** Ahora pegamos las palabras “día” y “del” sobre el bigote. </div> <div class=text-justify> <div class=pull-right> ❥ **STEP 6.** Now we paste the words “day” and “del” on the mustache. </div> <center></center> <center></center> <center> </center> <div class=text-justify> <div class=pull-left> ❥ **PASO 7.** Ahora extendemos la cartulina escolar y pegamos la corona sobre ella. </div> <div class=text-justify> <div class=pull-right> ❥ **STEP 7.** Now we spread the school cardboard and glue the crown on it. </div> <center> </center> <center> </center> <center> </center> <div class=text-justify> <div class=pull-left> ❥**PASO 8.** Debajo de la corona pegamos el bigote. </div> <div class=text-justify> <div class=pull-right> ❥ **STEP 8.** Under the crown we glue the mustache. </div> <center> </center> <center> </center> <center> </center> <div class=text-justify> <div class=pull-left> ❥ **PASO 9.** Por último pegamos la palabra “padre” debajo del bigote. </div> <div class=text-justify> <div class=pull-right> ❥ **STEP 9.** Finally we paste the word “father” under the mustache. </div> <center> </center> <center> </center> <div class=text-justify> <div class=pull-left> ❥ **PASO 10.** Ahora recortamos el exceso de cartulina y dejamos un borde delgado de esta alrededor del topper, quedando así: </div> <div class=text-justify> <div class=pull-right> ❥ **STEP 10.** Now we cut the excess cardboard and leave a thin edge of it around the topper, looking like this: </div> <center> </center> <center> </center> <center> </center> <div class=text-justify> <div class=pull-left> ❥**PASO 11.** Aplicamos una línea de silicón en la parte trasera del topper, justo en el centro y sobre ella pegamos el palito de altura. </div> <div class=text-justify> <div class=pull-right> ❥ **STEP 11.** We apply a line of silicone on the back of the topper, right in the center and on it we stick the height stick. </div> <center> </center> <center> </center> <center> </center> <div class=text-justify> <div class=pull-left> Y listo, finalmente tenemos un hermoso y creativo topper para regalar a papá en su día, podemos combinar los colores y elaborarlo como más nos guste, todo es cuestión de ser creativos con nuestro topper. Aquí les dejo 3 ideas más de toppers alusivos al dia del padre, espero que les gusten ❤ [Topper 1](https://hive.blog/hive-148441/@mariajcastro28/esp-eng-tutorial-de-un-lindo-topper-para-regalar-a-papa-en-su-dia-or-or-tutorial-of-a-cute-topper-to-give-to-dad-on-his-day) [Topper 2](https://hive.blog/hive-148441/@mariajcastro28/esp-eng-tutorial-para-elaborar-un-topper-alusivo-al-dia-del-padre-or-or-tutorial-to-make-a-topper-allusive-to-father-s-day) [Topper 3](https://hive.blog/hive-148441/@mariajcastro28/esp-eng-elaboracion-de-un-lindo-topper-para-el-dia-del-padre-tutorial-paso-a-paso-or-or-making-a-cute-topper-for-father-s-day) </div> <div class=text-justify> <div class=pull-right> And voila, we finally have a beautiful and creative topper to give to dad on his day, we can combine the colors and make it as we like, it's all a matter of being creative with our topper. Here are 3 more ideas of toppers alluding to Father's Day, I hope you like them ❤ [Topper 1](https://hive.blog/hive-148441/@mariajcastro28/esp-eng-tutorial-de-un-lindo-topper-para-regalar-a-papa-en-su-dia-or-or-tutorial-of-a-cute-topper-to-give-to-dad-on-his-day) [Topper 2](https://hive.blog/hive-148441/@mariajcastro28/esp-eng-tutorial-para-elaborar-un-topper-alusivo-al-dia-del-padre-or-or-tutorial-to-make-a-topper-allusive-to-father-s-day) [Topper 3](https://hive.blog/hive-148441/@mariajcastro28/esp-eng-elaboracion-de-un-lindo-topper-para-el-dia-del-padre-tutorial-paso-a-step-or-or-making-a-cute-topper-for-father-s-day) </div> <center> </center> <center> </center> <center> </center> <center><sub>*¡Gracias por detenerte a leer!* Todas las fotografías son de mi propiedad. Fotografías capturadas con mi _Samsung Galaxy A12_ </sub> _Nos vemos en mi próxima publicación._ **_¡Tengan un feliz día!_**</center> <center> <sub> *¡Thanks for stopping to read!* All photographs are my property. Photos captured with my _Samsung Galaxy A12_ </sub> _See you in my next post._ **_¡Have a happy day!_** </center>
| author | mariajcastro28 | ||||||||||||
|---|---|---|---|---|---|---|---|---|---|---|---|---|---|
| permlink | esp-eng-como-hacer-un-creativo-topper-para-el-dia-del-padre-or-or-tutorial-paso-a-paso-how-to-make-a-creative-topper-for-father | ||||||||||||
| category | hive-148441 | ||||||||||||
| json_metadata | {"tags":["spanish","cervantes","craft","tutorial","originalcontent","trafalgar","appreciator"],"image":["https://images.hive.blog/DQmdseSmXbCjtRRTFarEWSh4uyY5yMFmA3XRxKy3Afg6ZTa/306.png","https://images.hive.blog/DQme3UeeG1Ura2jGYvWjTjddxiNZXbu47gXE9aVK4RspNKJ/@mariajcastro28%203.png","https://images.hive.blog/DQmQrXduGaz3b9zDV4jaoFn3grvNsDgHAQBDCVAZuTkpZjE/1.jpg","https://images.hive.blog/DQmUKq3DaAKktEkokgDHRW1sQBjqwVn3wDfWrXwjx7EG2Gy/2.jpg","https://images.hive.blog/DQmYDcJGLN6TDVibBE261uvqtUJu5xBsZNzMdMeDY6qV3HN/3.jpg","https://images.hive.blog/DQmR2AjzsiVyjFUdNT159cVcH8vSLmf1CUS26ubh3EGyao8/4.JPG","https://images.hive.blog/DQmY2kCfE4Gmqd4uvk4gCCbqrUYsxQbYwaaQ1S2mfzqjNoG/5.JPG","https://images.hive.blog/DQmerXqNjtU6gGk88YDdPRRcHuKFptdgpXKYjW3nA2WbP11/6.jpg","https://images.hive.blog/DQma7KhbhavWZNLfNgECgfMAc71eRzsT1xzjXTEhnxYYdBk/7.jpg","https://images.hive.blog/DQmR38STci3sQBG16kcPoXwvZ1JovWBbLWAJDff5R9vKDZa/8.jpg","https://images.hive.blog/DQmSQV4ZMSfSaSv8ey7wD9V2YkRp5PZCfEK2fGyjFjFySQf/9.jpg","https://images.hive.blog/DQmfREVd4dqybtEZWcY8RFUdWxa19FShmzKx2HDnDT6pJd4/10.jpg","https://images.hive.blog/DQmevsdCv4pWtTcg8DuTBqRwAAuN41YLEUovj5xfsf6Ch4F/11.jpg","https://images.hive.blog/DQmUUZt5tr4vKS2Ek9PkvMci6otp5Cw4af3hjPkhpqn7kVK/12.jpg","https://images.hive.blog/DQmd6dPZTyPRVCEUqZcKrXsx11MkVsRq6dTjDiZCjUSRCkK/13.jpg","https://images.hive.blog/DQmfLjayceLQsD9wGxSRVjbsCGosHzsRnvHPwaW7CbysjCL/14.jpg","https://images.hive.blog/DQmRHZyBC46x8vhFgLCre3kHPS3eScyLY7tqr9e4P6nNT5U/15.jpg","https://images.hive.blog/DQmY4oNQnEW4MXq5JAZJ5bBgNKwuPkcRiFPkaU7Gmoae2aQ/16.jpg","https://images.hive.blog/DQmQHpuqikpRN2dJgwHLhMdSMAgAXP8sFiLUVhjwehGiRJJ/17.jpg","https://images.hive.blog/DQmQpQsSL26MNs48k85hNW3jh7JnNGWp3vs4xDEPkCuLfsC/18.jpg","https://images.hive.blog/DQmcNTXyWUbNf5w9vQjvT6MBYmpZ7i8Y9qVmcAL6pNjd6gW/19.jpg","https://images.hive.blog/DQmQLYJUL4zESxWD6o4nojZpv7akV9g8Jcu3nfQDS4LV5a9/20.jpg","https://images.hive.blog/DQmXBHeMp4pPGYdNZQfJW9RJUsSgZaHYYSfW4nFqagUT4jh/d8bf839d-62bb-4aa4-ad42-a0c2afb5e09f.jpg","https://images.hive.blog/DQmR7Hh6pfyaRm4WTpdwWegvonKTbpmkLajHbH4MpdNvbh8/dd379183-8f72-4254-a4ad-36bb8812410f.jpg","https://images.hive.blog/DQmcvHnvuK5kgQv4eHFKm5bHwaZuReft3Ye9b2wkVi5qCyx/@mariajcastro28.png"],"links":["https://hive.blog/hive-148441/@mariajcastro28/esp-eng-tutorial-de-un-lindo-topper-para-regalar-a-papa-en-su-dia-or-or-tutorial-of-a-cute-topper-to-give-to-dad-on-his-day"],"app":"hiveblog/0.1","format":"markdown"} | ||||||||||||
| created | 2021-06-17 05:03:27 | ||||||||||||
| last_update | 2021-06-17 05:03:27 | ||||||||||||
| depth | 0 | ||||||||||||
| children | 2 | ||||||||||||
| last_payout | 2021-06-24 05:03:27 | ||||||||||||
| cashout_time | 1969-12-31 23:59:59 | ||||||||||||
| total_payout_value | 6.137 HBD | ||||||||||||
| curator_payout_value | 6.246 HBD | ||||||||||||
| pending_payout_value | 0.000 HBD | ||||||||||||
| promoted | 0.000 HBD | ||||||||||||
| body_length | 11,778 | ||||||||||||
| author_reputation | 655,471,349,100,264 | ||||||||||||
| root_title | "[ESP-ENG] Como hacer un creativo topper para el día del padre || Tutorial paso a paso / How to make a creative topper for Father's Day || Step by step tutorial" | ||||||||||||
| beneficiaries |
| ||||||||||||
| max_accepted_payout | 1,000,000.000 HBD | ||||||||||||
| percent_hbd | 10,000 | ||||||||||||
| post_id | 104,380,016 | ||||||||||||
| net_rshares | 29,872,680,719,047 | ||||||||||||
| author_curate_reward | "" |
| voter | weight | wgt% | rshares | pct | time |
|---|---|---|---|---|---|
| good-karma | 0 | 37,211,906,442 | 4% | ||
| esteemapp | 0 | 14,403,509,111 | 4.07% | ||
| jomeszaros | 0 | 5,520,442,111 | 100% | ||
| eturnerx | 0 | 47,295,395,275 | 1.3% | ||
| appreciator | 0 | 27,855,371,677,257 | 9% | ||
| goldcoin | 0 | 47,069,882,882 | 100% | ||
| esteem.app | 0 | 1,069,112,307 | 3.99% | ||
| alinsonchangir | 0 | 52,581,688,877 | 100% | ||
| naty16 | 0 | 6,673,057,776 | 10% | ||
| tsunsica | 0 | 2,485,400,013 | 9% | ||
| miguelbaez | 0 | 537,630,200 | 4.5% | ||
| photographercr | 0 | 1,298,316,260 | 0.78% | ||
| linita | 0 | 27,665,952,919 | 100% | ||
| zeesh | 0 | 1,718,416,094 | 4.5% | ||
| globalcurrencies | 0 | 761,758,076 | 50% | ||
| ecency | 0 | 1,462,397,608,274 | 3.92% | ||
| leslieebano | 0 | 25,102,786,399 | 100% | ||
| teesart | 0 | 238,964,382,335 | 100% | ||
| ecency.stats | 0 | 952,626,619 | 4% | ||
| rosilys20 | 0 | 515,468,338 | 4.5% | ||
| noalys | 0 | 944,394,656 | 4.5% | ||
| kattycrochet | 0 | 1,022,820,144 | 2.25% | ||
| heypuch | 0 | 22,349,767,221 | 100% | ||
| derppunk | 0 | 1,691,178,603 | 100% | ||
| emansitticoof | 0 | 2,050,013,818 | 100% | ||
| josecarlos26 | 0 | 5,351,757,691 | 100% | ||
| pi-trader | 0 | 9,673,769,349 | 50% |
Your content has been **voted** as a part of [Encouragement program](https://ecency.com/ecency/@good-karma/encouragement-program-continues-82eafcd10a299). Keep up the good work! <br><br>Use Ecency daily to boost your growth on platform! <br><br><b>Support Ecency</b><br>[Vote for Proposal](https://hivesigner.com/sign/update-proposal-votes?proposal_ids=%5B141%5D&approve=true)<br>[Delegate HP and earn more](https://ecency.com/hive-125125/@ecency/daily-100-curation-rewards)
| author | ecency |
|---|---|
| permlink | re-2021617t5829753z |
| category | hive-148441 |
| json_metadata | {"tags":["ecency"],"app":"ecency/3.0.16-welcome","format":"markdown+html"} |
| created | 2021-06-17 05:08:30 |
| last_update | 2021-06-17 05:08:30 |
| depth | 1 |
| children | 0 |
| last_payout | 2021-06-24 05:08:30 |
| cashout_time | 1969-12-31 23:59:59 |
| total_payout_value | 0.000 HBD |
| curator_payout_value | 0.000 HBD |
| pending_payout_value | 0.000 HBD |
| promoted | 0.000 HBD |
| body_length | 474 |
| author_reputation | 549,971,524,037,747 |
| root_title | "[ESP-ENG] Como hacer un creativo topper para el día del padre || Tutorial paso a paso / How to make a creative topper for Father's Day || Step by step tutorial" |
| beneficiaries | [] |
| max_accepted_payout | 1,000,000.000 HBD |
| percent_hbd | 10,000 |
| post_id | 104,380,069 |
| net_rshares | 0 |
Siempre tan oportuna con tus hermosas manualidades, excelente para colocarlo en un deliciosos ponque de chocolate. Intentare hacer el mio, gracias. Te invito a seguirme y comentar mis publicaciones.
| author | lesliekat |
|---|---|
| permlink | quy6kk |
| category | hive-148441 |
| json_metadata | {"app":"hiveblog/0.1"} |
| created | 2021-06-19 11:57:57 |
| last_update | 2021-06-19 11:57:57 |
| depth | 1 |
| children | 0 |
| last_payout | 2021-06-26 11:57:57 |
| cashout_time | 1969-12-31 23:59:59 |
| total_payout_value | 0.000 HBD |
| curator_payout_value | 0.000 HBD |
| pending_payout_value | 0.000 HBD |
| promoted | 0.000 HBD |
| body_length | 198 |
| author_reputation | 13,743,088,892,638 |
| root_title | "[ESP-ENG] Como hacer un creativo topper para el día del padre || Tutorial paso a paso / How to make a creative topper for Father's Day || Step by step tutorial" |
| beneficiaries | [] |
| max_accepted_payout | 1,000,000.000 HBD |
| percent_hbd | 10,000 |
| post_id | 104,426,685 |
| net_rshares | 0 |