Hey there, This post goes into how I have set up a 16x2 LCD display to be used with my time-lapse rail. The LCD will display a number of menu items that allow you to configure the slider as well as starting and stopping the motion. I'll go through both the menu API and how I set up the buttons to navigate in a future post. Previous parts are here https://steemit.com/photography/@markangeltrueman/building-a-timelapse-slider-rail-with-arduino-part-1 https://steemit.com/photography/@markangeltrueman/building-a-timelapse-slider-rail-with-arduino---part-2---stepper-motor-1510869489-2758267 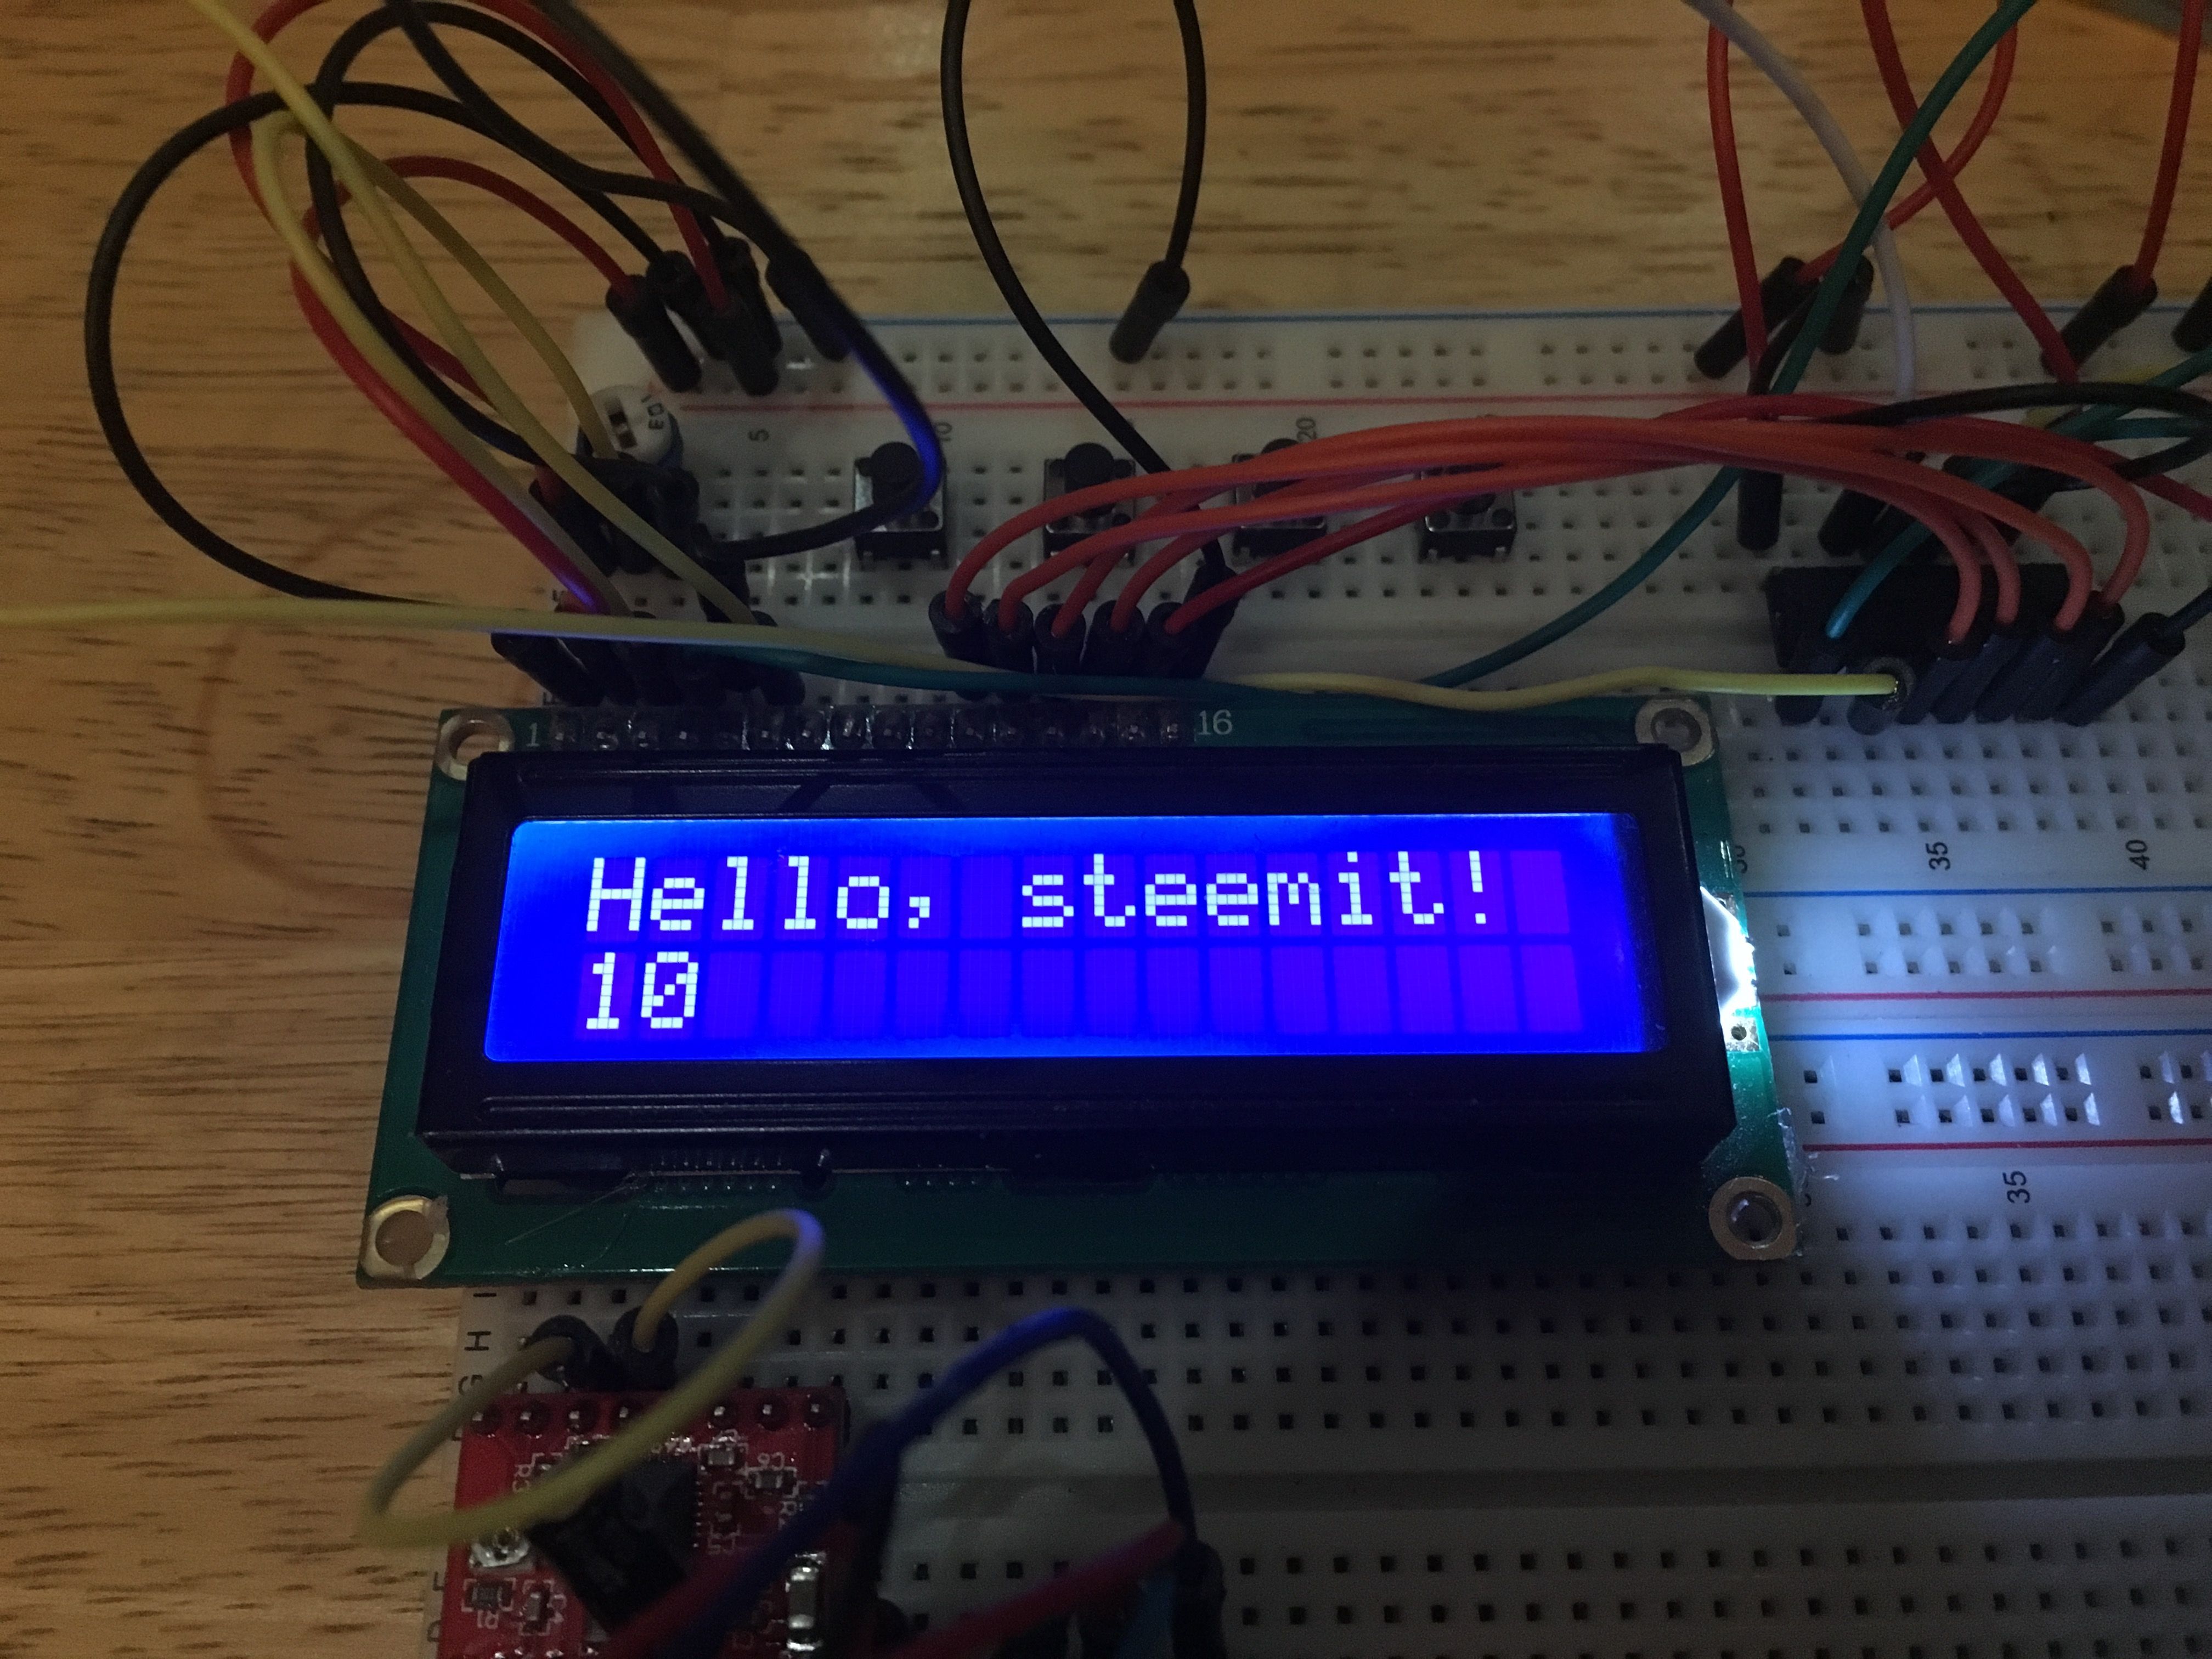 It is possible to connect an LCD directly to the Arduino but the problem with this is that it uses at least 6 data pins on the Arduino, which doesn't leave enough for the other functions I need from the Arduino. To get around this, I decided to use a 74HC595 bit shift register chip. These chips allow you to pulse values into the chip on a single pin and then "latch" the value in place before outputting it. There are 8 output pins which give plenty of flexibility. You can also chain these chips together so you can get 8,16,24,32 bit outputs from just a few Arduino pins. Clever stuff. Here is a schematic created in Fritzing (a great program if you want to do this kind of thing) 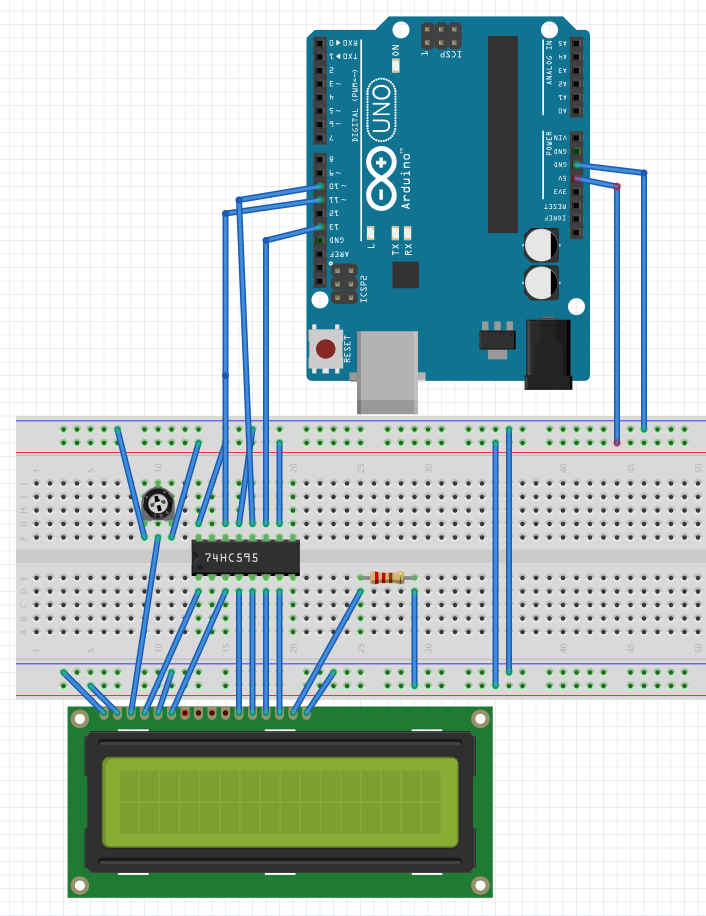 As you can see there are just 3 wires coming out of the Arduino (apart from 5v and GND) and they all go into the 595 chip. The chip then has 6 outputs into the LCD, 4 for data, 1 to enable the LCD and 1 to switch the mode of the LCD from "command" mode to "data" mode. Command mode is used to move the cursor, clear the screen etc. Data mode is enable to actually take the data sent in on the 4 (in this case) data pins and display it. In case you are wondering what the LCD pins do, this is a good page (i wont copy and paste the detail here) http://www.circuitstoday.com/interfacing-lcd-to-arduino In terms of Arduino code, you can't get any simpler. You need to include a couple of libraries, one for the LCD and one called SPI (serial peripheral interface), which tacks on the ability to use the 74HC595 chip. 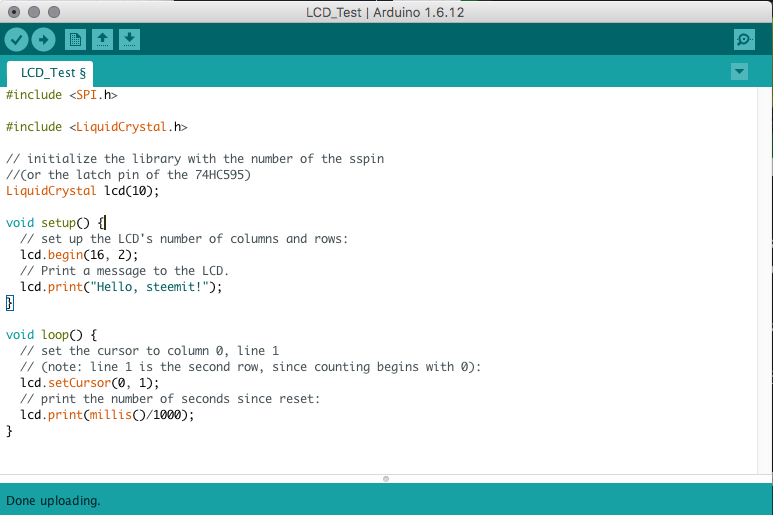 The output from this is shown in this video https://youtu.be/0FmKherJg18 And here is a quick video showing how altering the resistance through the potentiometer changes the brightness of the lcd text. You can change the backlight brightness by either altering the value of the resistor in place on the breadboard, or by replacing that resistor with a potentiometer too, but i prefer to just leave it with a 680 ohm resistor which gives a good level of light. https://youtu.be/eQy2utCO-Ds In the next part, I'll go through how to set up the Arduino to accept input from 4 different buttons on a single pin and touch on my custom menu API Thanks for looking Mark
| author | markangeltrueman |
|---|---|
| permlink | building-a-timelapse-slider-rail-with-arduino-part-3-lcd-display |
| category | photography |
| json_metadata | {"tags":["photography","arduino","timelapse","electronics","diy"],"image":["https://steemitimages.com/DQmS2Q9kRcMohe17CUPt5F9Gss77TQvPTMBjSBXLieZeXuA/IMG_0458.JPG","https://steemitimages.com/DQmZdnPfJvuvjGiAu9emaS6FUB3PBR1B2z9uBT8WeHj2qKz/Screen%20Shot%202017-11-18%20at%2021.06.03.png","https://steemitimages.com/DQmTqBYKbJWdW4ctzSHtqGxQ4EP38UcqmCrBjXLqC3s94kU/Screen%20Shot%202017-11-18%20at%2021.24.57.png","https://img.youtube.com/vi/0FmKherJg18/0.jpg","https://img.youtube.com/vi/eQy2utCO-Ds/0.jpg"],"links":["https://steemit.com/photography/@markangeltrueman/building-a-timelapse-slider-rail-with-arduino-part-1","https://steemit.com/photography/@markangeltrueman/building-a-timelapse-slider-rail-with-arduino---part-2---stepper-motor-1510869489-2758267","http://www.circuitstoday.com/interfacing-lcd-to-arduino","https://youtu.be/0FmKherJg18","https://youtu.be/eQy2utCO-Ds"],"app":"steemit/0.1","format":"markdown"} |
| created | 2017-11-18 21:36:36 |
| last_update | 2017-11-18 21:39:30 |
| depth | 0 |
| children | 4 |
| last_payout | 2017-11-25 21:36:36 |
| cashout_time | 1969-12-31 23:59:59 |
| total_payout_value | 6.610 HBD |
| curator_payout_value | 1.964 HBD |
| pending_payout_value | 0.000 HBD |
| promoted | 0.000 HBD |
| body_length | 3,202 |
| author_reputation | 75,759,505,276,179 |
| root_title | "Building a timelapse slider rail with Arduino - Part 3 - LCD Display" |
| beneficiaries | [] |
| max_accepted_payout | 1,000,000.000 HBD |
| percent_hbd | 0 |
| post_id | 20,816,288 |
| net_rshares | 3,846,742,194,572 |
| author_curate_reward | "" |
| voter | weight | wgt% | rshares | pct | time |
|---|---|---|---|---|---|
| pharesim | 0 | 104,224,528,413 | 0.03% | ||
| kushed | 0 | 37,491,976,594 | 1.34% | ||
| anwenbaumeister | 0 | 65,311,829,444 | 1.68% | ||
| gikitiki | 0 | 618,406,577 | 0.84% | ||
| toxichan | 0 | 584,306,712 | 1.68% | ||
| moisesmcardona | 0 | 636,978,701 | 0.5% | ||
| siavach | 0 | 1,851,350,455 | 1.68% | ||
| steemedia | 0 | 213,319,003 | 1.68% | ||
| lighteye | 0 | 20,212,074,138 | 51% | ||
| curie | 0 | 2,181,056,932,458 | 1.68% | ||
| cebymaster | 0 | 264,462,214 | 1.68% | ||
| hendrikdegrote | 0 | 1,367,824,935,530 | 1.68% | ||
| photo-trail | 0 | 250,858,349 | 100% | ||
| cotidiana | 0 | 237,487,749 | 1.68% | ||
| andy23 | 0 | 2,278,894,847 | 100% | ||
| blackwidow7 | 0 | 209,028,931 | 1.68% | ||
| jameshsmitharts | 0 | 5,122,635,439 | 100% | ||
| jamesashton | 0 | 401,662,710 | 100% | ||
| bp423 | 0 | 446,554,961 | 1.68% | ||
| markangeltrueman | 0 | 18,552,716,906 | 100% | ||
| cecicastor | 0 | 751,017,733 | 100% | ||
| ericoliveira | 0 | 5,170,605,758 | 100% | ||
| kouloumos | 0 | 773,757,108 | 1.68% | ||
| michaelwilshaw | 0 | 5,662,588,056 | 10% | ||
| diggerdugg | 0 | 208,090,730 | 1.68% | ||
| goodvibez | 0 | 682,407,060 | 100% | ||
| sieses | 0 | 143,333,337 | 1.68% | ||
| lacremo-it | 0 | 283,766,045 | 0.67% | ||
| tanyaschutte | 0 | 139,117,836 | 1.68% | ||
| karimwq | 0 | 505,539,789 | 100% | ||
| originalworks | 0 | 7,689,900,235 | 1.5% | ||
| shvedova | 0 | 498,909,556 | 100% | ||
| redko | 0 | 492,780,076 | 100% | ||
| clishino | 0 | 500,114,807 | 100% | ||
| lebovuchi | 0 | 504,782,764 | 100% | ||
| luizainsoho | 0 | 519,699,117 | 100% | ||
| gyzix5 | 0 | 503,285,980 | 100% | ||
| prata | 0 | 496,119,073 | 100% | ||
| ohreally | 0 | 206,299,806 | 1% | ||
| parno1po | 0 | 502,460,959 | 100% | ||
| ganeypopova | 0 | 954,005,281 | 100% | ||
| sushka | 0 | 513,511,186 | 100% | ||
| okryag | 0 | 528,961,183 | 100% | ||
| olasyalar | 0 | 515,579,800 | 100% | ||
| linarabota | 0 | 500,491,539 | 100% | ||
| zadornno | 0 | 505,746,500 | 100% | ||
| dubyn | 0 | 504,314,402 | 100% | ||
| nonuk | 0 | 503,187,129 | 100% | ||
| popupeva | 0 | 503,120,805 | 100% | ||
| vlladimirpo | 0 | 505,245,569 | 100% | ||
| hrustic | 0 | 505,079,377 | 100% | ||
| karnidin | 0 | 500,381,449 | 100% | ||
| zeks | 0 | 4,202,812,342 | 21% | ||
| gazseer | 0 | 497,560,300 | 100% | ||
| sanakorul | 0 | 491,098,293 | 100% | ||
| timofeybat | 0 | 985,583,461 | 100% |
Cool. :)
| author | andy23 |
|---|---|
| permlink | re-markangeltrueman-building-a-timelapse-slider-rail-with-arduino-part-3-lcd-display-20171118t215611759z |
| category | photography |
| json_metadata | {"tags":["photography"],"app":"steemit/0.1"} |
| created | 2017-11-18 21:55:12 |
| last_update | 2017-11-18 21:55:12 |
| depth | 1 |
| children | 0 |
| last_payout | 2017-11-25 21:55:12 |
| cashout_time | 1969-12-31 23:59:59 |
| total_payout_value | 0.000 HBD |
| curator_payout_value | 0.000 HBD |
| pending_payout_value | 0.000 HBD |
| promoted | 0.000 HBD |
| body_length | 8 |
| author_reputation | 65,119,270,641 |
| root_title | "Building a timelapse slider rail with Arduino - Part 3 - LCD Display" |
| beneficiaries | [] |
| max_accepted_payout | 1,000,000.000 HBD |
| percent_hbd | 10,000 |
| post_id | 20,817,417 |
| net_rshares | 0 |
Most interesting project @markangeltrueman, hardly can wait to see the final product and the movies made with it :)

@originalworks
| author | lighteye |
|---|---|
| permlink | re-markangeltrueman-building-a-timelapse-slider-rail-with-arduino-part-3-lcd-display-20171118t222952695z |
| category | photography |
| json_metadata | {"tags":["photography"],"users":["markangeltrueman","originalworks"],"app":"steemit/0.1"} |
| created | 2017-11-18 22:30:00 |
| last_update | 2017-11-18 22:31:48 |
| depth | 1 |
| children | 1 |
| last_payout | 2017-11-25 22:30:00 |
| cashout_time | 1969-12-31 23:59:59 |
| total_payout_value | 0.000 HBD |
| curator_payout_value | 0.000 HBD |
| pending_payout_value | 0.000 HBD |
| promoted | 0.000 HBD |
| body_length | 131 |
| author_reputation | 614,159,397,412,985 |
| root_title | "Building a timelapse slider rail with Arduino - Part 3 - LCD Display" |
| beneficiaries | [] |
| max_accepted_payout | 1,000,000.000 HBD |
| percent_hbd | 10,000 |
| post_id | 20,819,596 |
| net_rshares | 246,723,321 |
| author_curate_reward | "" |
| voter | weight | wgt% | rshares | pct | time |
|---|---|---|---|---|---|
| photo-trail | 0 | 246,723,321 | 100% |
The @OriginalWorks bot has determined this post by @markangeltrueman to be original material and upvoted(1.5%) it! <center></center> To call @OriginalWorks, simply reply to any post with @originalworks or !originalworks in your message!
| author | originalworks |
|---|---|
| permlink | re-re-markangeltrueman-building-a-timelapse-slider-rail-with-arduino-part-3-lcd-display-20171118t222952695z-20171118t223307 |
| category | photography |
| json_metadata | "{"app": "pysteem/0.5.4"}" |
| created | 2017-11-18 22:33:09 |
| last_update | 2017-11-18 22:33:09 |
| depth | 2 |
| children | 0 |
| last_payout | 2017-11-25 22:33:09 |
| cashout_time | 1969-12-31 23:59:59 |
| total_payout_value | 0.000 HBD |
| curator_payout_value | 0.000 HBD |
| pending_payout_value | 0.000 HBD |
| promoted | 0.000 HBD |
| body_length | 358 |
| author_reputation | 79,292,026,602,057 |
| root_title | "Building a timelapse slider rail with Arduino - Part 3 - LCD Display" |
| beneficiaries | [] |
| max_accepted_payout | 1,000,000.000 HBD |
| percent_hbd | 10,000 |
| post_id | 20,819,798 |
| net_rshares | 0 |
Full support @markangeltrueman!
| author | photo-trail |
|---|---|
| permlink | re-markangeltrueman-building-a-timelapse-slider-rail-with-arduino-part-3-lcd-display-20171118t223101009z |
| category | photography |
| json_metadata | {"tags":["photography"],"users":["markangeltrueman"],"app":"steemit/0.1"} |
| created | 2017-11-18 22:31:09 |
| last_update | 2017-11-18 22:31:09 |
| depth | 1 |
| children | 0 |
| last_payout | 2017-11-25 22:31:09 |
| cashout_time | 1969-12-31 23:59:59 |
| total_payout_value | 0.000 HBD |
| curator_payout_value | 0.000 HBD |
| pending_payout_value | 0.000 HBD |
| promoted | 0.000 HBD |
| body_length | 31 |
| author_reputation | 30,503,178,530,838 |
| root_title | "Building a timelapse slider rail with Arduino - Part 3 - LCD Display" |
| beneficiaries | [] |
| max_accepted_payout | 1,000,000.000 HBD |
| percent_hbd | 10,000 |
| post_id | 20,819,673 |
| net_rshares | 0 |