**Hello Everyone!** **How are you today?** A new week is here and I can't belive how fast December and Christmas is approaching! Iiik, I'm so excited!<3 I'm not really here to talk about Christmas though, hehe, I'm stopping by to share with you all another printing technique I've tried out recently and that I've fallen head over heels in love with! **REDUCTION PRINTING.** Have you heard about it? Even though it does require a lot of work and precision its totally worth the slight head ache it can bring. Today I am going to talk about the process of making a reduction print from this example; 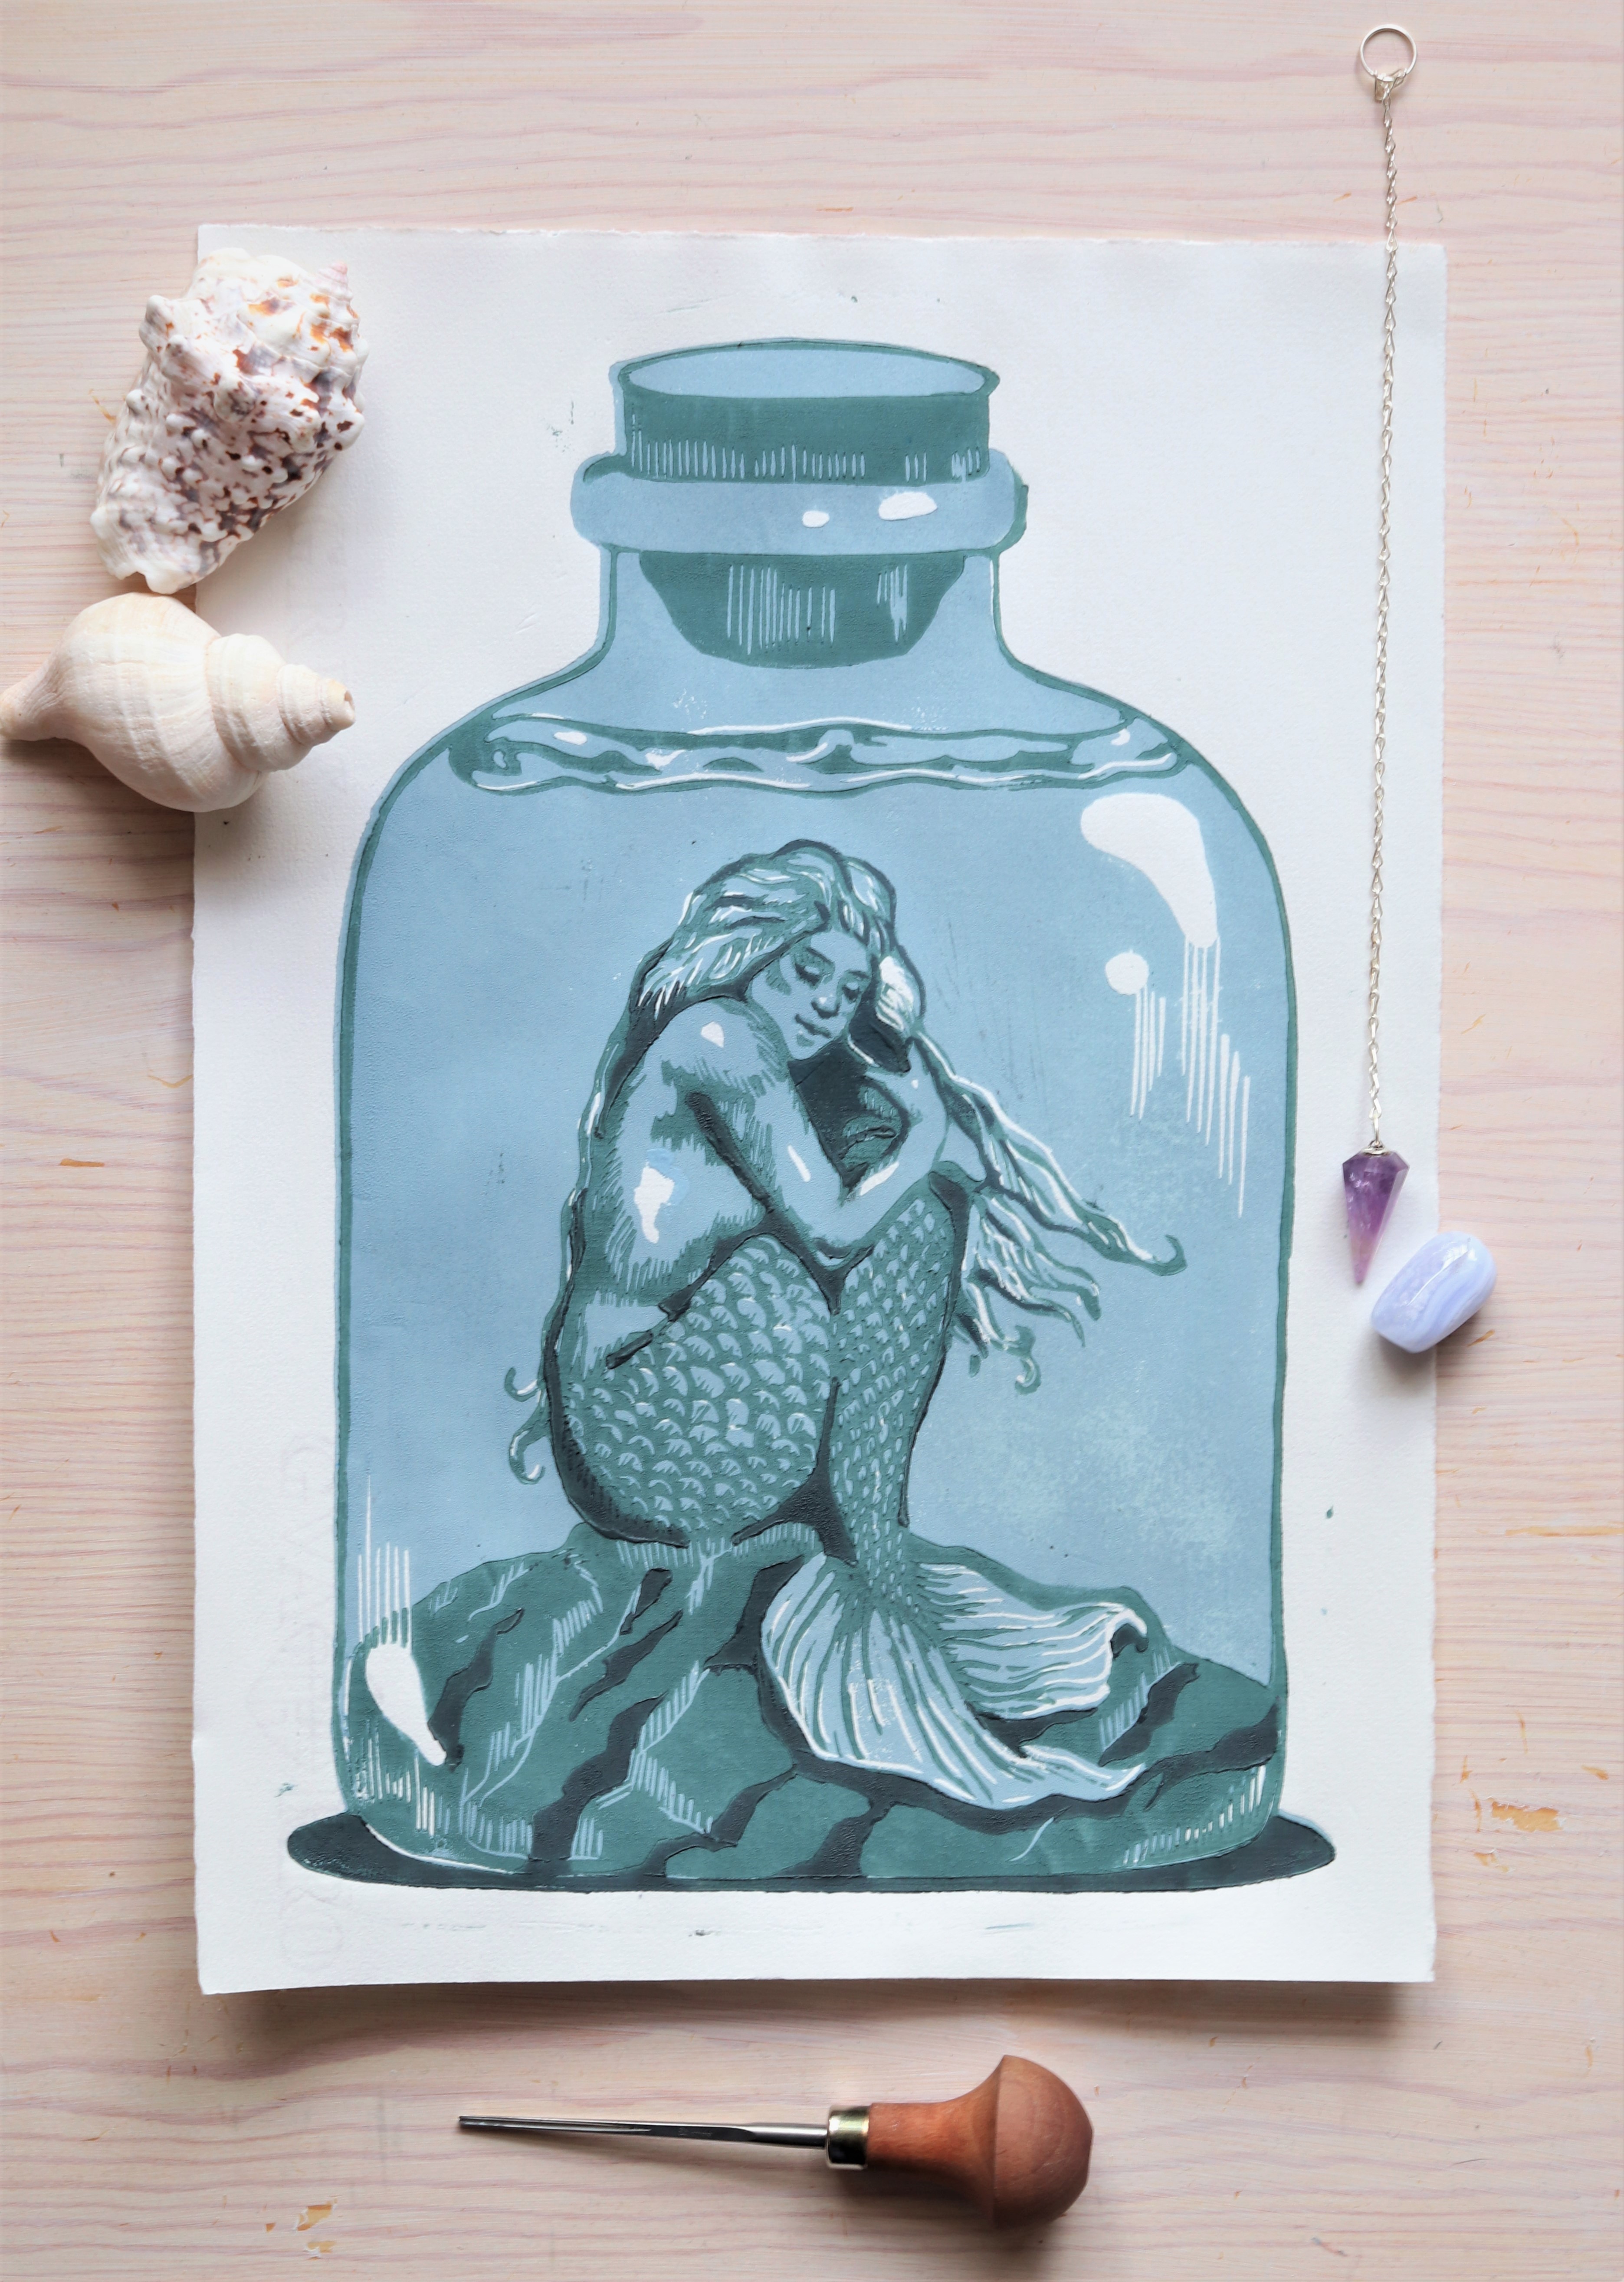 _''Magic in a bottle'', linoleum reduction print on Ingres paper._ Before I star going into details I'm going to try and explain as simply as possible what reduction printing is; **Reduction printing is when you print the same Block (Wood, linoleum) several times ontop of each other, but every time you print your block you have carved away a little bit more of the previous image. This way you can make a print with several colors in the same image. To make it easier you start with the lightest color, then carve away everything you want to maintain that lightest color in your next layer and so on.** If you are new to reduction printing, the best way is to start with something simple, like two colors. In this print I'm going to show you I have printed my plate three times and therefor have four colors. (The paper counts as one color.) 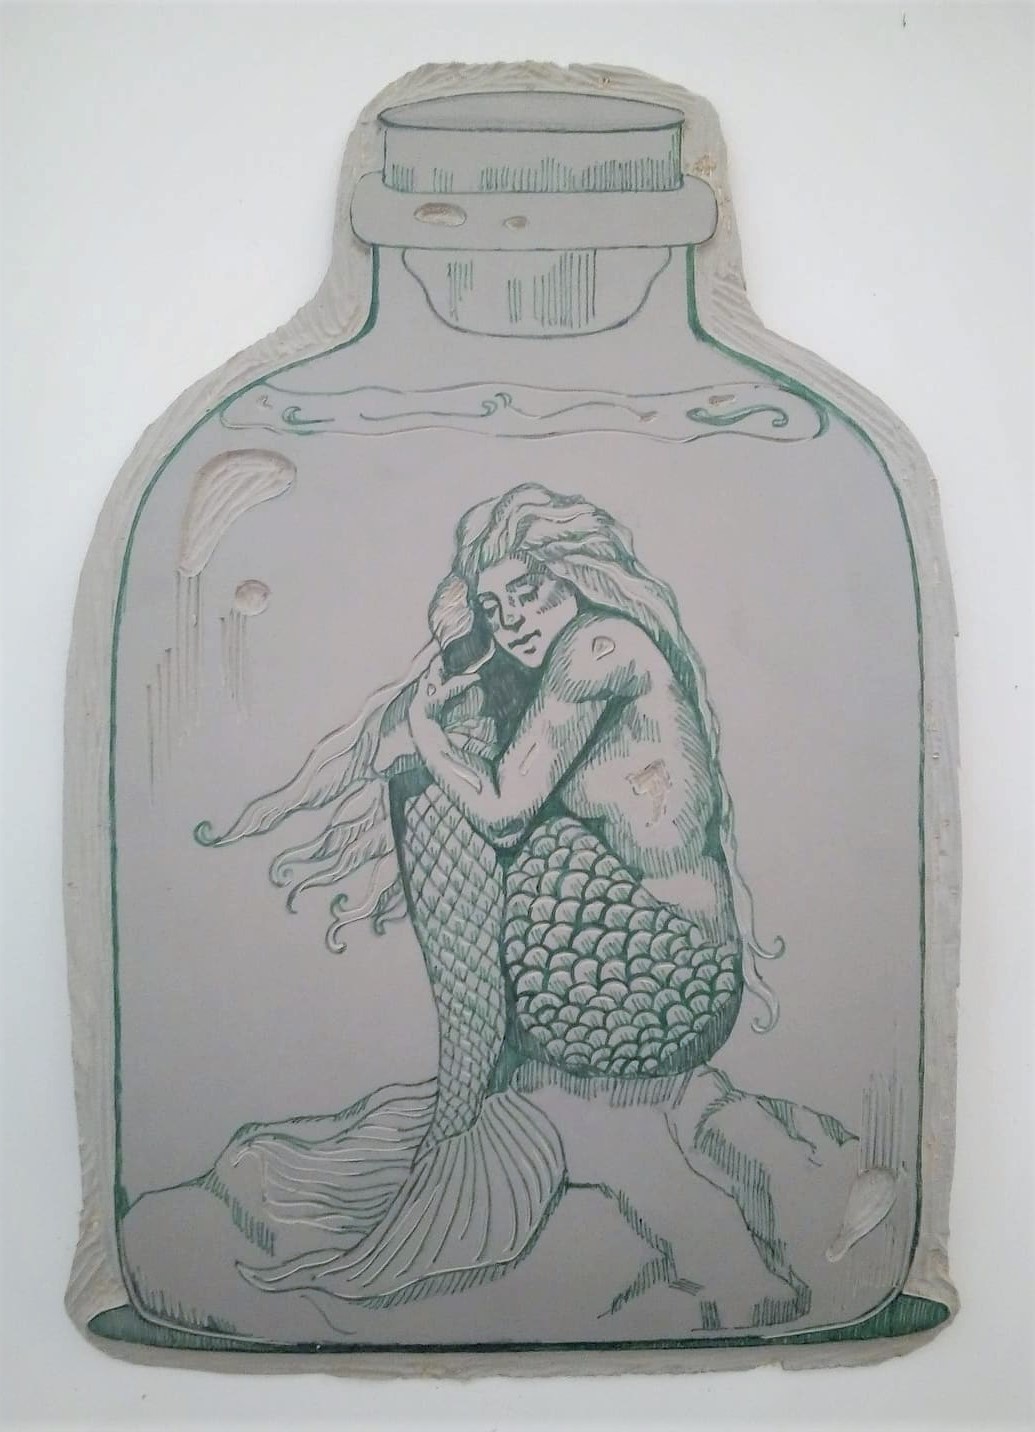 In this first image you can see I have drawn up my image on my piece of linoleum. I use a standard grey linoleum you can get at most art stores. Now the first thing I am going to do is carve out the areas that I want to be pure paper. You can see I have carved out the highlights in the bottle and some other smaller areas. 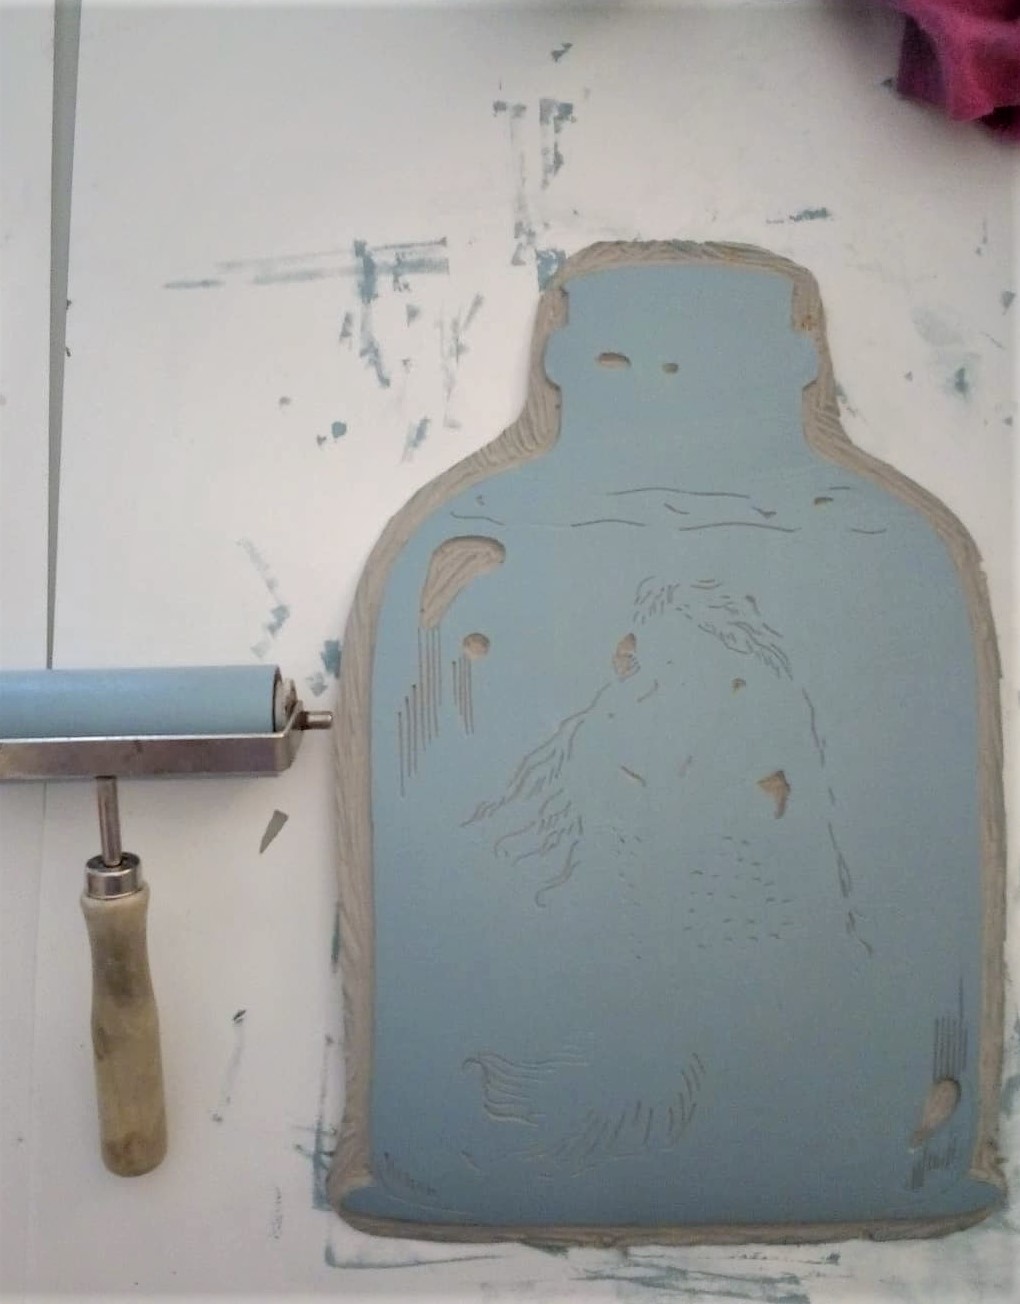 The next thing I am going to do is mix my lightest color and use a standard roller to roll it on my lino. I usually roll my ink in a glass plate before I roll it on my block. When the ink is in a thin even layer on your roller and it makes a ''smacking'' sound on your glas plate you know you're good to roll on the ink. Make sure you have covered your Whole Block With an even layer and then prepare for printing. **THIS IS IMPORTANT!** Because you are printing more than once on the same piece of paper its important to make a register to make sure your images line up. If not you will end up wit the block not aligning and the Whole point of reduction printing gets lost. Saying that though you always want to print a few extra sheets of your first block anyways just to make sure you have some backups. Even with a register the paper can move a bit and your image can be ruined. 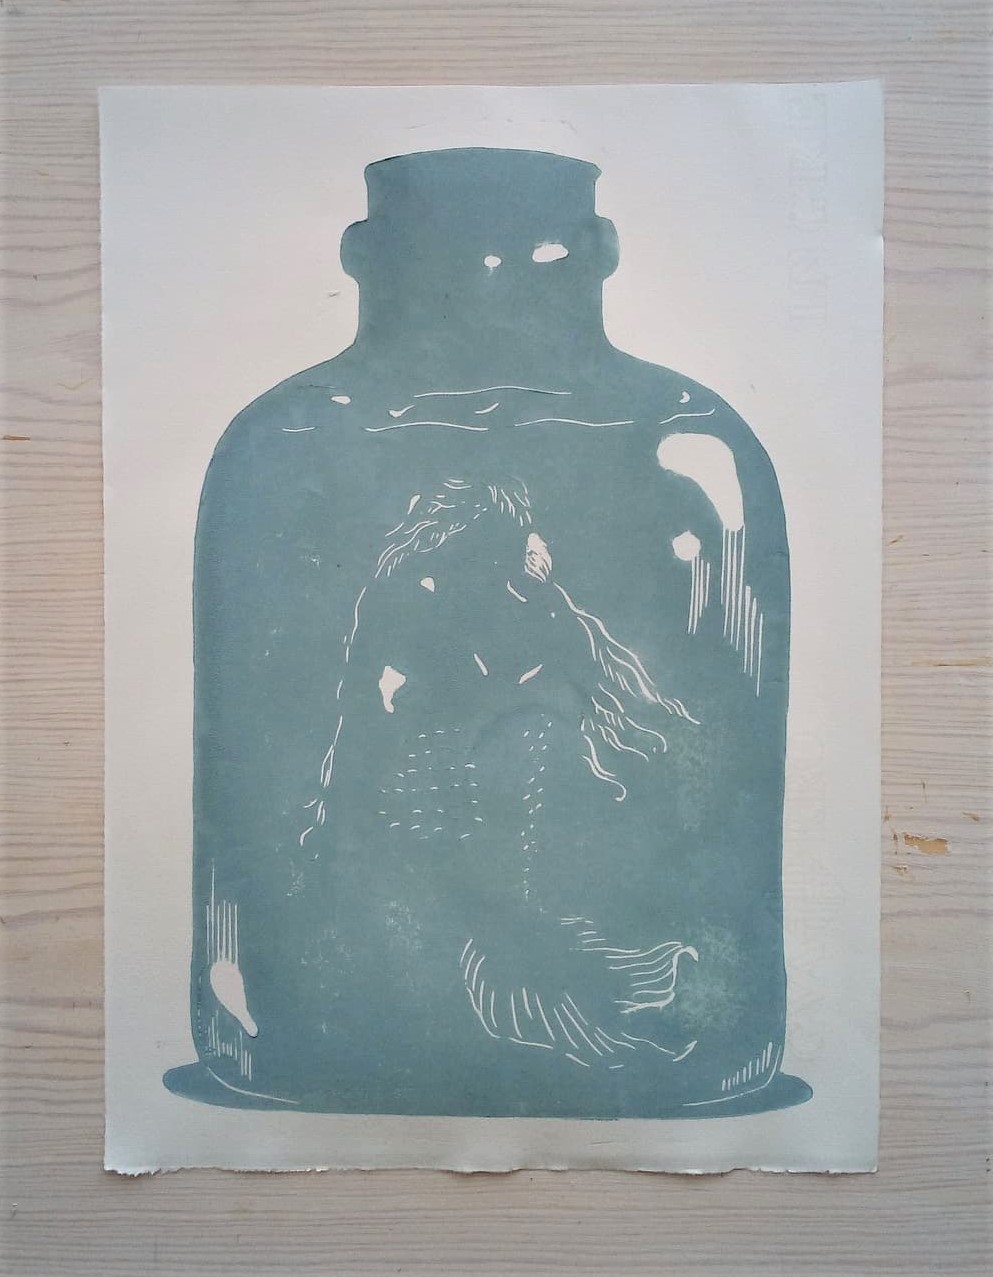 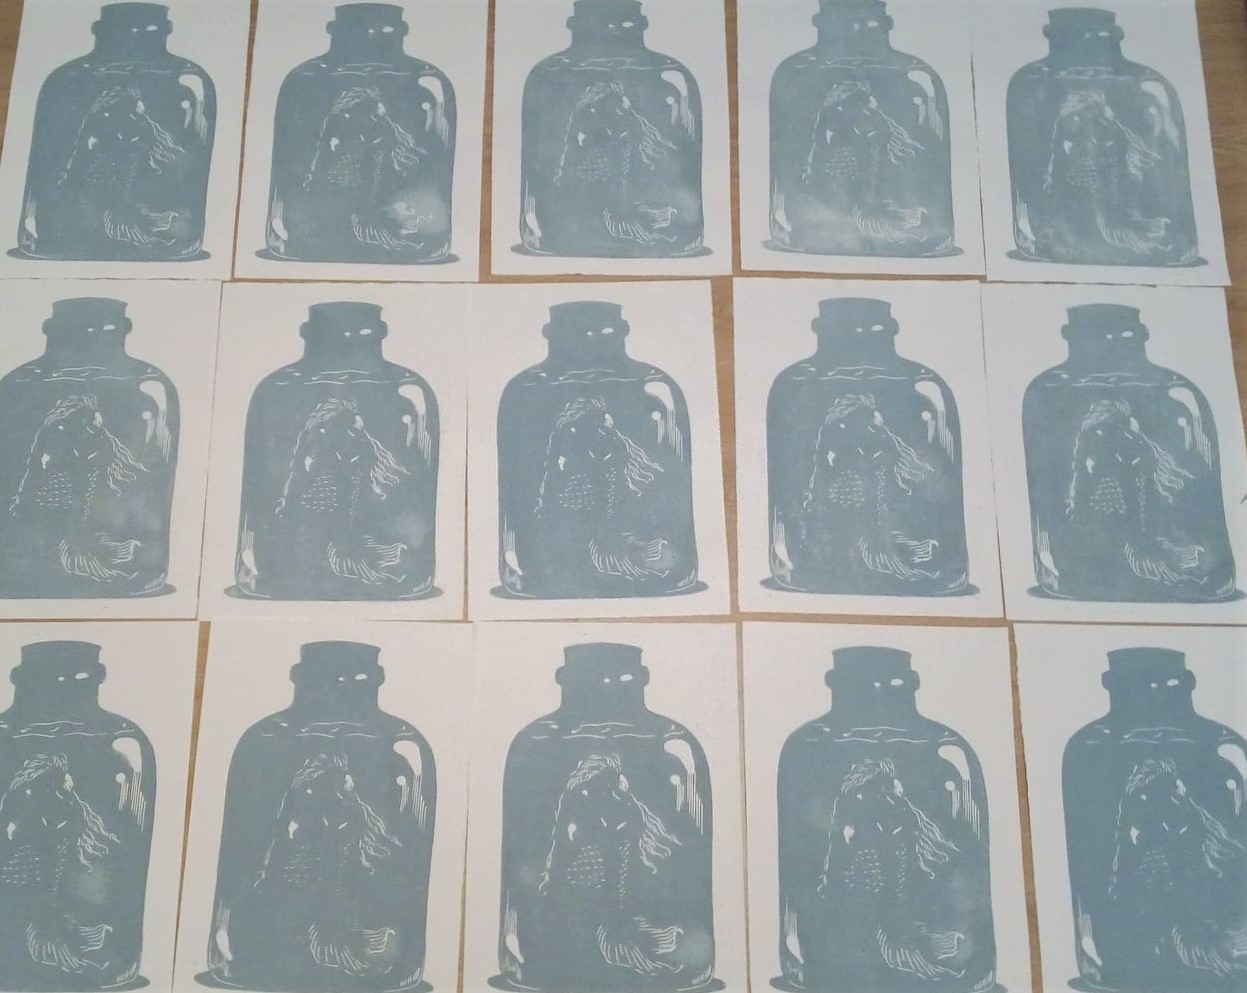 Above you can see the results after my first printing session. Before you print your second layer ontop you want to make sure that the first layer is dry so you usually have to wait a couple of days. That gives you time to carve out your Next color! :) 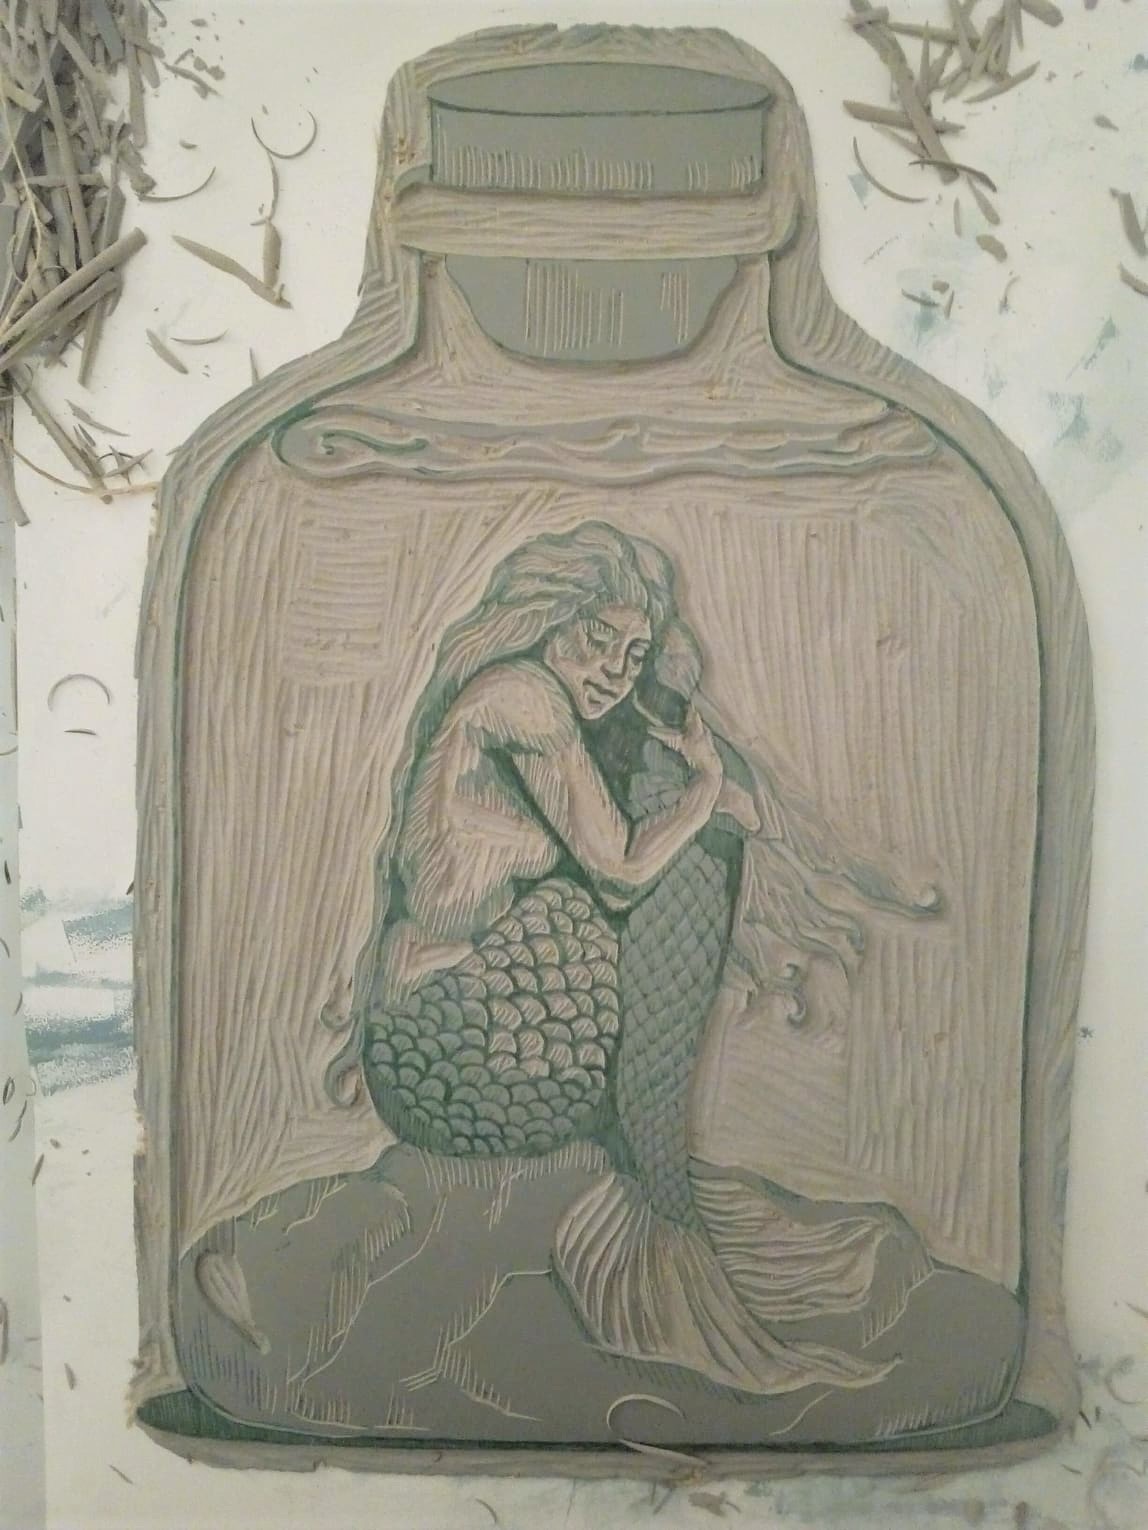 _Second layer carved._ Now I have carved away everything that I wanted to maintain the light blue color of the bottle and am just left With the mermaid, the rocks and the corck. These I will print With a slightley darker greenish color. 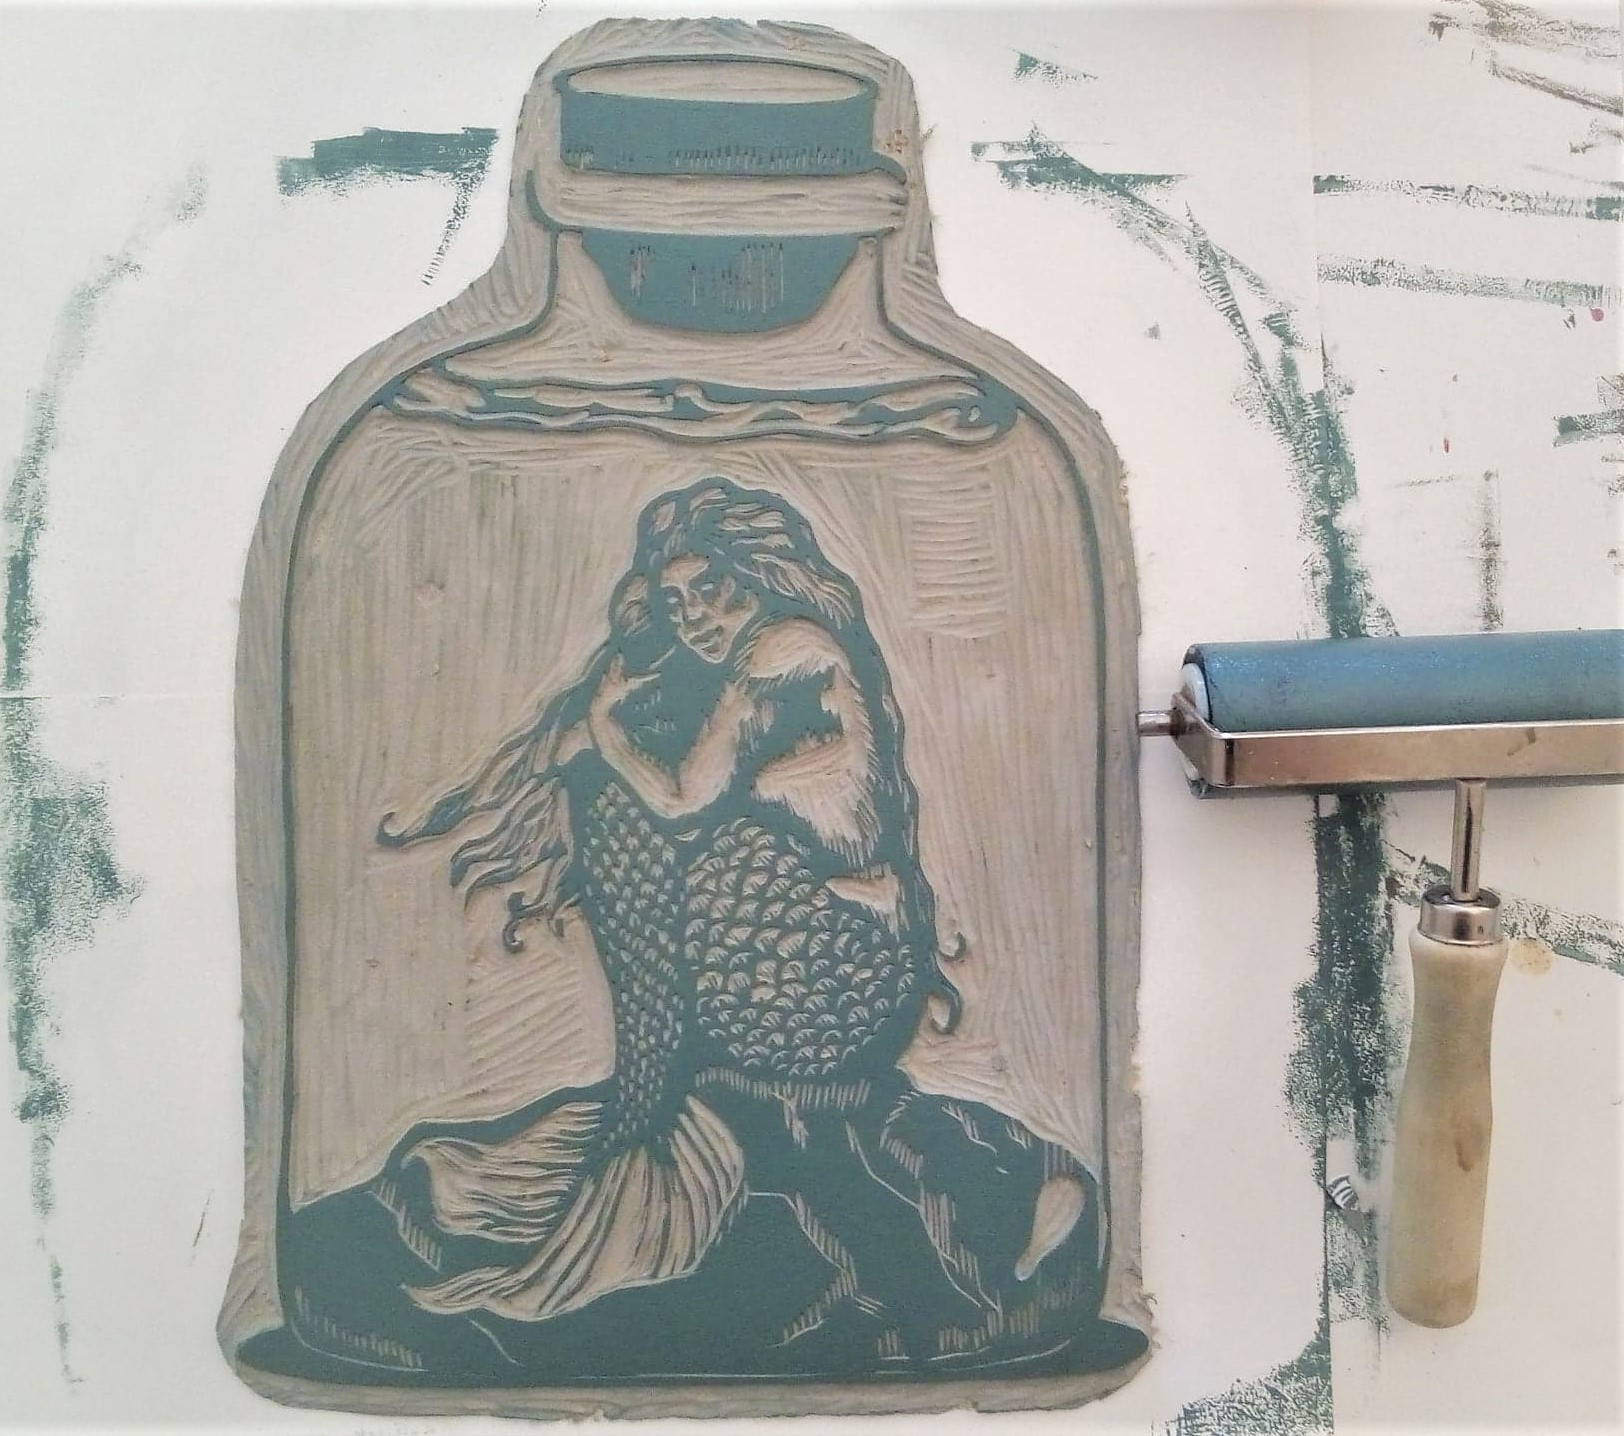 _All inked up.._ I make sure to allign my print in my register that I have kept from last session and print. **I use a hand barren to print all my linocuts. You can also use a wooden spoon or a press if you are Lucky enough to have one ;)** 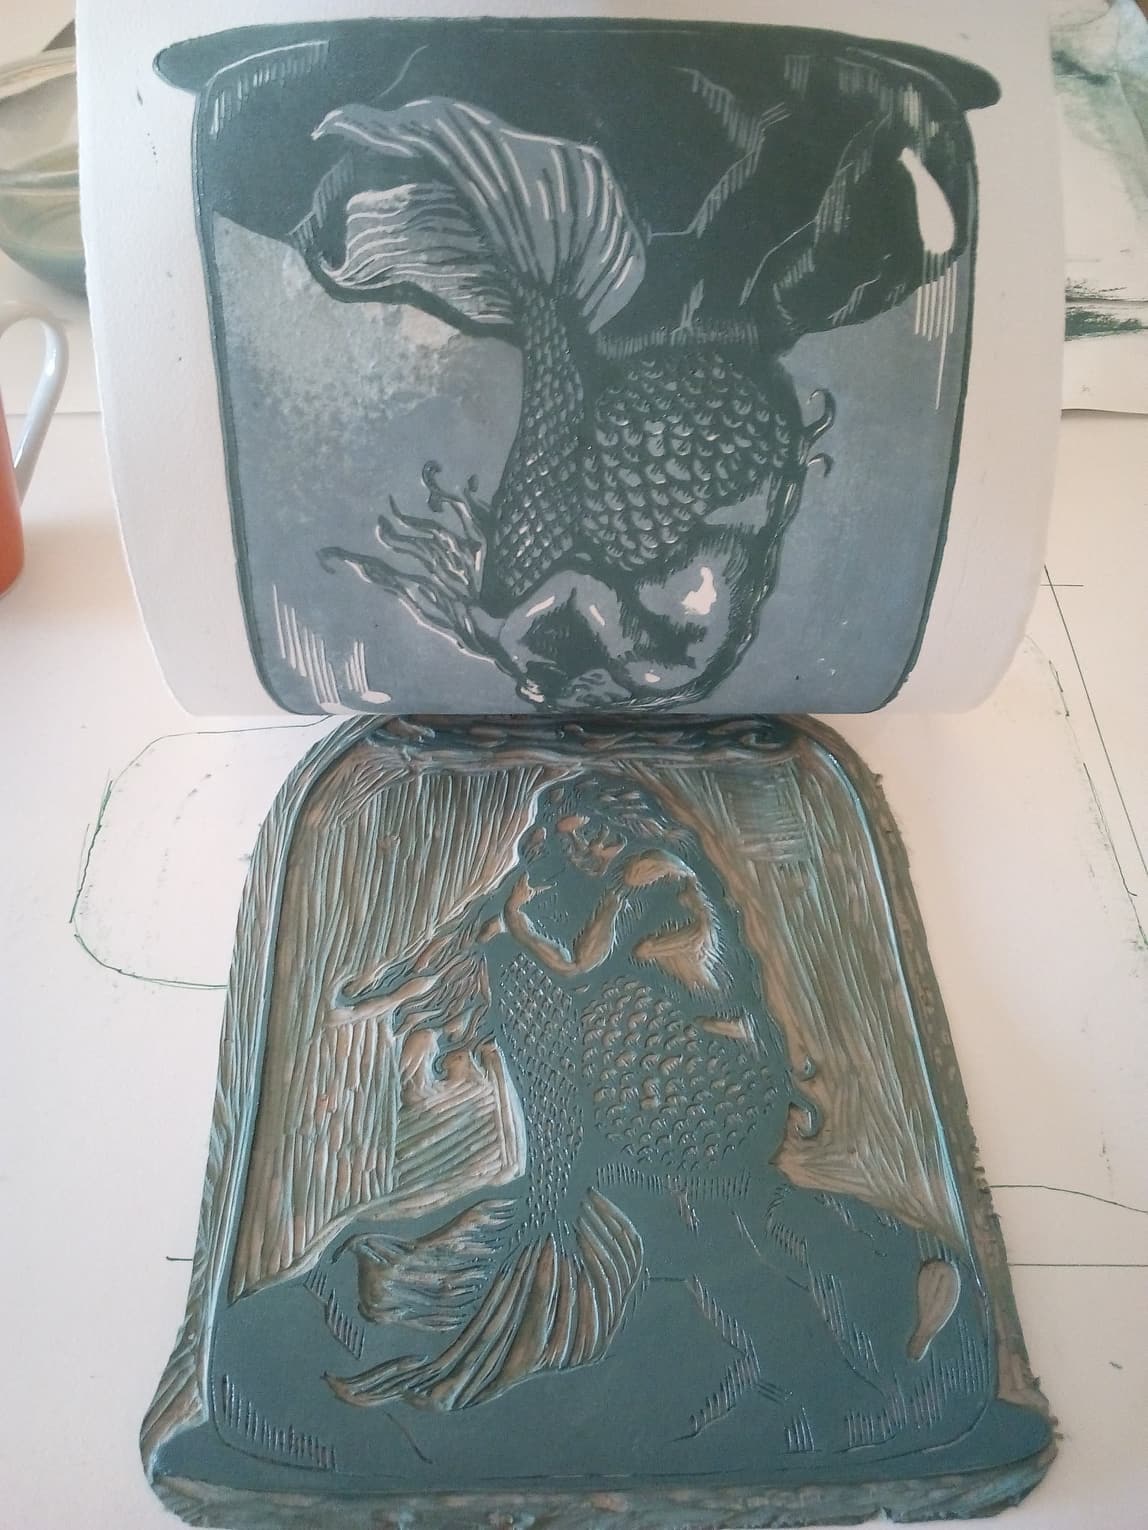 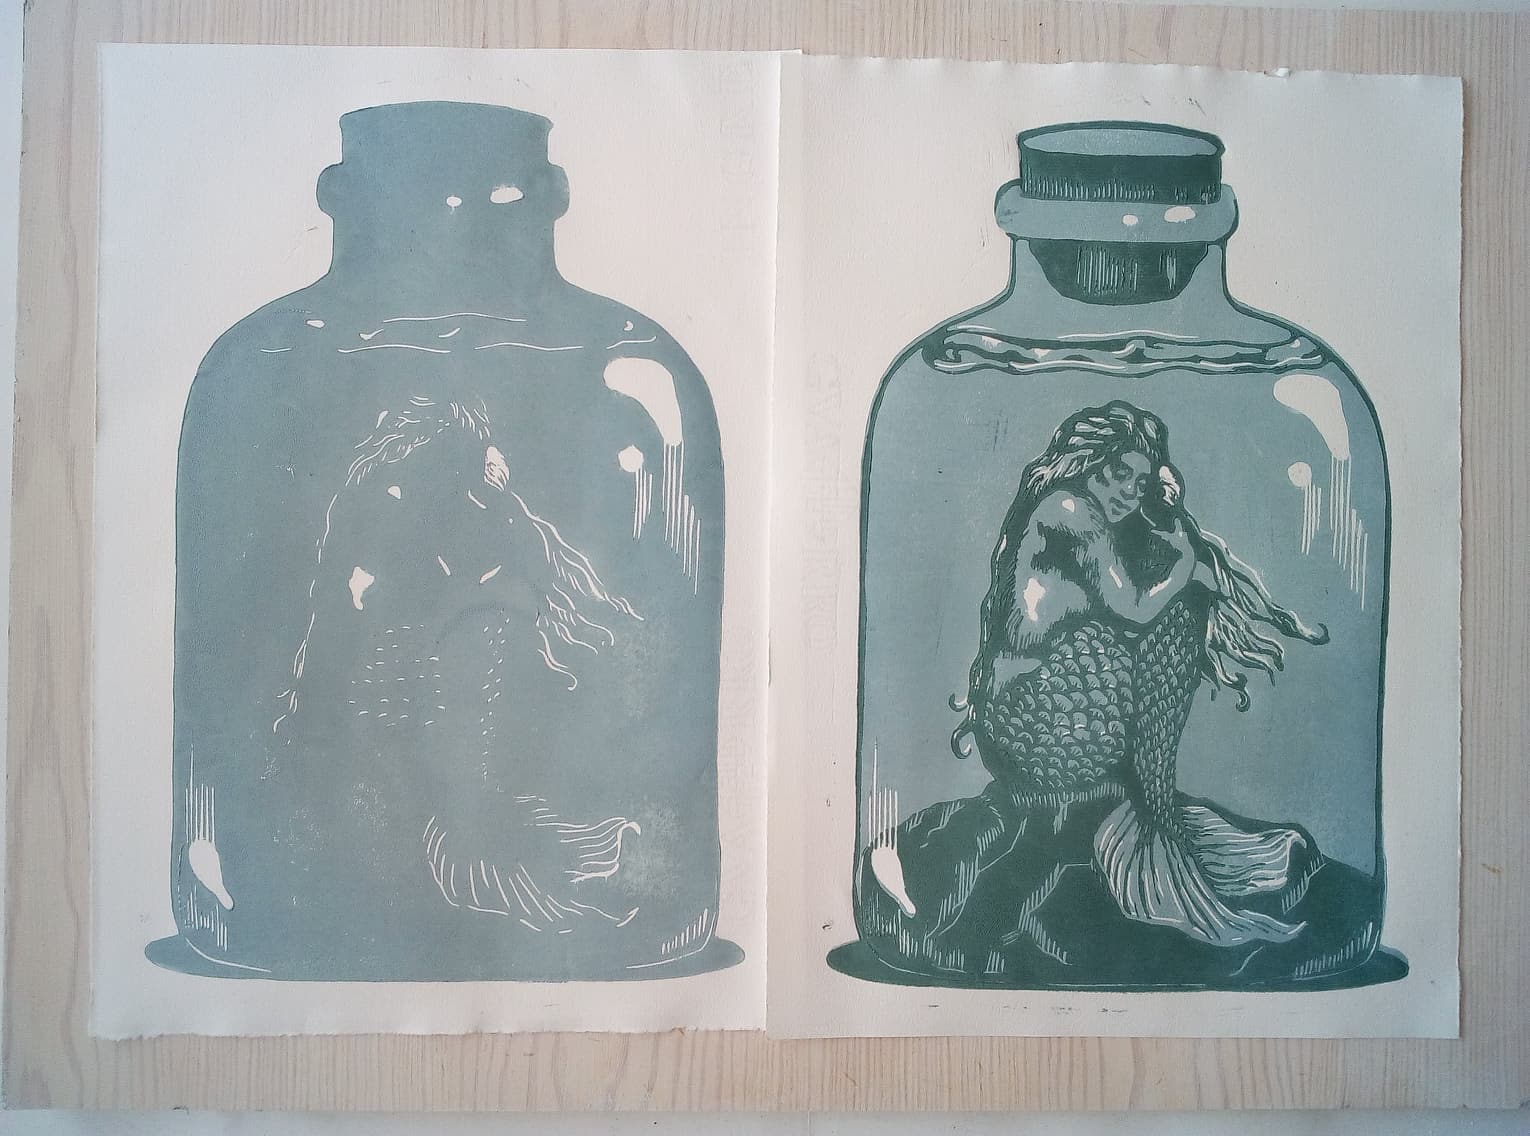 And now we have two layers, three colors! :) For the final layer I cut away quite a lot and was only left with a few lines which I wanted to print in an even darker color for some additional details. The process was the same; **Wait for the previous layer to dry, cut away everything I wanted to stay in the previous color, ink the plate and print in on my register.** 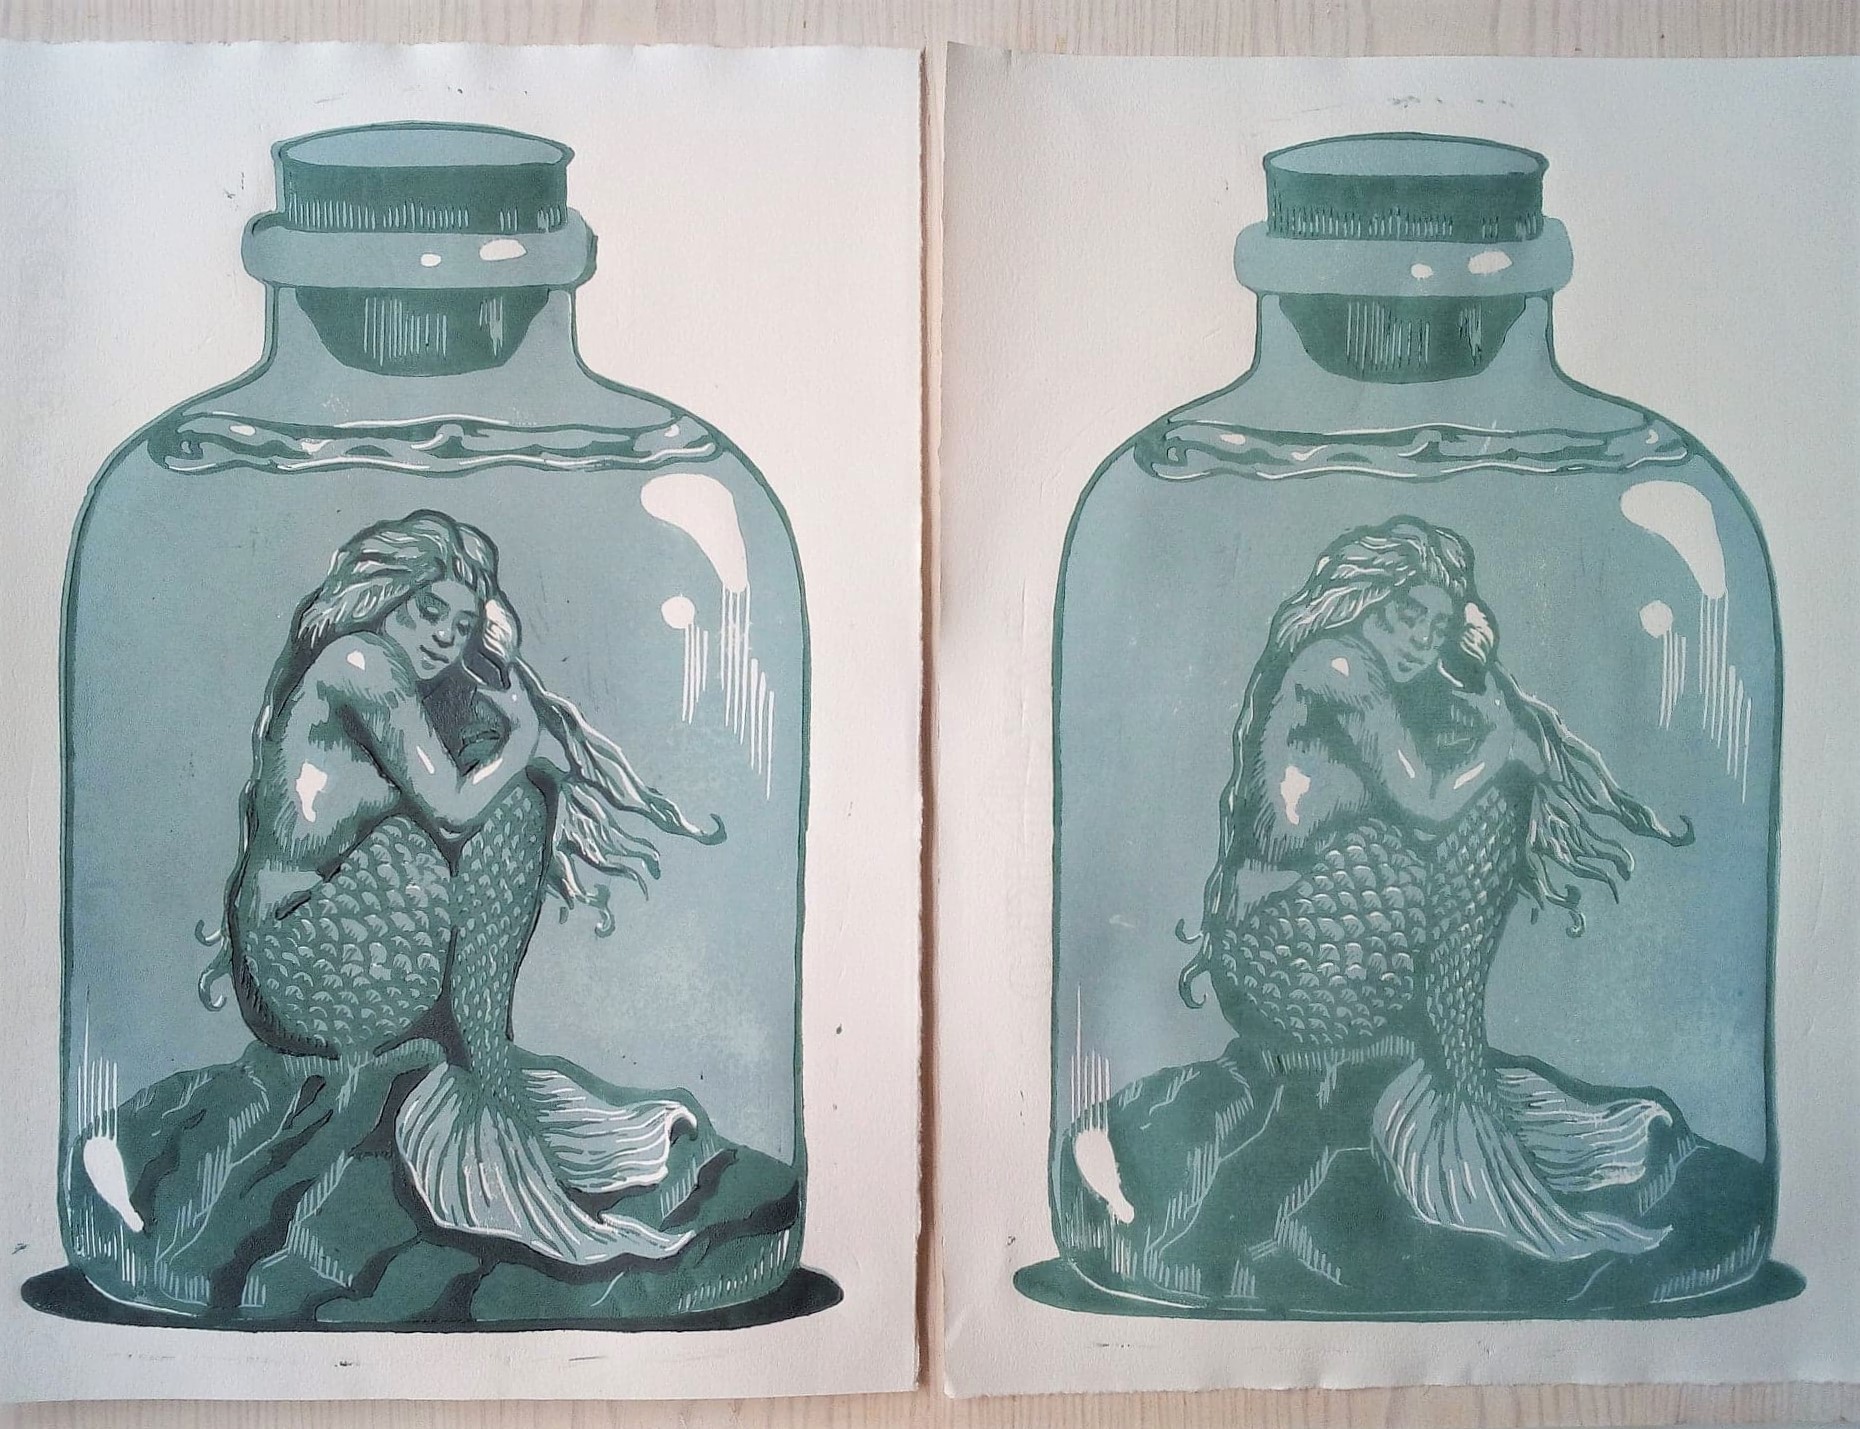 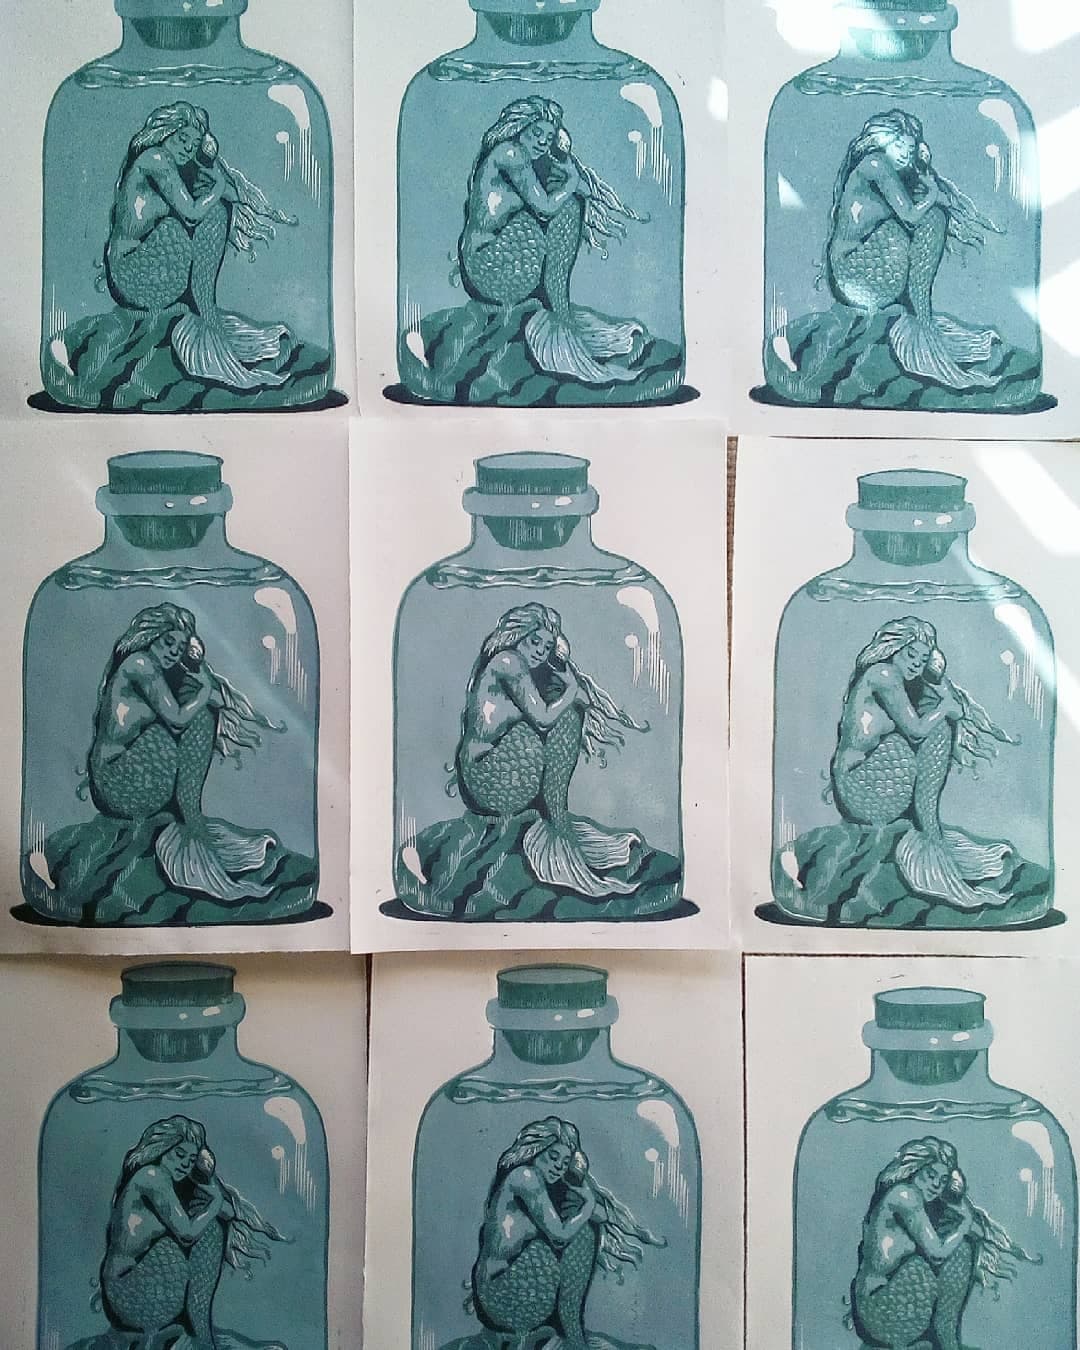 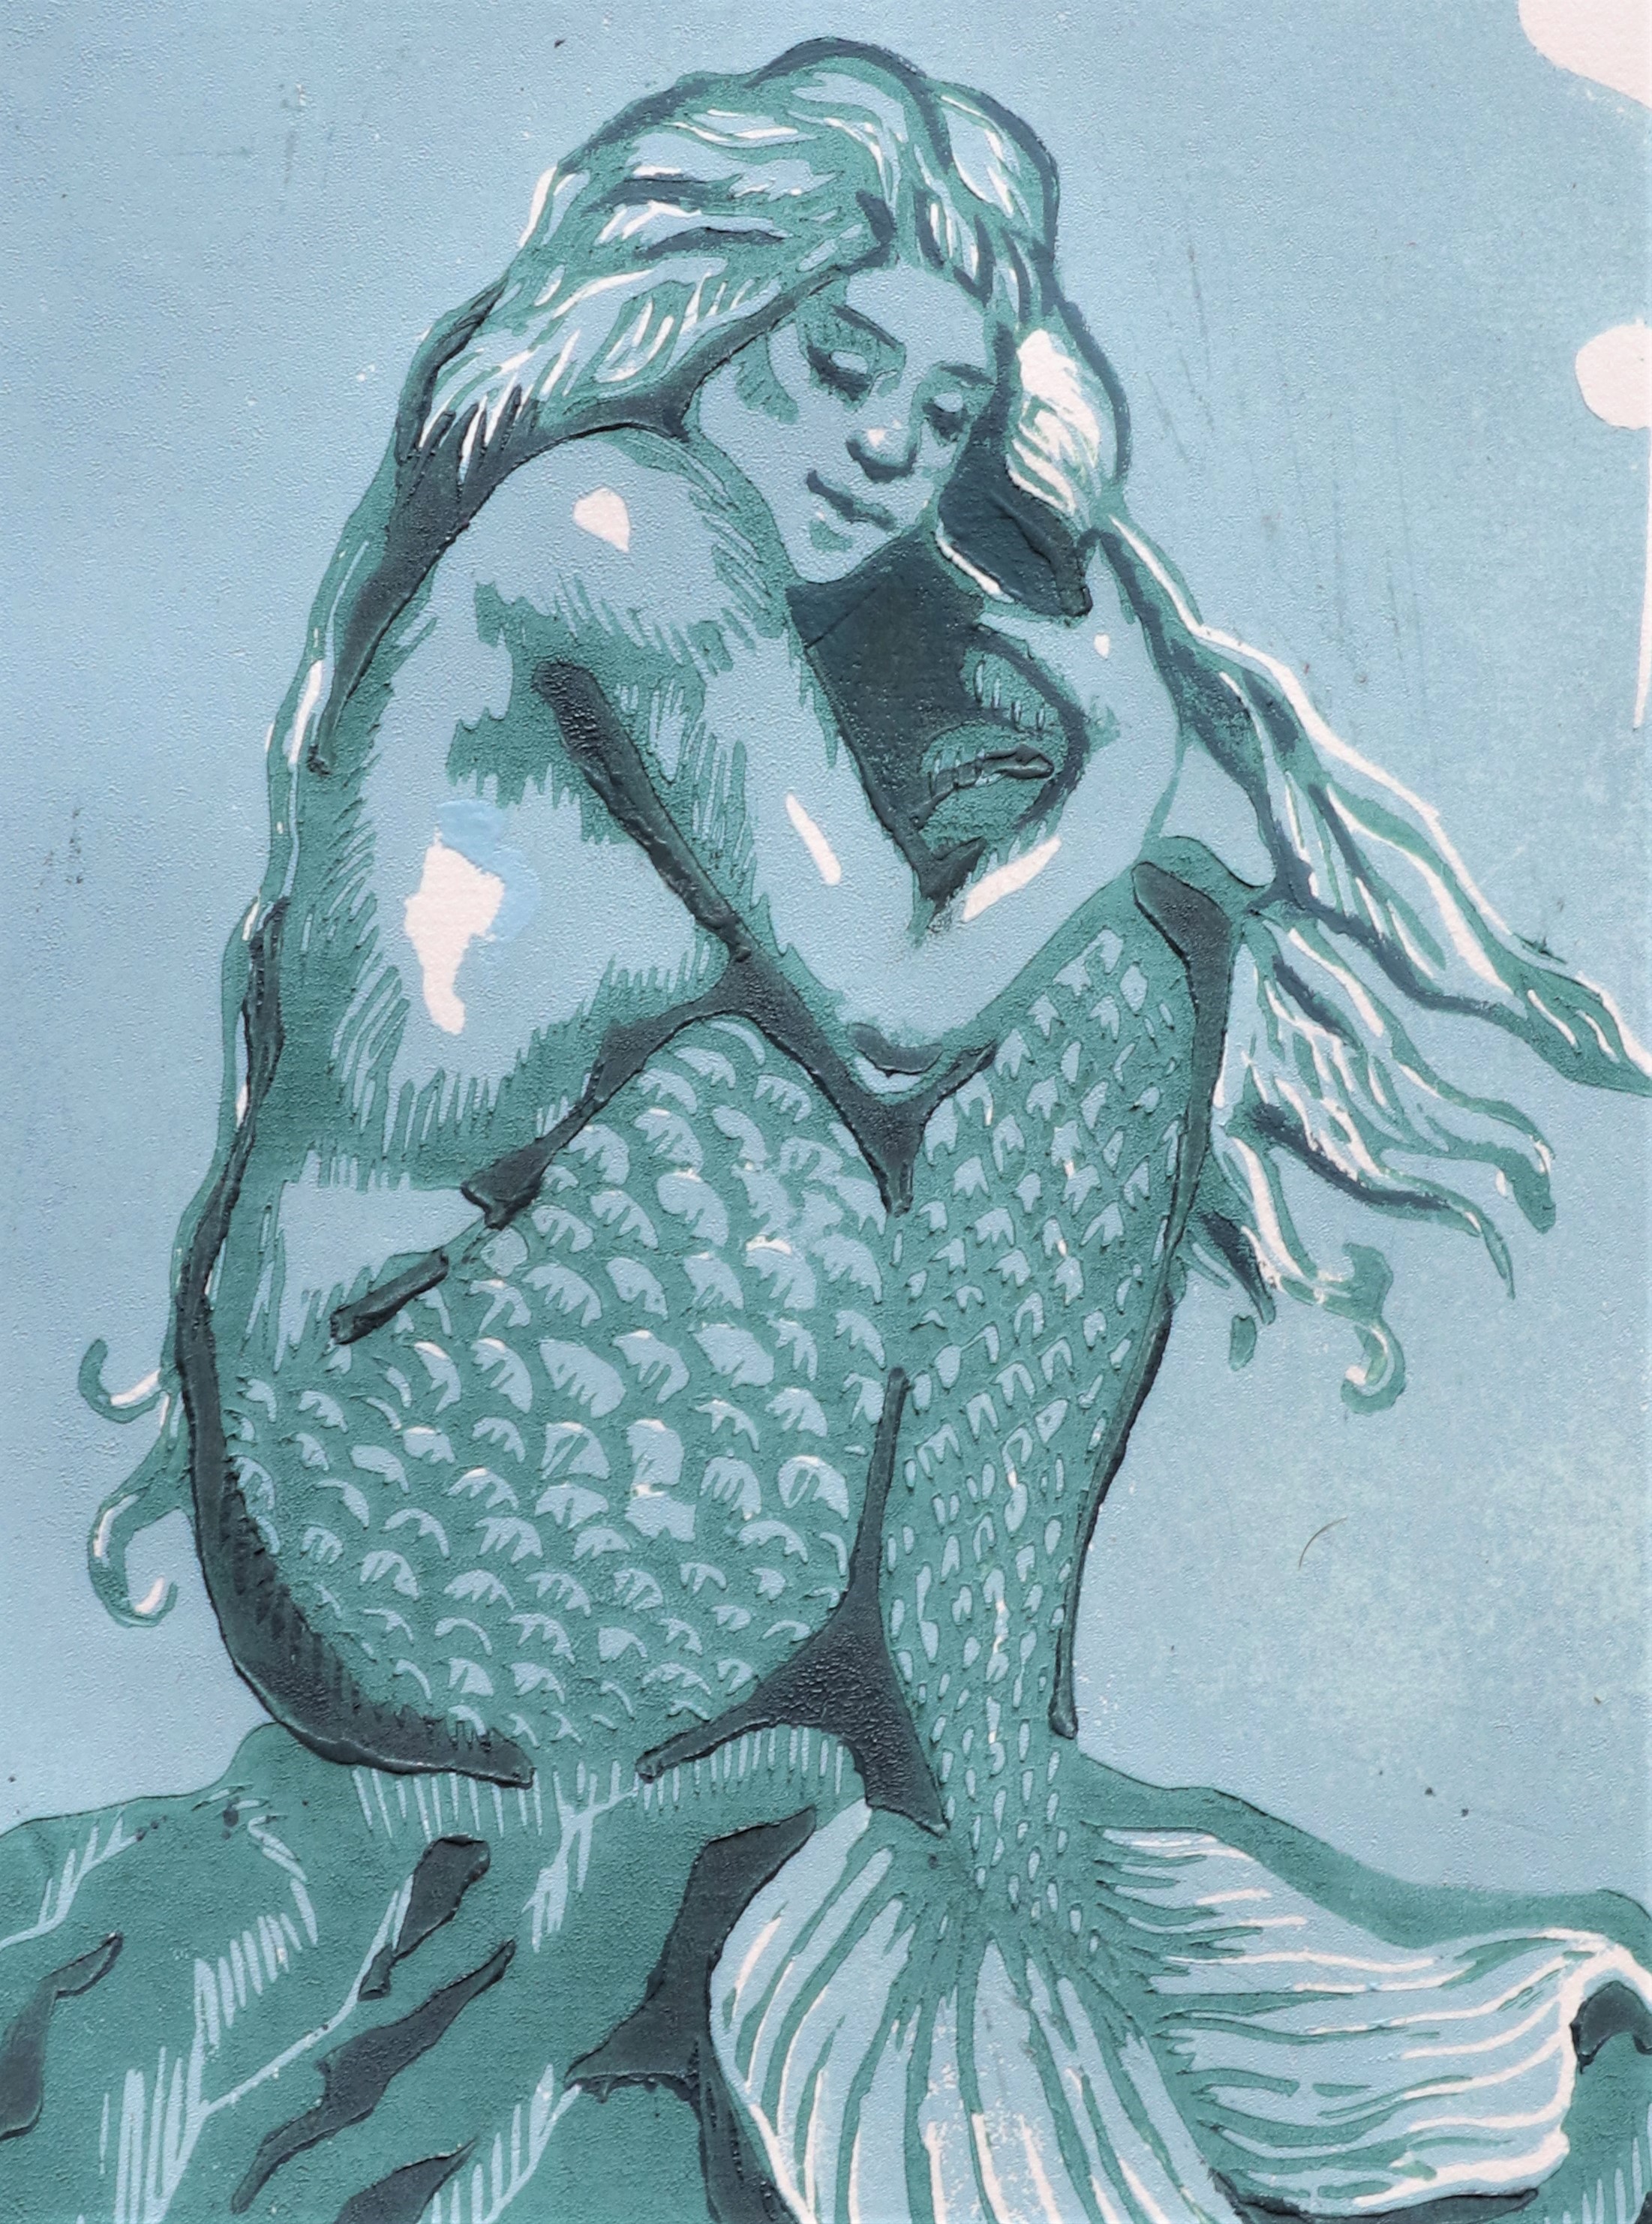 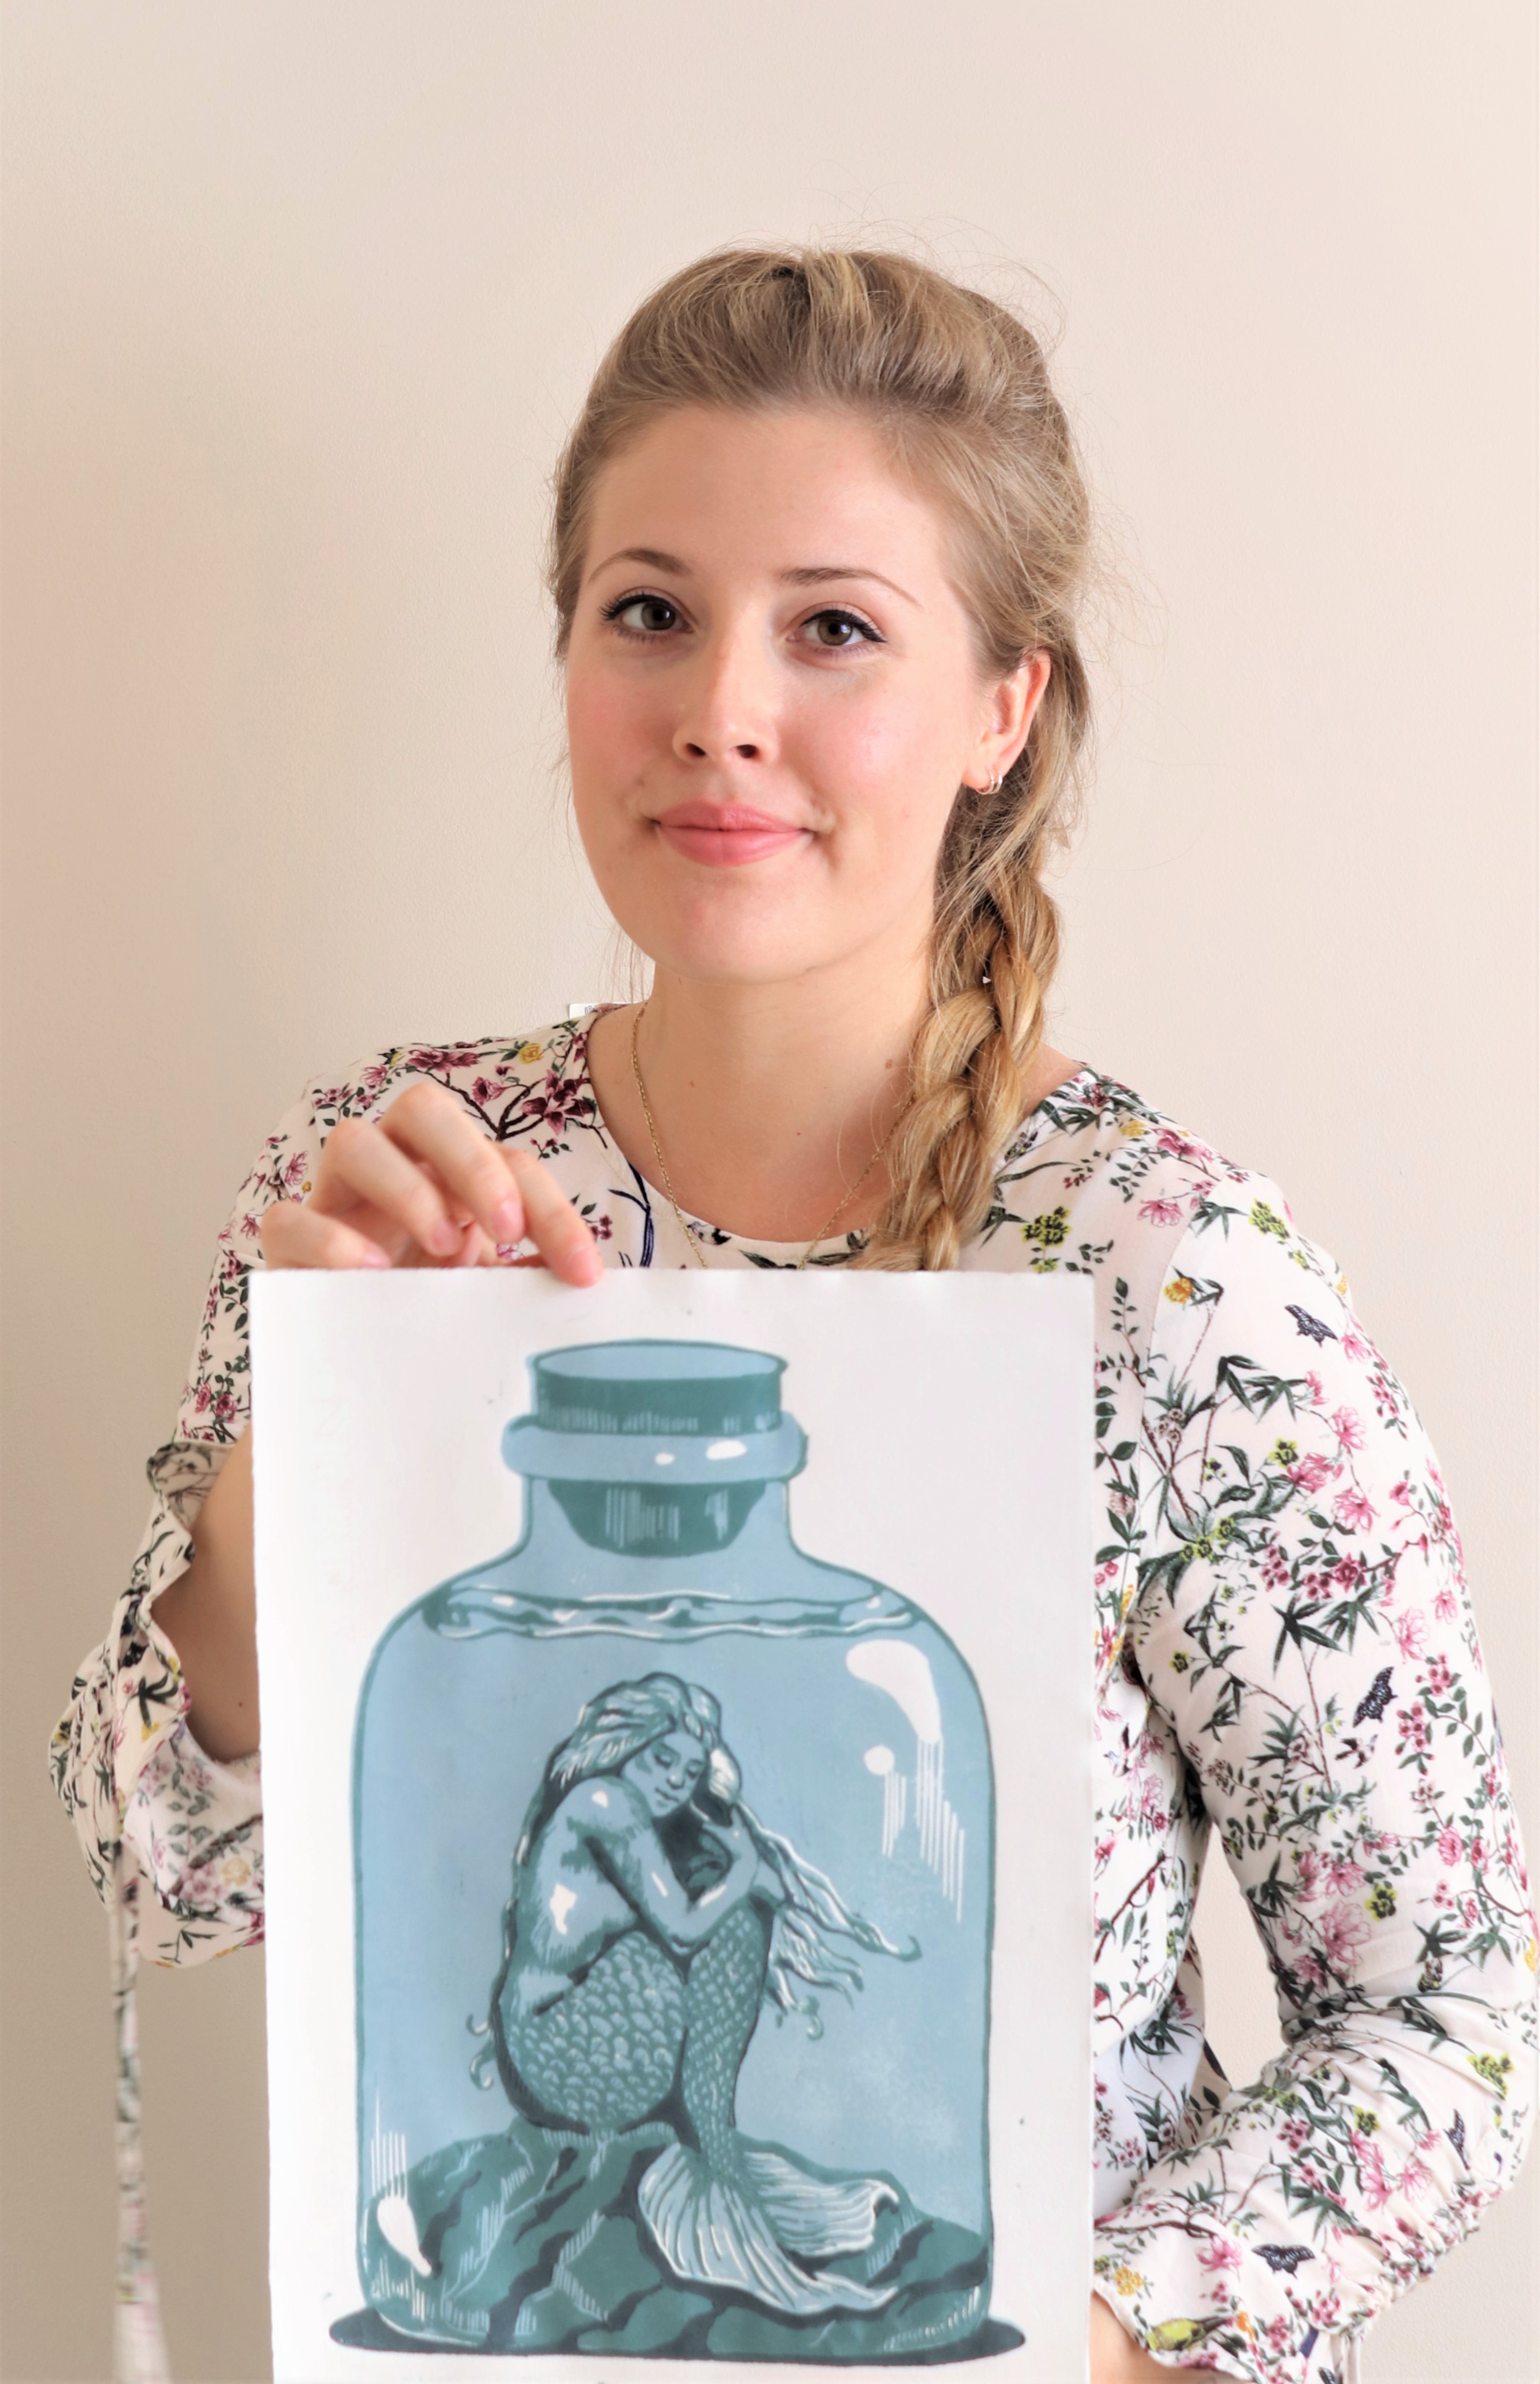 ##### And there you have it! # What do you think? Would you like to try reduction printing? It sure is a lot of fun even though the process is a bit longer! **I hope you enjoyed the read and that you all are having a wonderful New week! <3**
| author | mayasky |
|---|---|
| permlink | a-new-way-of-printing-original-mermaid-print-with-a-step-by-step-tutorial |
| category | art |
| json_metadata | {"tags":["art","diy","tutorial","print","mythology"],"image":["https://cdn.steemitimages.com/DQmarziLriGqeKatmMNLK4spqEpkAP6oJQpz6w1h5uy6D6q/IMG_2877.JPG","https://cdn.steemitimages.com/DQmc3saWzZ9FUmwTPonaNLTn2KkMkhKG72Jbct695xqW4Jt/46922674_2046030478818660_1251185816558895104_n.jpg","https://cdn.steemitimages.com/DQmQSR1S6hT3W3VDMxjPnK2KxDghcRoAR798RMYSzmxHL8b/46947395_327988054704545_1114126074339393536_n.jpg","https://cdn.steemitimages.com/DQmZjsUsoeNagbnpBjEhRpkUFH8n3SaNGMAuANgMEgvUJGA/46830877_206405466948340_6512695593687580672_n.jpg","https://cdn.steemitimages.com/DQmdPG26QuTWuQzQkpQNXaPydjPnaQGe758oXFQNaiNP5TF/46820771_472935076567739_7309167570441994240_n.jpg","https://cdn.steemitimages.com/DQmWqex56CcSH1mJQg8RbS73mhFs8SSat5TnSuCTL9gcZei/46798855_1910153735769934_2394928250204717056_n.jpg","https://cdn.steemitimages.com/DQmP5KXMioke3zw2gJZe5PhAfiQ2FwXh9HiooAgi4oWeoro/45651802_187619772118880_4736371719348944896_n.jpg","https://cdn.steemitimages.com/DQmWaxefBqtj4p9rLreadrjh6EjNSHphDxeyNPDHtaYNj4S/46787908_942659352610769_7883790858426777600_n.jpg","https://cdn.steemitimages.com/DQme7p1EjzHewA6RBR1D9nbiUWJ8ky7VbnLsksnSJV1nKua/46888141_304245540185121_4211626681141559296_n.jpg","https://cdn.steemitimages.com/DQmW93X34G69RKR3HvgLdHu7xeSRAzAwsnQniNEJHYzZPAC/45683088_205132413716723_4006348521660743680_n.jpg","https://cdn.steemitimages.com/DQmdHCSJVxQ9sTnUQ3B6VJT6T614jVqPJmNgFyuLJqBtnsW/45484553_195015984717368_870131172686954496_n.jpg","https://cdn.steemitimages.com/DQmZiGKCgNCdJUMkibTQxXwkq8DnDuGBoJJkJA137HSkLG7/IMG_2885.JPG","https://cdn.steemitimages.com/DQmeSzWTiJgFKSebnDNNLAXfVhPwQNBcd7UrKL3VBn48BDt/IMG_2927.JPG"],"app":"steemit/0.1","format":"markdown"} |
| created | 2018-11-27 17:46:51 |
| last_update | 2018-11-27 17:46:51 |
| depth | 0 |
| children | 3 |
| last_payout | 2018-12-04 17:46:51 |
| cashout_time | 1969-12-31 23:59:59 |
| total_payout_value | 2.394 HBD |
| curator_payout_value | 0.741 HBD |
| pending_payout_value | 0.000 HBD |
| promoted | 0.000 HBD |
| body_length | 6,211 |
| author_reputation | 32,677,895,593,938 |
| root_title | "A new way of printing! Original Mermaid print with a step by step tutorial." |
| beneficiaries | [] |
| max_accepted_payout | 1,000,000.000 HBD |
| percent_hbd | 10,000 |
| post_id | 75,999,768 |
| net_rshares | 5,197,692,289,435 |
| author_curate_reward | "" |
| voter | weight | wgt% | rshares | pct | time |
|---|---|---|---|---|---|
| wackou | 0 | 161,054,555,630 | 2.52% | ||
| drifter1 | 0 | 743,941,536 | 4.2% | ||
| lola-carola | 0 | 134,890,650 | 4.2% | ||
| anwenbaumeister | 0 | 431,530,450 | 8.4% | ||
| expanse | 0 | 101,859,801 | 4.2% | ||
| raymondspeaks | 0 | 825,472,896 | 4.2% | ||
| liberosist | 0 | 24,039,210,212 | 8.4% | ||
| joshglen | 0 | 83,085,606 | 8.4% | ||
| misha | 0 | 7,050,049,924 | 100% | ||
| psygambler | 0 | 517,566,598 | 4.2% | ||
| penguinpablo | 0 | 139,623,519,127 | 6% | ||
| natureofbeing | 0 | 88,728,769,996 | 100% | ||
| johano | 0 | 21,406,329,027 | 100% | ||
| lk666 | 0 | 869,144,386 | 4.2% | ||
| eforucom | 0 | 19,697,267,194 | 1% | ||
| curie | 0 | 232,703,656,869 | 8.4% | ||
| maxjoy | 0 | 2,213,536,077 | 100% | ||
| hendrikdegrote | 0 | 3,980,769,524,047 | 8.4% | ||
| mayasky | 0 | 2,385,053,985 | 100% | ||
| vact | 0 | 159,981,071,280 | 8.4% | ||
| golbang | 0 | 18,745,596,222 | 2.52% | ||
| dashfit | 0 | 749,690,339 | 4.2% | ||
| bukiland | 0 | 4,133,190,050 | 1.19% | ||
| gangstayid | 0 | 237,731,154 | 4.2% | ||
| resteemer | 0 | 82,768,986 | 3.36% | ||
| boynashruddin | 0 | 147,302,172 | 4.2% | ||
| gmedley | 0 | 619,704,981 | 4.2% | ||
| pacokam8 | 0 | 302,276,246 | 3.36% | ||
| moksamol | 0 | 1,018,291,643 | 4.2% | ||
| getrichordie | 0 | 308,769,726 | 4.2% | ||
| thatsweeneyguy | 0 | 447,370,943 | 4.2% | ||
| momogrow | 0 | 8,374,457,376 | 8.4% | ||
| the-eliot | 0 | 127,742,579 | 4.2% | ||
| dbzfan4awhile | 0 | 47,441,374 | 4.2% | ||
| coquiunlimited | 0 | 396,258,117 | 4.2% | ||
| evilhippie | 0 | 39,750,793,936 | 100% | ||
| locikll | 0 | 3,410,771,543 | 16.8% | ||
| tracer-paulo | 0 | 324,026,368 | 100% | ||
| aboutyourbiz | 0 | 1,615,365,802 | 8.4% | ||
| howtostartablog | 0 | 148,291,755 | 0.84% | ||
| pinoy | 0 | 4,714,656,516 | 100% | ||
| jayna | 0 | 500,588,831 | 1.26% | ||
| cryptokrieg | 0 | 992,373,293 | 8.4% | ||
| riche-gould | 0 | 163,637,749 | 4.2% | ||
| slickhustler007 | 0 | 372,327,137 | 4.2% | ||
| makrotheblack | 0 | 235,126,187 | 4.2% | ||
| nitego | 0 | 1,004,614,745 | 2.52% | ||
| neumannsalva | 0 | 1,184,756,743 | 4.2% | ||
| phogyan | 0 | 197,493,684 | 4.2% | ||
| g0nr0gue | 0 | 421,506,453 | 4.2% | ||
| onethousandwords | 0 | 88,586,224 | 4.2% | ||
| leyla5 | 0 | 73,093,591 | 4.2% | ||
| opheliapoe | 0 | 115,475,673 | 4.2% | ||
| azbeen | 0 | 20,736,401,330 | 100% | ||
| weirdheadaches | 0 | 77,609,105 | 0.84% | ||
| felixrodriguez | 0 | 318,103,303 | 4.2% | ||
| azulear | 0 | 102,911,878 | 4.2% | ||
| honeysara | 0 | 419,527,417 | 2.1% | ||
| massivevibration | 0 | 3,426,305,007 | 5% | ||
| cooknbake | 0 | 139,972,228 | 1.68% | ||
| clweeks | 0 | 468,611,584 | 5.04% | ||
| fremy | 0 | 748,513,637 | 100% | ||
| derekvonzarovich | 0 | 78,177,080 | 4.2% | ||
| filipino | 0 | 605,797,753 | 10% | ||
| gotgame | 0 | 205,926,452 | 4.2% | ||
| jlsplatts | 0 | 469,218,004 | 1.68% | ||
| mayowadavid | 0 | 272,914,018 | 4.2% | ||
| poodai | 0 | 331,293,797 | 4.2% | ||
| gotmeens | 0 | 25,154,098,083 | 100% | ||
| happychild | 0 | 101,793,117 | 4.2% | ||
| peaceandwar | 0 | 1,206,204,958 | 4.2% | ||
| enzor | 0 | 208,886,007 | 8.4% | ||
| joendegz | 0 | 117,223,683 | 4.2% | ||
| jesusj1 | 0 | 66,630,202 | 100% | ||
| skadi | 0 | 15,594,036,796 | 70% | ||
| digitalpnut | 0 | 79,296,732 | 4.2% | ||
| kjl90 | 0 | 925,271,235 | 100% | ||
| drmake | 0 | 4,555,591,125 | 4.2% | ||
| pechichemena | 0 | 341,913,511 | 1.68% | ||
| motivatorjoshua | 0 | 98,178,553 | 8.4% | ||
| skycae | 0 | 1,047,131,498 | 8.4% | ||
| sireh | 0 | 132,181,498 | 0.84% | ||
| woolnami | 0 | 5,290,616,423 | 2.52% | ||
| xanderslee | 0 | 444,953,327 | 8.4% | ||
| kenadis | 0 | 954,439,248 | 4.2% | ||
| esaia.mystic | 0 | 351,465,961 | 8.4% | ||
| funtraveller | 0 | 2,909,676,506 | 0.3% | ||
| thescubageek | 0 | 444,431,936 | 4.2% | ||
| alprazo.lamb | 0 | 114,020,253 | 4.2% | ||
| maski | 0 | 197,554,960 | 4.2% | ||
| cryptonized | 0 | 19,309,269,718 | 6% | ||
| akumar | 0 | 75,542,392 | 4.2% | ||
| venalbe | 0 | 250,570,159 | 4.2% | ||
| anikekirsten | 0 | 115,891,988 | 8.4% | ||
| hkmoon | 0 | 590,021,258 | 4.2% | ||
| gordon92 | 0 | 292,202,788 | 4.2% | ||
| stahlberg | 0 | 1,525,094,930 | 4.2% | ||
| gabrielatravels | 0 | 152,436,793 | 2.1% | ||
| catalincernat | 0 | 224,398,637 | 8.4% | ||
| cordeta | 0 | 192,179,022 | 4.2% | ||
| reizak | 0 | 679,107,596 | 3.36% | ||
| zlatkamrs | 0 | 468,224,304 | 7.98% | ||
| creatrixity | 0 | 302,414,170 | 4.2% | ||
| hetty-rowan | 0 | 242,602,254 | 4.2% | ||
| lilianajimenez | 0 | 104,714,300 | 4.2% | ||
| saintchristopher | 0 | 6,779,201,088 | 100% | ||
| m1alsan | 0 | 85,193,981 | 4.2% | ||
| adamzi | 0 | 278,201,933 | 4.2% | ||
| silkroadgo | 0 | 10,615,783,203 | 2.52% | ||
| jjohnson78 | 0 | 75,954,298 | 4.2% | ||
| thabiggdogg | 0 | 1,171,238,870 | 4.2% | ||
| wisewoof | 0 | 278,358,672 | 4.2% | ||
| pab.ink | 0 | 11,950,541,318 | 100% | ||
| giddyupngo | 0 | 235,175,571 | 4.2% | ||
| debbietiyan | 0 | 174,892,354 | 4.2% | ||
| mininthecity | 0 | 314,398,911 | 6.72% | ||
| edprivat | 0 | 389,883,553 | 1% | ||
| steempinup | 0 | 521,851,027 | 100% | ||
| randomwanderings | 0 | 110,561,085 | 4.2% | ||
| didic | 0 | 3,701,332,989 | 4.2% | ||
| niko3d | 0 | 311,251,362 | 4.2% | ||
| warpedpoetic | 0 | 248,984,193 | 1.26% | ||
| operahoser | 0 | 491,428,529 | 1.34% | ||
| wdoutjah | 0 | 90,592,407 | 4.2% | ||
| nwjordan | 0 | 1,133,272,429 | 8.4% | ||
| loydjayme25 | 0 | 135,933,846 | 4.2% | ||
| oghie | 0 | 420,983,254 | 50% | ||
| ameliabartlett | 0 | 170,585,729 | 1.26% | ||
| mindscapephotos | 0 | 135,139,125 | 2.94% | ||
| beladro | 0 | 101,070,252 | 4.2% | ||
| vegan.niinja | 0 | 505,936,459 | 4.2% | ||
| benleemusic | 0 | 1,674,505,163 | 0.84% | ||
| lianaakobian | 0 | 936,531,620 | 8.4% | ||
| ivan-g | 0 | 955,917,190 | 4.2% | ||
| chimtivers96 | 0 | 253,202,647 | 8.4% | ||
| zipporah | 0 | 2,203,217,861 | 1.68% | ||
| sissyjill | 0 | 70,854,953 | 7% | ||
| joelagbo | 0 | 191,580,723 | 4.2% | ||
| targodan | 0 | 6,107,363,820 | 100% | ||
| morbyjohn | 0 | 124,335,769 | 7% | ||
| norwegianbikeman | 0 | 120,118,673 | 4.2% | ||
| positiveninja | 0 | 1,053,829,429 | 4.2% | ||
| kookyan | 0 | 137,233,780 | 4.2% | ||
| wanasoloben | 0 | 541,881,199 | 4.2% | ||
| phaazer1 | 0 | 74,927,045 | 4.2% | ||
| acknowledgement | 0 | 766,399,718 | 10% | ||
| sbi2 | 0 | 34,808,452,589 | 4% | ||
| cjunros | 0 | 196,141,235 | 4.2% | ||
| bitmycoin | 0 | 65,062,779 | 4.2% | ||
| patchnotes | 0 | 120,884,890 | 5.04% | ||
| blue-dragon | 0 | 4,606,176,932 | 100% | ||
| elsll | 0 | 125,012,403 | 8.4% | ||
| sooflauschig | 0 | 9,948,812,174 | 100% | ||
| bavi | 0 | 260,253,128 | 4.2% | ||
| hiddenblade | 0 | 227,744,326 | 4.2% | ||
| outtheshellvlog | 0 | 125,388,757 | 4.2% | ||
| kendallron | 0 | 98,479,681 | 8.4% | ||
| woolnyeo | 0 | 600,633,679 | 2.52% | ||
| apteacher | 0 | 129,266,138 | 1.68% | ||
| deholt | 0 | 91,012,180 | 3.78% | ||
| qberryfarms | 0 | 154,698,619 | 4.2% | ||
| paramimd | 0 | 137,201,708 | 5.04% | ||
| onethousandpics | 0 | 72,306,547 | 4.2% | ||
| gracelbm | 0 | 270,998,479 | 4.2% | ||
| marcuz | 0 | 132,838,912 | 4.2% | ||
| metama | 0 | 2,219,083,681 | 4.2% | ||
| avizor | 0 | 657,198,386 | 4.2% | ||
| romanleopold | 0 | 146,997,352 | 4.2% | ||
| dobrica | 0 | 205,680,286 | 4.2% | ||
| niouton | 0 | 376,712,662 | 1.68% | ||
| cosmophobia | 0 | 430,342,725 | 4.2% | ||
| disruptivas | 0 | 99,370,814 | 3.98% | ||
| punchymcstab | 0 | 542,149,100 | 100% | ||
| blewitt | 0 | 1,212,340,863 | 0.42% | ||
| ilovecryptopl | 0 | 948,560,366 | 6.72% | ||
| oezixxx | 0 | 114,230,736 | 8.4% | ||
| yomismosoy | 0 | 151,933,532 | 50% | ||
| ashfaaaq | 0 | 113,350,133 | 4.2% | ||
| call-me-howie | 0 | 3,381,211,386 | 4.2% | ||
| hansmast | 0 | 657,928,561 | 4.2% | ||
| deividluchi | 0 | 104,327,102 | 4.2% | ||
| wstanley226 | 0 | 1,810,242,583 | 50% | ||
| hawaj | 0 | 721,456,017 | 8.4% | ||
| minuetoacademy | 0 | 145,512,999 | 8.4% | ||
| danlipert | 0 | 109,314,017 | 4.2% | ||
| clement.poiret | 0 | 443,931,574 | 8.4% | ||
| annaabi | 0 | 648,775,860 | 4.2% | ||
| ananas.studio | 0 | 136,097,747 | 8.4% | ||
| mrunderstood | 0 | 128,538,548 | 4.2% | ||
| synthtology | 0 | 227,458,194 | 4.2% | ||
| diyanti86 | 0 | 93,501,522 | 4.2% | ||
| trang | 0 | 717,863,962 | 4.2% | ||
| raghao | 0 | 130,274,983 | 4.2% | ||
| rhethypo | 0 | 362,831,358 | 4.2% | ||
| swapfuture | 0 | 1,295,918,772 | 5.46% | ||
| predict-crypto | 0 | 239,299,608 | 0.16% | ||
| chickenmeat | 0 | 212,112,025 | 4.2% | ||
| javier.dejuan | 0 | 1,857,152,481 | 8.4% | ||
| zerokun | 0 | 72,250,211 | 4.2% | ||
| andydream | 0 | 124,451,487 | 4.2% | ||
| alom8 | 0 | 142,345,970 | 4.2% | ||
| raoufwilly | 0 | 109,762,045 | 2.52% | ||
| daddywilliam | 0 | 266,416,056 | 4.2% | ||
| deadcountry | 0 | 176,078,486 | 4.2% | ||
| alvin0617 | 0 | 117,651,171 | 4.2% | ||
| sarhugo | 0 | 305,800,402 | 4.2% | ||
| whitebot | 0 | 18,218,310,250 | 1% | ||
| liubao | 0 | 188,959,840 | 4.2% | ||
| hairgistix | 0 | 791,654,638 | 4.2% | ||
| goodcontentbot | 0 | 1,052,235,817 | 10% |
Your result is worth the effort you put in your artwork! I like this technique, especially for book illustrations. Why you came up with the idea to capture the mermaid into a bottle? Is there a fairytale behind?
| author | johano |
|---|---|
| permlink | re-mayasky-a-new-way-of-printing-original-mermaid-print-with-a-step-by-step-tutorial-20181127t191842421z |
| category | art |
| json_metadata | {"tags":["art"],"app":"steemit/0.1"} |
| created | 2018-11-27 19:18:39 |
| last_update | 2018-11-27 19:18:57 |
| depth | 1 |
| children | 2 |
| last_payout | 2018-12-04 19:18:39 |
| cashout_time | 1969-12-31 23:59:59 |
| total_payout_value | 0.000 HBD |
| curator_payout_value | 0.000 HBD |
| pending_payout_value | 0.000 HBD |
| promoted | 0.000 HBD |
| body_length | 211 |
| author_reputation | 7,273,789,425,613 |
| root_title | "A new way of printing! Original Mermaid print with a step by step tutorial." |
| beneficiaries | [] |
| max_accepted_payout | 1,000,000.000 HBD |
| percent_hbd | 10,000 |
| post_id | 76,003,477 |
| net_rshares | 0 |
Thank you so much @joanho! :) I don't know if there is a fairytale behind it, but maybe there is! :) I'll check it out. The idea sort of developed naturally. I knew I wanted to make a mermaid print and came accross all these other linocut artists that made prints of plants in bottles and then I thought it would be cool to put a mermaid in there instead! :)
| author | mayasky |
|---|---|
| permlink | re-johano-re-mayasky-a-new-way-of-printing-original-mermaid-print-with-a-step-by-step-tutorial-20181128t121155897z |
| category | art |
| json_metadata | {"tags":["art"],"users":["joanho"],"app":"steemit/0.1"} |
| created | 2018-11-28 12:12:00 |
| last_update | 2018-11-28 12:12:00 |
| depth | 2 |
| children | 1 |
| last_payout | 2018-12-05 12:12:00 |
| cashout_time | 1969-12-31 23:59:59 |
| total_payout_value | 0.000 HBD |
| curator_payout_value | 0.000 HBD |
| pending_payout_value | 0.000 HBD |
| promoted | 0.000 HBD |
| body_length | 358 |
| author_reputation | 32,677,895,593,938 |
| root_title | "A new way of printing! Original Mermaid print with a step by step tutorial." |
| beneficiaries | [] |
| max_accepted_payout | 1,000,000.000 HBD |
| percent_hbd | 10,000 |
| post_id | 76,038,584 |
| net_rshares | 9,877,805,134 |
| author_curate_reward | "" |
| voter | weight | wgt% | rshares | pct | time |
|---|---|---|---|---|---|
| johano | 0 | 9,877,805,134 | 50% |
...and the bottle provides a nice frame as well. Thanks for coming back. Have a great day!
| author | johano |
|---|---|
| permlink | re-mayasky-re-johano-re-mayasky-a-new-way-of-printing-original-mermaid-print-with-a-step-by-step-tutorial-20181128t201959419z |
| category | art |
| json_metadata | {"tags":["art"],"app":"steemit/0.1"} |
| created | 2018-11-28 20:19:54 |
| last_update | 2018-11-28 20:19:54 |
| depth | 3 |
| children | 0 |
| last_payout | 2018-12-05 20:19:54 |
| cashout_time | 1969-12-31 23:59:59 |
| total_payout_value | 0.000 HBD |
| curator_payout_value | 0.000 HBD |
| pending_payout_value | 0.000 HBD |
| promoted | 0.000 HBD |
| body_length | 90 |
| author_reputation | 7,273,789,425,613 |
| root_title | "A new way of printing! Original Mermaid print with a step by step tutorial." |
| beneficiaries | [] |
| max_accepted_payout | 1,000,000.000 HBD |
| percent_hbd | 10,000 |
| post_id | 76,059,994 |
| net_rshares | 0 |