<br>
## <center>🎨Saludos mis queridos amigos creativos 🎨.</center>
>## <center>🎨 Greetings my dear creative friends 🎨.</center>
<br>

<div class="text-justify">Me siento súper feliz de estar nuevamente con ustedes, hoy quiero compartir un material y que mejor que hacerlo en esta excelente comunidad donde dejamos fluir nuestras ideas y transformamos lo que no servía en algo útil y hermoso. </div>
<br>
><div class="text-justify">I feel super happy to be with you again, today I want to share a material and what better than to do it in this excellent community where we let our ideas flow and transform what was not useful into something useful and beautiful . </div>
<br>
<div class="text-justify">Hoy haremos un "Hermoso Cuadro de Cucharas o paletas" hechas totalmente a mano, con madera reciclada. Este material es ideal para decorar nuestra casa, lugar de trabajo, son muchísimas las oportunidades que tenemos de hacer con madera reciclada, así que si vas por la calle y ves un pedazo de madera guardalo puede ser muy útil. </div>
<br>
><div class="text-justify">Today we will make a "Beautiful Table of Spoons or palettes" made entirely by hand, with recycled wood. This material is ideal for decorating our home, workplace, there are many opportunities we have to do with recycled wood, so if you go down the street and see a piece of wood, save it can be very useful. </div>
<br>

<br>
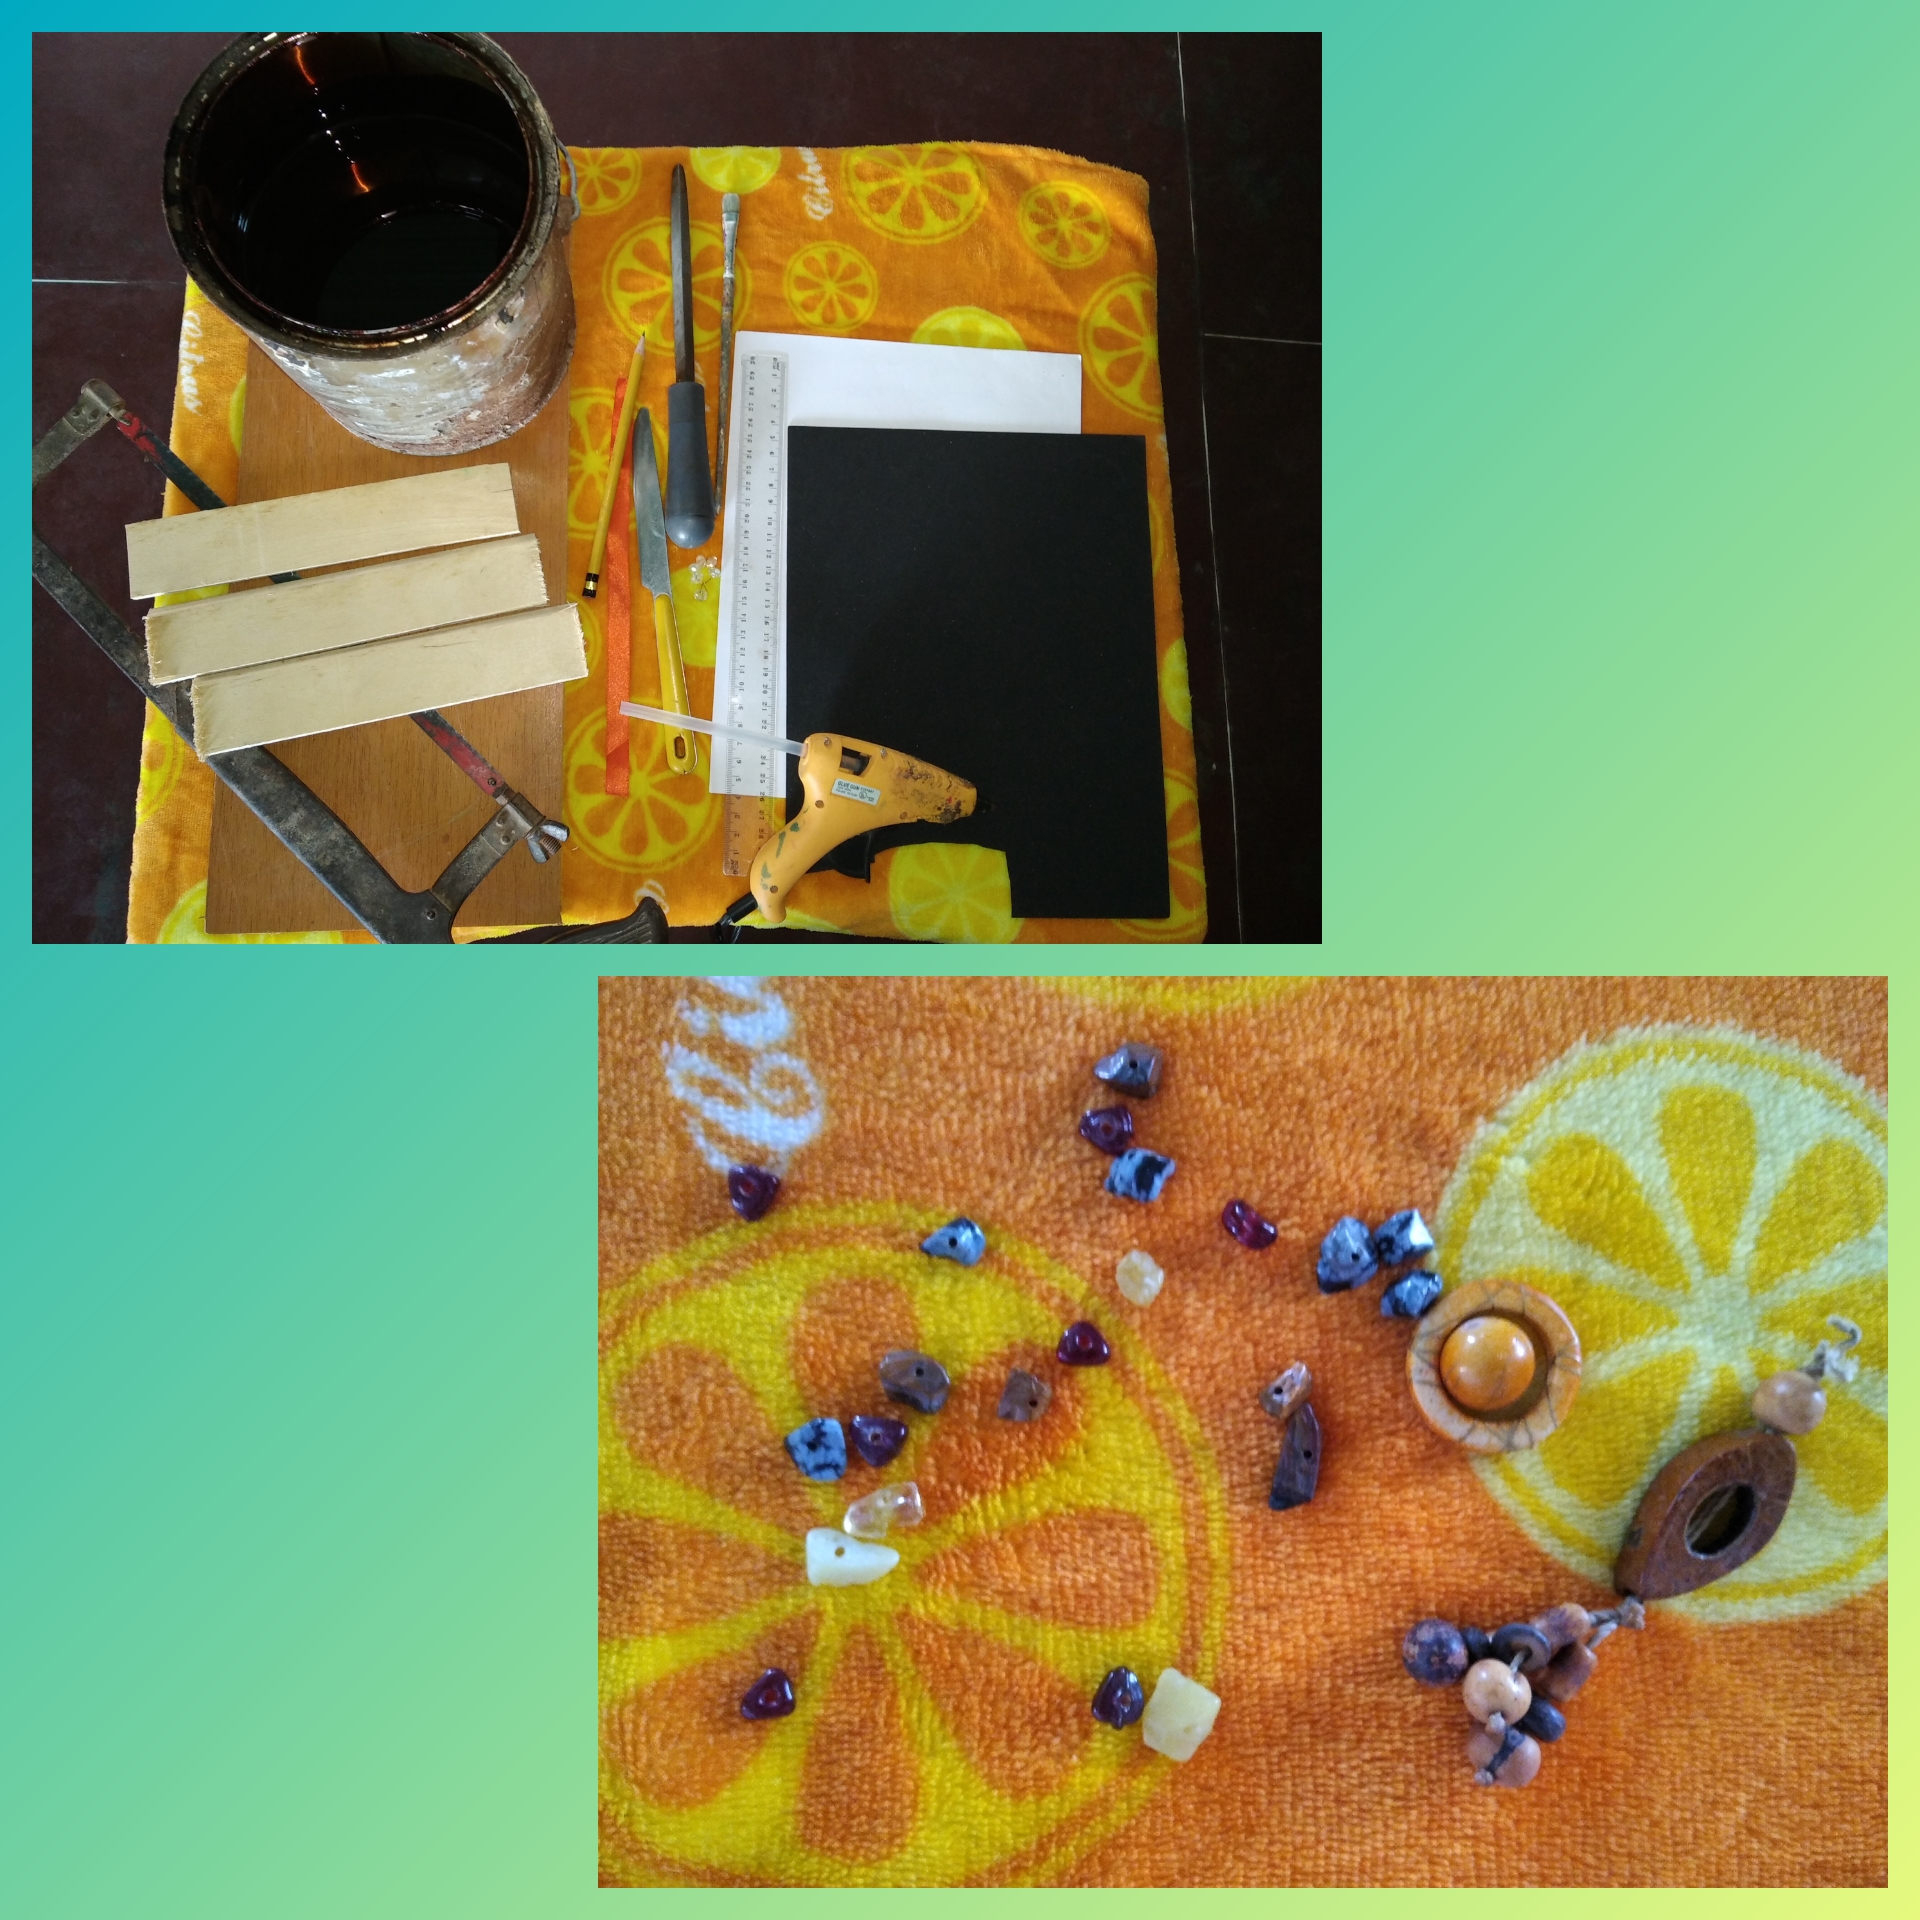
<div class="text-justify">Los materiales que he usado para este hermoso cuadro de cucharas hecho a mano son: </div>
<br>
><div class="text-justify">The materials I have used for this beautiful handmade table of spoons are: </div>
<br>

## <center>Materiales y Herramientas.</center>
>## <center>Materials and Tools.</center>
<br>
<br>
<div class="text-justify">✓ 3 tablitas de madera reciclada 5cm cada una.</div>
<div class="text-justify">✓ 1 madera de 30 cm.</div>
<div class="text-justify"> ✓ 1 hoja de segueta.</div>✓ 1 hoja blanca reciclada.</div>
<div class="text-justify">✓ 1 Lápiz de grafito.</div>
<div class="text-justify"> ✓ 1 Foami negro.</div>
<div class="text-justify">✓ Barniz.</div>
<div class="text-justify">✓ 1 Silicón en barra.</div>
<div class="text-justify">✓ 1 Pistola de silicón.</div>
<div class="text-justify">✓ 1 Regla.</div>
<div class="text-justify">✓ 1 Cuchillo.</div>
<div class="text-justify">✓ Apliques.</div>
<div class="text-justify">✓ Cinta bebé naranja.</div>
<br>
><div class="text-justify">✓ 3 recycled wood boards 5cm each.</div>
<div class="text-justify">✓ 1 piece of 30 cm wood.</div>
<div class="text-justify"> ✓ 1 hacksaw blade.</div>✓ 1 recycled white blade.</div>
<div class="text-justify">✓ 1 Graphite pencil.</div>
<div class="text-justify"> ✓ 1 black Foami.</div>
<div class="text-justify">✓ Varnish.</div>
<div class="text-justify">✓ 1 silicone bar.</div>
<div class="text-justify">✓ 1 glue gun.</div>
<div class="text-justify">✓ 1 Rule.</div>
<div class="text-justify">✓ 1 Knife.</div>
<div class="text-justify">✓ Applies.</div>
<div class="text-justify">✓ Orange baby headband.</div>
<br>

## <center>Elaboración de las Paletas o Cucharas.</center>
<br>
>## <center>Making the Pallets or Spoons.</center>
<br>
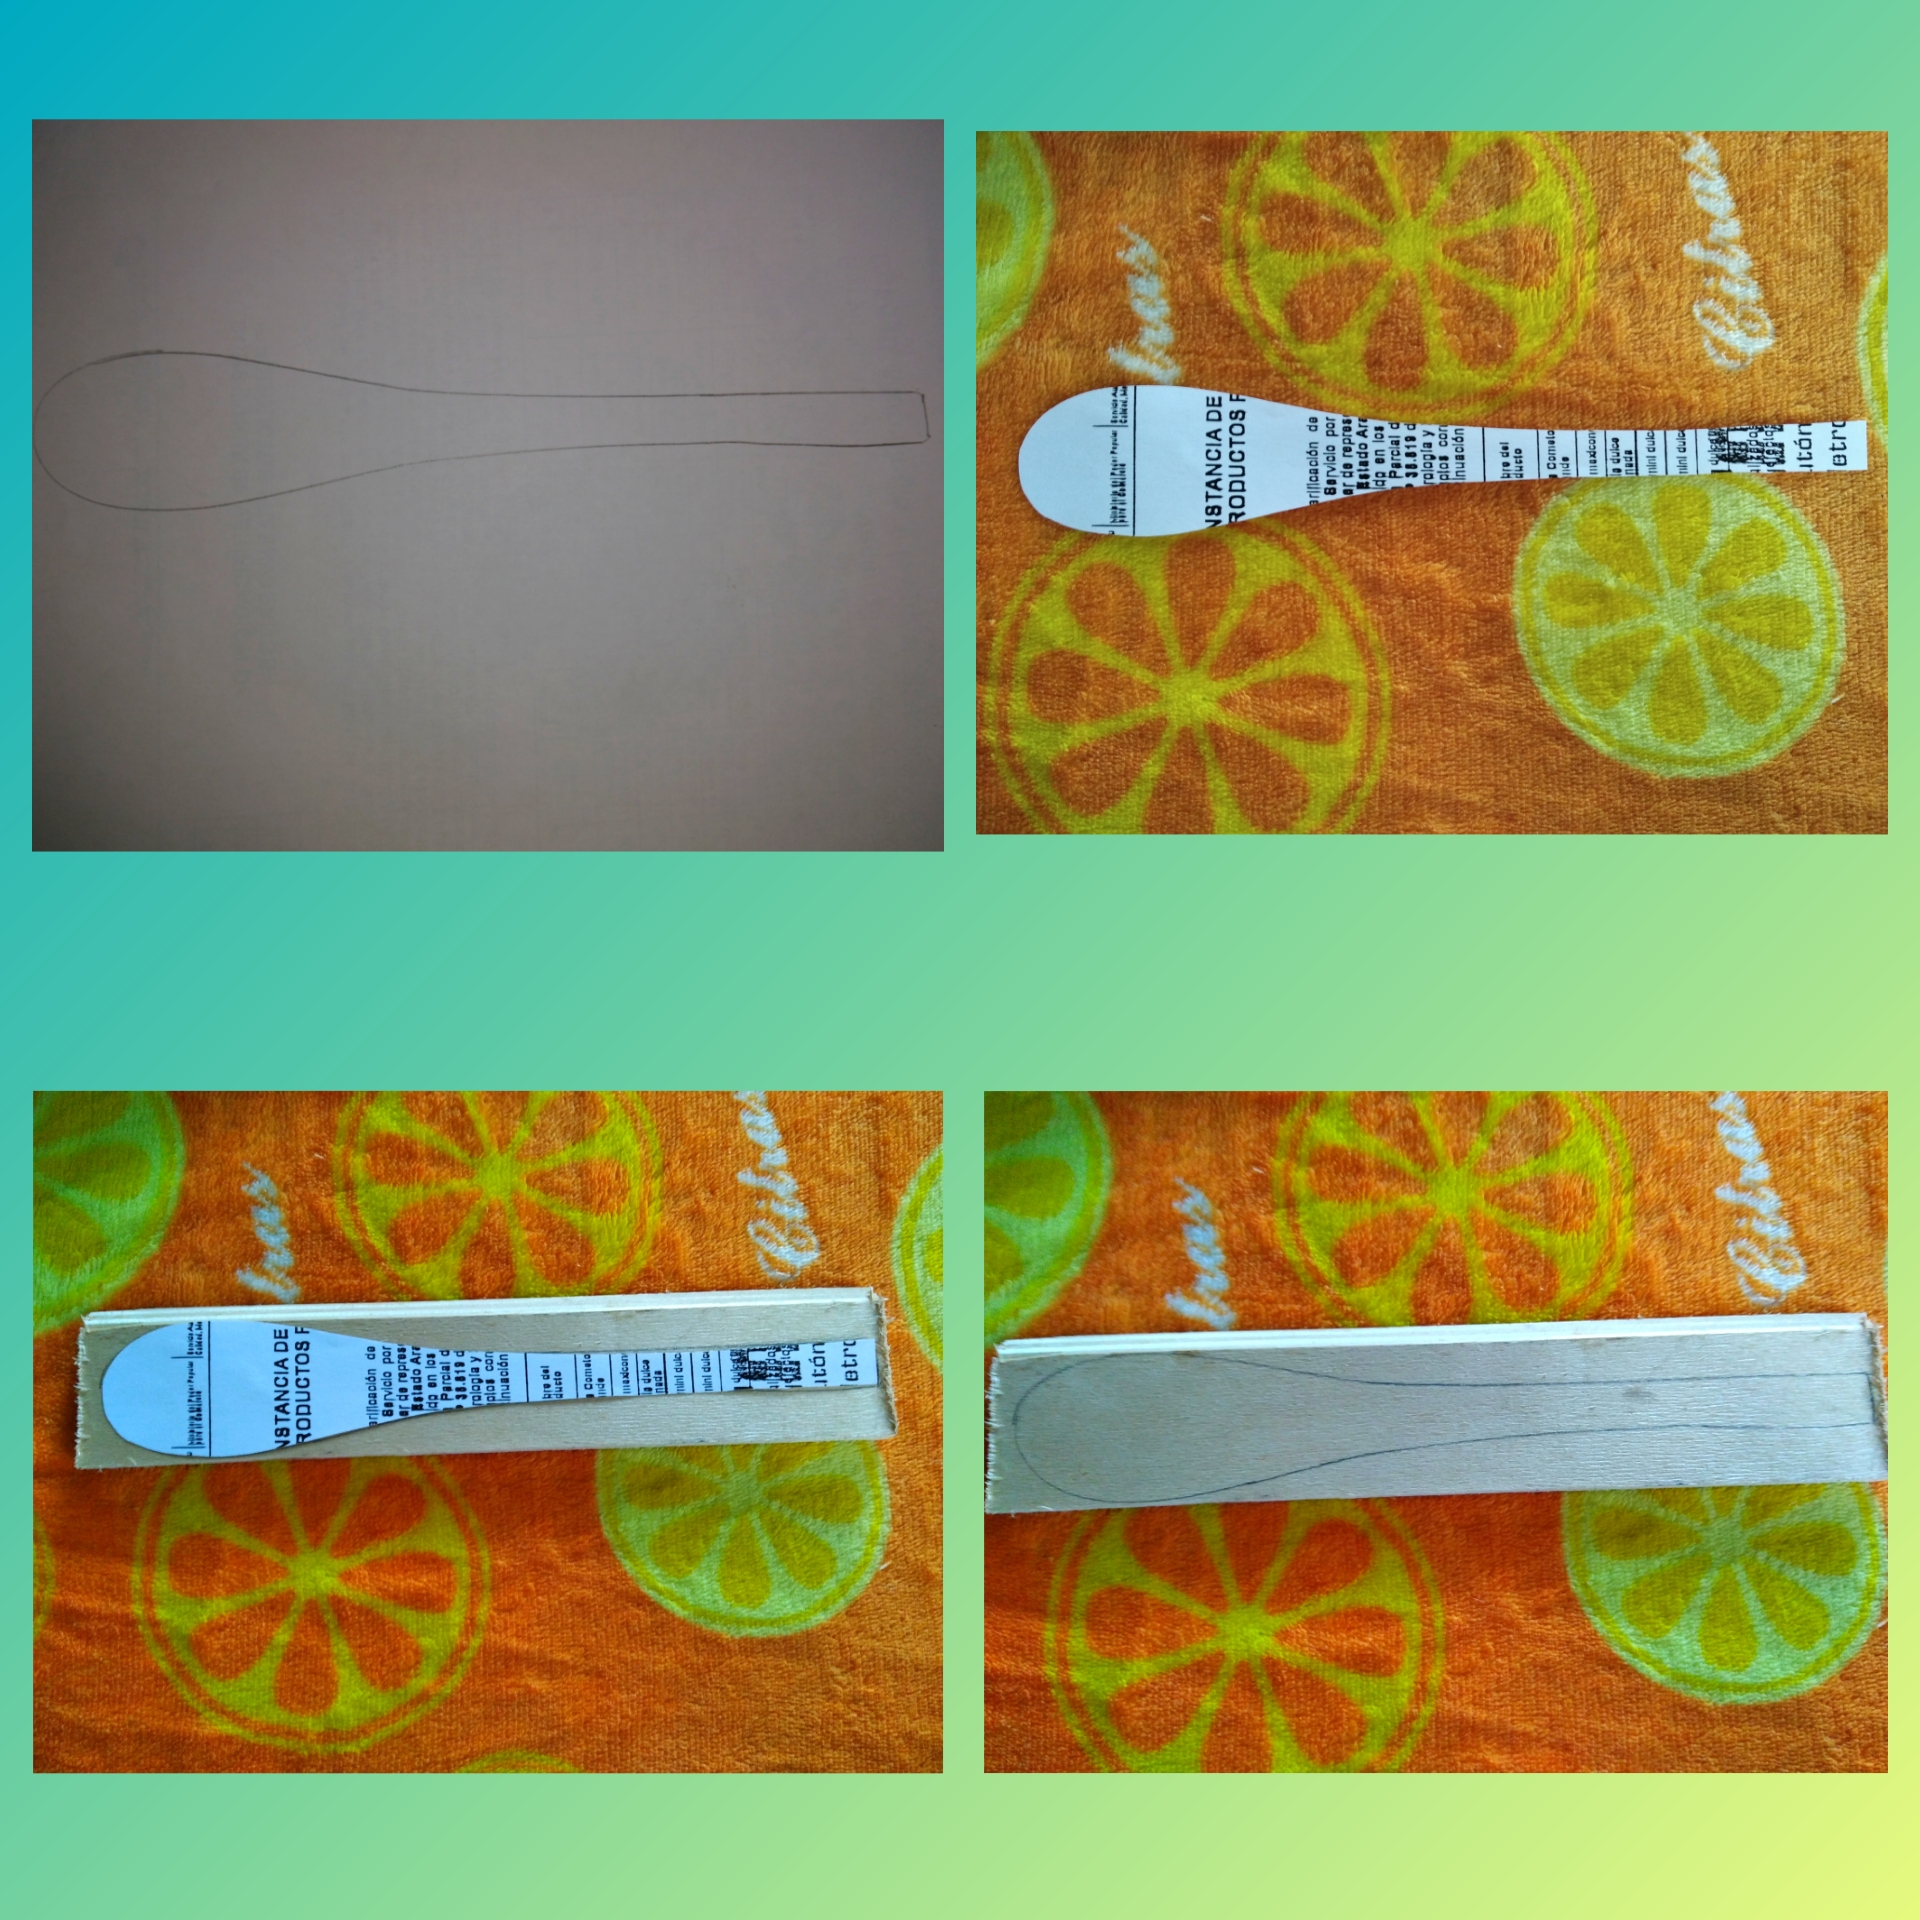
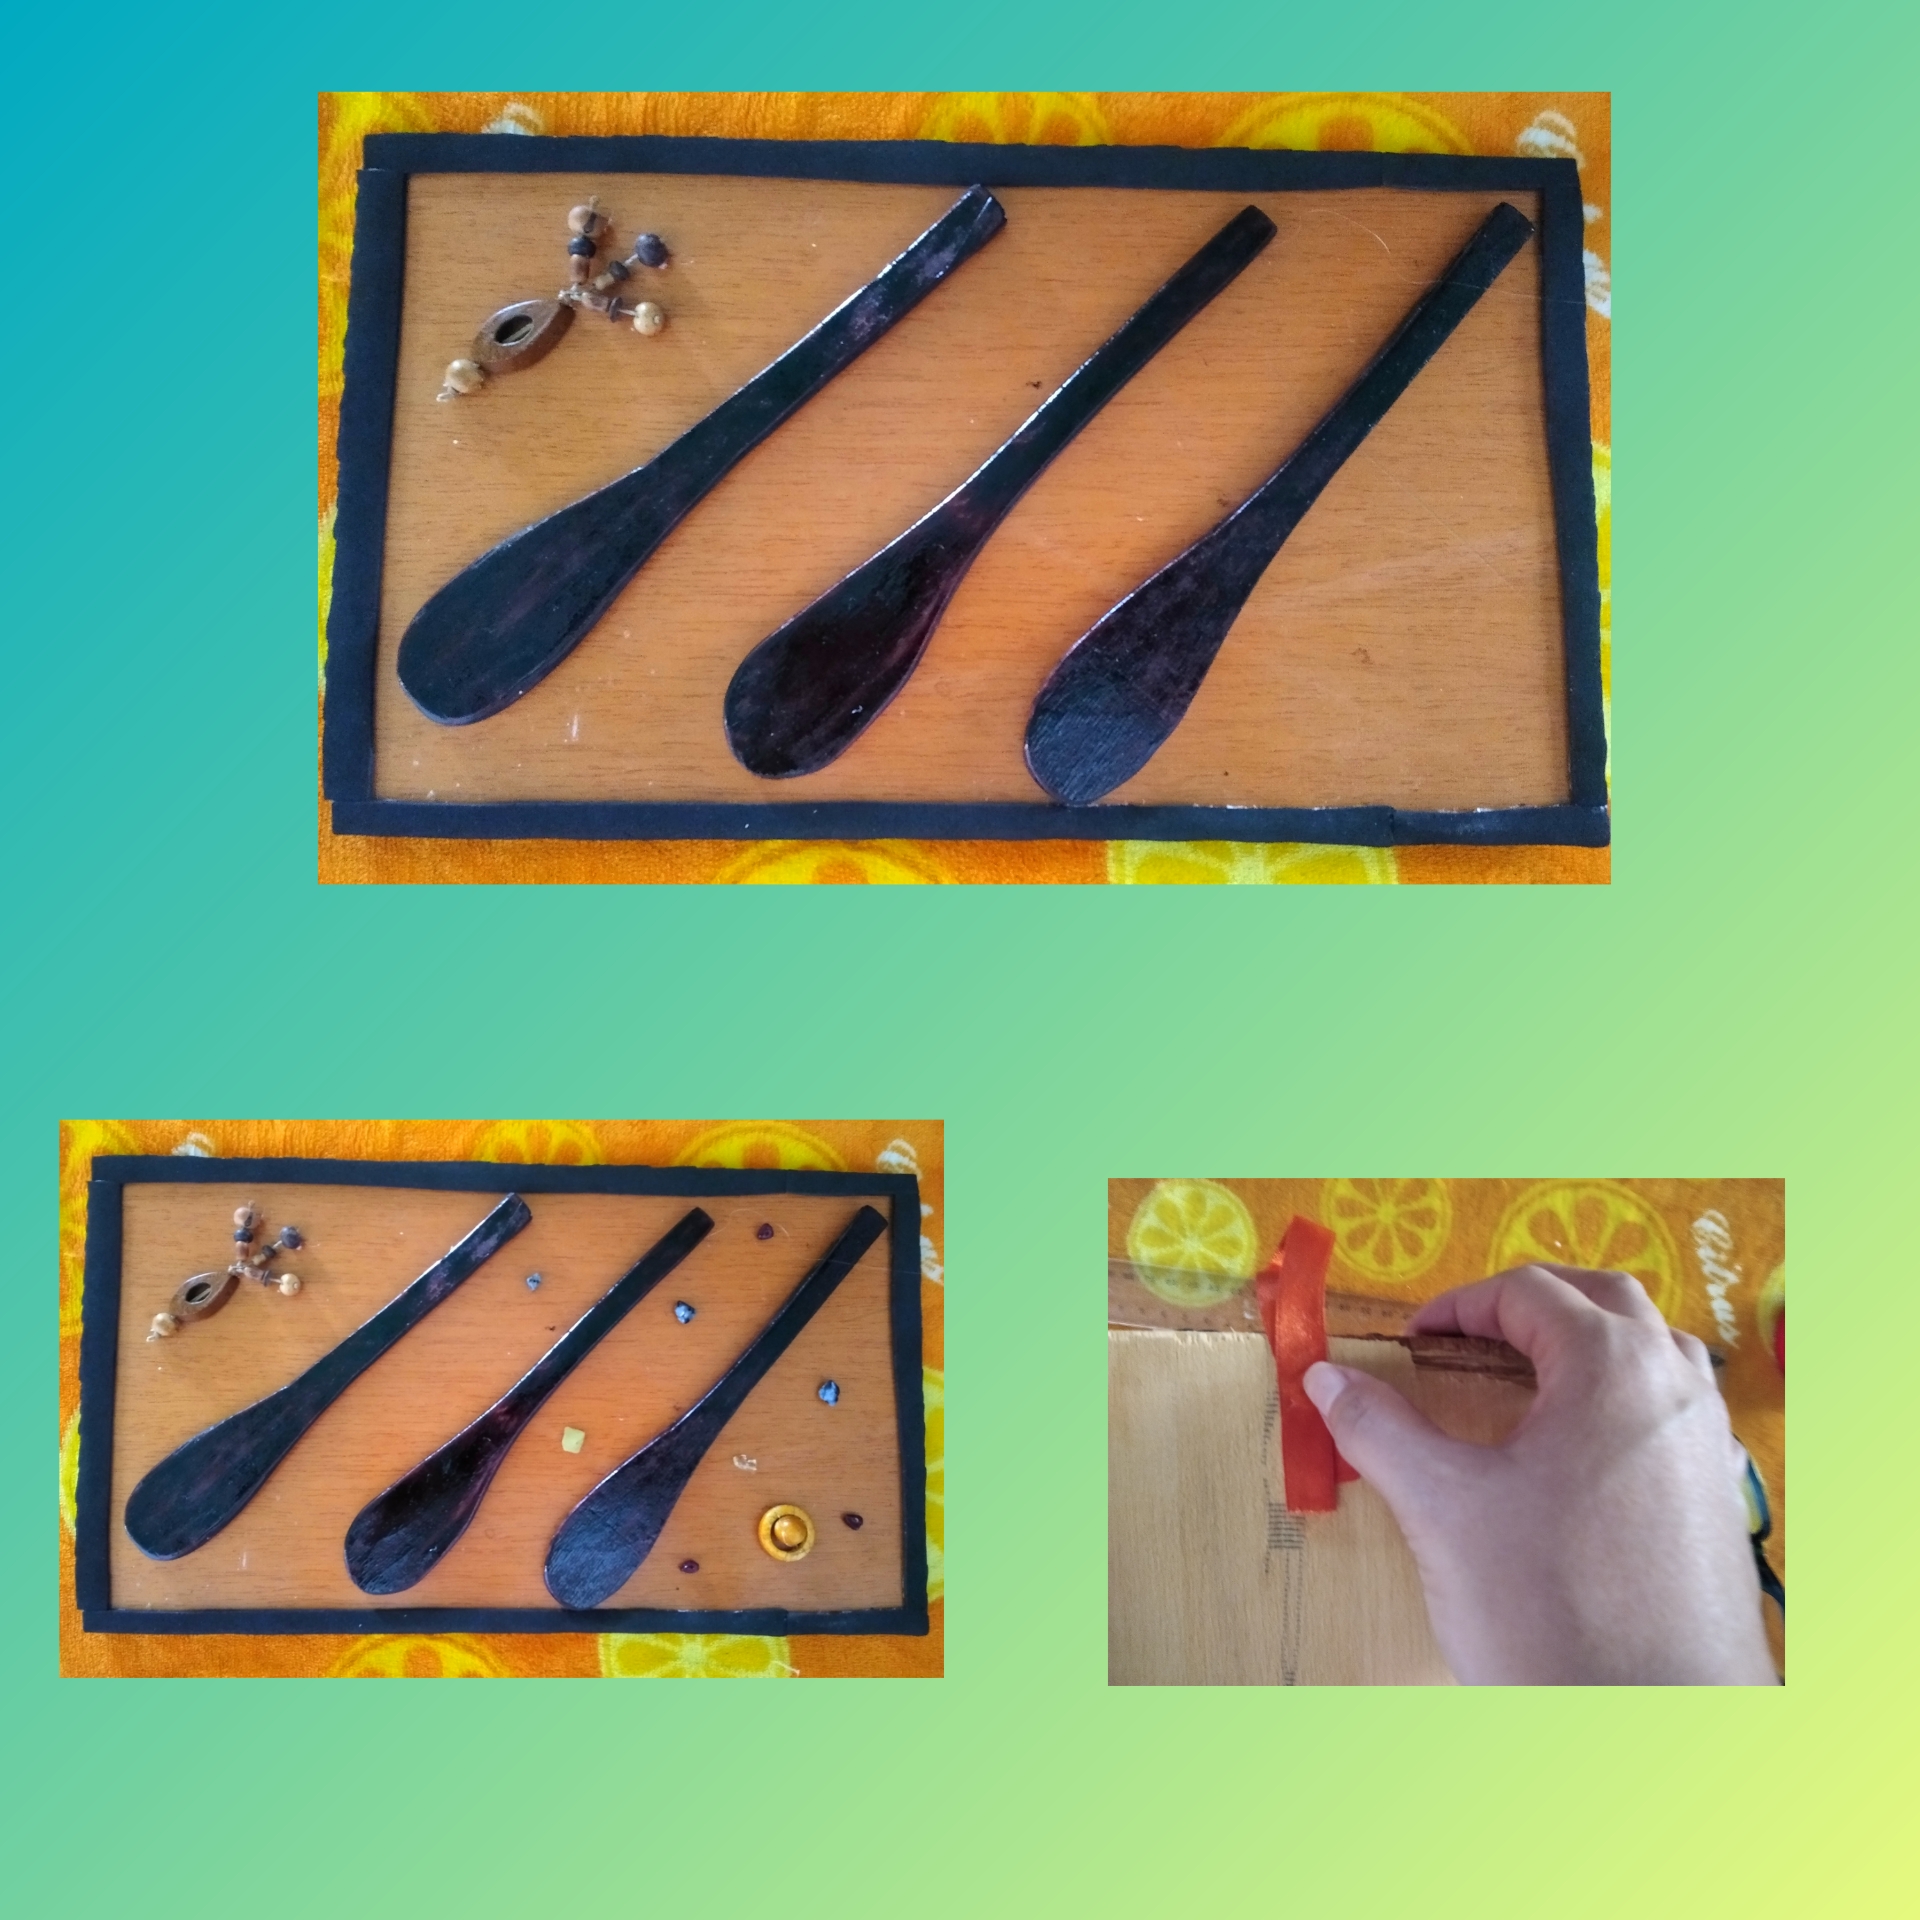
## <div class="text-justify">Paso 1.</div>
<div class="text-justify"> La elaboración del cuadro la vamos a comenzar haciendo con nuestras manos las paletas o cucharas de madera para lo cual vamos a tomar la hoja blanca reciclada y en ella vamos a dibujar la paleta o cuchara, luego con una tijera recortamos por el borde, colocamos el dibujo sobre la tabla de madera y lo repasamos, este proceso lo hacemos con las 3 paletas.</div>
<br>
>## <div class="text-justify">Step 1.</div>
><div class="text-justify"> We are going to start the elaboration of the painting by making the palettes or wooden spoons with our hands, for which we are going to take the recycled white sheet and on it we are going to draw the palette or spoon, then With scissors we cut the edge, we place the drawing on the wooden board and we review it, we do this process with the 3 palettes.</div>
<br>
<br>
## <div class="text-justify">Paso 2.</div>
<div class="text-justify">Luego de tener la paleta dibujada, con una hoja de segueta o cuchillo vamos a ir cortando la madera poco a poco y con cuidado para que no se nos dañe, nos guiamos por el dibujo que tenemos y así damos cortando hasta darle forma, este proceso lo repetimos con cada paleta o cuchara, hasta conseguir la forma deseada. Este paso 2 es el paso más largo en esta elaboración debemos tener paciencia hasta obtener el resultado.</div>
<br>
>## <div class="text-justify">Step 2.</div>
><div class="text-justify">After having the palette drawn, with a hacksaw blade or knife we are going to cut the wood little by little and carefully so that it is not damaged, we are guided by the drawing we have And so we cut until it is shaped, we repeat this process with each palette or spoon, until we get the desired shape. This step 2 is the longest step in this elaboration, we must be patient until we obtain the result.</div>
<br>

<br>

<br>
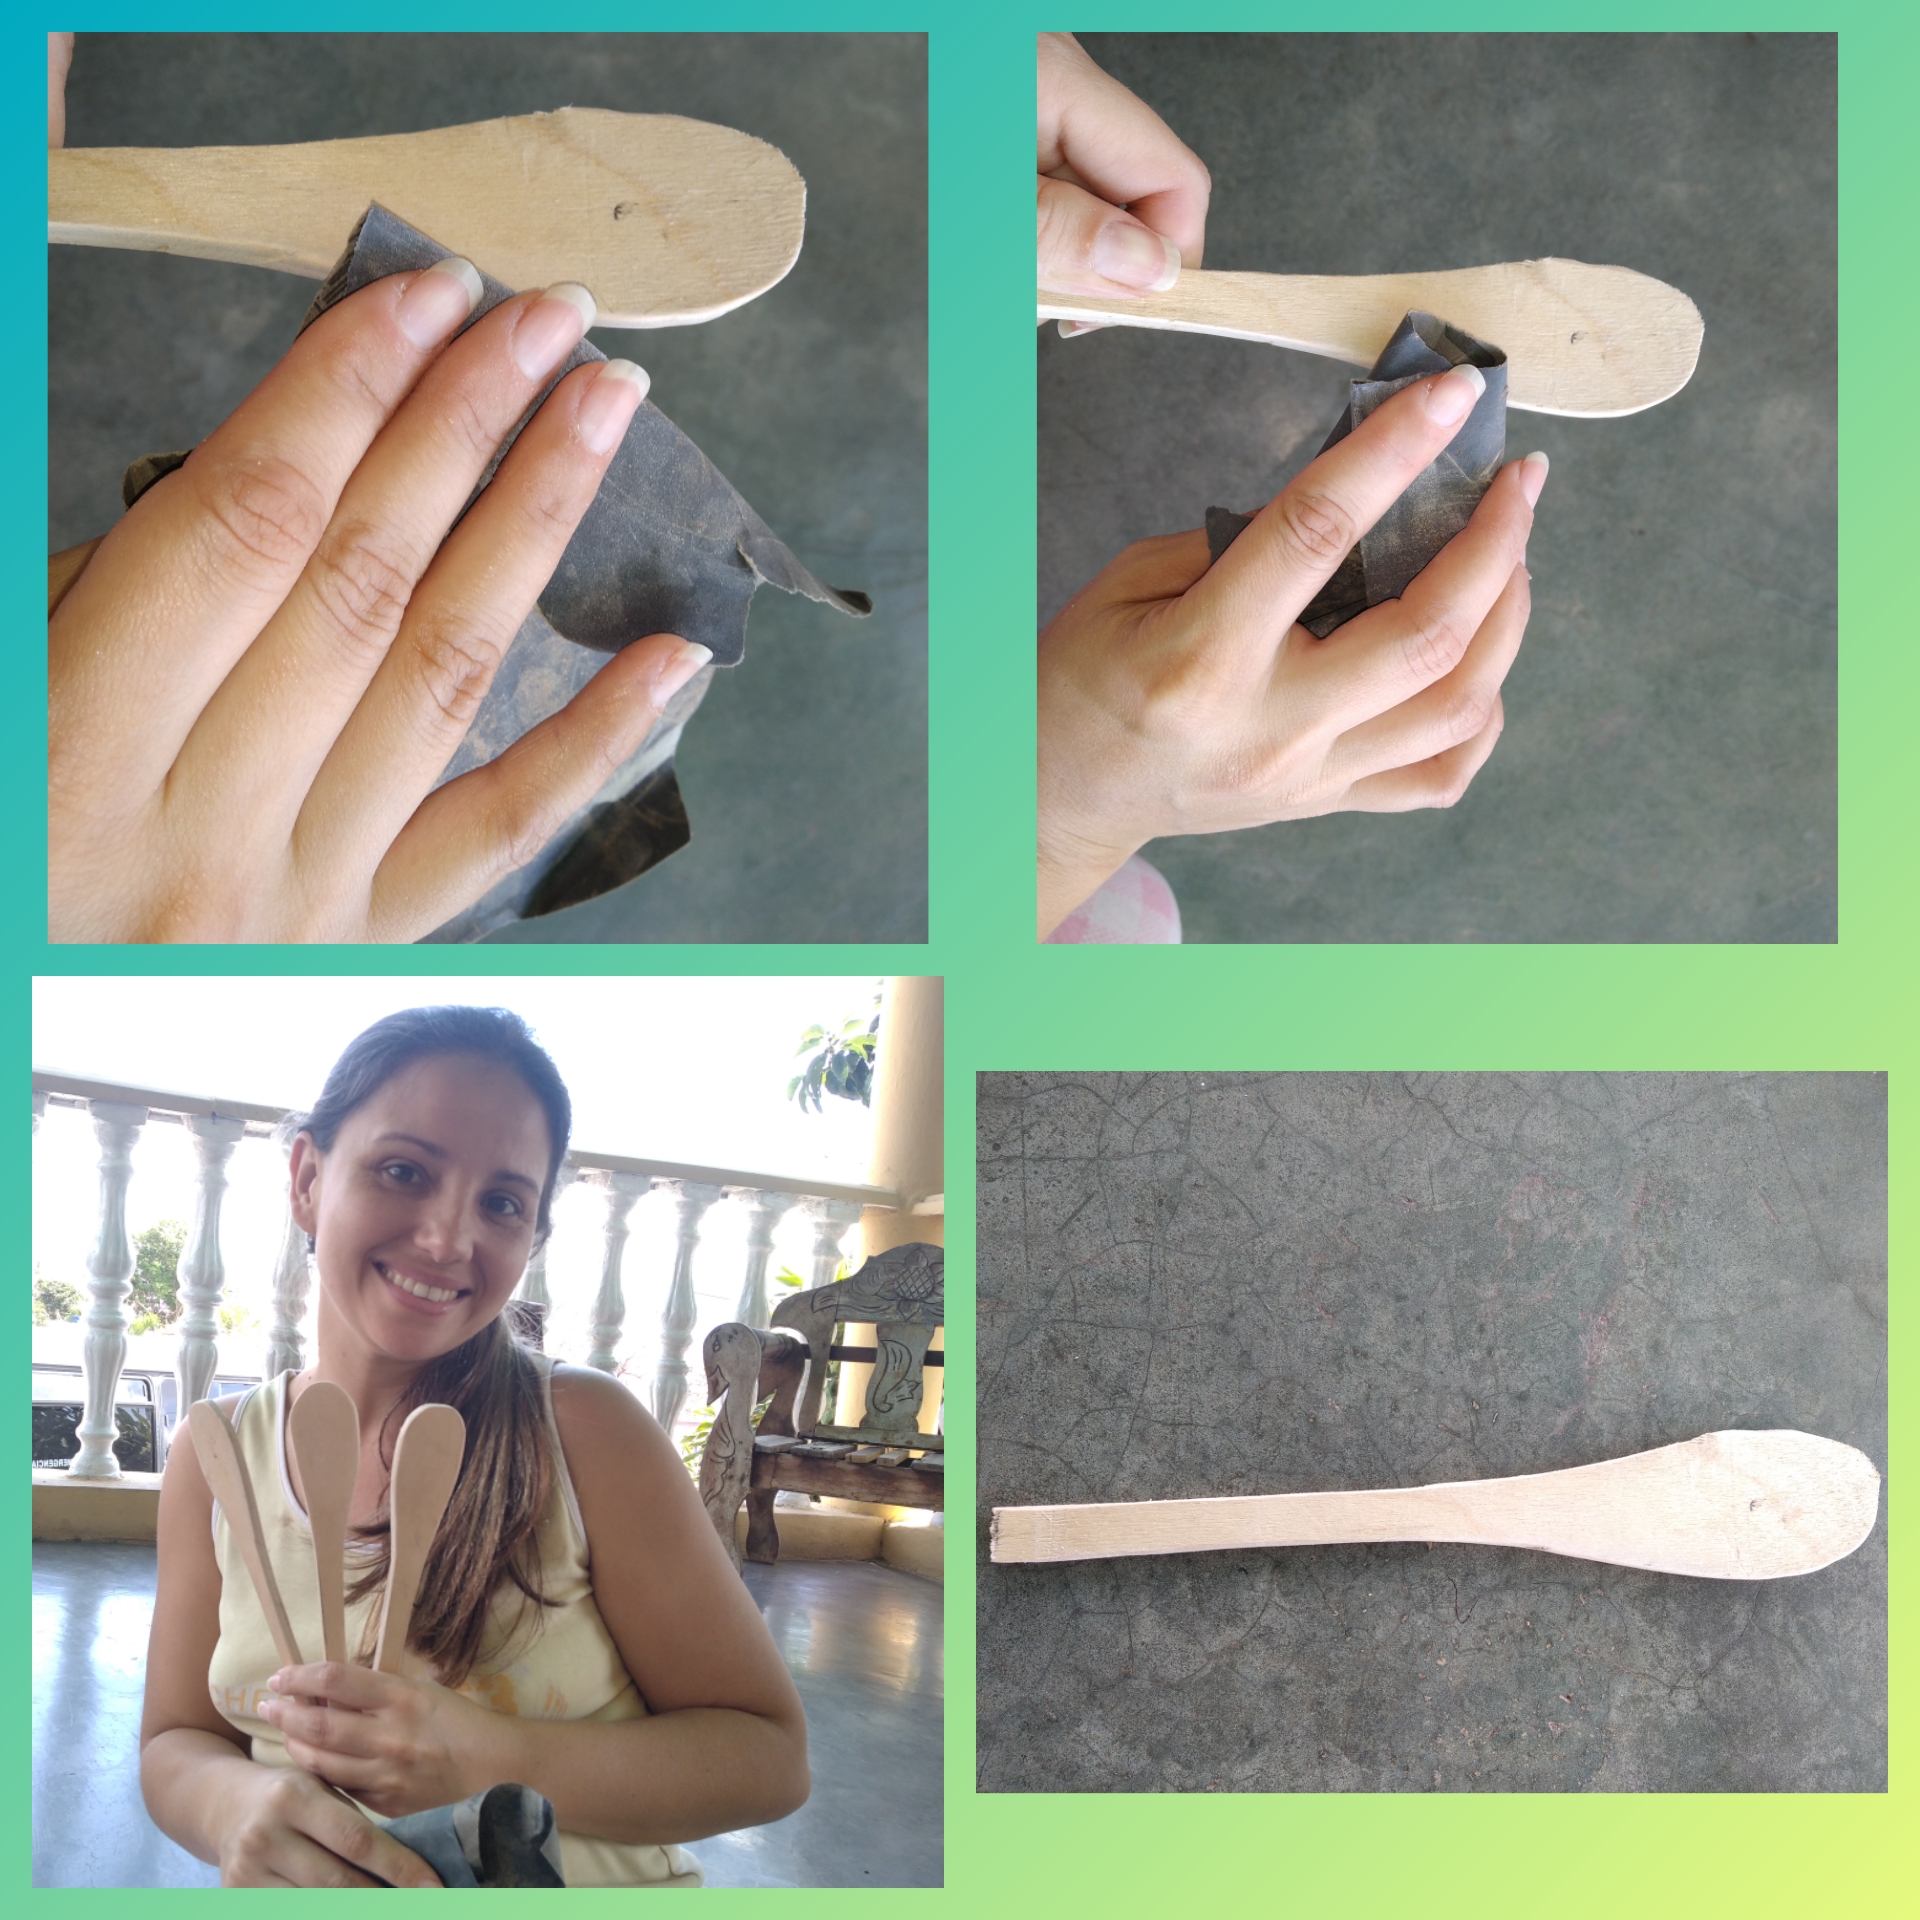
## <div class="text-justify">Paso 3.</div>
<div class="text-justify">El paso 3 consiste en lijar las paletas, al terminar de cortarlas nos van a quedar ásperas y con imperfecciones nada que la lija no pueda solucionar, así que vamos a pasar la lija por todo el borde de la paleta para darle suavidad y una mejor apariencia.</div>
<br>
>## <div class="text-justify">Step 3.</div>
><div class="text-justify">Step 3 consists of sanding the pallets, when we finish cutting them they will be rough and with imperfections, nothing that the sandpaper cannot fix, so we are going to sandpaper the entire edge of the palette to give it softness and a better appearance.</div>
<br>
<br>
<div class="text-justify">Así de lindas, quedaron las tres paletas o cucharas.</div>
><div class="text-justify">That's how cute the three palettes or spoons turned out.</div>

<br>
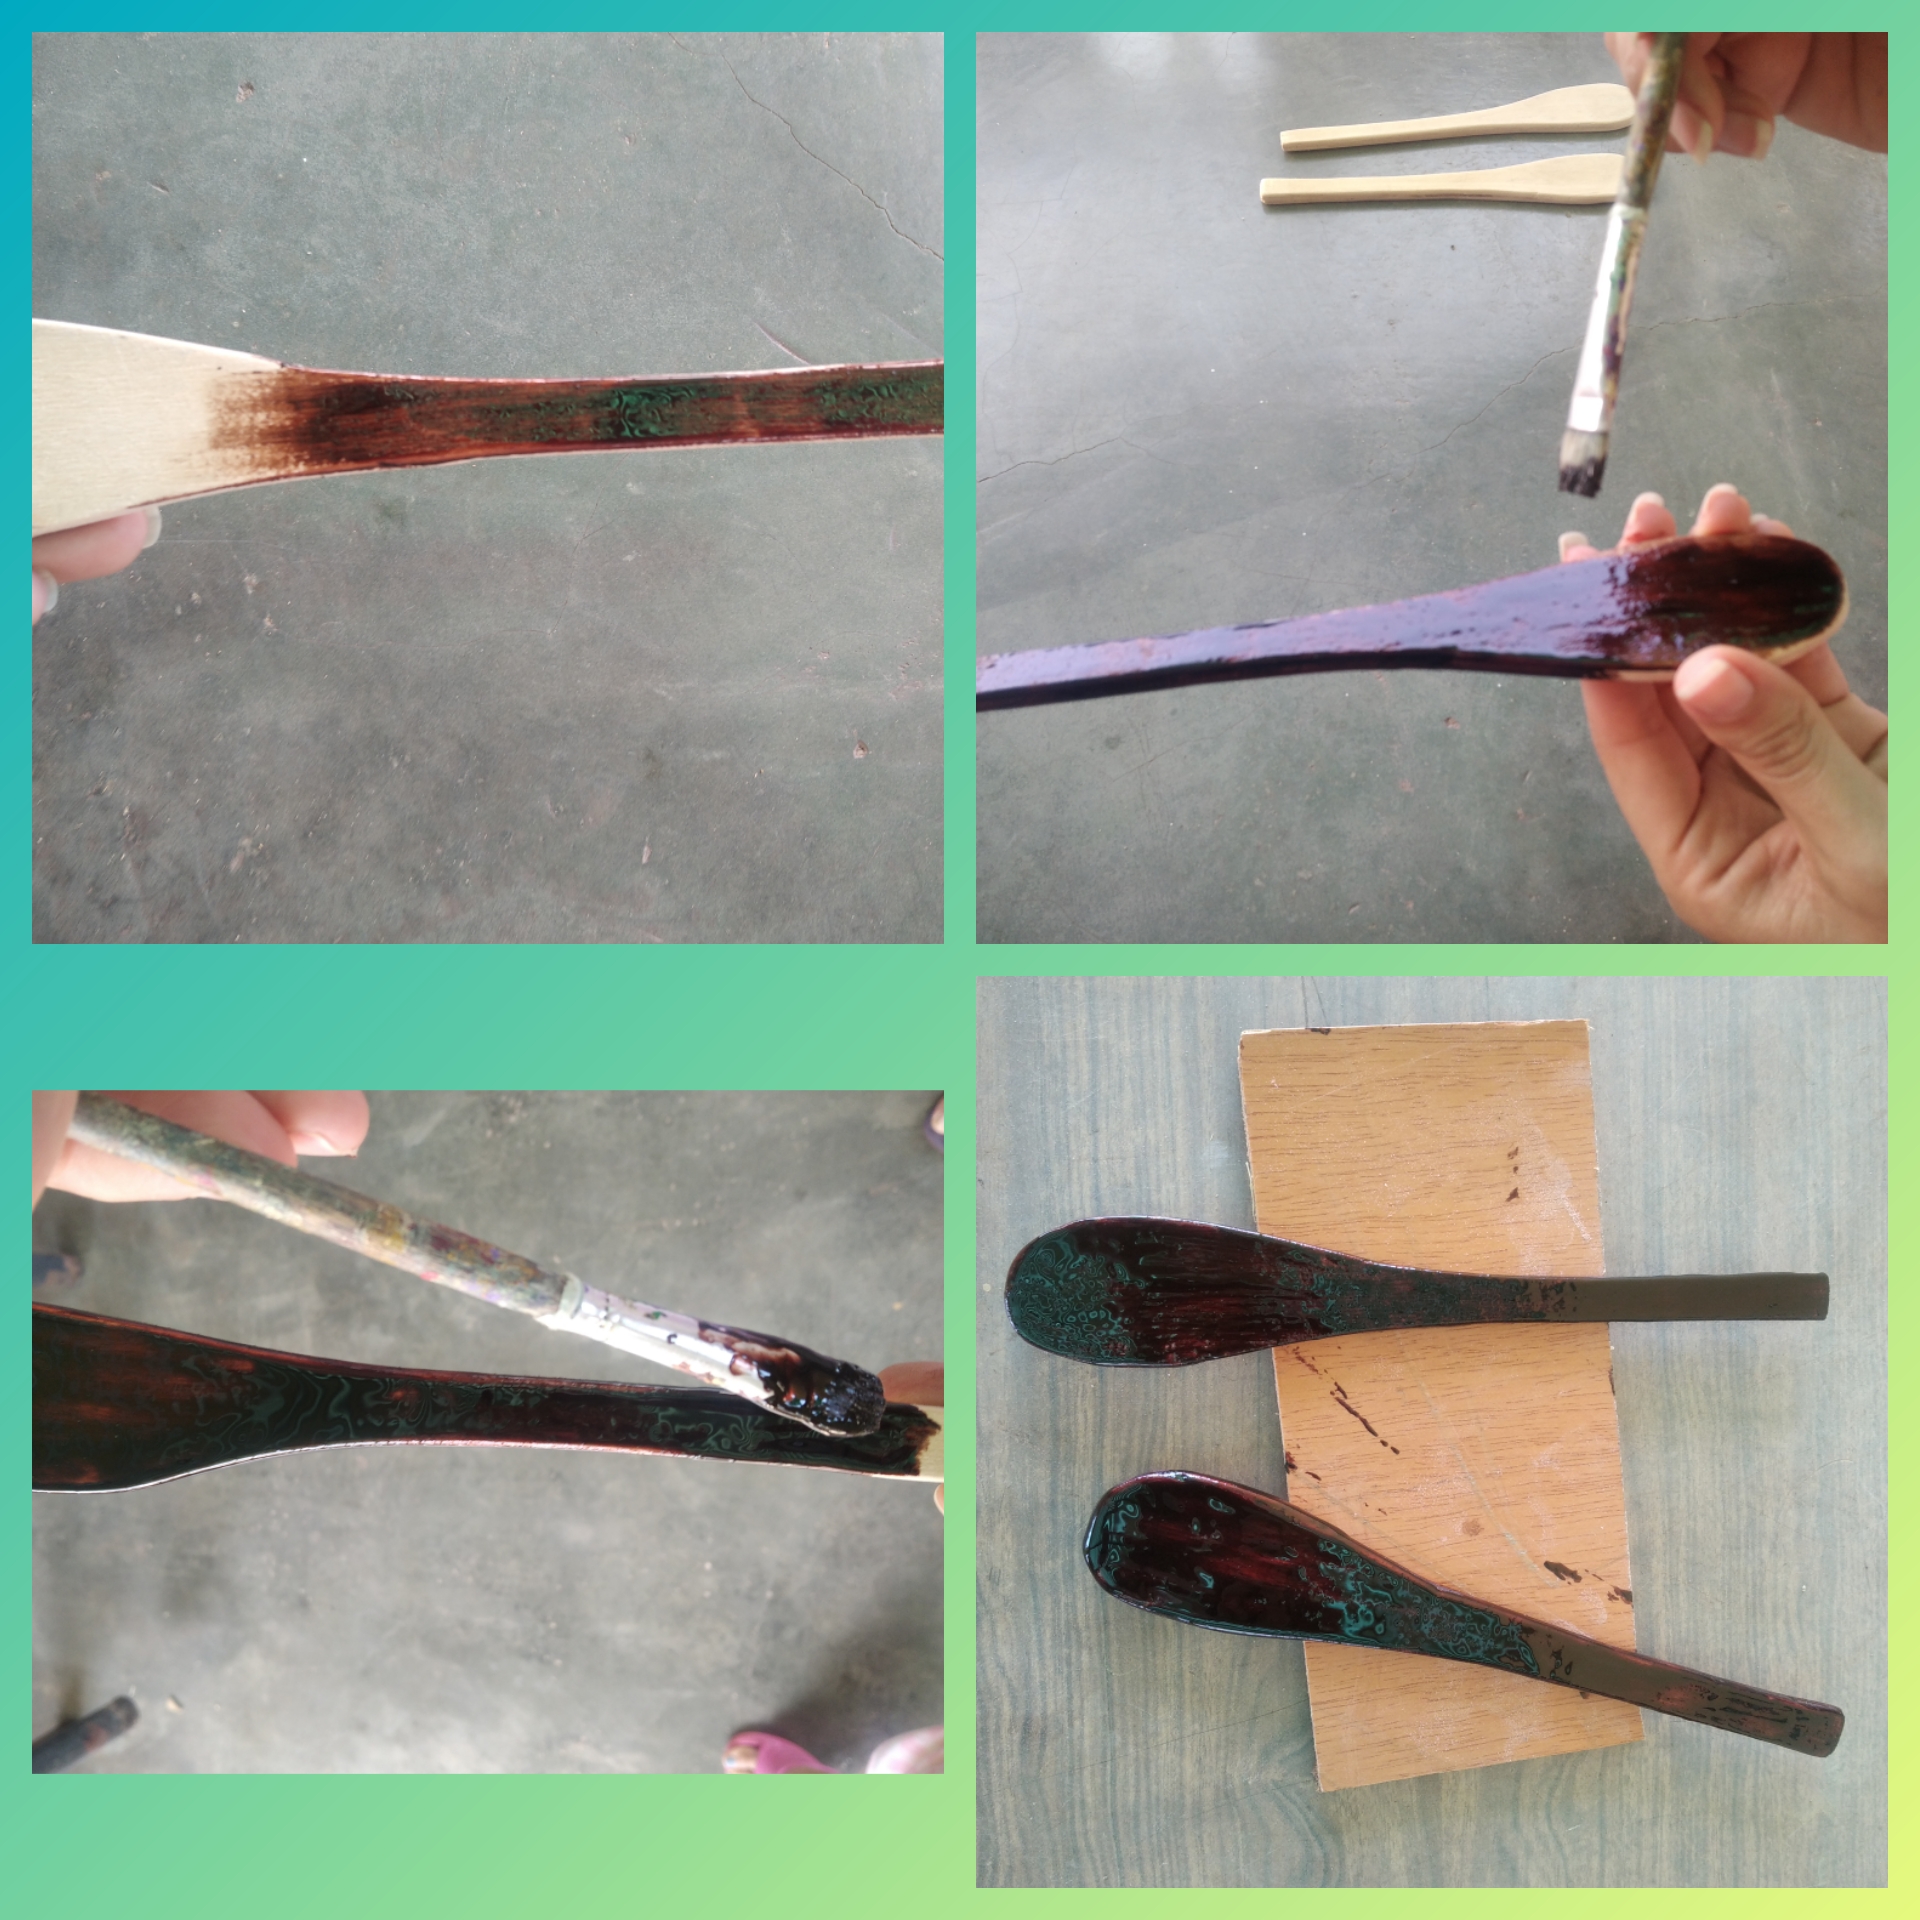
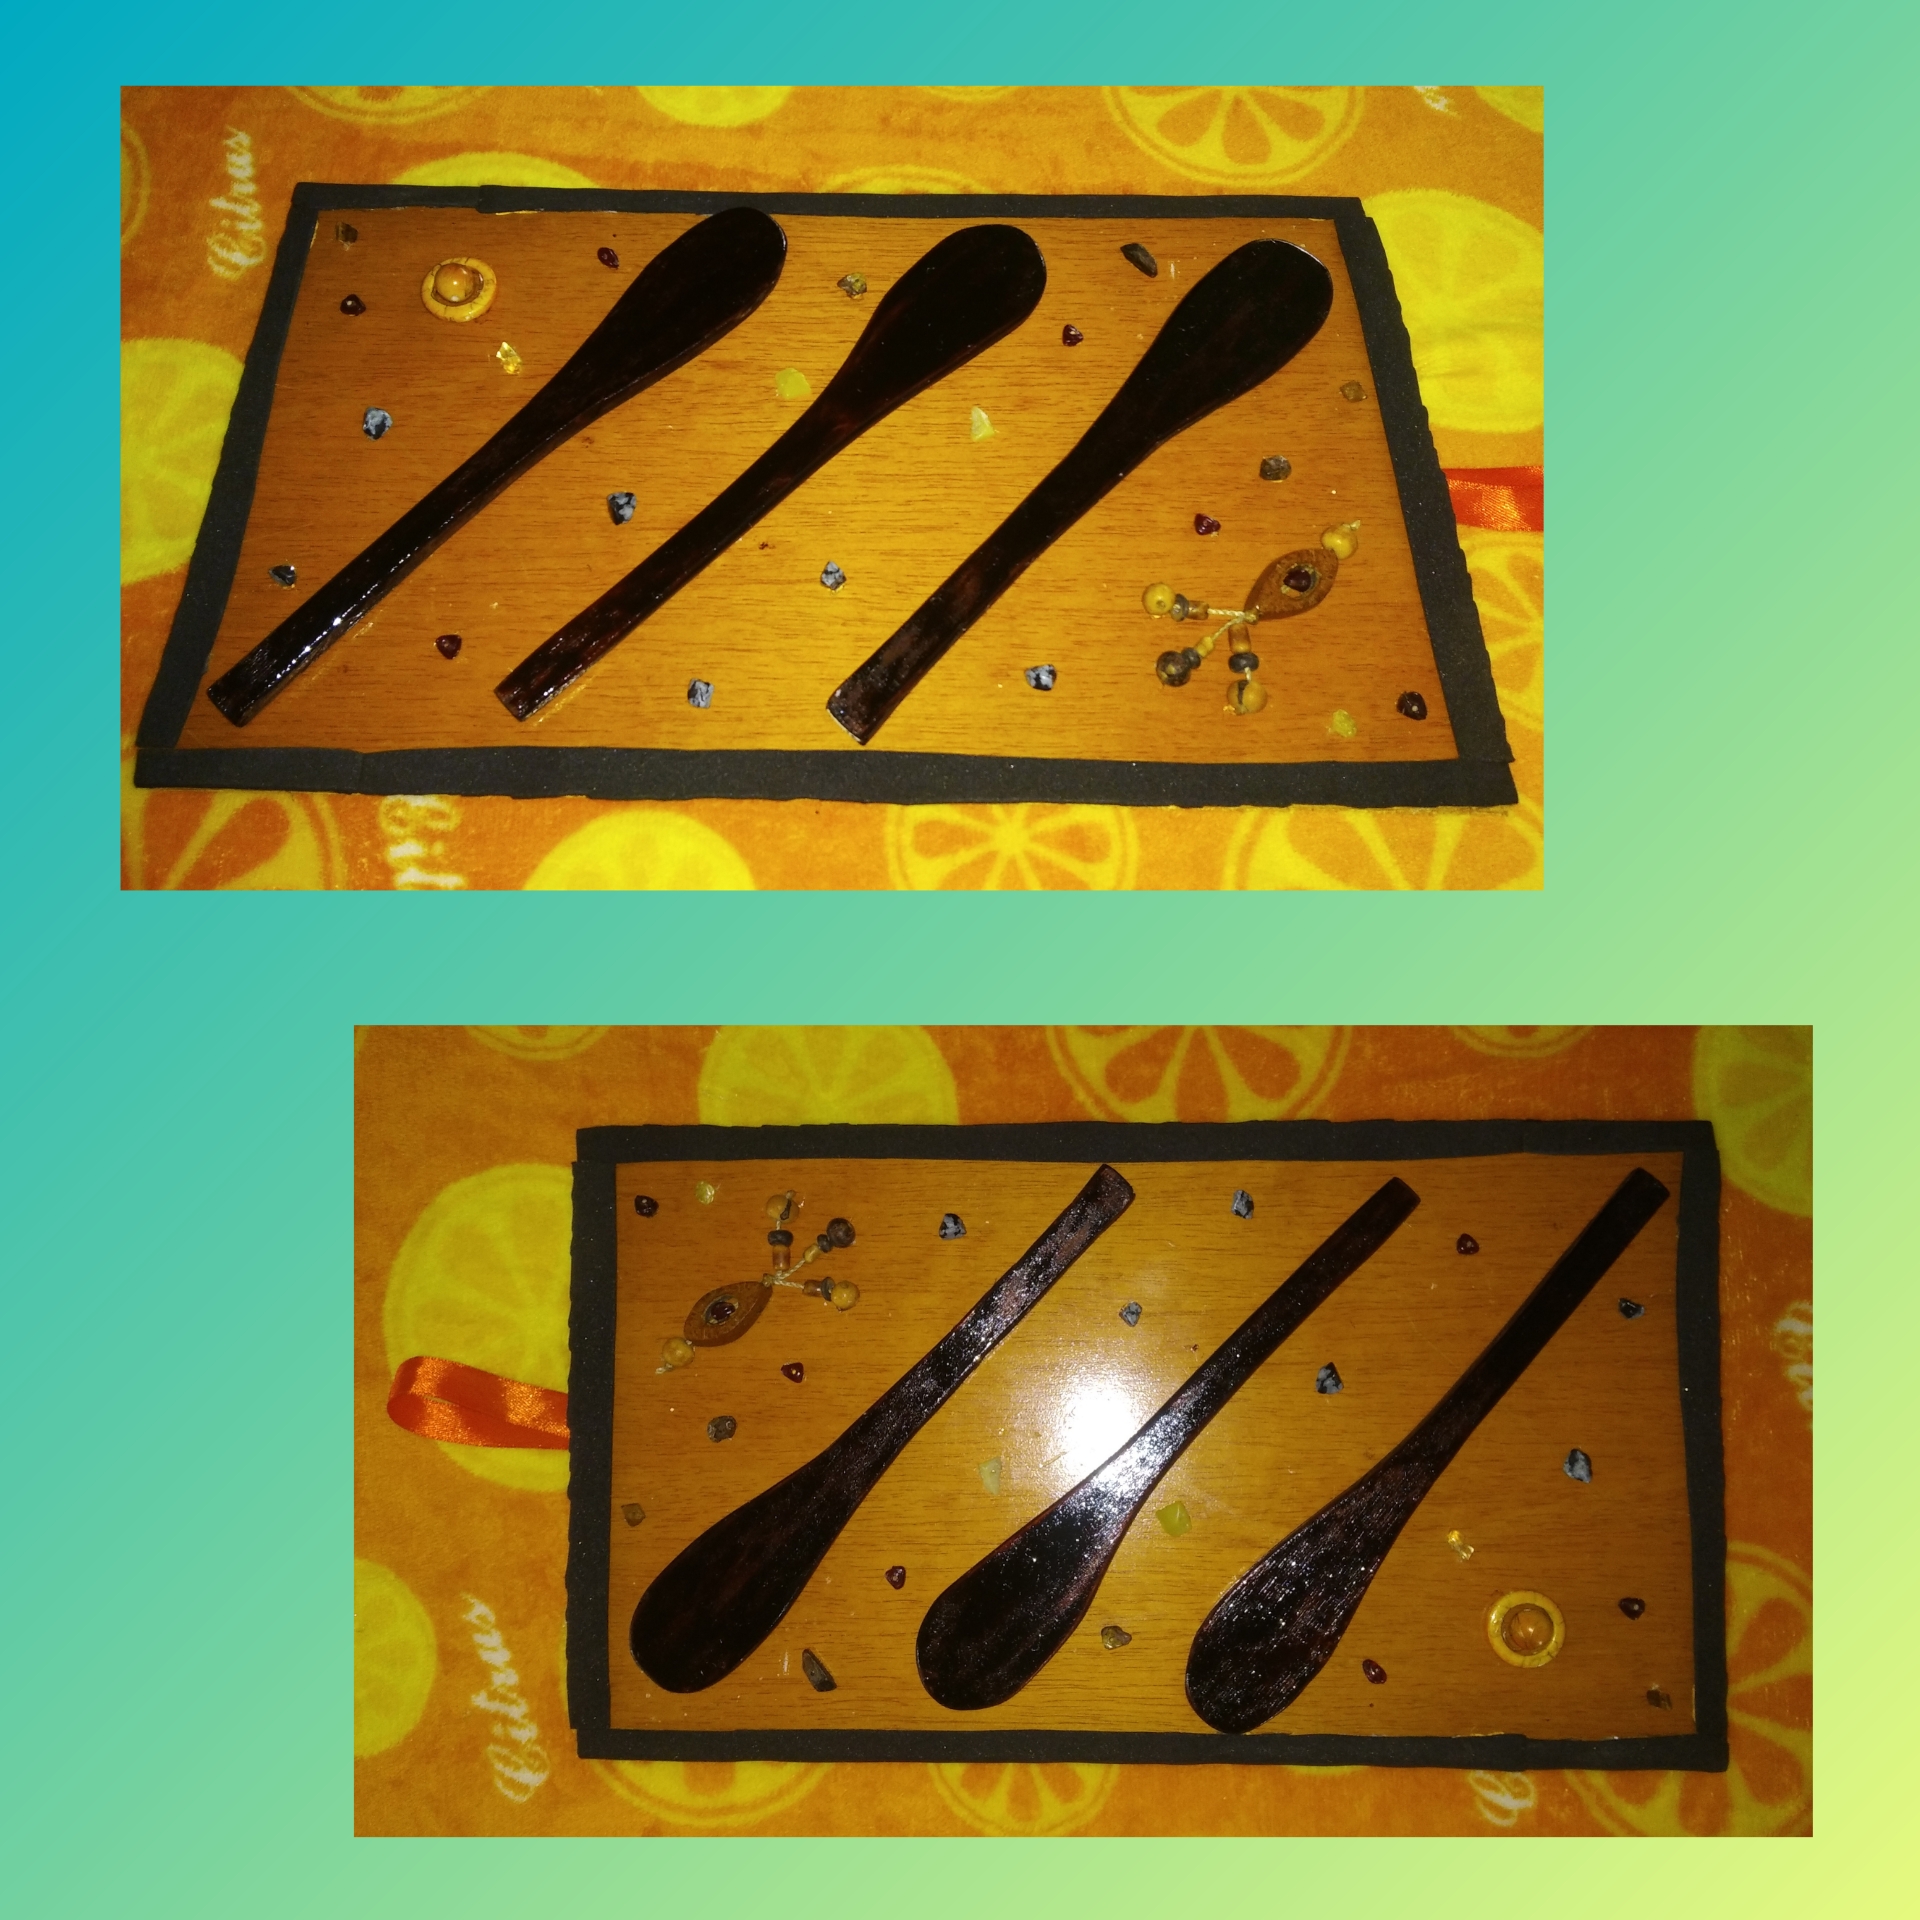
## <div class="text-justify">Paso 4.</div>
<div class="text-justify">Ahora vamos a darle color a las paletas, las vamos a pintar, yo usé barniz también podemos jugar con los colores. Luego de pintarlas las dejamos para que sequen muy bien, ya tenemos nuestras paletas listas ahora procederemos a embellecer la base donde fijaremos las paletas.</div>
<br>
>## <div class="text-justify">Step 4.</div>
><div class="text-justify">Now we are going to color the palettes, we are going to paint them, I used varnish we can also play with the colors. After painting them, we leave them to dry very well, we already have our palettes ready, now we will proceed to beautify the base where we will fix the palettes.</div>
<br>
<br>

## <center>Elaboración del cuadro.</center>
>## <center>Creation of the table.</center>
<br>
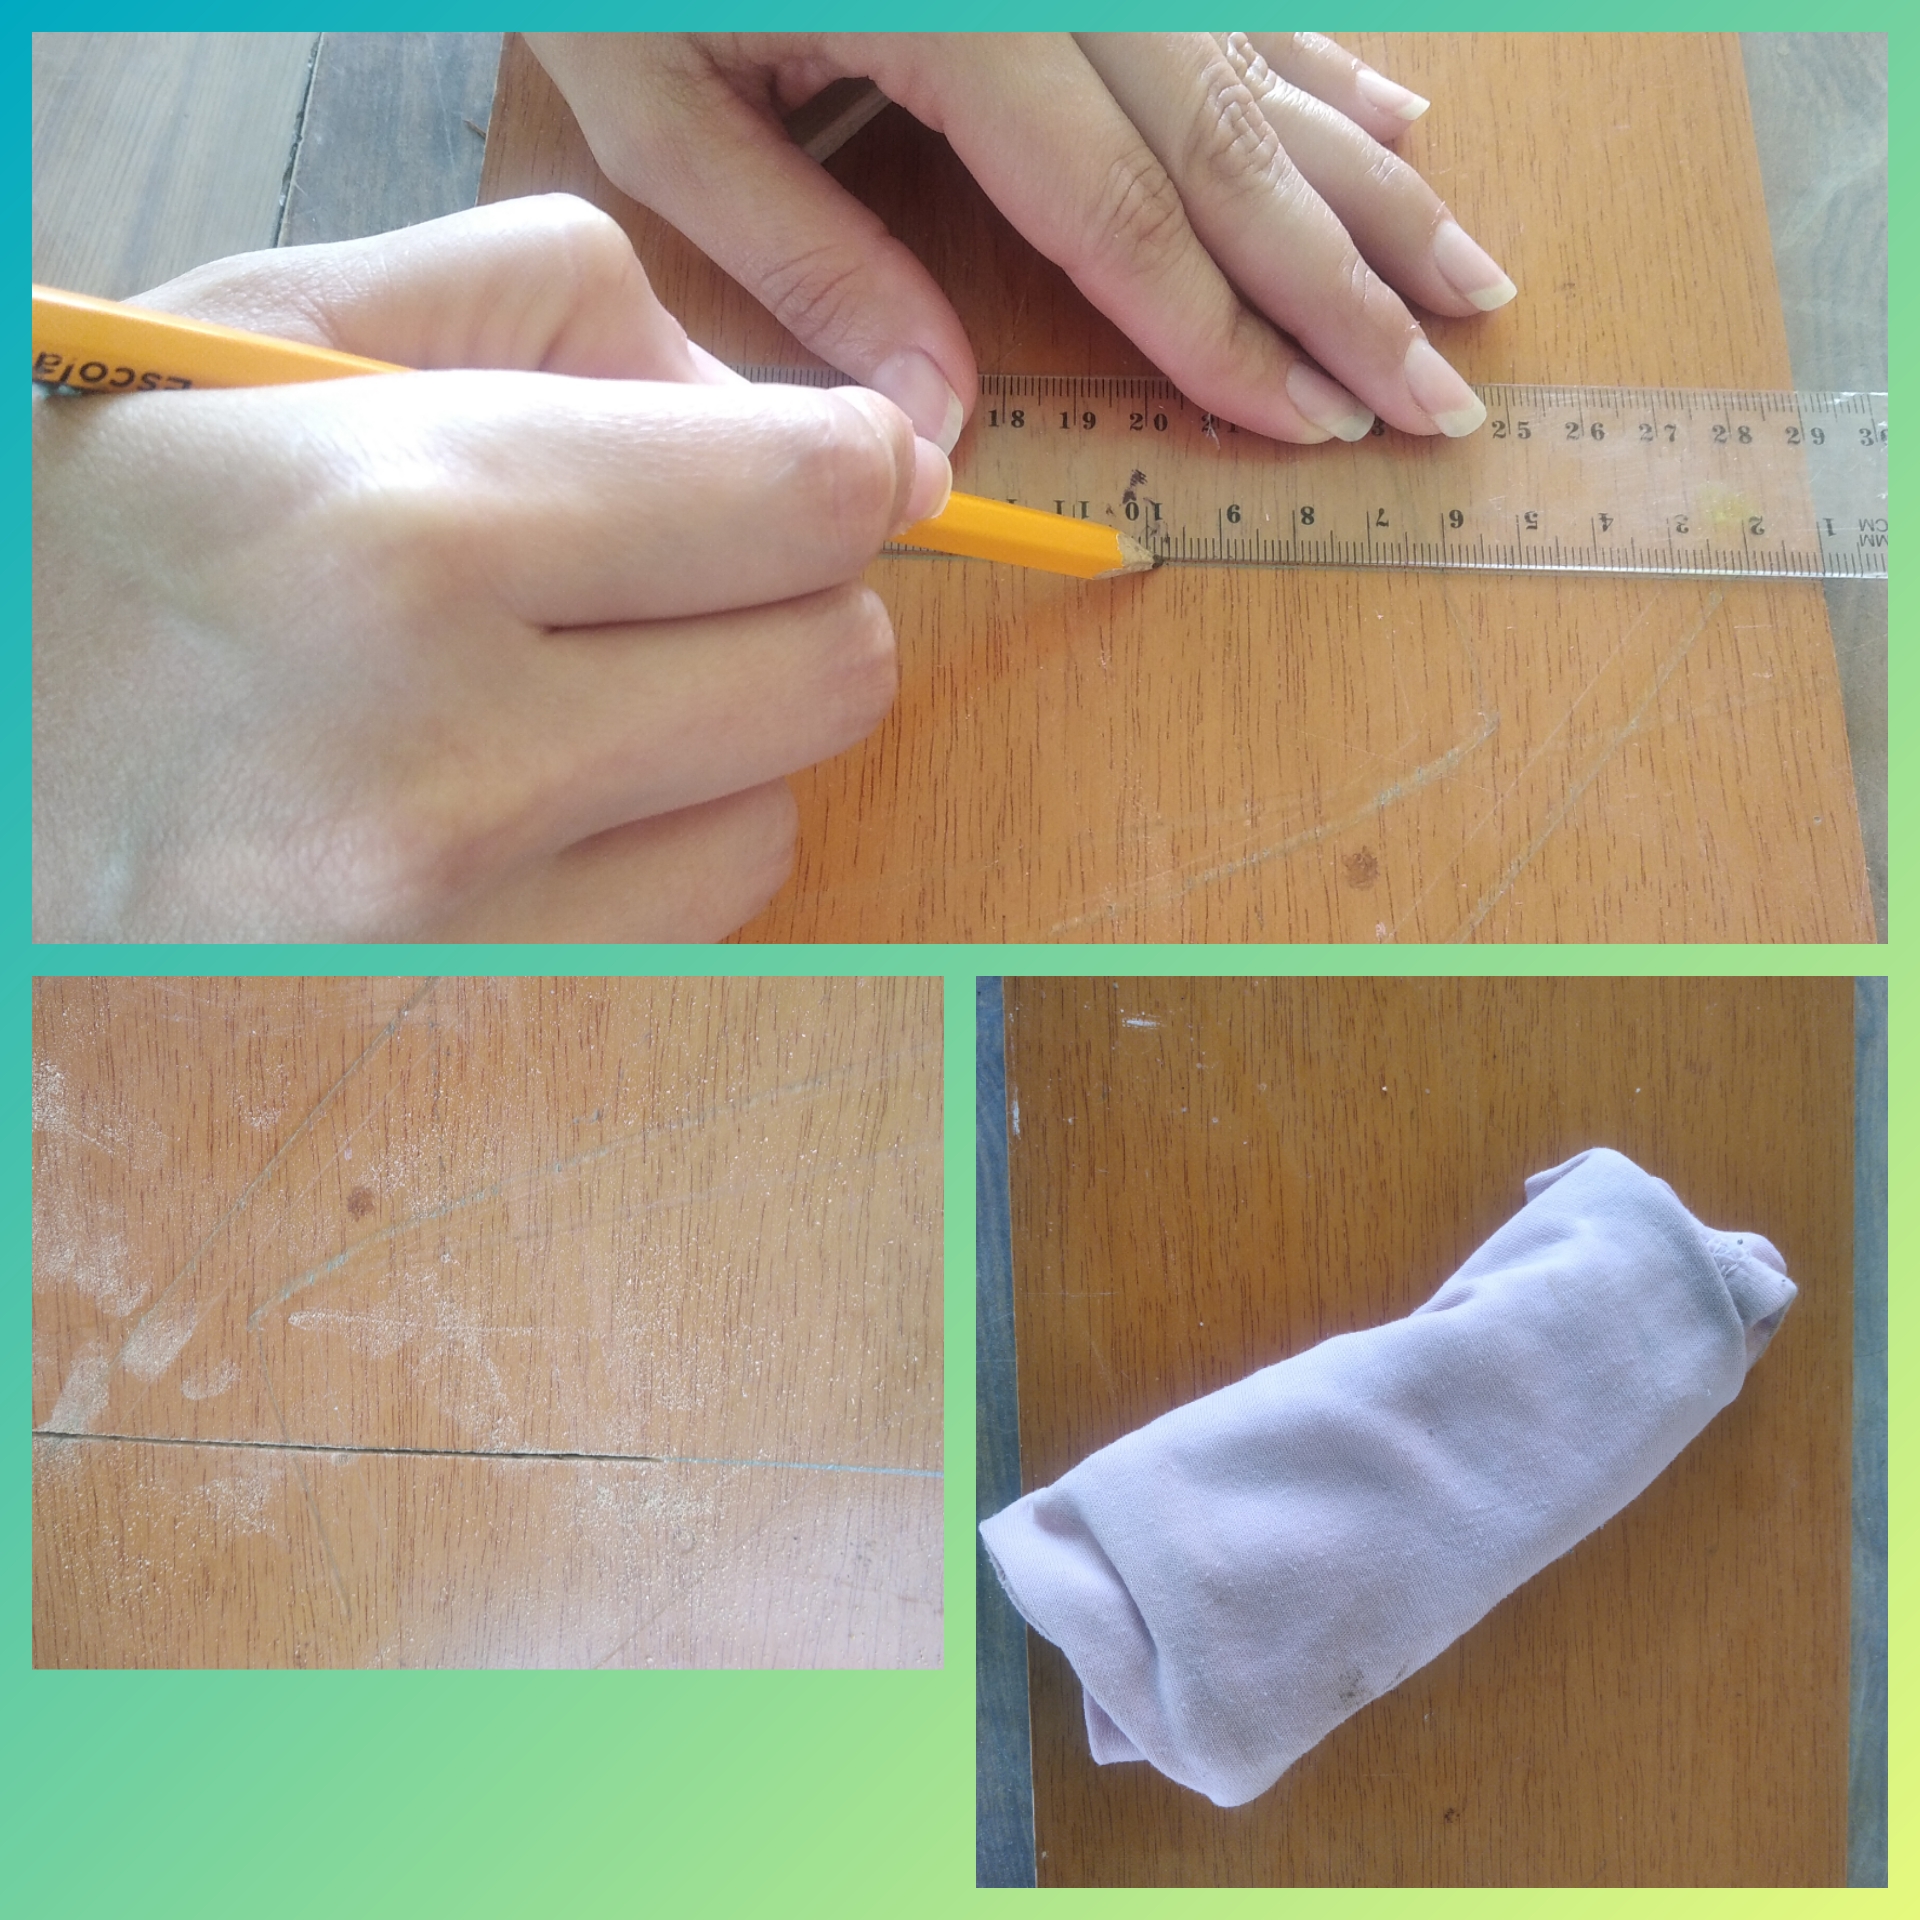
## <div class="text-justify">Paso 5.</div>
<div class="text-justify">El primer paso es ajustar la madera a la medida deseada, en este caso con la segueta la voy a cortar a 30 cm, luego con un paño húmedo la voy a limpiar para retirar el polvo. </div>
<br>
>## <div class="text-justify">Step 5.</div>
><div class="text-justify">The first step is to adjust the wood to the desired size, in this case with the hacksaw I am going to cut it to 30 cm, then with a damp cloth I am going to clean it to remove the dust. </div>
<br>
<br>
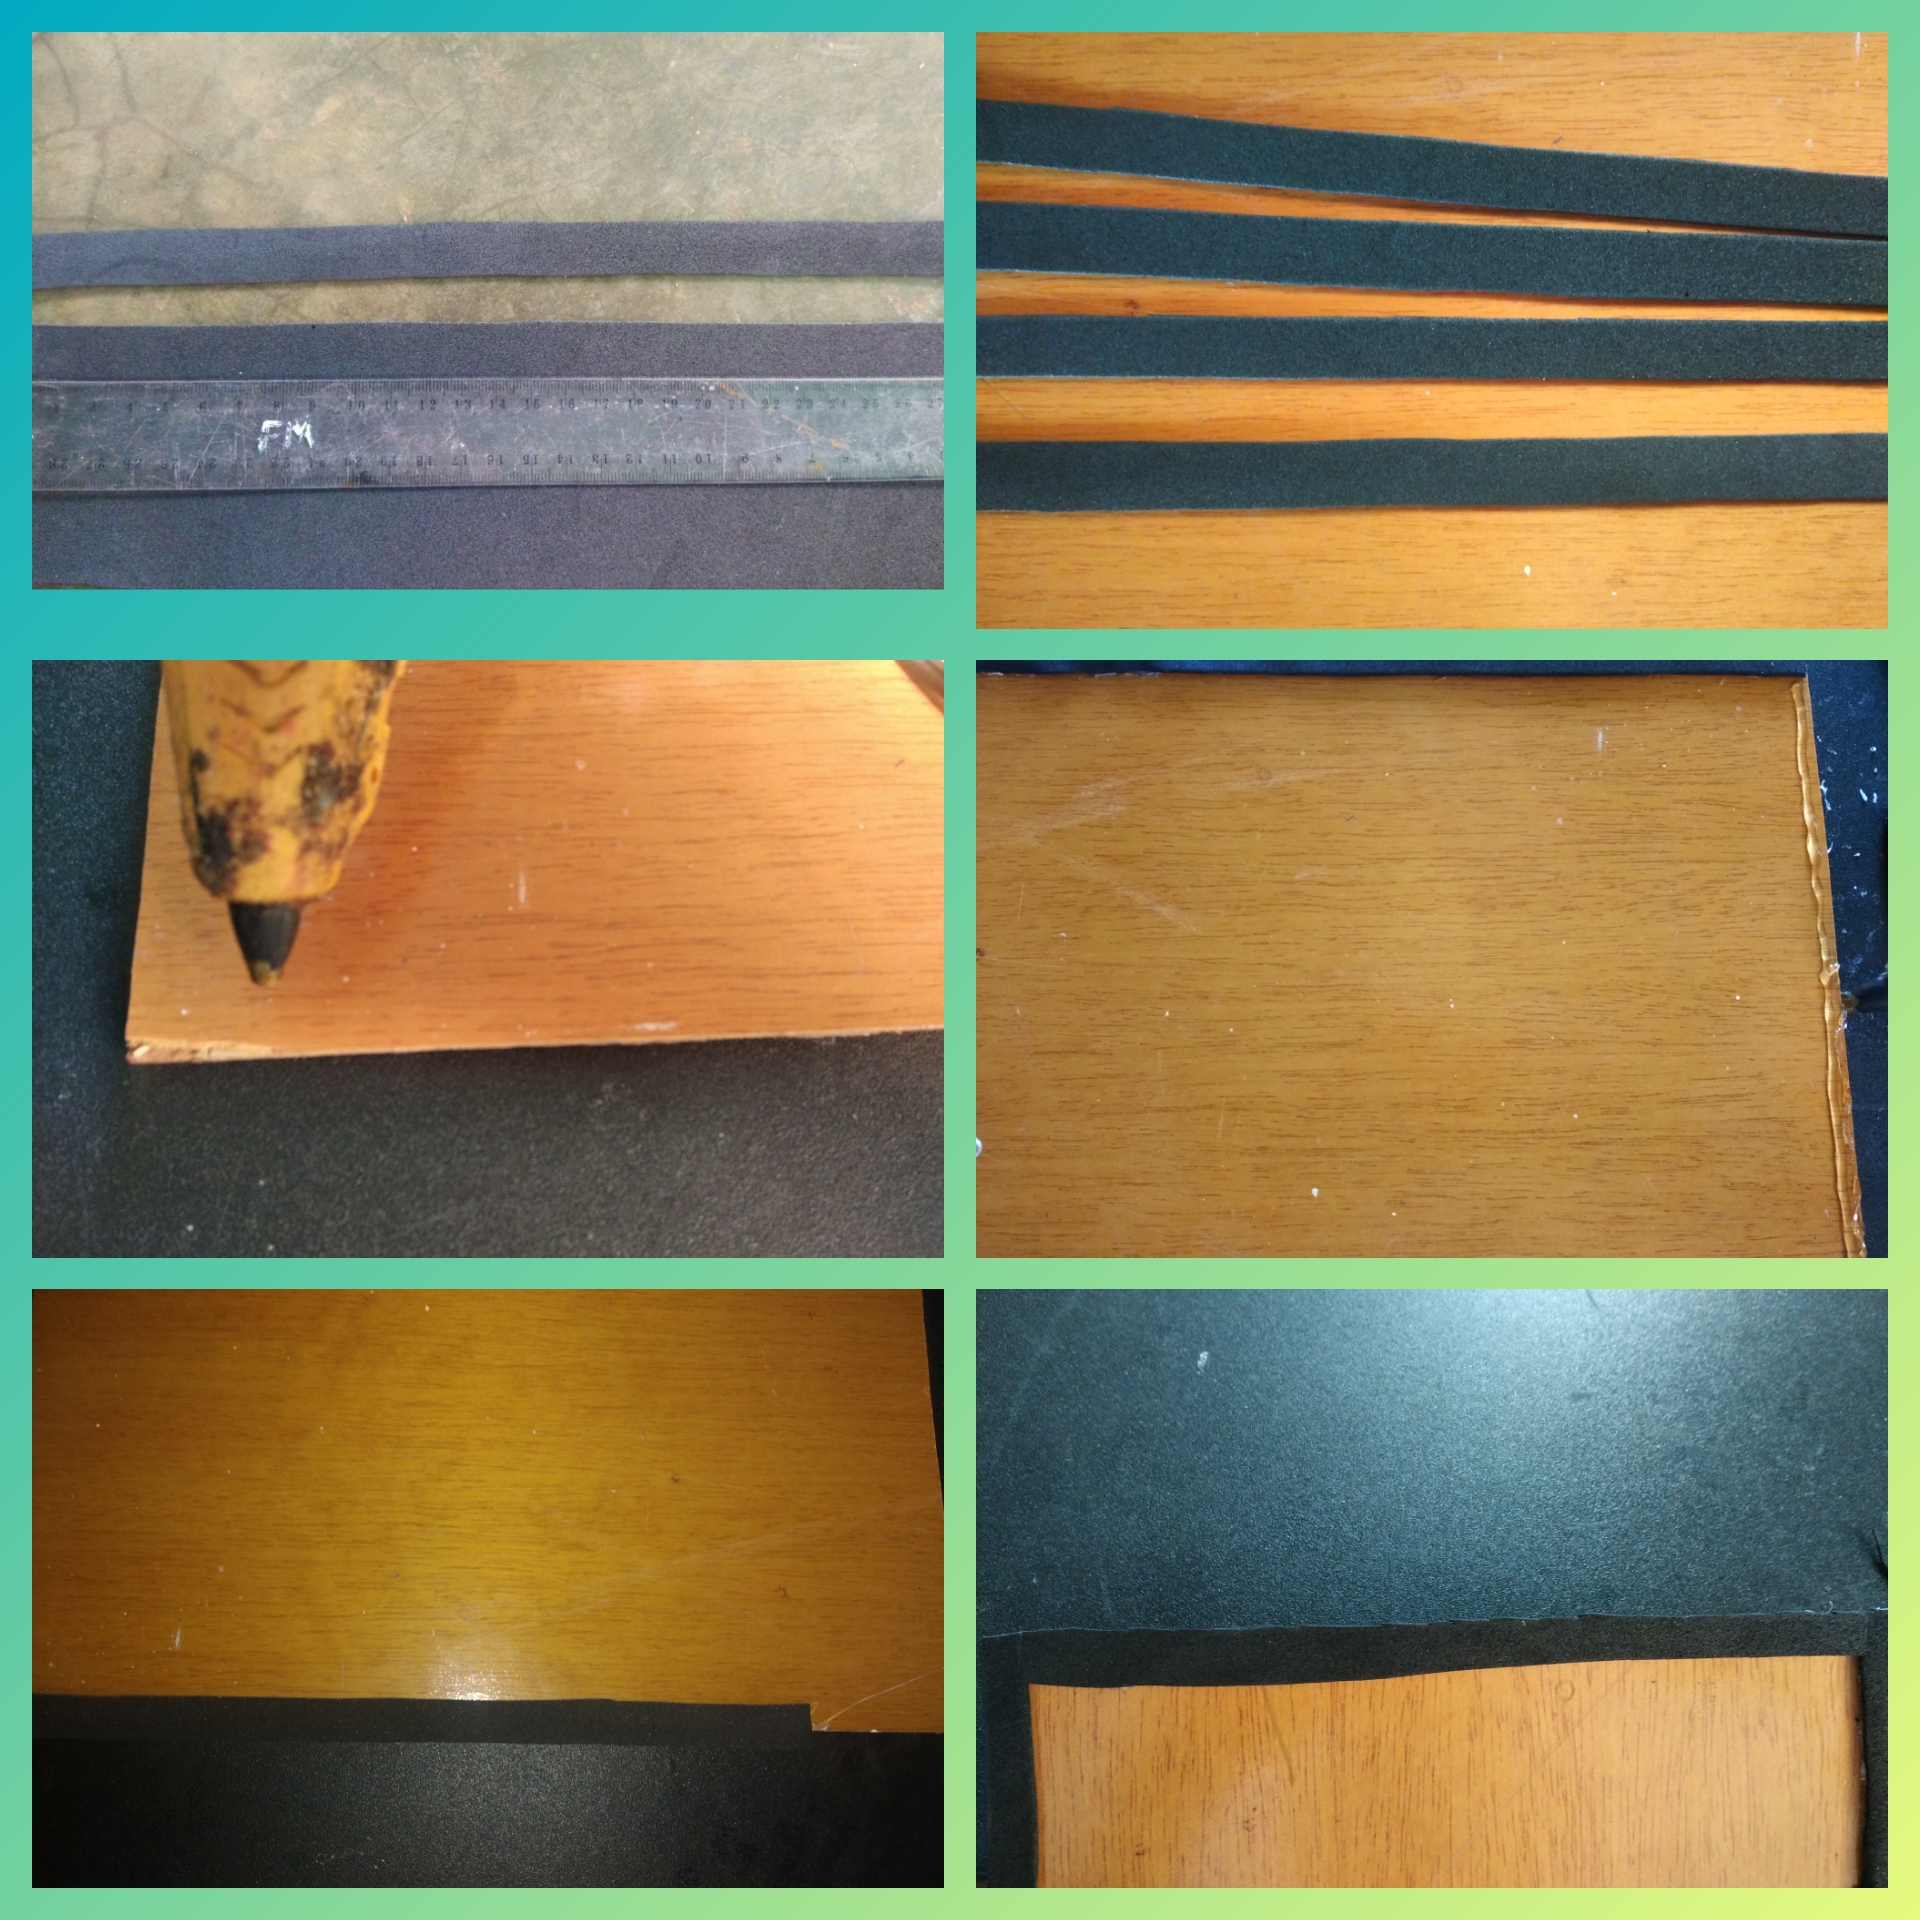
## <div class="text-justify">Paso 6.</div>
<div class="text-justify">Como es una madera reciclada, quise hacer un marco para dale mejor apariencia. Tome el foami negro y corte 4 tiras de 1,5 cm y con silicón de barra fuí pegando por todo el borde de la madera, luego lo recorte en forma de mar.</div>
<br>
>## <div class="text-justify">Step 6.</div>
><div class="text-justify">Since it is a recycled wood, I wanted to make a frame to give it a better appearance. Take the black foami and cut 4 strips of 1.5 cm and with a silicone bar I was sticking around the edge of the wood, then cut it in the shape of a sea.</div>
<br>
<br>
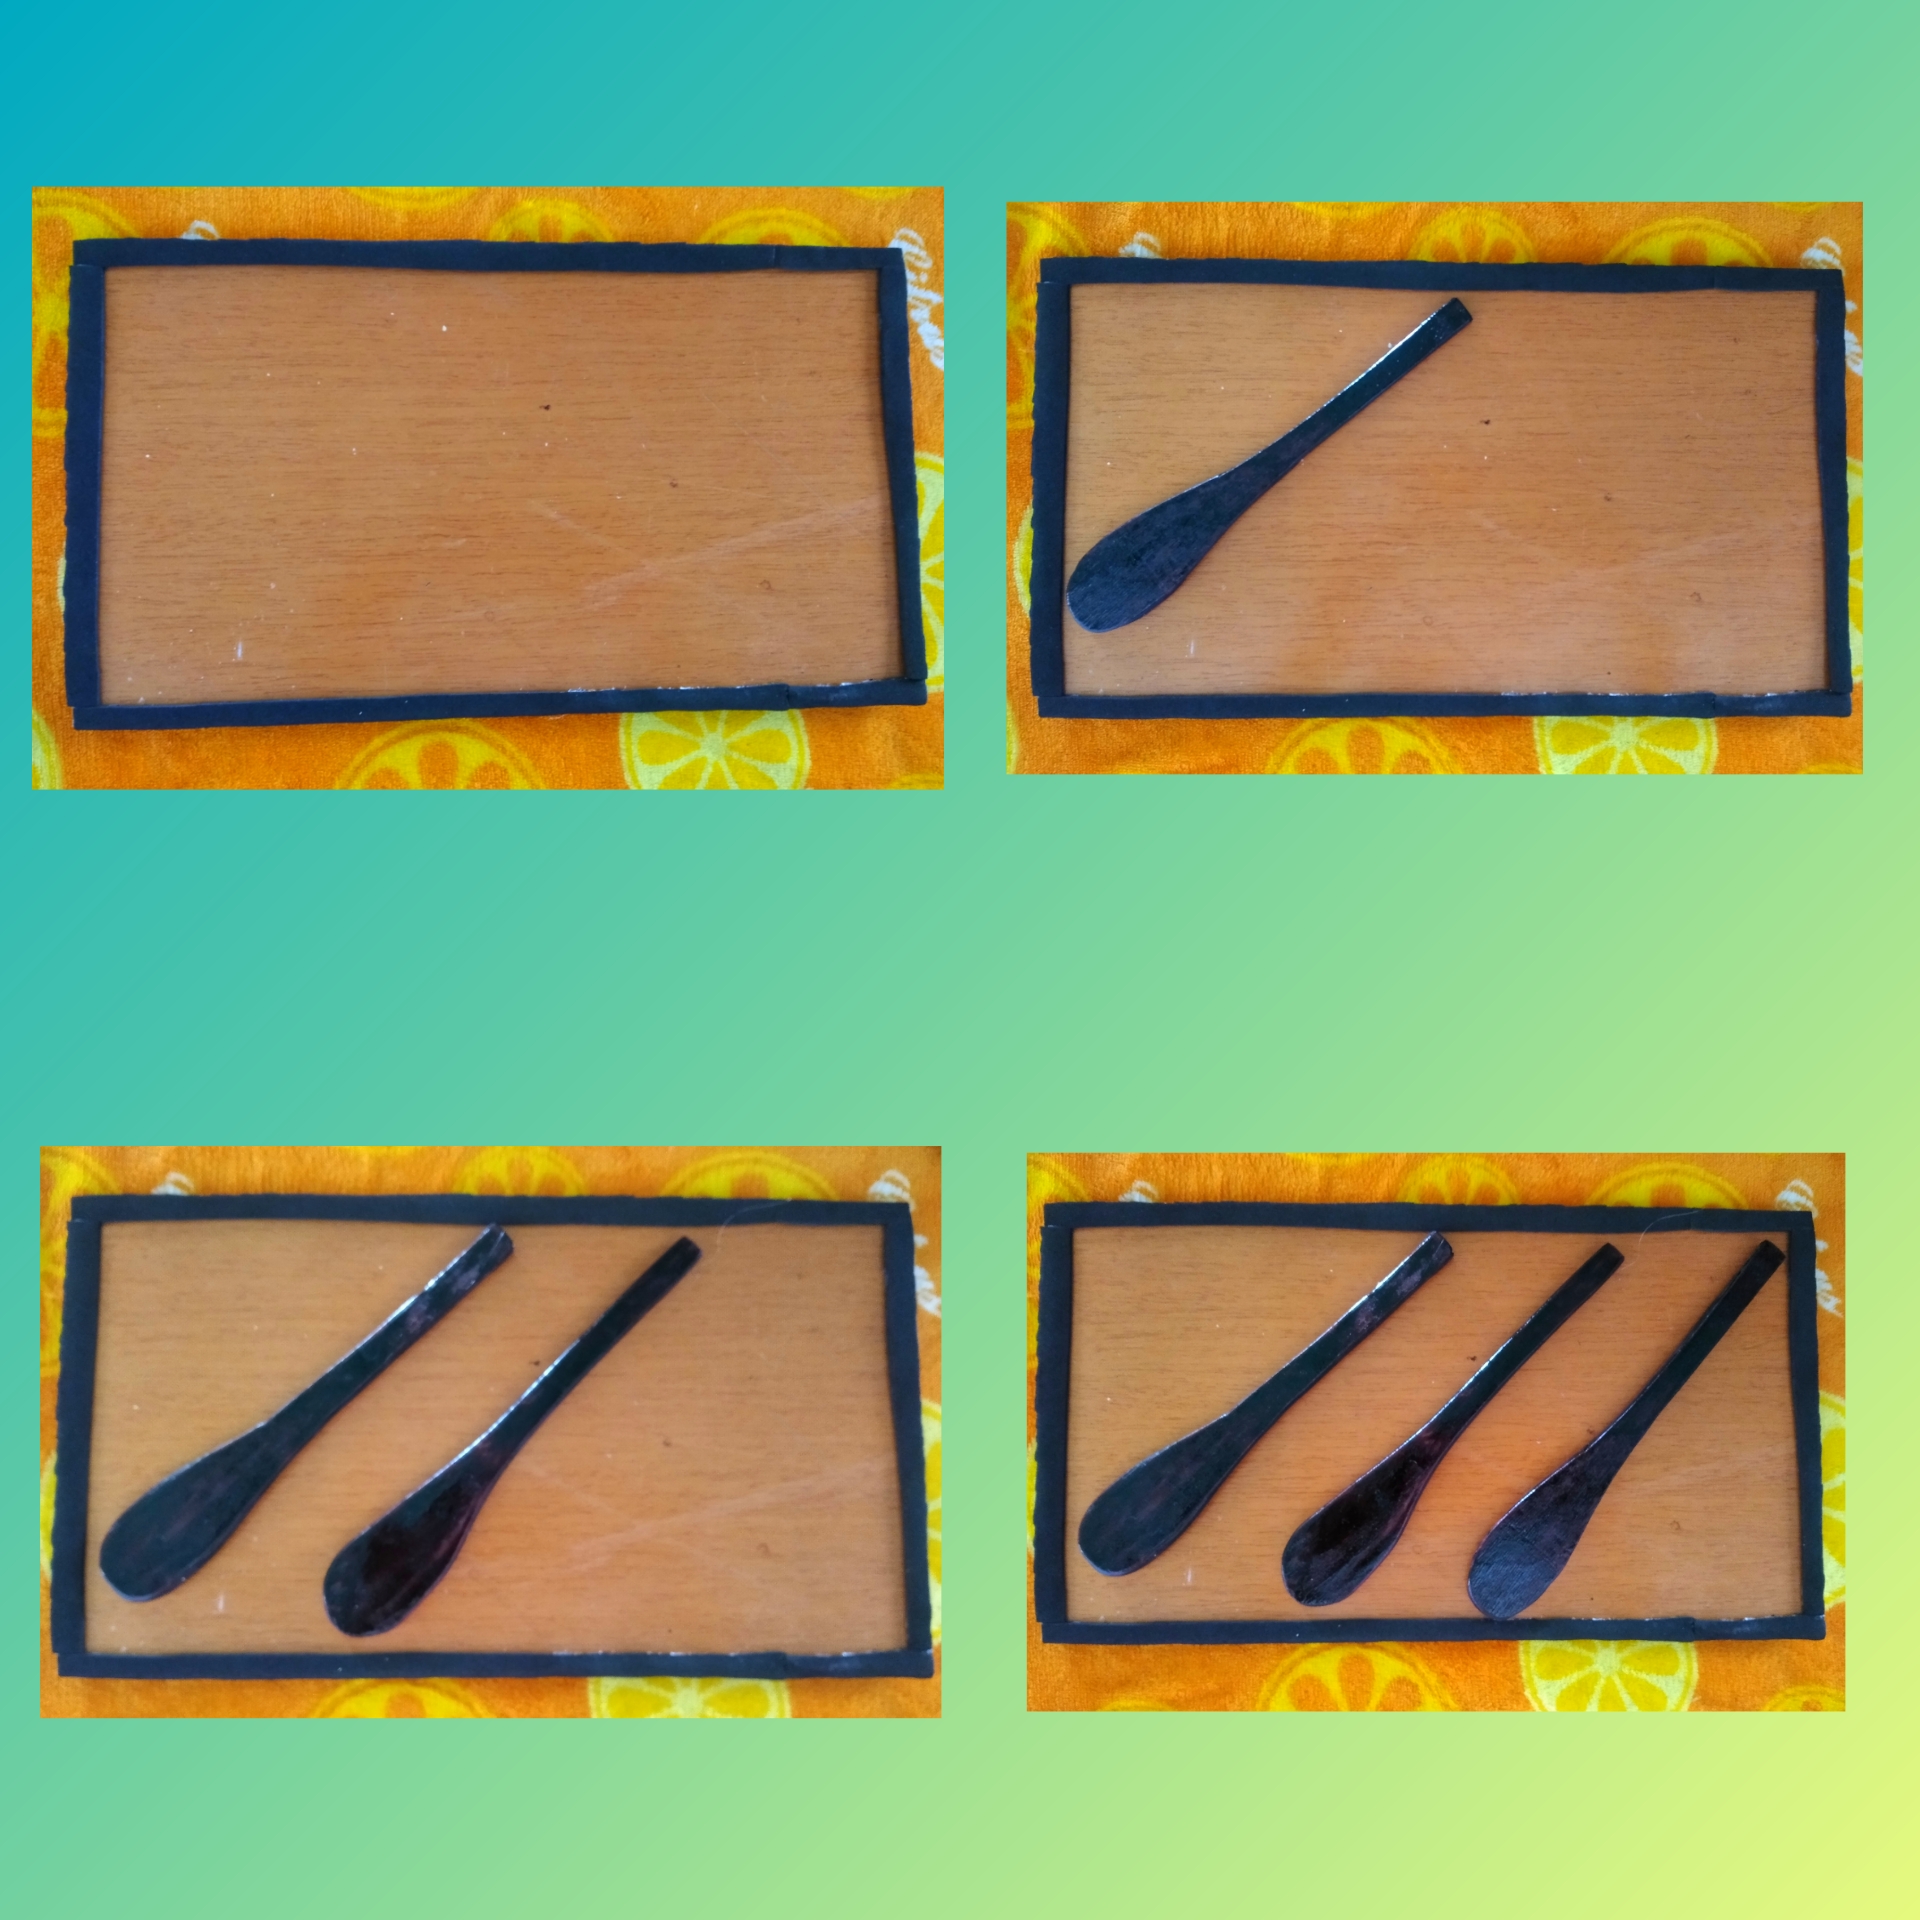
## <div class="text-justify">Paso 7.</div>
<div class="text-justify">Terminado el cuadro. Ahora vamos a armar. Tomamos la primera cuchara y con silicón en barra la fijamos a la madera, de igual manera hacemos con la segunda y luego con la tercera y última cuchara.</div>
<br>
>## <div class="text-justify">Step 7.</div>
><div class="text-justify">Done the box. Now let's assemble. We take the first spoon and with a silicone bar we fix it to the wood, in the same way we do with the second and then with the third and last spoon.</div>
<br>
<br>
## <div class="text-justify">Paso 8.</div>
<div class="text-justify">Este es el último paso en el cual colocaremos los apliques al cuadro, use piedras en tono vinotinto, marrón y naranja los cuales hacen un buen contraste con la madera. Y con silicón coloqué por detrás una cinta bebé color naranja que servirá para colgar el cuadro. </div>
<br>
>## <div class="text-justify">Step 8.</div>
><div class="text-justify">This is the last step in which we will place the appliqués on the painting, I used stones in burgundy, brown and orange tones which make a good contrast with the wood. And with silicone I placed an orange baby ribbon behind that will serve to hang the painting. </div>
<br>
<br>

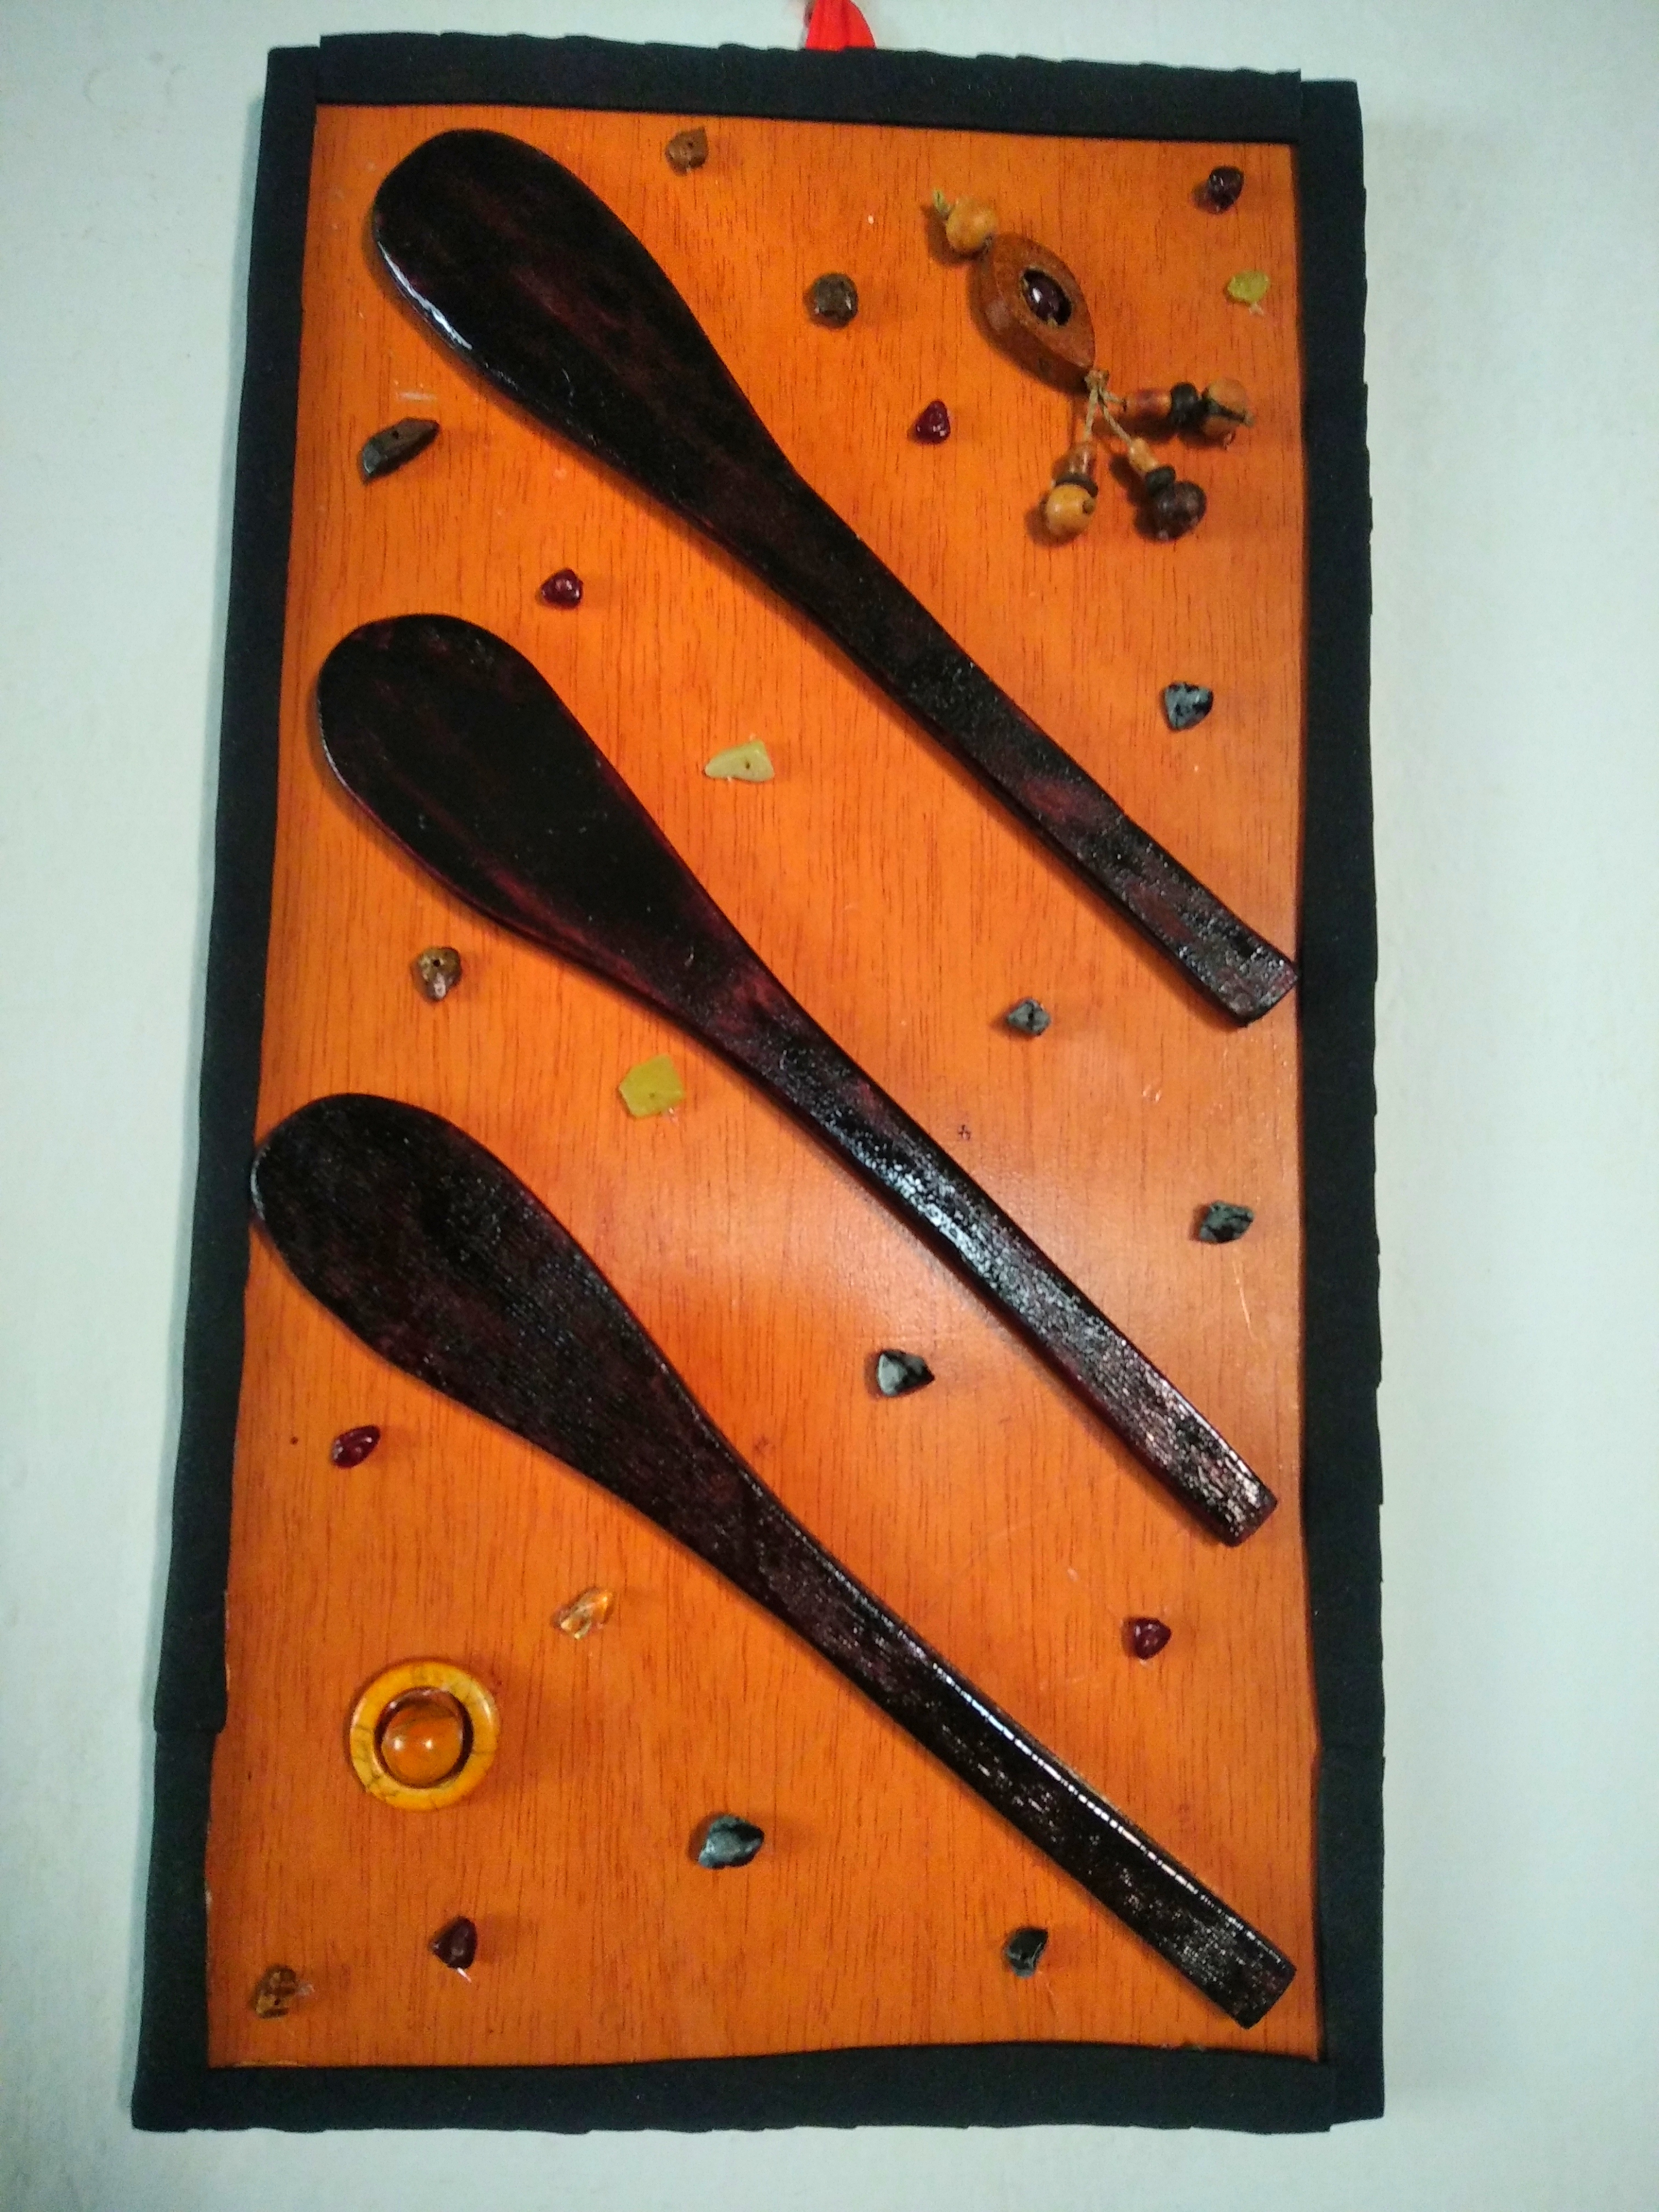
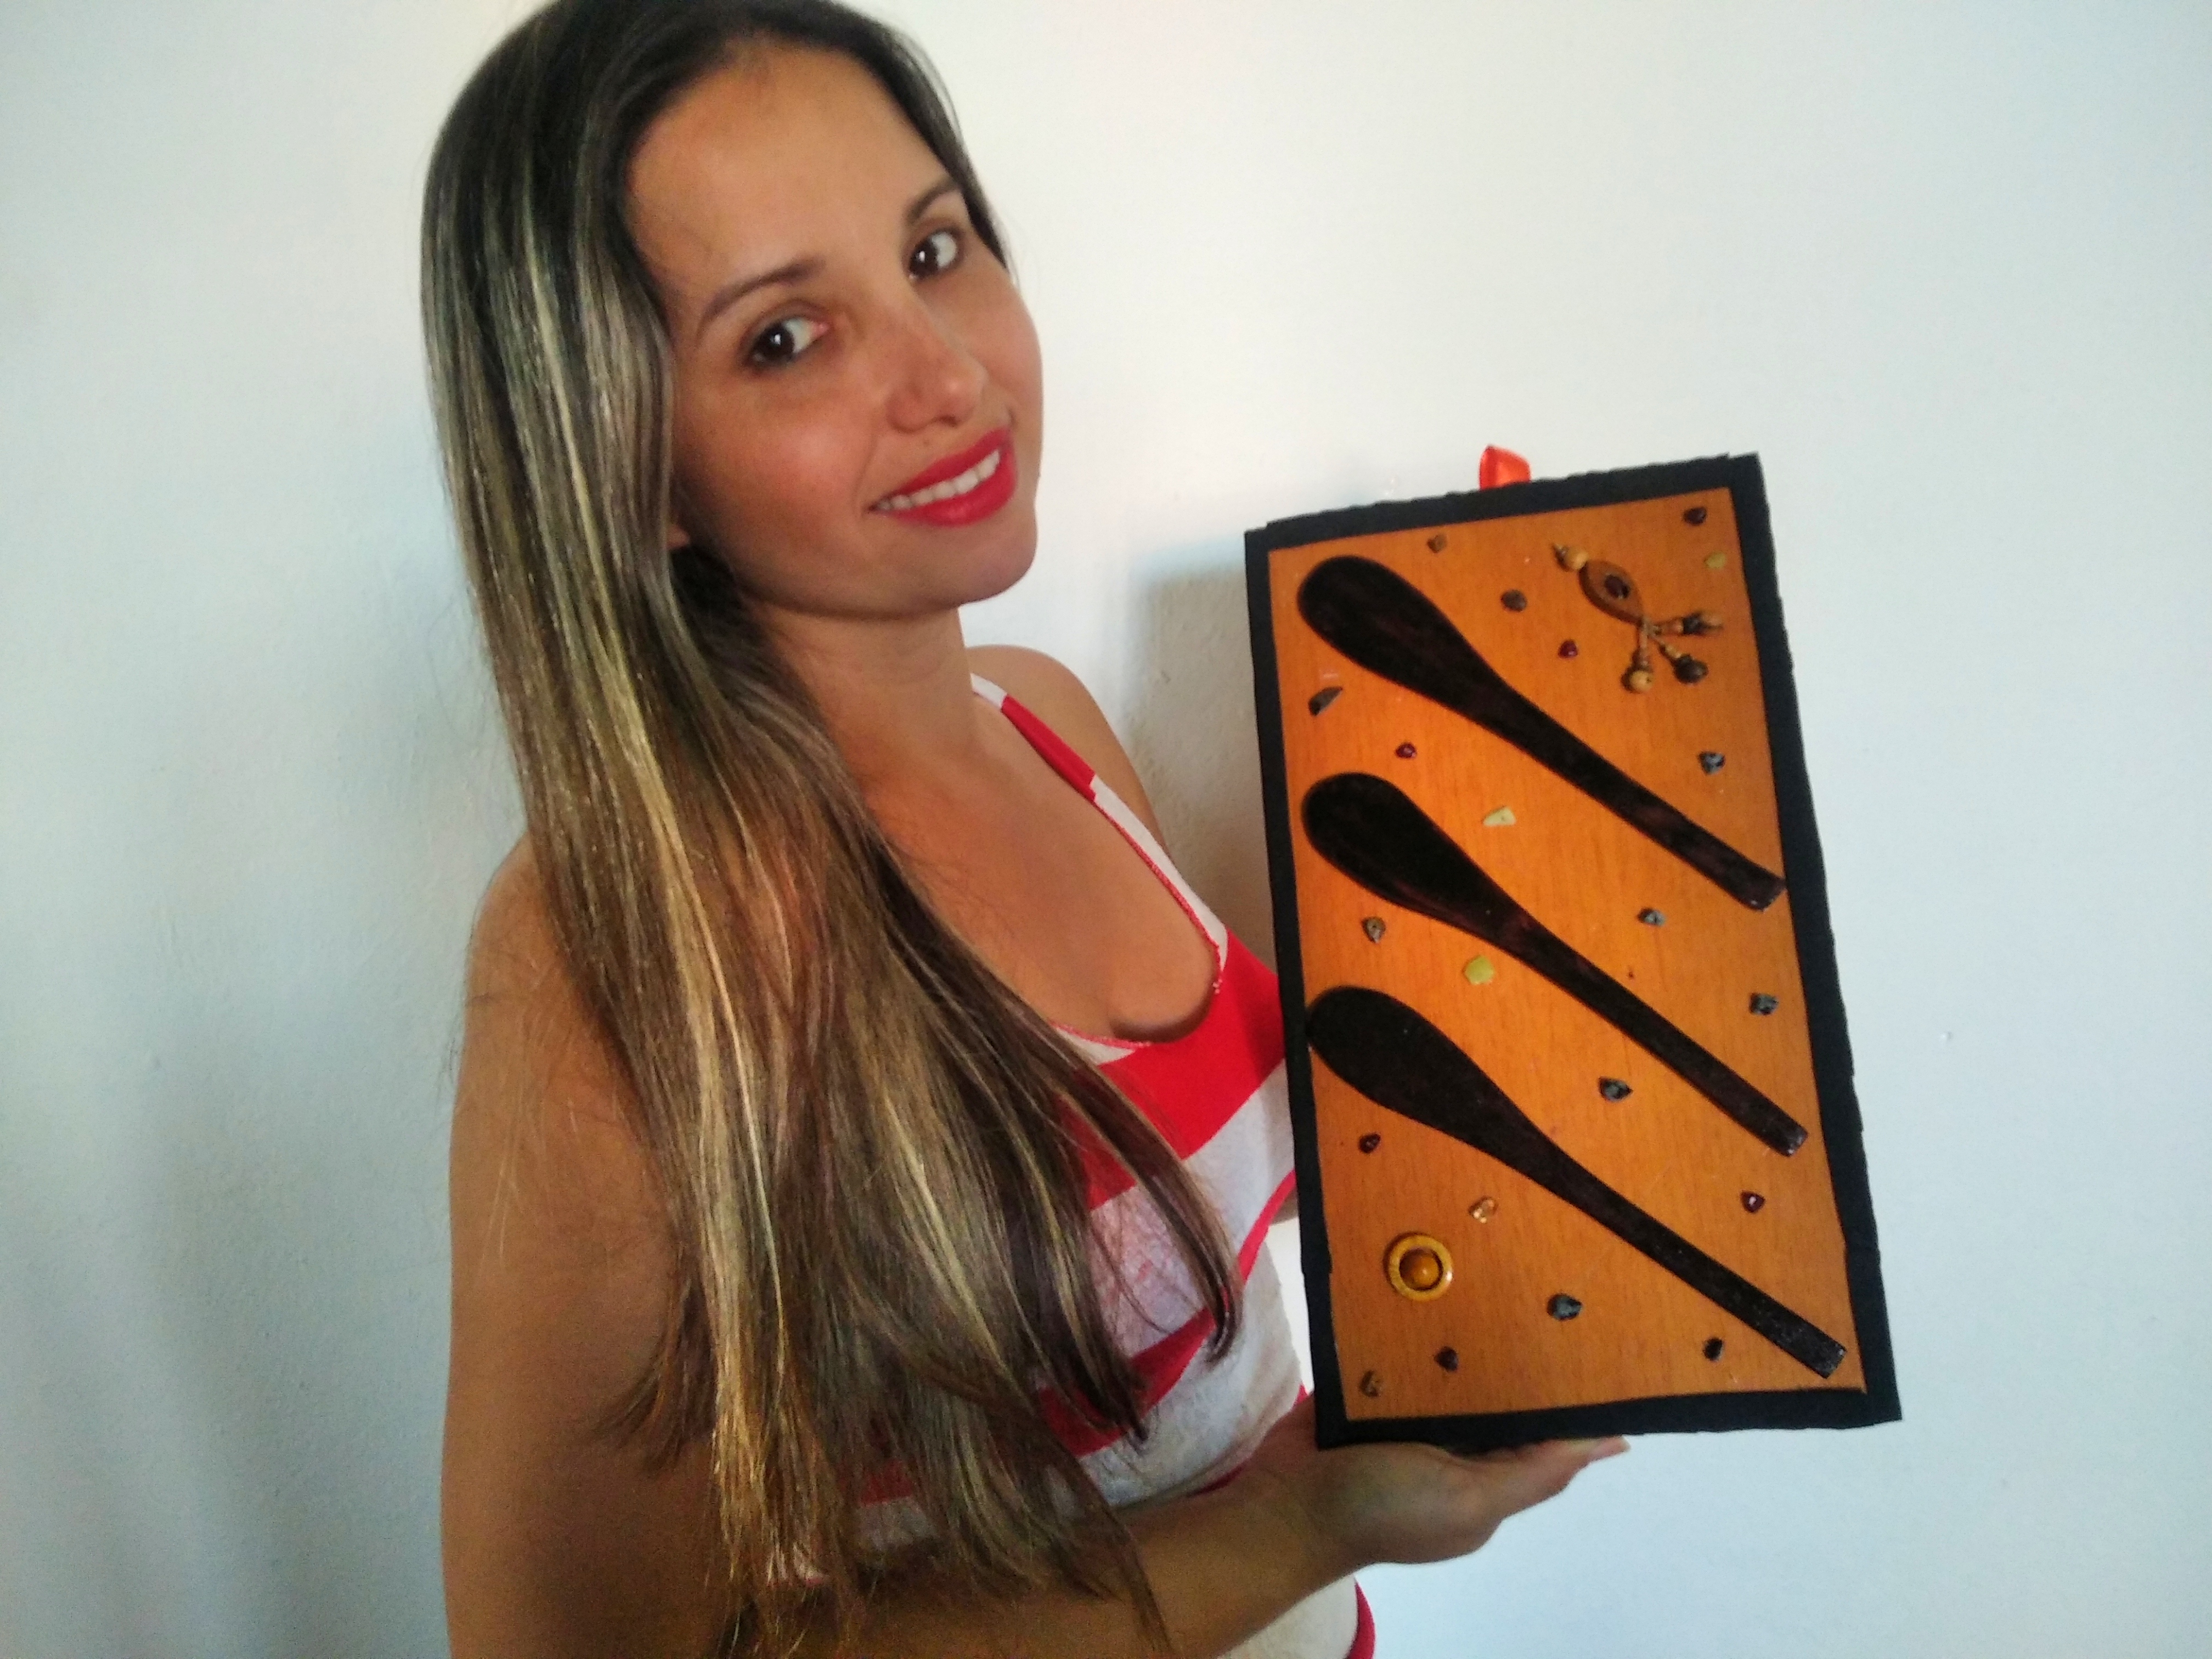
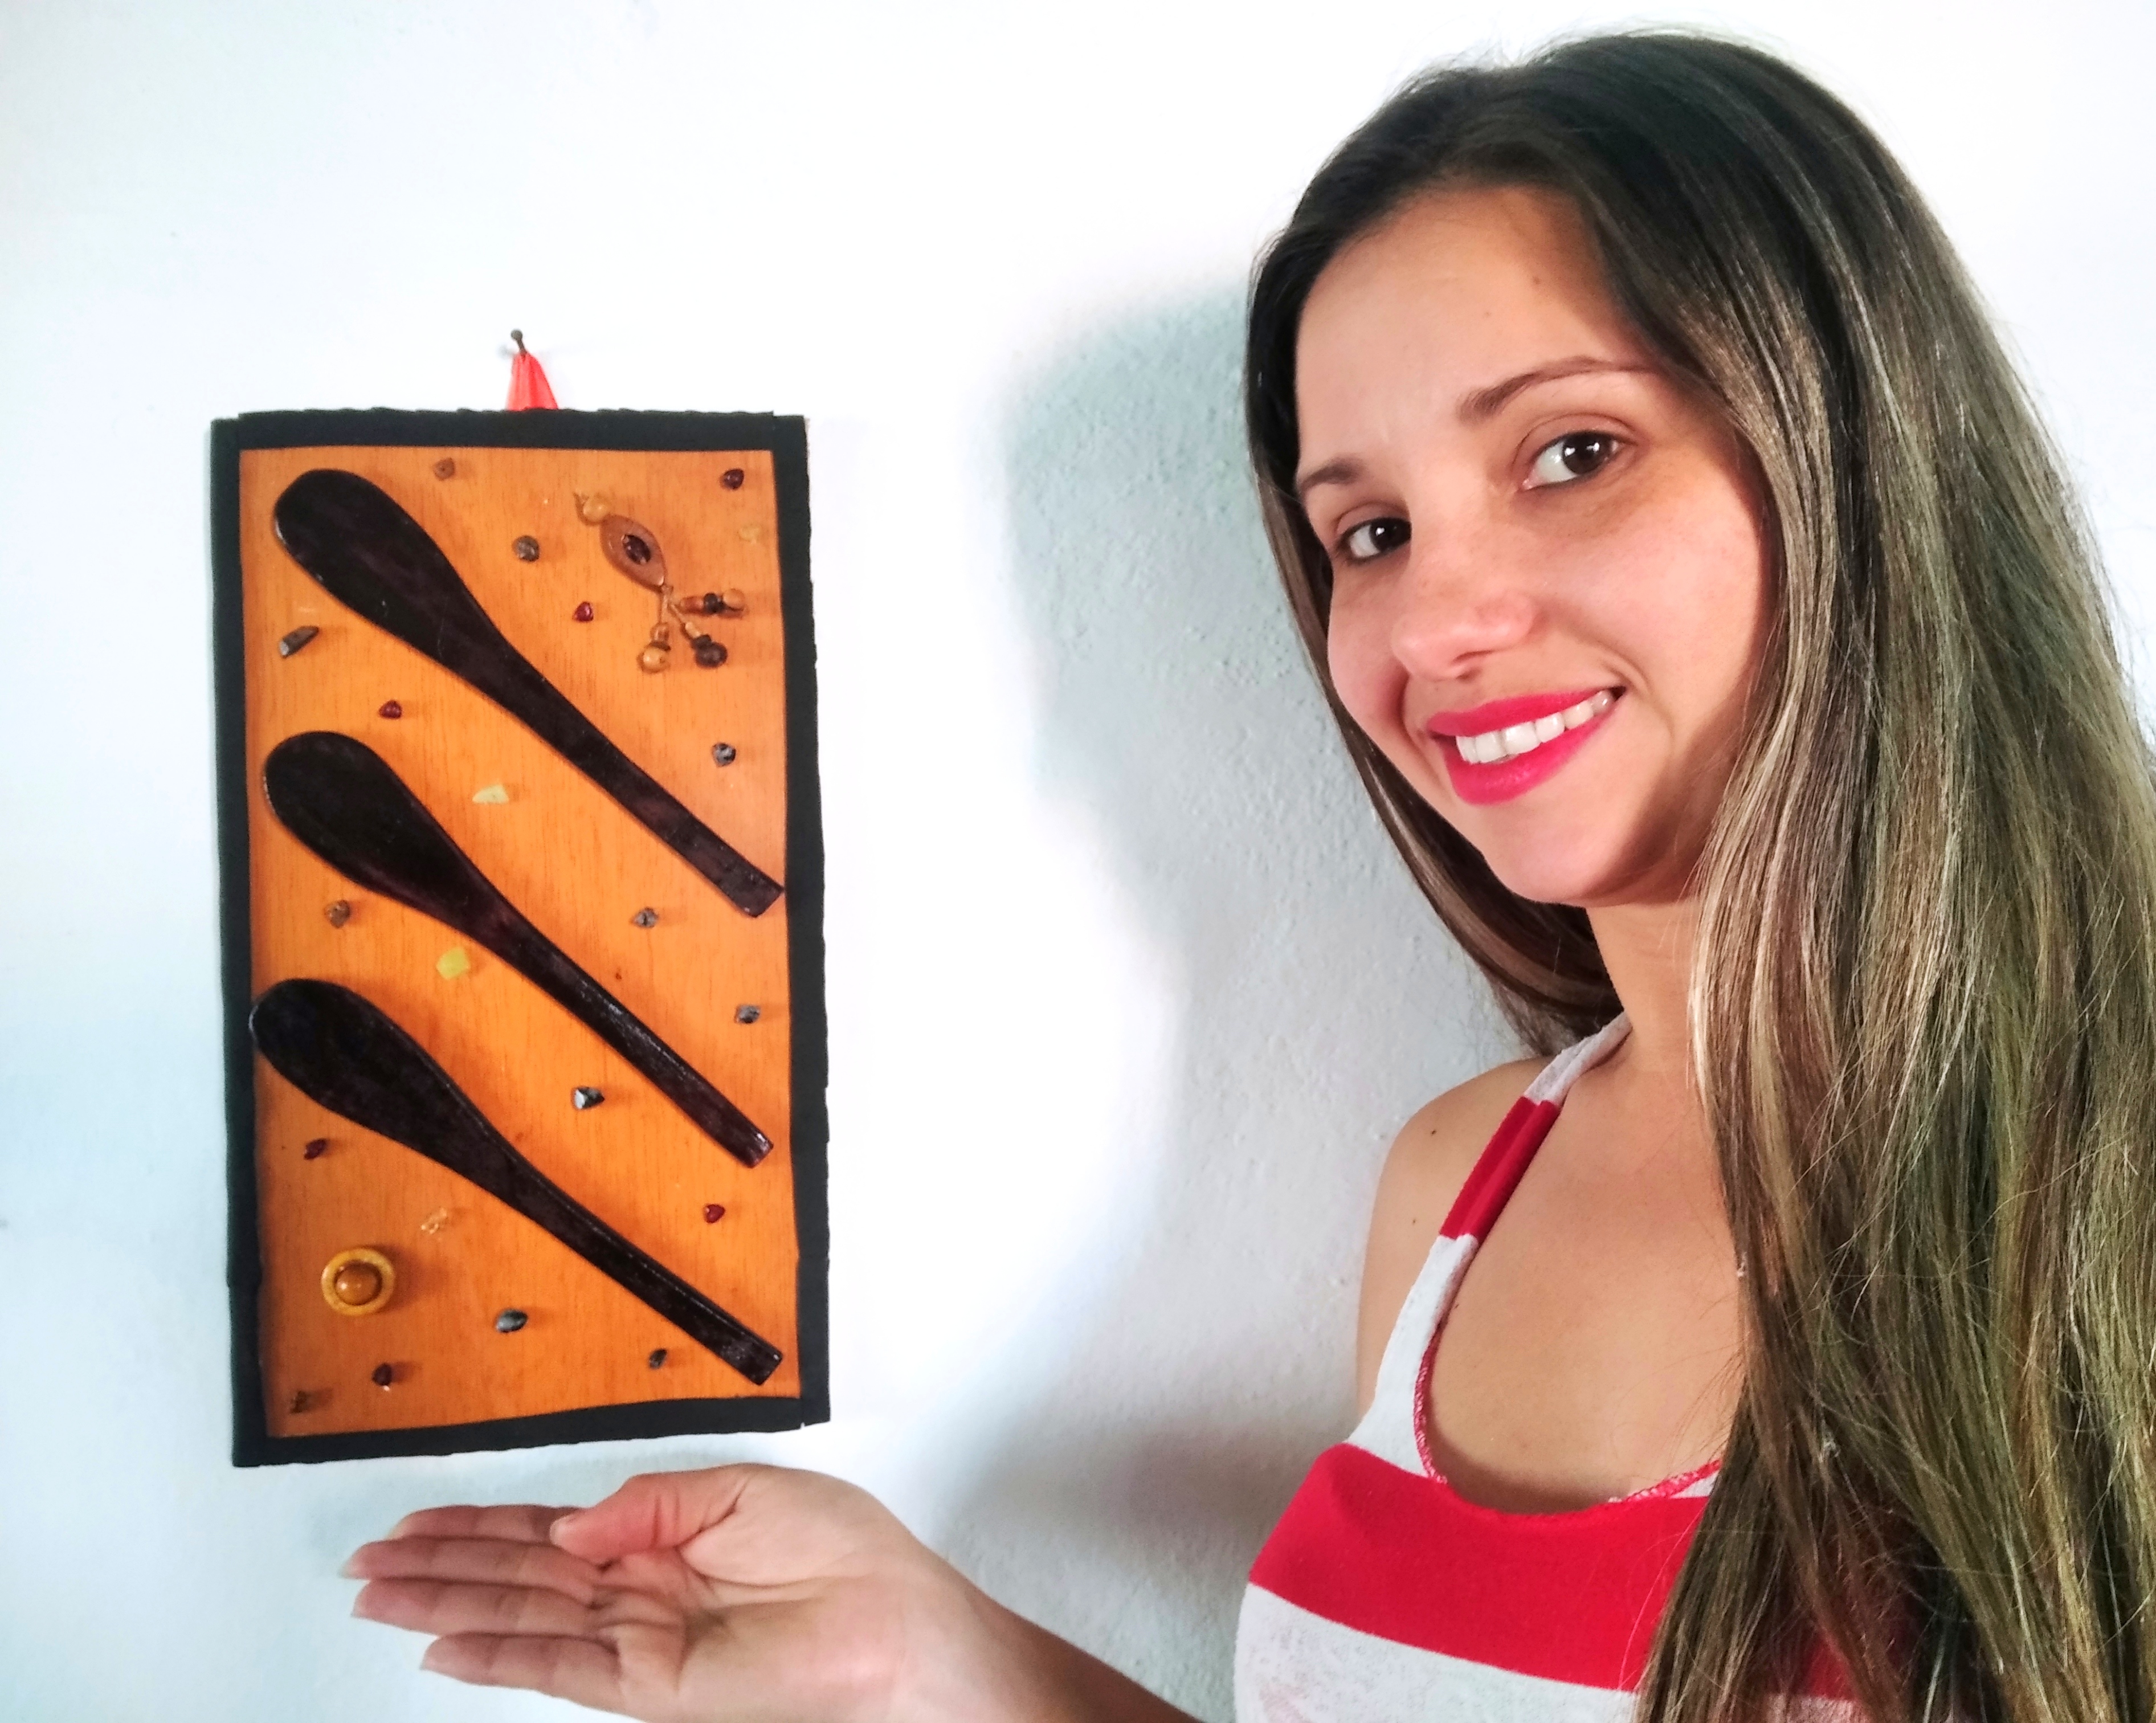
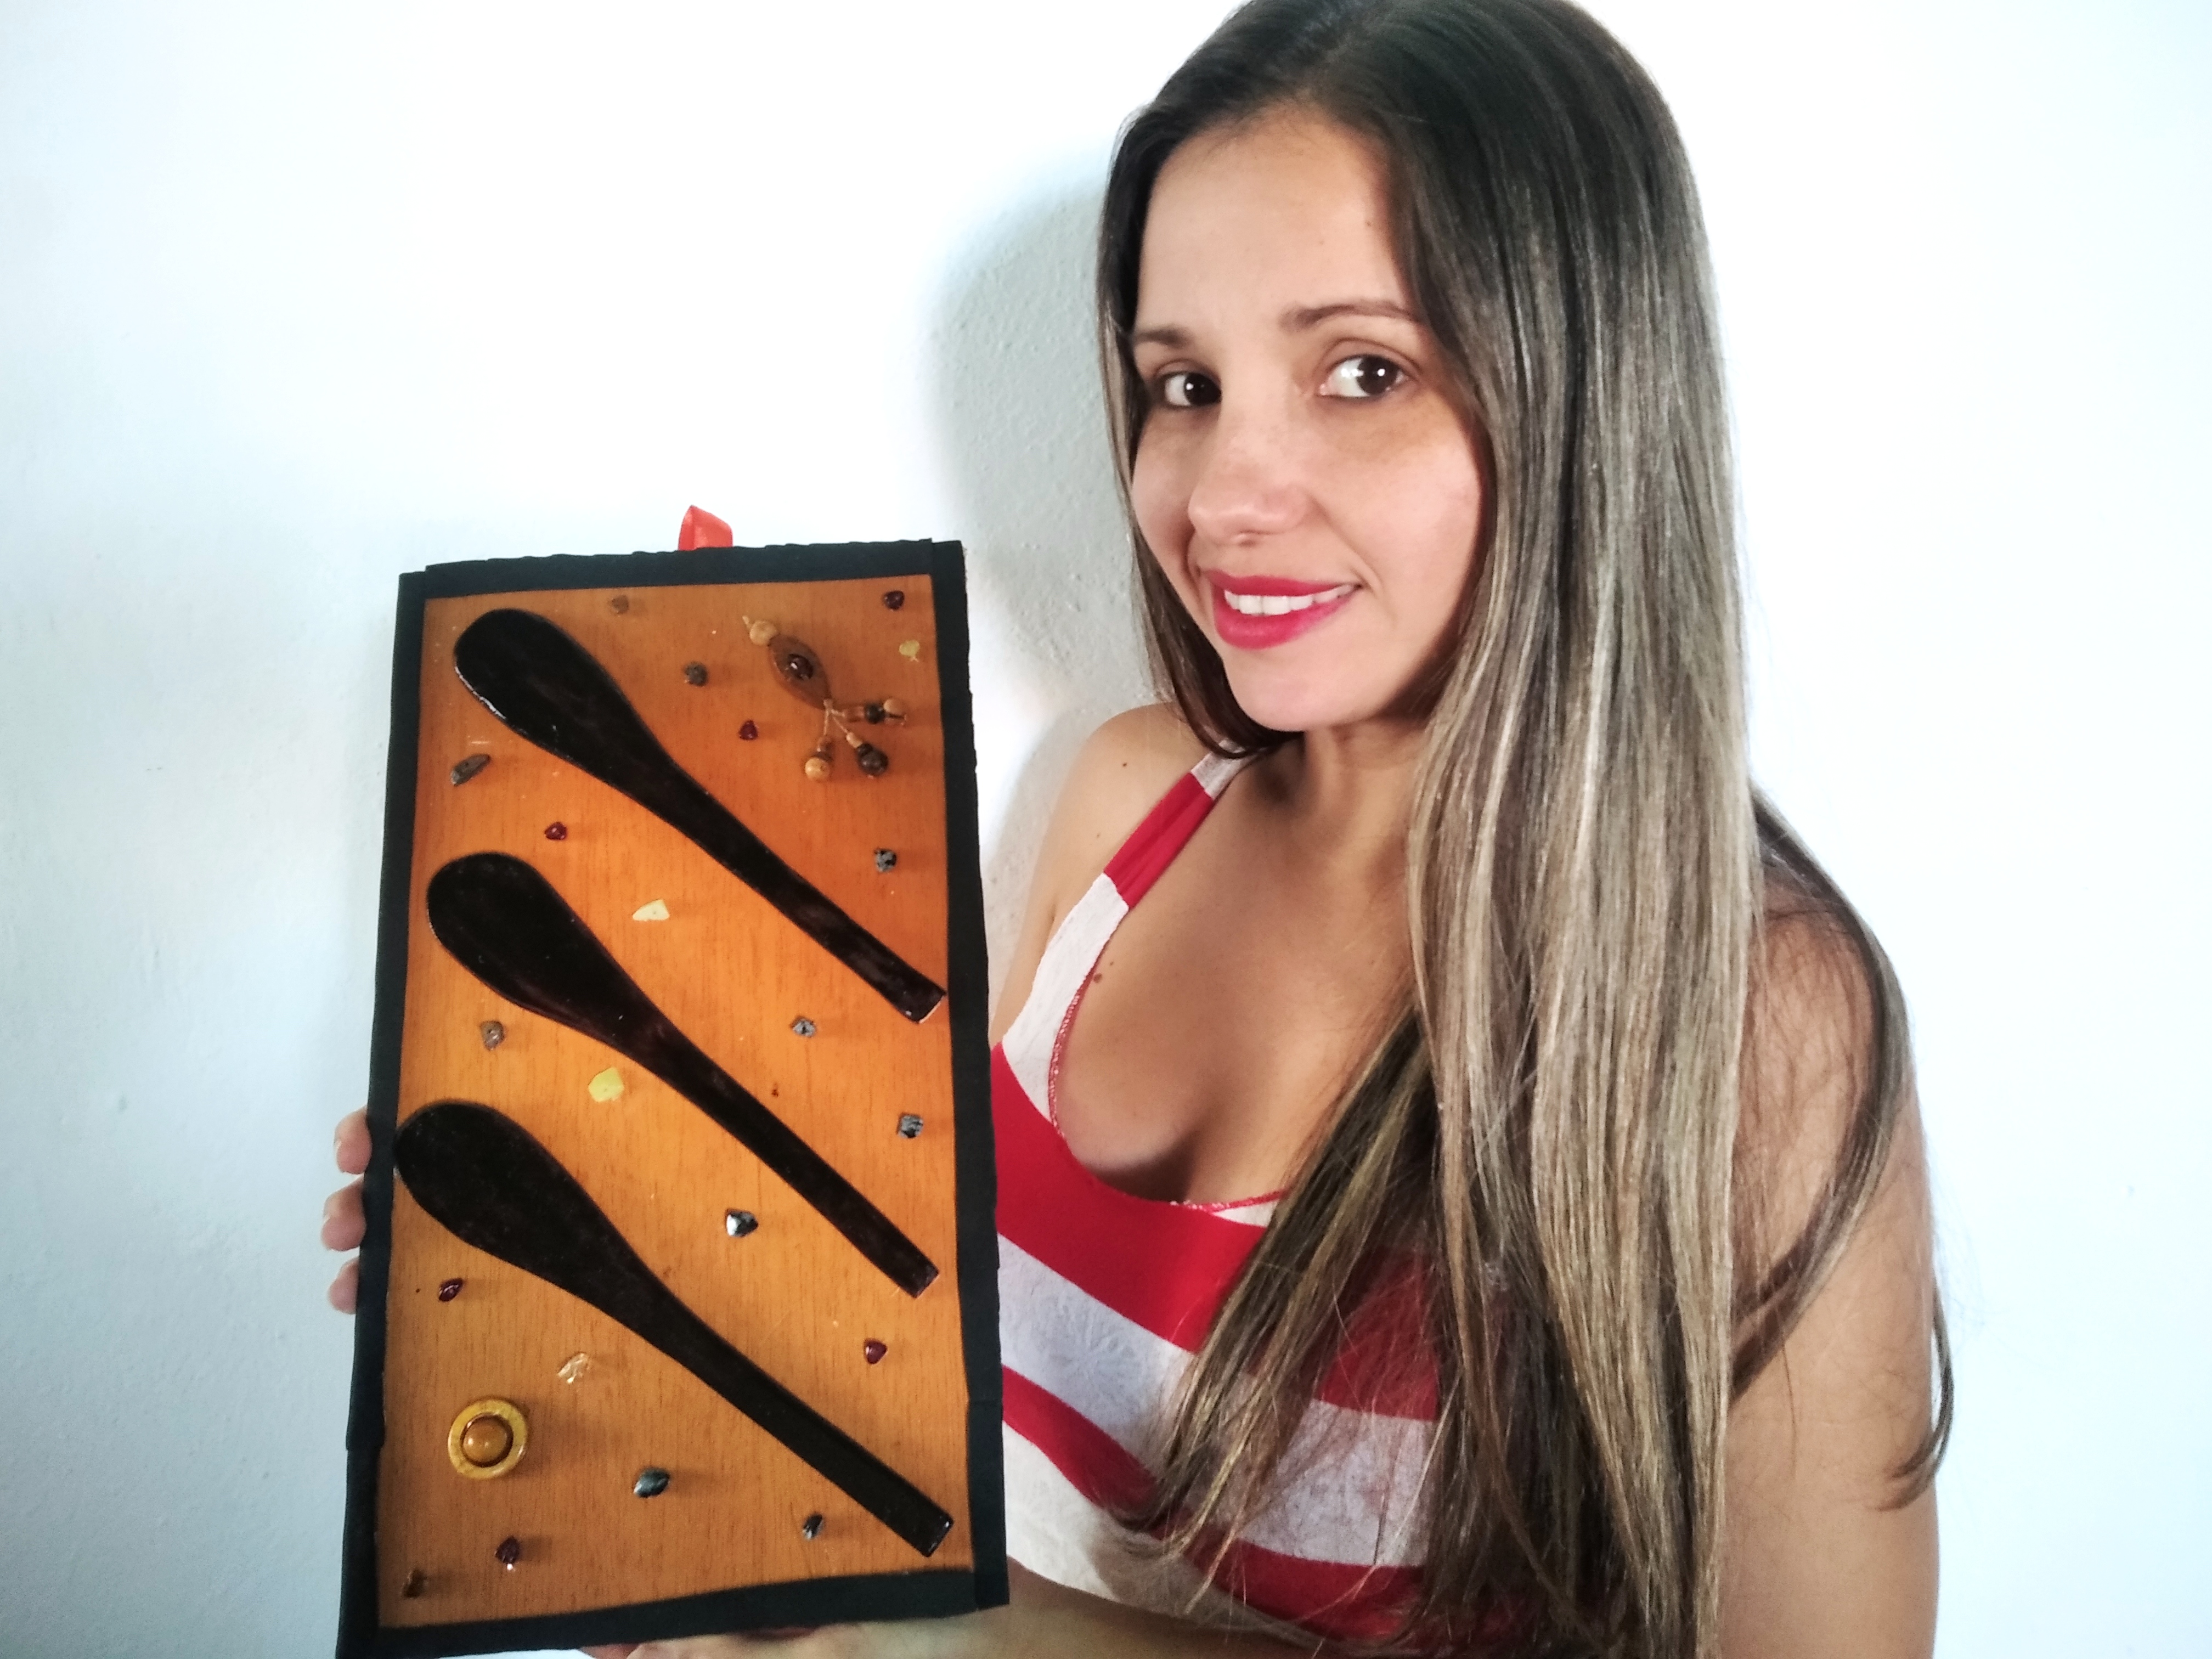
## <center>Cuadro Terminado</center>
<br>
>## <center>Done Frame</center>
<br>
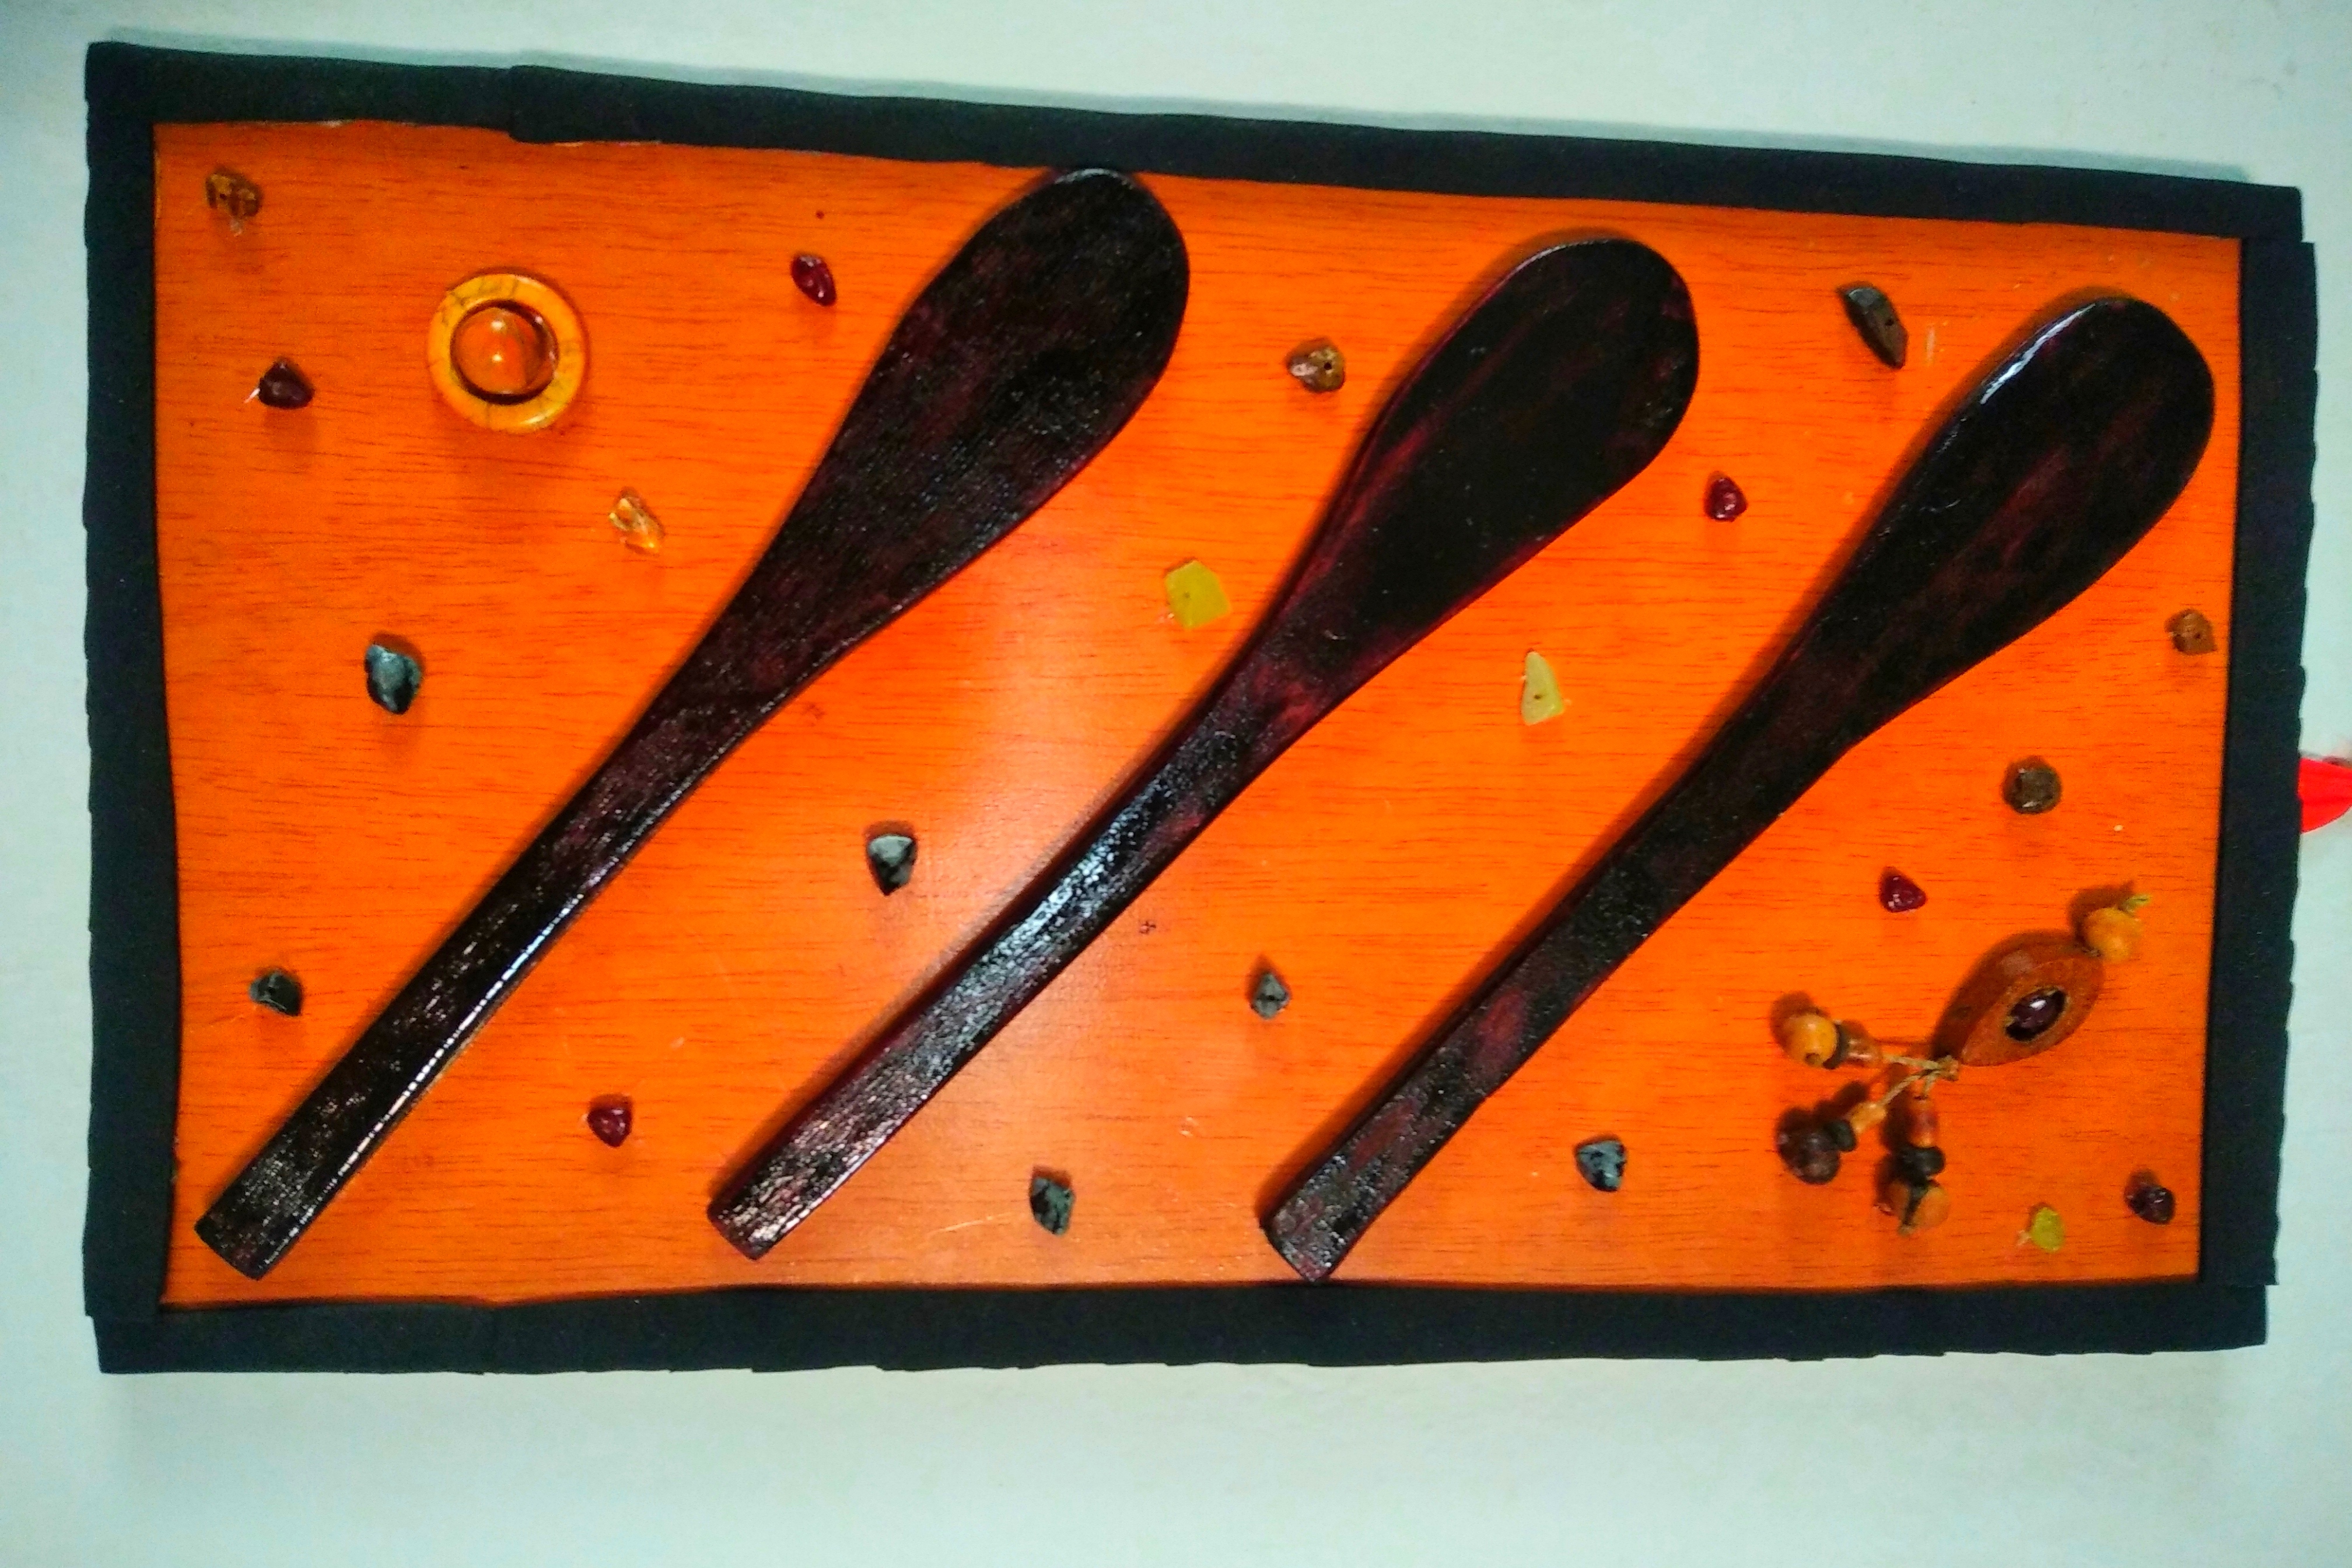
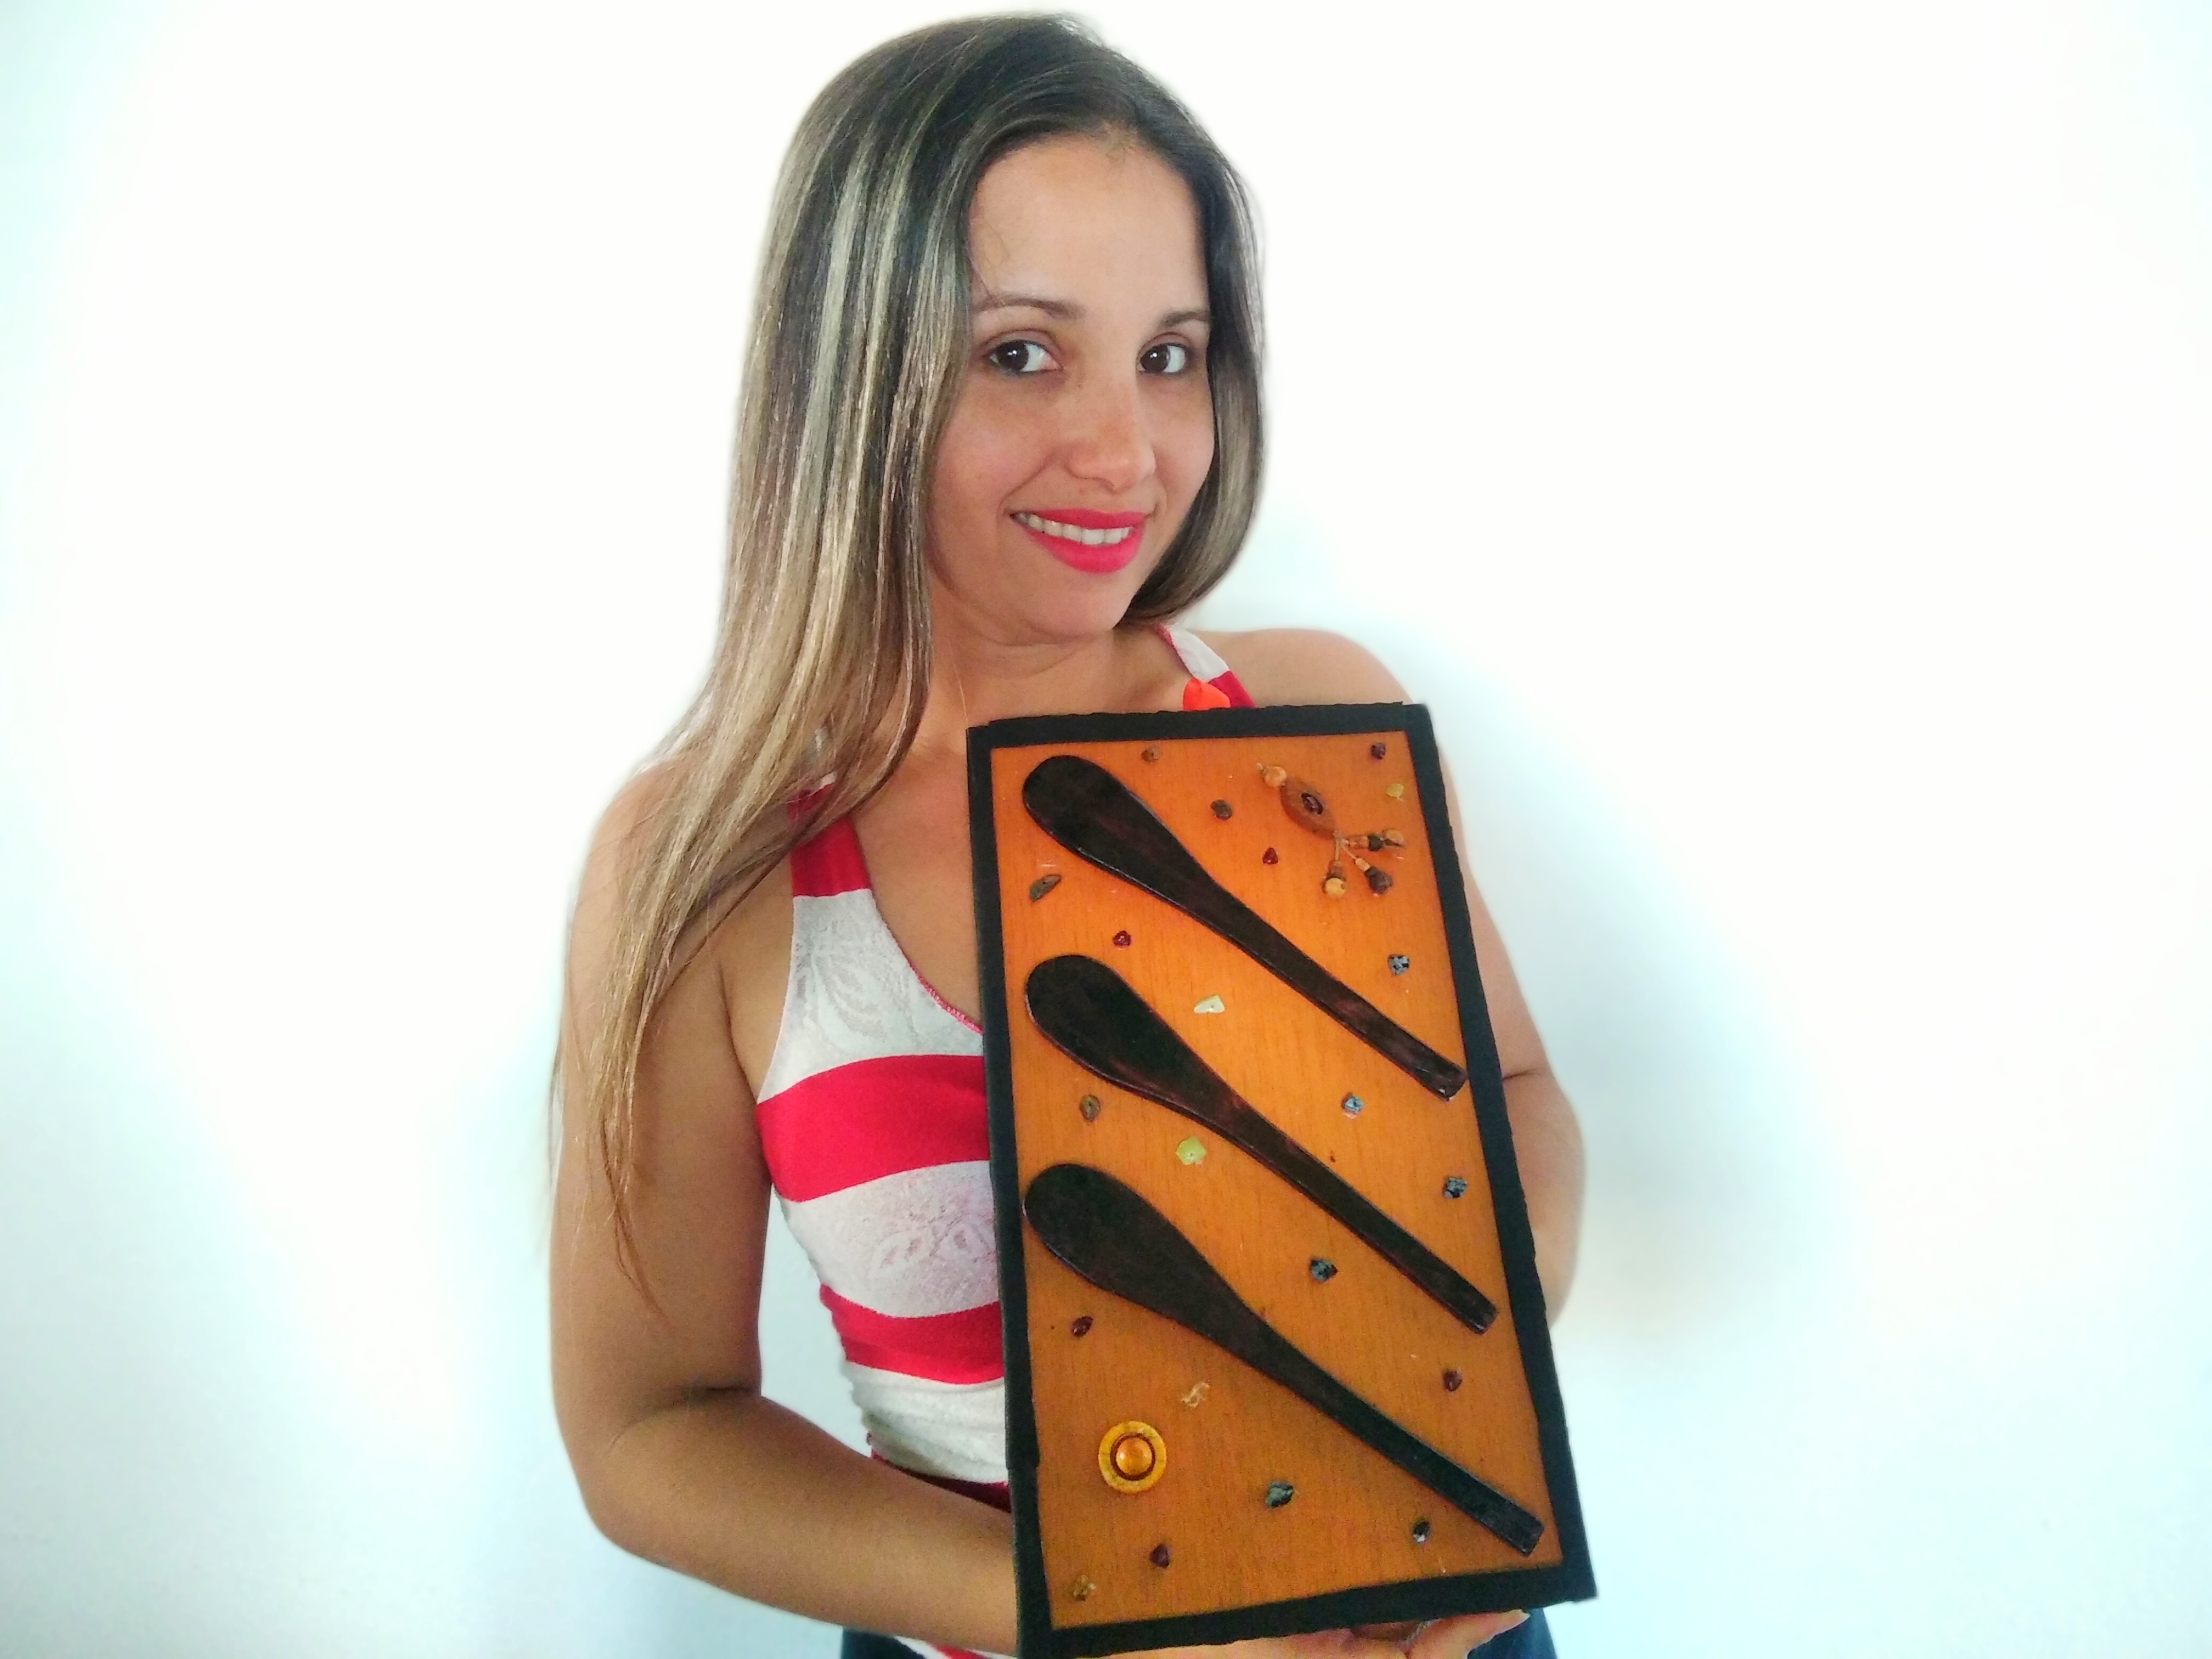
<div class="text-justify">Ahora sí amigos, veamos el resultado final, lo lindo que quedó este hermoso cuadro hecho a mano con madera reciclada, los dejo con las imágenes para que se enamoren y hagan el cuadro en casita. </div>
<br>
><div class="text-justify">Now yes friends, let's see the final result, how beautiful this beautiful handmade painting with recycled wood turned out, I leave you with the images so that you fall in love and make the painting at home. </div>
<br>
<br>
<br>
<br>
<br>
<br>
<br>

**<div class="text-justify">Amigos a mí me encantó el resultado final, deseo que de igual manera les guste a ustedes. De antemano quiero agradecer a los que me visitan y me leen, nos vemos pronto en otro "Arte Manual". </div>**
<br>
>**<div class="text-justify">Friends, I loved the final result, I hope you like it the same way. In advance I want to thank those who visit me and read me, see you soon in another "Manual Art". </div>**
<br>

<div class="text-justify"><sub>Todas las fotografías son mi propiedad, tomada con mi teléfono Redmi 8A y editadas con la aplicación Polish.Traductor Googl.co.ve. Los separadores de texto usados. All photos are my property, taken with my Redmi 8A phone. Translator Googl.co.ve. The text separators used.</sub></div>
[Source](https://www.tutorialesteemit.com/recomendaciones/separadores-de-texto-para-blog/)
<br>