# or... When you’re working on a static site and GitHub Pages feels like the perfect hosting solution, since you like having everything in one place and then you realize you need an additional environment but you still don’t want to use anything but GitHub… Here’s what you can do.
_This is a “special needs” article but also a general introduction to GitHub Actions._
_Originally posted here: https://markus-kottlaender.medium.com/when-youre-working-on-a-static-site-and-github-pages-feels-like-the-perfect-hosting-solution-a41c37f4e326_
Since the advent of Single Page Applications the requirements for hosting have been reduced to a minimum. Anything that can serve a static HTML file will do the job just fine and the browser, bombarded with Javascript, does the heavy lifting. High availability and security is a totally different topic of course but in this case I believe GitHub has you covered.
With [Pages](https://pages.github.com) GitHub offers a very convenient service for hosting such an app. You push to your repository and GitHub updates the deployment for you. You even get a nice subdomain like `username.github.io` or you can connect your own domain. There’s just one downside.
If your project is not just a literally very static website but an actual “app” and you are working together with other people, you probably want to have multiple deployments, like a development and a staging environment. The problem is… A repository on GitHub can only have a single GitHub Page instance and you probably don’t want to maintain a mirror repository for each of your environments, so you’ll end up using an external hosting service and then you start questioning GitHub Pages as your preferred hosting solution all together. In this article I will show you what I did to “stay on GitHub“.
### GitHub Actions & Workflows
Not only does GitHub offer free hosting but also free and pretty flexible and powerful workflow automation with [GitHub Actions](https://github.com/features/actions). If you are not already familiar with CI/CD and GitHub Actions in particular, I recommend you to change that asap. I ignored this topic for far too long but now I’m a huge fan. It simply gives you superpowers.
I’ll try to give you a brief but effective introduction:
GitHub runs [virtual machines](https://github.com/actions/virtual-environments) that act as task runners for your projects. Those tasks can either run on a schedule, as a cronjob, or get [triggered by events](https://docs.github.com/en/actions/reference/events-that-trigger-workflows) that occur on GitHub, like pushing commits to a branch, opening or closing issues or commenting on them, to name some common ones. These tasks can be comprised of multiple steps that can be chained together and depend on one another, hence the term _Workflows_. The terminology is the following: _Workflows_ have one or more _jobs_, each with one or more _steps_, which can make use of an _action_, which can have _inputs_ and _outputs_.
Actions are the “atoms” a workflow is made of, so to say. An action is a repository on GitHub, containing an `action.yml` file, describing its inputs and outputs. That means an action can basically do anything you want. It is worth mentioning though, that you actually don’t even have to use actions in your workflows at all. You can also just run arbitrary commands on the operating system the workflow runs on and sometimes that is all you need. You can think of GitHub Workflows simply as… “executing stuff” on a virtual machine that GitHub spawns for you on demand.
To add a new workflow you need to add a YAML configuration file inside the `.github/workflows` directory of your repository. GitHub will automatically pick that up and run it according to the terms you configure. Here’s a `hello-world.yml` that shows probably the most simple and useless workflow possible:
```yaml
name: Hello World
on:
schedule:
- cron: '0 0 * * *'
jobs:
hello-world:
runs-on: ubuntu-latest
steps:
- run: echo Hello World!
```
_(I’ll not cover the YAML format in this article but I’ll tell you that the dashes represent items in an array and if there are no dashes you are dealing with object keys. If there are dashes followed by… no dashes… it’s an array of objects. In contrast to plain JSON it supports single quotes and comments. Everything that is not quoted is considered a string, unless it’s obviously not a string._ [_YAML is a superset of JSON._](http://yaml.org/spec/1.2/spec.html#id2759572) _Wait… Did I just… anyway…)_
Once a day at 0:00 o’clock this workflow runs and prints “Hello World!” to some virtual Ubuntu machine’s _stdout_, somewhere in GitHub’s networks. It does not use any action but instead runs an _echo_ command. A single step can either _run_ commands OR _use_ an action.
```yaml
jobs:
hello-world:
runs-on: ubuntu-latest
steps:
- uses: hello-world/say-action@v1
with:
say: Hello World!
```
You set the inputs of an action, if it has any, by using the _with_ keyword. I’d have called it _inputs_ but who cares.
#### Outputs and Dependent Jobs
If an action has outputs, you can use them in consecutive steps of the same job. The step with the outputs just needs an _id_ to be referenced by other steps.
```yaml
jobs:
hello-world:
runs-on: ubuntu-latest
steps:
- id: get-name
uses: hello-world/get-name-action@v1 # has a "name" output
- uses: hello-world/greet-action@v1
with:
name: ${{ steps.get-name.outputs.name }}
```
To make a job dependent on a previous one and thus allow it to use its outputs, you must specify which outputs exactly to make available and then you define an array of _“needs”_.
```yaml
jobs:
get-name:
runs-on: ubuntu-latest
outputs:
name: ${{ steps.get-name.outputs.name }}
steps:
- id: get-name
uses: hello-world/get-name-action@v1 # has a "name" output
say-name:
runs-on: ubuntu-latest
steps:
- uses: hello-world/greet-action@v1
with:
name: ${{ steps.get-name.outputs.name }}
```
#### Secrets & Environments
Sometimes you need to use credentials, like an API key and you don’t want to expose such values in your workflow file directly. In your repository’s settings you’ll find a section called “Secrets”.
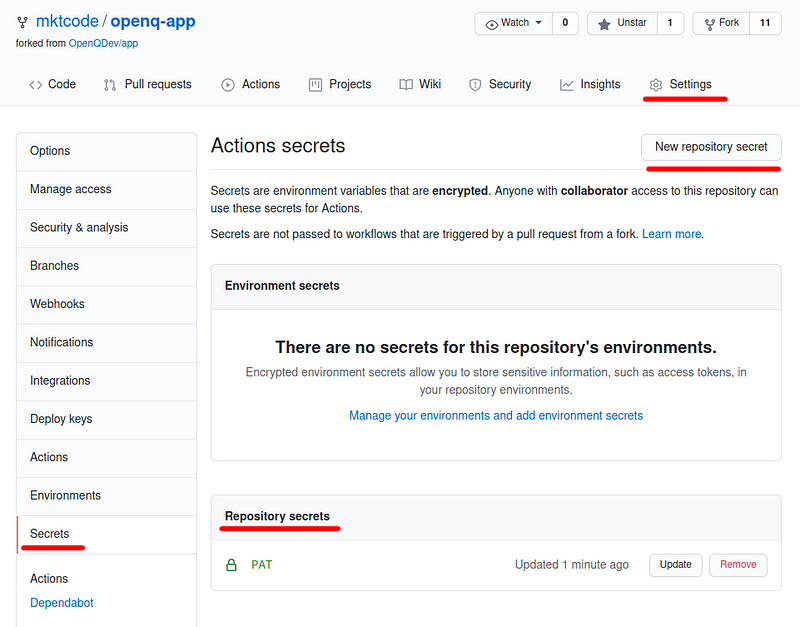
Here you can define those values and you can use them in your workflows like this.
```yaml
steps:
- run: echo ${{ secrets.SECRET_STRING }}
```
Secrets can also be defined for an entire organization on GitHub (go to its settings and there “Secrets”), to be available in all workflows across all repositories of that organization. On the other hand, you can also further restrict access to secrets. That’s what [environments](https://docs.github.com/en/actions/reference/environments) are for. Think of them as “categories” of secrets in a certain repository.
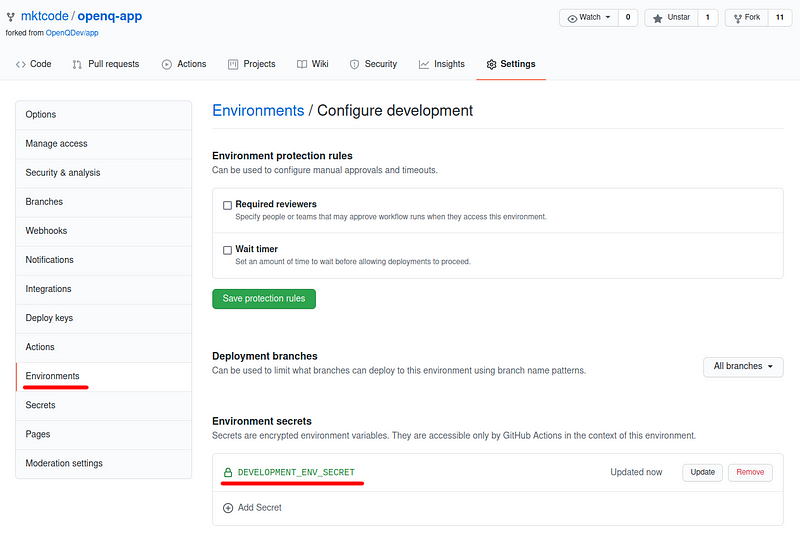
You can [tell a workflow job what environment’s secrets it can access](https://docs.github.com/en/actions/reference/workflow-syntax-for-github-actions#jobsjob_idenvironment). Let’s say you’ve created an environment in your repository’s settings called _development._
```yaml
jobs:
hello-world:
runs-on: ubuntu-latest
environment: development
steps:
- run: echo ${{ secrets.DEVELOPMENT_ENV_SECRET }}
```
In the environment settings you’ll see that access can also be restricted to certain branches, so that only a workflow that was triggered by an event related to a matching branch has access to the environment’s secrets and you can also require an admin to approve those workflow runs before they actually run.
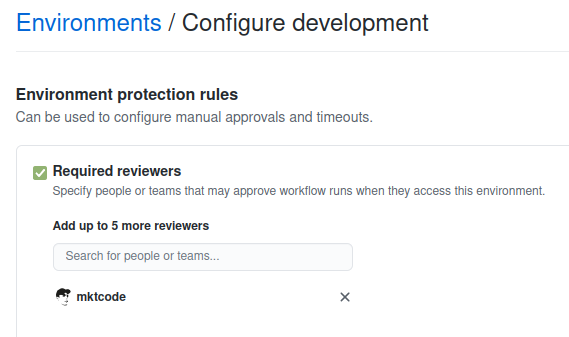

We’ll use that later in the article.
After digesting this very condensed information you should have a feeling for how powerful and flexible these workflows can be and that you can basically do anything you can imagine. For example, I am using them to integrate cryptocurrency payments into deployment pipelines on GitHub but that’s a top secret project and you better erase that information from your memory right now. Ok? Good. Thanks.
If you want to dive deeper into GitHub Actions on your own, browse through [the docs](https://docs.github.com/en/actions) and if you want to start experimenting, I recommend adding [Workflow syntax for GitHub Actions](https://docs.github.com/en/actions/reference/workflow-syntax-for-github-actions) and [Events that trigger workflows](https://docs.github.com/en/actions/reference/events-that-trigger-workflows) to your bookmarks.
#### ATTENTION: A quick note on security when using secrets with unofficial/unverified actions!
As mentioned, actions can take inputs. Those inputs can be secrets. A common example is Docker:
```yaml
jobs:
build-and-push-docker-image:
runs-on: ubuntu-latest
steps:
- name: Login to DockerHub
uses: docker/login-action@v1
with:
username: ${{ secrets.DOCKERHUB_USERNAME }}
password: ${{ secrets.DOCKERHUB_TOKEN }}
```
The action being used here is [_docker/login-action_](https://github.com/marketplace/actions/docker-login)_,_ which is a verified action:
What version of the action you use is specified by the `@v1` at the end, which is a branch or tag name. Now, Docker might be a trustworthy author but even trusted organizations might have a new team member every now and then and sometimes new team members turn out to be not as trustworthy as the rest of the organization they just joined and security policies are sometimes more a theoretical thing. Anyway… At the latest when working with unverified actions you need to be aware of one thing (in case you aren’t already):
#### **The code referenced by a tag can change!**
That means: An action you pass one of your secrets to, can today be your best friend and tomorrow steal your most secret secrets, without you ever even knowing, and reveal them to your worst enemies, who are browsing the dark web looking for the latest hacks and leaks!
If in any doubt, reference an action by a commit hash, like this:
```yaml
- name: Login to shady service
uses: trustme/spy-action@`172239021f7ba04fe7327647b213799853a9eb89`
with:
password: ${{ secrets.SUPER_SECURE_PASSWORD }}
```
**AND** make sure that the code referenced by that commit hash actually does what the readme says it does. If you don’t… well… then just use the tag name. You have been warned (by [the docs](https://docs.github.com/en/actions/learn-github-actions/finding-and-customizing-actions#using-release-management-for-your-custom-actions) too).
### My GitHub Pages Scenario
Now that you should be up to speed with GitHub Actions and Workflows and everything, I’ll finally go into my specific real-world-scenario where a few workflows manage multiple GitHub Pages instances, representing different environments for the app I was working on.
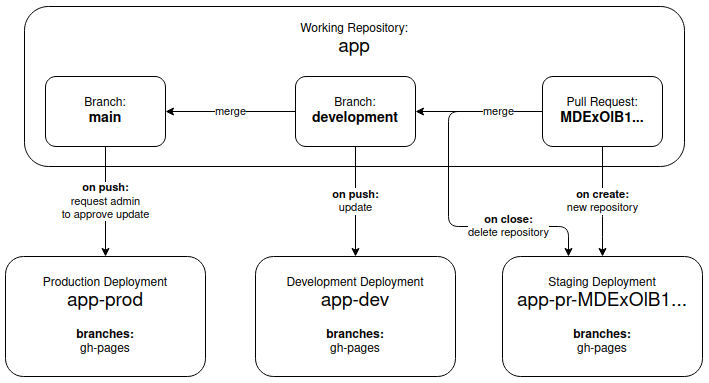
I needed three environments that behave like this:
* **Production**: The app that users will actually use. Updated on push to main branch, requiring admin approval.
* **Development**: Preview of the latest development progress. Updated on push to development branch.
* **Staging**: “Phoenix” deployments, created for pull requests from feature branches and deleted on close, which includes merges.
The main repository, just called “_app”_, does not have it’s own GitHub Page. Instead there are two additional repositories, “_app-prod”_ and “_app-dev”_. I mentioned in the beginning, that you surely don’t want to maintain any mirror repositories and that’s why these repositories only hold a build of the app and have their GitHub Page enabled. That’s their only purpose. Additionally each pull request on the development branch will result in a new repository named _“app-pr-[ID of pull request]”._ Here’s a visualization:
#### Workflow: Development Build and Deploy
Let’s start with the development deployment, since it’s the most straight forward without any extras. Take a look at [this workflow file](https://github.com/OpenQDev/app/blob/715573cd6ceebe87e7e235180510eaacacb7d74a/.github/workflows/deploy-dev.yml) and then I’ll guide you through it step by step. The gist of what happens is, we checkout the repository, build the app and push that build to the _app-dev_ repository.
**1.)** The workflow runs when new commits are pushed to the development branch but not for changes that only affect the workflow files themselves or any markdown files:
[https://github.com/OpenQDev/app/blob/715573cd6ceebe87e7e235180510eaacacb7d74a/.github/workflows/deploy-dev.yml#L2-L7](https://github.com/OpenQDev/app/blob/715573cd6ceebe87e7e235180510eaacacb7d74a/.github/workflows/deploy-dev.yml#L2-L7)
**2.)** We set the URL that is connected to the _app-dev_ repository’s GitHub Page as a global environment variable, to use it later in the workflow:
[https://github.com/OpenQDev/app/blob/715573cd6ceebe87e7e235180510eaacacb7d74a/.github/workflows/deploy-dev.yml#L8-L9](https://github.com/OpenQDev/app/blob/715573cd6ceebe87e7e235180510eaacacb7d74a/.github/workflows/deploy-dev.yml#L8-L9)
**3.)** There’s actually just one job, with a lot of steps, that runs on a _ubuntu-latest_ virtual machine, using secrets we configured for our development environment in the repository settings:
[https://github.com/OpenQDev/app/blob/715573cd6ceebe87e7e235180510eaacacb7d74a/.github/workflows/deploy-dev.yml#L11-L16](https://github.com/OpenQDev/app/blob/715573cd6ceebe87e7e235180510eaacacb7d74a/.github/workflows/deploy-dev.yml#L11-L16)
**FYI:** Setting the _url_ key for the environment only means that GitHub will show a link to that URL in different places on github.com, like in a related pull request or [the repository’s deployments overview](https://github.com/OpenQDev/app/deployments).
**4.)** We use [an official action](https://github.com/actions/setup-node) (actions provided by the _actions_ GitHub organization) to prepare Node.js on the VM:
[https://github.com/OpenQDev/app/blob/715573cd6ceebe87e7e235180510eaacacb7d74a/.github/workflows/deploy-dev.yml#L18-L19](https://github.com/OpenQDev/app/blob/715573cd6ceebe87e7e235180510eaacacb7d74a/.github/workflows/deploy-dev.yml#L18-L19)
**5.)** We use normal Git commands to set the GitHub Actions bot as the commit author, because later we will commit and push changes to a repository:
[https://github.com/OpenQDev/app/blob/715573cd6ceebe87e7e235180510eaacacb7d74a/.github/workflows/deploy-dev.yml#L22-L25](https://github.com/OpenQDev/app/blob/715573cd6ceebe87e7e235180510eaacacb7d74a/.github/workflows/deploy-dev.yml#L22-L25)
**6.)** We checkout the repository to a _build_ directory, using [the official checkout action](https://github.com/actions/checkout):
[https://github.com/OpenQDev/app/blob/715573cd6ceebe87e7e235180510eaacacb7d74a/.github/workflows/deploy-dev.yml#L27-L30](https://github.com/OpenQDev/app/blob/715573cd6ceebe87e7e235180510eaacacb7d74a/.github/workflows/deploy-dev.yml#L27-L30)
**FYI:** If you don’t pass a specific repository name to the checkout action, like in step 8, it will simply checkout the repository in which the workflow lives.
**7.)** We move into this _build_ directory and actually build the app (a [Nuxt.js](https://nuxtjs.org/) app by the way), after setting some environment variables. Then we move back to the parent directory:
[https://github.com/OpenQDev/app/blob/715573cd6ceebe87e7e235180510eaacacb7d74a/.github/workflows/deploy-dev.yml#L32-L41](https://github.com/OpenQDev/app/blob/715573cd6ceebe87e7e235180510eaacacb7d74a/.github/workflows/deploy-dev.yml#L32-L41)
**FYI:** Exported environment variables are not persistent across jobs/steps and are not to be confused with the [workflow’s env vars](https://docs.github.com/en/actions/reference/workflow-syntax-for-github-actions#env) (line 9), which are available throughout the entire workflow.
**8.)** Now we checkout the _app-dev_ repository to a _deploy_ directory, this time also providing a personal access token as a secret. This allows as to push changes to that repository in the next step:
[https://github.com/OpenQDev/app/blob/715573cd6ceebe87e7e235180510eaacacb7d74a/.github/workflows/deploy-dev.yml#L43-L48](https://github.com/OpenQDev/app/blob/715573cd6ceebe87e7e235180510eaacacb7d74a/.github/workflows/deploy-dev.yml#L43-L48)
**9.)** And then we simply copy the files from the _build_ directory to the _deploy_ directory, resulting in changes in the repository that we then need to commit and push:
[https://github.com/OpenQDev/app/blob/715573cd6ceebe87e7e235180510eaacacb7d74a/.github/workflows/deploy-dev.yml#L50-L58](https://github.com/OpenQDev/app/blob/715573cd6ceebe87e7e235180510eaacacb7d74a/.github/workflows/deploy-dev.yml#L50-L58)
**FYI:** [Line 54 and 55](https://github.com/OpenQDev/app/blob/715573cd6ceebe87e7e235180510eaacacb7d74a/.github/workflows/deploy-dev.yml#L54-L55) add files needed for the GitHub Page to work properly. We disable Jekyll as GitHub’s default static site generator (we take care of that ourselves by using Nuxt) and we configure the domain we want to be connected to our development deployment.
**Done!**
Now isn’t that super easy and intuitive? :D I’m not claiming that this is the smartest and most efficient way of doing this. But I hope it’s comprehensible enough. Let’s move on to the production deployment.
#### Workflow: Production Build and Deploy
Take a look at [the workflow file](https://github.com/OpenQDev/app/blob/715573cd6ceebe87e7e235180510eaacacb7d74a/.github/workflows/deploy-prod.yml) and you will notice that it’s… pretty much the same. The only differences are [the branch this workflow “listens” to](https://github.com/OpenQDev/app/blob/715573cd6ceebe87e7e235180510eaacacb7d74a/.github/workflows/deploy-prod.yml#L4), [the deployment URL](https://github.com/OpenQDev/app/blob/715573cd6ceebe87e7e235180510eaacacb7d74a/.github/workflows/deploy-prod.yml#L9), [the environment](https://github.com/OpenQDev/app/blob/715573cd6ceebe87e7e235180510eaacacb7d74a/.github/workflows/deploy-prod.yml#L15), two of [the env vars used when building the app](https://github.com/OpenQDev/app/blob/715573cd6ceebe87e7e235180510eaacacb7d74a/.github/workflows/deploy-prod.yml#L37-L38) and [the deployment repository](https://github.com/OpenQDev/app/blob/715573cd6ceebe87e7e235180510eaacacb7d74a/.github/workflows/deploy-prod.yml#L46). The more significant difference however, is the environment’s configuration in the repository settings. It will allow this workflow to run only after an admin approved it.

And I think that’s all there is to say about the production deployment and we can take a look at the most interesting part of all this. Pull requests.
#### Workflow: Pull Request Build and Deploy
Again, first go through [the workflow file](https://github.com/OpenQDev/app/blob/715573cd6ceebe87e7e235180510eaacacb7d74a/.github/workflows/deploy-pr.yml), try to make sense of it on your own and then I’ll just explain what’s different here.
Most importantly there is no repository for this deployment yet. We have to create it from our workflow. To have a unique name for the repository, we fetch the GraphQL ID of the pull request:
[https://github.com/OpenQDev/app/blob/715573cd6ceebe87e7e235180510eaacacb7d74a/.github/workflows/deploy-pr.yml#L9-L10](https://github.com/OpenQDev/app/blob/715573cd6ceebe87e7e235180510eaacacb7d74a/.github/workflows/deploy-pr.yml#L9-L10)
**FYI:** The `github` variable lets you access the context of a workflow run, e.g. the event that triggered it, including the pull request object itself.
There’s a separate job that creates the repository, using a special action I created:
[https://github.com/OpenQDev/app/blob/715573cd6ceebe87e7e235180510eaacacb7d74a/.github/workflows/deploy-pr.yml#L13-L21](https://github.com/OpenQDev/app/blob/715573cd6ceebe87e7e235180510eaacacb7d74a/.github/workflows/deploy-pr.yml#L13-L21)
You can take a look at the action itself, to see what’s actually going on:
[https://github.com/mktcode/create-repository-action/blob/b1dd3b3dcdcc491795ae189db97383a47f04808e/index.js#L6-L29](https://github.com/mktcode/create-repository-action/blob/b1dd3b3dcdcc491795ae189db97383a47f04808e/index.js#L6-L29)
The next job depends on the repository being created and uses the _pr-staging_ environment:
[https://github.com/OpenQDev/app/blob/715573cd6ceebe87e7e235180510eaacacb7d74a/.github/workflows/deploy-pr.yml#L23-L28](https://github.com/OpenQDev/app/blob/715573cd6ceebe87e7e235180510eaacacb7d74a/.github/workflows/deploy-pr.yml#L23-L28)
From there on it’s pretty much the same as the development and production workflow. The only thing missing is deleting the repository, once the pull request gets merged/closed. This is handled in [a separate workflow](https://github.com/OpenQDev/app/blob/715573cd6ceebe87e7e235180510eaacacb7d74a/.github/workflows/delete-deploy-pr.yml). It uses [another special action](https://github.com/mktcode/delete-repository-action/blob/8e1765df0893c4555badce772bcd0b732e2770e3/index.js#L6-L17) I created.
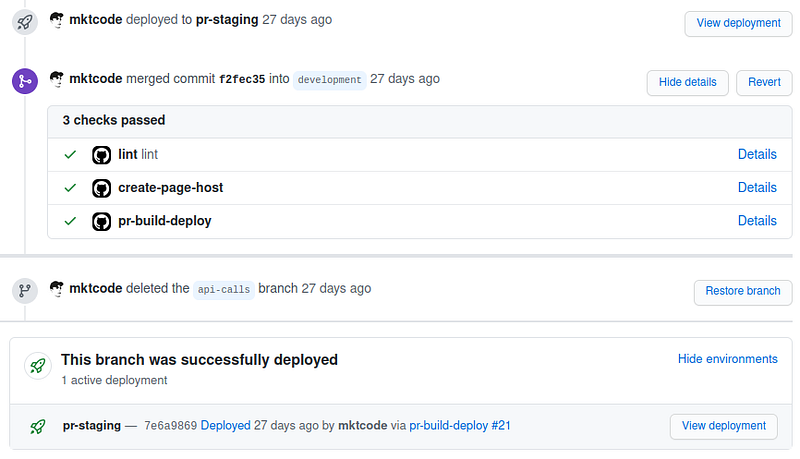
An now you can have pull requests [like this one](https://github.com/OpenQDev/app/pull/134) with their own automatic deployments to test the changed before merging.
**And that’s actually it! We’re done.** We now have a static site project, with multiple environments, living entirely on GitHub. And this is just one possible configuration of which I’m sure is far from perfect. In fact I am working on some improvements. So maybe I will update this article soon. But I hope you got a feeling for what’s possible with GitHub Actions and Workflows and that you start experimenting and creating your own ones for your own individual purposes now.
#### **Thanks for reading!**
_You can follow me on_ [_Twitter_](https://twitter.com/@thecodelander) _and_ [_GitHub_](https://github.com/mktcode)_. For longer discussions, questions, feedback and so on, I just created a_ [_Discord Server_](https://discord.gg/vnGDEg9Ydv)_. Not sure if that really makes sense but feel free to step by and say hello. :)_