### Learning to do stuff poorly w/ @mstafford;
#### AKA, "Did I just get *worse* at this?"
I'm currently working on my steem (d)App* project a bit more frequently as the weather cools down, and I just got remotivated to work on a few things that I had been putting on the back-burner. Specifically, I've been meaning to leverage the powerful [GeoDjango](https://docs.djangoproject.com/en/2.2/ref/contrib/gis/) package:
<sub>**I'd be lying if I said it was really a (d)ecentralized application*</sub>
<center></center>
The earlier version of EXHAUST actually had this package implemented, but I hadn't really done anything with it yet save some testing. In tandem, I'm going to document my process here in an effort to do just that -- document. I'm horrible at writing my process and assumptions down, and I need to change. I barely even comment anything when I spray Python everywhere, and it takes me forever to remember WTF I was thinking. Today -- it all changes. Sorta...
People that know me have told me I'm pretty casual. I'm gonna keep it this way, and just kinda stream-of-conciousness this guide. For some of the basics w/ Django -- I recommend checking out some of the goods of @steempytutorials -- like [this one on starting a Steem Django app](https://steemit.com/utopian-io/@steempytutorials/part-0-create-steem-web-applications-with-django-and-steem-python). So w/ that in mind, lets dig into it.
***
Before I start this journey, it's probably a pretty useful exercise to figure out *WHAT* we want to accomplish before we just start go fuckin' crushing it. So with that in mind, here are some objectives:
### Objectives:
1. Install GeoDjango and dependencies;
2. Set up a new Postgres database w/ appropriate 'extensions' and get our Django project to interact w/ new database;
a) This requires implementing some database routing, since we're going to leave our original database in operation;
3. Figure out how to *display* the map object;
4. Figure out how to display *content from our new GIS Database* in maps that can be viewed by anyone;
a) The GeoDjango tutorials are actually quite lacking in this aspect -- so we'll find something else / get creative here;
5. Think of what we can do to make this even better;
***
### Assumptions:
As mentioned above, I want to set up some GIS functionality for my project that's currently process. With that in mind, I'm not going to go into detail on how to install Django itself -- there are some *awesome* official documentation and resources for this elsewhere. So, I'm starting this guide with the following assumptions:
* We're using ***Ubuntu for an OS***;
* We ***already have a working installation of Django running***;
* We're using ***Postgres as our backend Database Manager -- and have already installed it***;
* Fun fact -- my Django project is hosted by [DigitalOcean](https://www.digitalocean.com/) and they provide a really thorough guide on [How to Set Up Django w/ Postgres and Nginx](https://www.digitalocean.com/community/tutorials/how-to-set-up-django-with-postgres-nginx-and-gunicorn-on-ubuntu-16-04)
|Django|Postgres|Nginx|Ubuntu|
|---|---|---|---|
|||||
***
## Step 1 - Install GeoDjango and Dependencies:
This section will be enjoyably brief, as the instructions on the GeoDjango [installation instructions](https://docs.djangoproject.com/en/2.2/ref/contrib/gis/install/) were concise, up to date, and easy.
1. First -- lets start up a new django-app called 'webmap':
```python manage.py startapp webmap```
2. Install GeoDjango:
a. hahaha! Tricked you sucka! This shit comes preloaded w/ Django, and you just gotta turn it on. It's like you're having your *true powers unlocked* like that episode of Dragon Ball Z.
<center></center>
So. It's already installed. We just gotta enable it in our project settings. Go to your favorite editor (I'm too dumb to learn ```vim```, so I tend to use ```nano```), and edit your DjanoProjects settings file:
```/path/to/project$ nano myproject/settings.py```
and make sure you have the GIS contrib package, and our new ```webmap``` app 'installed' to your project:
```
INSTALLED_APPS = [
...,
'django.contrib.auth',
'django.contrib.gis',
'webmap',
...,
]
```
I'm also showing that I have the ```django.contrib.auth``` package installed, as it might come up later. My project obviously allows users to login and manage various things on their account -- and I'd like to be able to link ```Users``` from the ```auth``` package, to shapes and geometries in the ```gis``` package. ```Auth``` is automatically added whenever you start a new Django project, I believe, and most of the time there's probably no reason to remove it.
3. Install GeoSpatial Libraries and other dependencies;
a. [binutls](https://packages.ubuntu.com/xenial/binutils) -- not gonna lie, I'm not 100% certain what this is. A quick google search says it's a **GNU assembler, linker and binary utilities**. Sounds like low-level computer wizardry sorta stuff -- and that's a good enough explanation for me. Let me know in the comments if you've got a laymans description of what this is.
b. [libproj](https://packages.ubuntu.com/xenial/libproj-dev) -- Maps have all sorts of different projection types. That's why on some maps, various countries look huge -- while on others, they look less huge. This library is a **Cartographic projection library (development files)** . More details on this sorta stuff can be found [here](https://en.wikipedia.org/wiki/Map_projection)
c. [gdal](https://packages.ubuntu.com/xenial/gdal-bin) -- GDAL is a translator library for raster and vector geospatial data formats. More info on GDAL can be found [here](https://gdal.org/)
Since I'm doing all of this on a server w/ an Ubuntu OS, I can install all of these packages w/ a quick ```sudo apt-get install binutils libproj-dev gdal-bin```.
<center></center>
<center>Gotta love it when shit is easy.</center>
## Step 2 - Create a new PostGIS spatial database, and get Django working with *multiple databases*:
So I've never really done it, but I would *IMAGINE* that you could be totally fine with operating on a single database. It's probably even easier. But I'm not proud of myself for always doing things the easy way. I typically trudge through things in a ridiculous order, and make my projects needlessly harder than they have to be.
So I'm approaching things like you already have a fairly stable project, and you just thought of something cool you could do if you *just had some webmaps*. We're gonna add a new database, and then operate on both *at the same time*.
<center></center>
#### Lets start a new Postgres Database
Git to yer terminal!
```
postgres@myserver:/path/to/project$ createdb geodjangodb
postgres@myserver:/path/to/project$ psql geodjangodb
psql (10.10 (Ubuntu 10.10-0ubuntu0.18.04.1))
Type "help" for help.
geodjangodb=# CREATE EXTENSION postgis;
CREATE EXTENSION
geodjangodb=# \q
```
Dope! Database is created and ready to be populated with our sweet sweet geometry.
We already "installed" the ```django.contrib.gis```in our setup earlier. Lets jump back into ```myproject/settings.py``` file and define our second (or first, depending how far ahead you plan your life). Scroll down until you get to your ```DATABASE``` definition. You'll see something like this:
```
# Database
# https://docs.djangoproject.com/en/2.2/ref/settings/#databases
DATABASES = {
'default': {
'ENGINE': 'django.db.backends.postgresql_psycopg2',
'NAME': 'projectdbname',
'USER': 'dbadmin',
'PASSWORD': 'S3CR3TP$SSW0RD',
'HOST': 'localhost',
'PORT': '',
},
}
```
lets add a second entry into the ```DATABASES``` dictionary, and lets tell django to call this database ```maptest```:
```
# Database
# https://docs.djangoproject.com/en/2.2/ref/settings/#databases
DATABASES = {
'default': {
'ENGINE': 'django.db.backends.postgresql_psycopg2',
'NAME': 'projectdbname',
'USER': 'dbadmin',
'PASSWORD': 'S3CR3TP$SSW0RD',
'HOST': 'localhost',
'PORT': '',
},
'maptest': {
'ENGINE': 'django.contrib.gis.db.backends.postgis',
'NAME': 'geodjangodb',
'USER': 'dbadmin',
'PASSWORD': 'S3CR3TP$SSW0RD',
'HOST': 'localhost',
'PORT': '',
}
}
```
We're getting pretty close to ready for migrating our project and getting everything ready -- but we've got two more things to do:
* Create a model for our Database and use some actual spatial model fields; and
* We need to set up some database routing, so our spatial-data entries *only get writtien to the database that supports it*. This is called ```routing```... probably...
Lets edit our ```webmap/models.py``` file -- and because it's probably useful, lets create the same ```WorldBorders``` that's covered in the GeoDjango [tutorial](https://docs.djangoproject.com/en/2.2/ref/contrib/gis/tutorial/#defining-a-geographic-model) with a super efficienct (read: shameless) copy/paste:
```
from django.contrib.gis.db import models
class WorldBorder(models.Model):
# Regular Django fields corresponding to the attributes in the
# world borders shapefile.
name = models.CharField(max_length=50)
area = models.IntegerField()
pop2005 = models.IntegerField('Population 2005')
fips = models.CharField('FIPS Code', max_length=2)
iso2 = models.CharField('2 Digit ISO', max_length=2)
iso3 = models.CharField('3 Digit ISO', max_length=3)
un = models.IntegerField('United Nations Code')
region = models.IntegerField('Region Code')
subregion = models.IntegerField('Sub-Region Code')
lon = models.FloatField()
lat = models.FloatField()
# GeoDjango-specific: a geometry field (MultiPolygonField)
mpoly = models.MultiPolygonField()
# Returns the string representation of the model.
def __str__(self):
return self.name
```
The important thing to take away from the above copypaste is the ```mpoly``` field near the bottom. Notice that ```from django.contrib.gis.db``` we imported our ```models``` module. From this, we get the new ```MultiPolygonField``` ```class```.
Start a new ```python``` file, ```routers.py```, in your ```/path/to/project/myproject/```folder. Same place where we found ```settings.py``` and blindly chuck this shit in there:
```
class DBRouter:
"""
A router to control all database operations on models in the
world application.
"""
def db_for_read(self, model, **hints):
"""
Attempts to read webmap models go to geodjangodb.
"""
if model._meta.app_label == 'webmap':
return 'maptest'
return None
def db_for_write(self, model, **hints):
"""
Attempts to write webmap models go to geodjangodb.
"""
if model._meta.app_label == 'webmap':
return 'maptest'
return None
def allow_migrate(self, db, app_label, model_name=None, **hints):
"""
Make sure the webmap app only appears in the 'geodjangodb'
database.
"""
if app_label == 'webmap':
return db == 'maptest'
return None
```
Cool! So what this does, is override a few standard functions in django in terms of how it interacts with its backend database. It will, by default, go to the database you've set as "default" in teh ```settings.py``` file. Otherwise, for reading from, or writing to the database, it'll look for the ```maptest``` database if we're dealing with our new ```webmap``` app. Also, since the geometry fields in our spatial database require whatever kinda neat extension stuff we did before, we need to make sure that the ```webmap``` app only appears in the ```maptest``` database.
Lets do it. The moment we've been waiting for... Lets make like a flock of birds and ```migrate```! Note that if you just run the standard ```python manage.py migrate``` you'll ***ONLY*** run the migration operation for the ***DEFAULT*** database. In order to migrate for our new ```maptest``` database, we just need to specify ```python manage.py migrate --database=maptest```
```
(env) me@server:/path/to/project$ python manage.py makemigrations
sanity check!
Migrations for 'webmap':
webmap/migrations/0001_initial.py
- Create model WorldBorder
(env) me@server:/path/to/project$ python manage.py migrate --database=maptest
sanity check!
Operations to perform:
Apply all migrations: existingapp1, admin, auth, existingapp2, contenttypes, steemkeychain, webmap, existingapp3, existingapp4, sessions
Running migrations:
Applying contenttypes.0001_initial... OK
Applying auth.0001_initial... OK
Applying A BUNCH MORE OF THESE...
```
Okay. Not gonna lie. That felt like more work than I was led to believe this was going to be. However -- things *seem* to be functioning, and I'm willing to ignorantly believe that it's going to get better.. *This is a cheeky, hidden, mid-sentence post to see if anyone has read this far into the post -- the first account to comment that "@exhaust is the best damn GIS-enabled, activity-based, STEEM project around!" gets 10 STEEM!* It'll all be worth it when we develop our cream of the crop GIS enhanced steem-app. Hooooo boy.
<center></center>
## Step 3 - Get some maps showing up on our website:
So one of the things we did in the [previous section]() was to define our ```WorldBorder``` model. We defined this to work nicely w/ the ```*.shp``` (shapefile) that's provided in the [GeoDjango tutorial](https://docs.djangoproject.com/en/2.2/ref/contrib/gis/tutorial/#importing-spatial-data). It contains borders for the countries of the world, and is useful in performing spatial searches by country.
After you've loaded the data (you should have defined a python file for ```webmap/load.py``` and then executed the ```webmap.load.run()``` method). This should have created an entry in our ```WorldBorder``` model for every country that's defined in the shapefile.
The quickest way to see this data on *a map*, is to register our ```webmap``` app for the django ```admin``` site -- this is covered, again, in the [GeoDjango Tutorial](https://docs.djangoproject.com/en/2.2/ref/contrib/gis/tutorial/#putting-your-data-on-the-map) but I'll copy/paste for now, and then we'll take it a step further:
Register ```WorldBorder``` in the ```webmap/admin.py```:
```
### webmap/admin.py
from django.contrib.gis import admin
from .models import WorldBorder
admin.site.register(WorldBorder, admin.GeoModelAdmin)
```
and then ensure your admin site is pathed, and also import the ```admin``` module from ```django.contrib.gis```:
```
from django.contrib.gis import admin
from django.urls import include, path
urlpatterns = [
path('admin/', admin.site.urls),
url(r'^maptest/', include('webmap.urls')),
]
```
Since we *KNOW* we're going to have to do this eventually anyways, we've added the entry for our new ```webmap``` app ```urls.py``` file. So if we navigate a web browser to ourproject.site/maptest/ -- we'll be directed to the urls listed in our ```webmap``` app -- which we'll define shortly.
Now, we can see all the country borders we just imported, if we go to our admin page at https://localhost:8000/admin :
<center>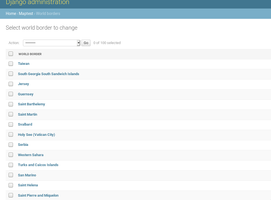 | 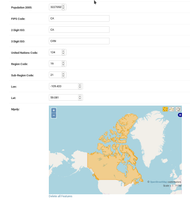</center>
...Cool? Sooo.. People have to log in to the *ADMIN* page to see stuff? That seems dumb...
#### and it IS dumb.
## Step 4 - Link content from our fancy-pants PostGIS geospatial database into some Django views / forms, and HTML templates:
*(pro-top: if you use big words / phrases like "geospatial database", people generally just assume you know what you're talking about, even if you don't).*
So lets make a couple quick and dirty placeholders just to get things working on a site that's not the admin site. We're going to write a new ```view```, a new ```form```, a very simple ```html``` file, and add a couple lines to our ```urls.py``` files. It's gonna be fun. Hopefully.
#### The form!
```
## webmap/forms.py
from django.contrib.gis import forms
class GeoForm(forms.Form):
label="Maps!"
mpoly = forms.MultiPolygonField(widget=
forms.OSMWidget(attrs={
'map_width': 800,
'map_height': 500
})
)
```
A couple notes on the above:
* We've imported the forms module for the ```django.contrib.gis``` package;
* We're using the OSM (OpenStreetMap) widget to display our maps, rather than Google or OpenLayers.
* Our form class is called ```GeoForm```, and our default map size is 800 x 500 pixels
#### The view!
```
### webmap/views.py
from webmap.forms import GeoForm
# Generic Map Areas
from webmap.models import WorldBorder
from django.http import HttpResponse, Http404, HttpResponseRedirect
from django.contrib.gis.geos import MultiPolygon
from django.template import loader
from django.views import View
import re
# Create your views here.
def world(request):
countries = WorldBorder.objects.filter(pop2005__gte=0).order_by('name')
all_countries = 'SRID=4326;MULTIPOLYGON ('
for idx, border in enumerate(countries):
temp_text = re.sub('SRID=4326;MULTIPOLYGON \(','',border.mpoly.ewkt)
temp_text = re.sub('\)\)\)','))',temp_text)
if idx > 0:
all_countries += ","
all_countries += temp_text
all_countries += ")"
all_countries = MultiPolygon().from_ewkt(all_countries)
geo = GeoForm()
geo.fields['mpoly'].initial = all_countries
context = {
'map':geo,
'countries': countries,
}
template = loader.get_template('maptest/mapbasic.html')
return HttpResponse(template.render(context,request))
def country(request, country_id):
countries = WorldBorder.objects.filter(pop2005__gte=0).order_by('name')
selected = WorldBorder.objects.get(pk=country_id)
geo = GeoForm()
geo.fields['mpoly'].initial = selected.mpoly
context = {
'map':geo,
'countries': countries,
'selected': country,
}
template = loader.get_template('maptest/mapbasic.html')
return HttpResponse(template.render(context,request))
```
A couple notes on the above:
* We're importing our ```GeoForm``` from the ```forms.py``` we just created;
* We're importing our ```WorldBorder``` model from the ```models.py``` file created much earlier;
* Importing a couple standard django http response modules that I just kinda copy-paste into new view files;
* We're also importing the ```MultiPolygon``` class from ```django.contrib.gis.geos```;
* This is going to let us define new geometry in our map -- our "new" geometry will be a "multipolygon" of all the countries in our "WorldBorders" data put together;
* ```countries``` is a queryset of all countries organized by date;
* ```all_countries``` is a variable for our new geometry. We're adding some text at the start to define the **projection** (SRID=4326), and **geometry type** (MULTIPOLYGON); then
* iterating through all the countries to:
* remove that same text from each line for the specific country;
* add the geometry definition for that specific country as a new "polygon" in our "multipolygon" geometry held in ```all_countries```
* Create a new ```MultiPolygon``` class object from the ```all_countries``` data, and use it to define the initial data in our ```GeoForm```;
* Then we package up our ```GeoForm``` and list of ```countries``` in some context variables to send to our template!
* We've also created a second view that will handle displaying an *INDIVIDUAL* country from our data set. Managed in a similar fashion -- but we don't have to bundle a bunch of shit together.
Getting close now!
#### The URLs!
```
### webmap/urls.py
from django.urls import include, path
from . import views
urlpatterns = [
path("", views.world, name="world"),
path("c<int:country_id>/",views.country, name='maps'),
]
```
Some notes on the above:
* Make sure you import the ```include``` and ```path``` modules;
* The first entry takes us to our bastardized "all countries" display. This is directed to the ```webmap.views.world``` method we created;
* The second entry will take a variable from the hyperlink for which country to show, which is directed to the ```webmap.views.country``` method we definte above.
#### The template!
```
### webmap/templates/mapbasic.html
<html>
<link rel="stylesheet" href="https://stackpath.bootstrapcdn.com/bootstrap/4.3.1/css/bootstrap.min.css" integrity="sha384-ggOyR0iXCbMQv3Xipma34MD+dH/1fQ784/j6cY/iJTQUOhcWr7x9JvoRxT2MZw1T" crossorigin="anonymous">
<body>
<div class="container container-fluid home-block" style="max-width:1920px">
<div class="row">
<div class="col-sm-2">
<h3><center>Change Country</center></h3>
{% for country in countries %}
<ul><a class="btn btn-success btn-block" href="/maptest/c{{ country.pk }}/">{{ country.name }}</a></ul>
{% endfor %}
</div>
<div class="col-sm-10">
<div class="row">
<div class="col-sm">
<h2><center>Browsing Maps for {{ selected.name }}</center></h2>
<form method="post" enctype="multipart/form-data">
<div class="row">
{% csrf_token %}
{{ map.media }}
{{ map }}
</div>
</div>
</div>
<div class="row">
<div class="col-sm">
Choose a country on the left!
</div>
</div>
</div>
</div>
</div>
<script src="https://stackpath.bootstrapcdn.com/bootstrap/4.3.1/js/bootstrap.min.js" integrity="sha384-JjSmVgyd0p3pXB1rRibZUAYoIIy6OrQ6VrjIEaFf/nJGzIxFDsf4x0xIM+B07jRM" crossorigin="anonymous"></script>
</body>
</html>
```
A couple notes on the above:
* We're importing [Bootstrap 4](https://getbootstrap.com/docs/4.0/getting-started/introduction/) CSS and JS for our simple layout;
* We iterate through all the countries in our database, and create a link in the sidebar on the left of our page;
* We call up a ```{% csrf_token %}``` to prevent our users getting played like a bunch of chumps. Protect [yo-self](https://portswigger.net/web-security/csrf/tokens);
* We're displaying our prepopulated map
<center>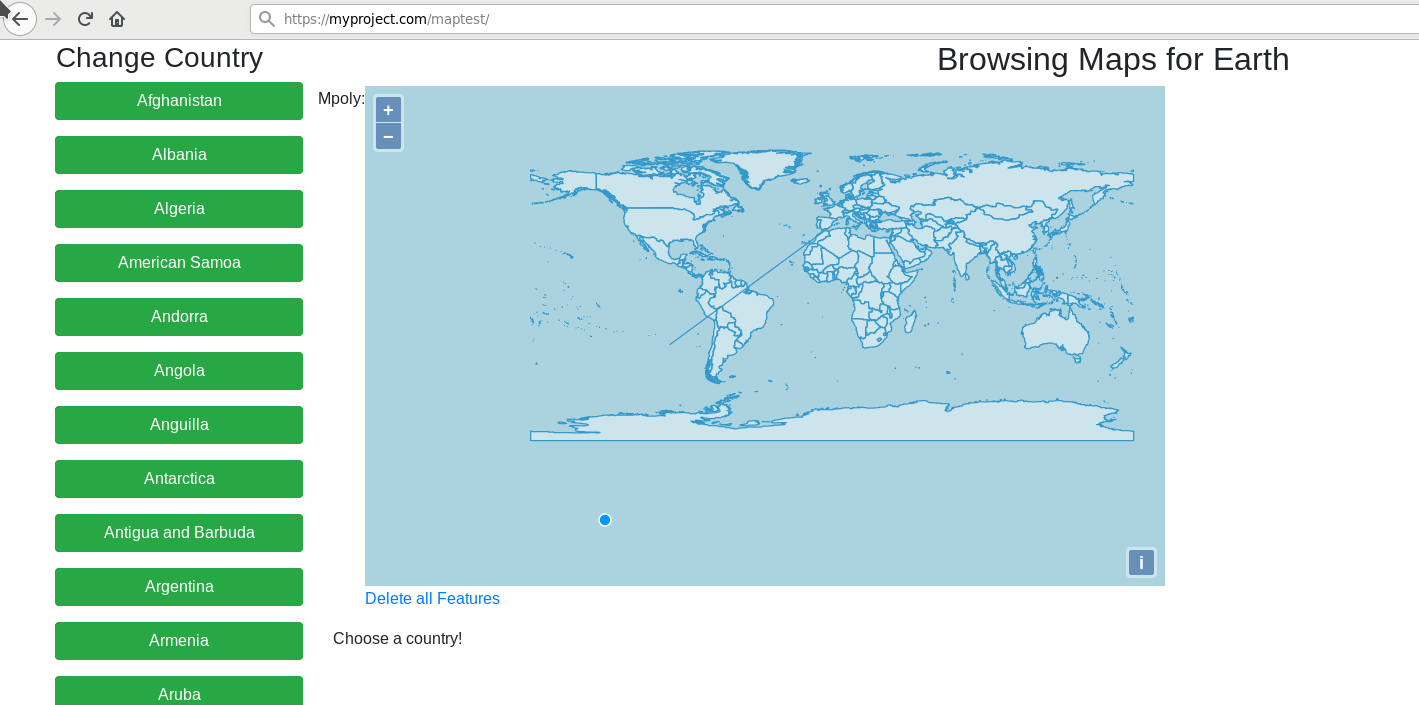</center>
<center>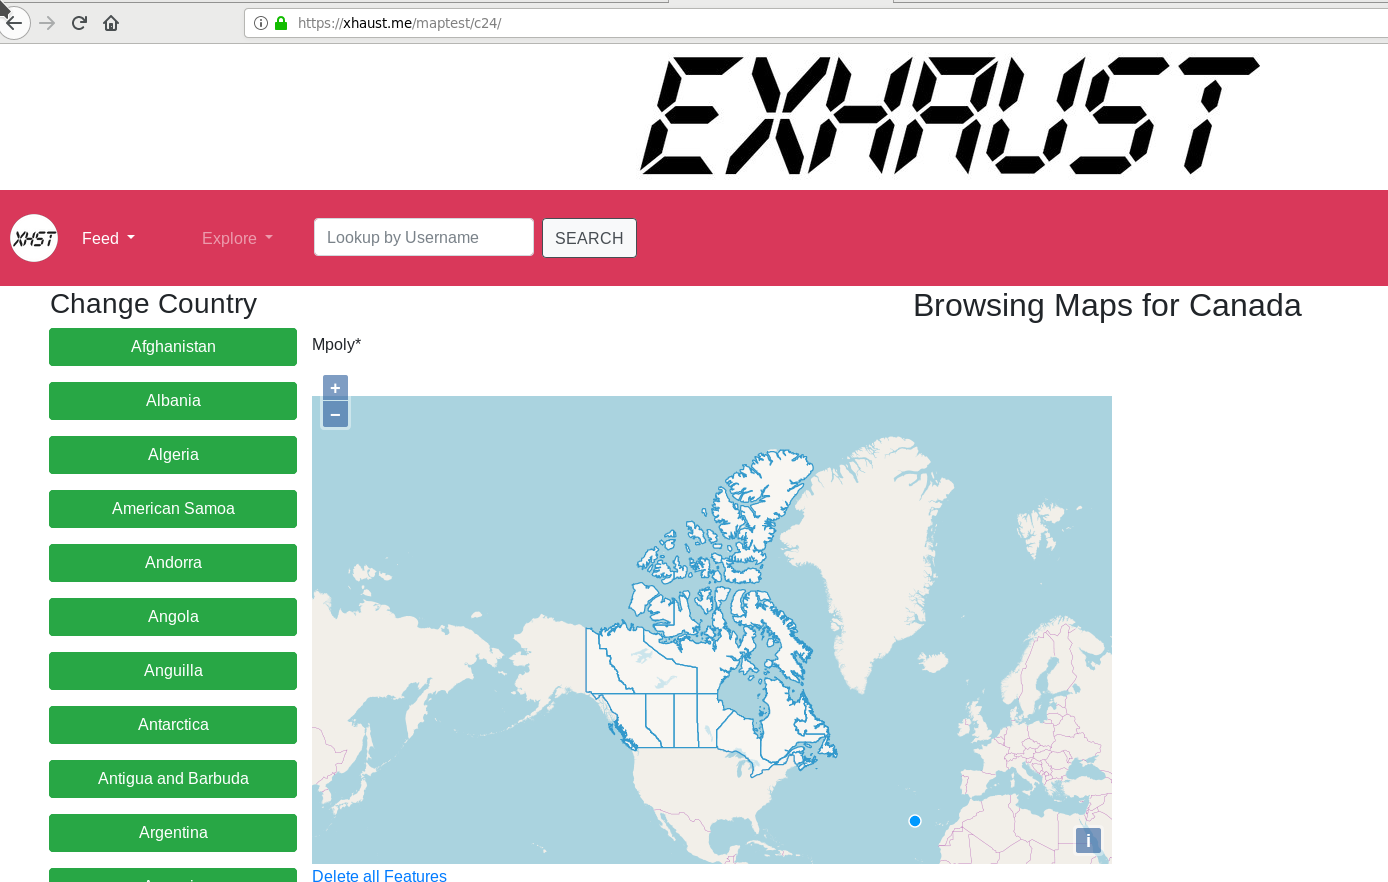</center>
<center>*Adding a bit more detail can go a long way*</center>
## Step 5 - Think about some cool stuff we could do to make this even better -- or at least, less bad:
So I was going to continue this rant / tutorial / evidence-of-my-incompetence a bit more -- but I think this is definitely long enough. I'll finish things off with a few bullet points of what I'm thinking would be a great way to expand / polish this idea. So without further ado, here are some of my thoughts:
* Utilize the [Django-Leaflet](https://github.com/makinacorpus/django-leaflet) project that others have worked on. This should improve the UX with maps;
* I'm hoping / assuming that "hyperlink clickable geometries" is something that Leaflet can achieve.
* Implement some controls so (specific) users are able to edit/create/manage geometries;
* Put in a bit more detail, and grab provinces/states/territories;
* You can see from the image above that I've already done this on my project;
* Allow users to query their data by geo area.
* Compile and save custom figures;
* Extend this and link w/ SMT / SCOT tokens so business "register" their geo-location based on said SMT / SCOT tokens;
* Extend so project users can link their profile to areas that their responsible for managing;
There's all sorts of different ways that information can be broken down and/or categorized based one geographic zones. The sky is essentialy the limit. I've got some pretty interesting plans for GIS and [EXHAUST](https://xhaust.me)! I hope you join me as we explore this path together moving forwards.
***
What do you think are some cool use cases for coupling STEEM / SCOT/ SMTs and GIS / spatial analysis? YOu've seen all these #team-canada or #team-malaysia tags floating around. Maybe this could all just be in the background, and there would be some group metrics / rewards just for being in a certain part of the world. Or maybe this would be a great way to meet new Steemians in your area. Or maybe you could sort @travelfeed curated content by areas on a map, and see reviews for different cities / countries on a map.
I'm keen to hear what you think. Let me know!