<div class="text-justify">
<div class="pull-right">

</div>
This tutorial is how to get the open source [Devuan](https://www.devuan.org) Jessie Linux distribution running on the ASUS Tinker Board.
**There is no prebuilt image for the Devuan Linux OS for the Tinker Board.** There is a Raspberry Pi 2 image that's pretty close, but it's not bootable. It's the right architecture, but the wrong boot magic/kernel, so here's a quick and dirty way to get Tinker Board Devuan Jessie up and running. Once that's done, I'll also cover adding the typical desktop components and a new user for the system.
What will I Learn?
-----------------
* How to write an embedded Linux distro to a micro SD card
* How to over write the rootfs of that distribution with a target Linux distro that doesn't yet support the Tinker Board
* How to use `gparted` to resize a file system
* How to boot strap a new kernel build for the Tinker Board
* How to finish a bare bones install of an embedded Linux distro
* How to add a new user to a system
Requirements
------------
* ASUS Tinker Board (& Keyboard, Monitor, Mouse)
* Ethernet Cable & wired internet to connect to the Tinker Board
* 2.5A Power Supply
* Linux Desktop or Laptop Computer
* Micro SD Card and Reader
Difficulty
----------
* Intermediate
Although anyone with a basic grasp of the command line system could follow this tutorial it might require lower-intermediate skill to fully grasp and understand the tools and concepts.
Overview
========
This tutorial will walk you through the steps of fetching two SD Card images of existing Linux distributions. One distribution is the Tinker OS, a custom Debian distribution, and the other is the Devuan Raspberry PI2 image. The Tinker OS image will provide the bootloader and Linux kernel that will be used to bootstrap the system. The Devuan Raspberry PI2 image will be providing the root file system which is a collection of user-land utilities (eg, not the kernel) for Linux. Putting these pieces together will work because the applications from the Raspberry PI2 are compiled for the same architecture that the Tinker Board uses, the `armhf` one. We can't simply use the Raspberry PI image on the Tinker Board because the Tinker Board uses a different bootloader (different binary blob) than the Raspberry PI.
Once these pieces have been combined, the new system will be used to install the tools needed to fetch and build a kernel for the device to use in the new operating system. Technically the existing kernel could be left in place, but for continued support and updates, the new kernel source needs to be fetched as there would be no way to patch or update the old kernel. Also, the existing kernel lacks support for various devices like some USB game controllers. By building and installing a new kernel, it becomes possible to make future updates as well as customizations.
Even though this tutorial is specific to making a Devuan Jessie SD card to run on the Tinker Board, the same concepts apply to merging any pre-built embedded boot files with any pre-built embedded rootfs. This statement will make more sense after reading the rest of the tutorial :-).
What Works:
* Everything but hardware accelerated 3D graphics :-(
Tutorial Contents
=======
Get the Devuan Rootfs
---------------------
> Do this on your desktop/laptop.
Go to [here](https://mirror.leaseweb.com/devuan/devuan_jessie/embedded/) and get the `devuan_jessie_1.0.0_armhf_raspi2.img.xz` file. Or fetch it with `wget`:
wget https://mirror.leaseweb.com/devuan/devuan_jessie/embedded/devuan_jessie_1.0.0_armhf_raspi2.img.xz
Get the Tinker Board Jessie Image
-------------------------------
> Do this on your desktop/laptop.
Go to the Tinker Board forum post with the [official images](https://tinkerboarding.co.uk/forum/thread-69.html) and download the `linaro-jessie-alip-v16.zip` file. Or fetch it with `wget`:
wget http://dlcdnet.asus.com/pub/ASUS/mb/Linux/Tinker_Board_2GB/20170330-tinker-board-linaro-jessie-alip-v16.zip
Extract the Tinker Board Jessie image over the SD card
-----------------------------------------
> Do this on your desktop/laptop.
**Be sure you are picking the correct device here or you will face potentially catastrophic data loss!**
Extract the Jessie image over the SD Card so that it creates a Tinker Board bootable SD Card. Double check that the device you are targeting is your SD Card by checking the sizes with `fdisk`. For example, I've inserted an 8GB Micro SD card into my desktop, so I look for it like this:
# fdisk -l
Disk /dev/sdc: 7.5 GiB, 8054112256 bytes, 15730688 sectors
Units: sectors of 1 * 512 = 512 bytes
Sector size (logical/physical): 512 bytes / 512 bytes
I/O size (minimum/optimal): 512 bytes / 512 bytes
Disklabel type: gpt
Disk identifier: A9C16A57-7F40-A843-B06D-3984872BE523
Device Start End Sectors Size Type
/dev/sdc1 8192 40959 32768 16M ChromeOS kernel
/dev/sdc2 40960 3543006 3502047 1.7G Microsoft basic data
In this case, there's random crap on my SD Card that I'm going to blow away, the important bits are that I know this is the card because none of my other disks are this size.
Here's how to extract the Jessie image over the SD Card, note that I'm targeting `/dev/sdc` because that's the one I saw in `fdisk` as my SD Card:
unzip 20170330-tinker-board-linaro-jessie-alip-v16.zip
dd if=20170330-tinker-board-linaro-jessie-alip-v1.6.img of=/dev/sdc
Now, to dispel the earlier hand waving when I said boot code and kernel, the boot code that the rockchip accepts resides in the beginning of the disk, before the partition. This code requires some proprietary binary blob to be present in order for the board to boot up and pass control off to the Linux kernel. The kernel itself is in the first partition of that micro SD card image as a regular file. So by copying the entire image, we get the boot code that exists before the partition, the partition with the kernel, and the partition with the Tinker OS root filesystem.
This takes a little time, both in unzipping and then again while writing to the card. When it finishes, you're left with a bootable and fully working Tinker OS. Optionally, you can make this faster and instead of doing the above, you could copy just the boot parts, but when something goes wrong, you wont have been able to test as you go along. For example, you could test this SD card to make sure you've done everything correctly by using it to boot up the Tinker Board.
> A note on terminology: The rootfs is the part of the image that contains the contents of the root filesystem, this is generally the directories and files that make up the user-land portion of the operating system.
Extract the Devuan RootFS to the SD card (over-writing the tinker rootfs)
------------------------------------------
> Do this on your desktop/laptop.
**Again, be sure you are picking the correct device here or you will face potentially catastrophic data loss!**
This command will decompress the entire Jessie Devuan image and then take just the rootfs partition and write it over the SD card.
xzcat devuan_jessie_1.0.0_armhf_raspi2.img.xz | dd skip=264192 bs=512 of=/dev/sdc2
Note the value passed to skip, that tells `dd` to skip `264192` blocks from the input before writing any input to the output file. I obtained that value by inspecting the extracted image file to simplify the tutorial steps. But for the curious, that value was obtained by looking at the partition table contained in the original `devuan_jessie_1.0.0_armhf_raspi.img`. For example:
> You don't need to run this command, I'm just illustrating where the values came from in the above command.
# fdisk -lu devuan_jessie_1.0.0_armhf_raspi.img
Disk devuan_jessie_1.0.0_armhf_raspi.img: 1.9 GiB, 1982857216 bytes, 3872768 sectors
Units: sectors of 1 * 512 = 512 bytes
Sector size (logical/physical): 512 bytes / 512 bytes
I/O size (minimum/optimal): 512 bytes / 512 bytes
Disklabel type: dos
Disk identifier: 0x47813b40
Device Boot Start End Sectors Size Id Type
devuan_jessie_1.0.0_armhf_raspi.img1 2048 264191 262144 128M c W95 FAT32 (LBA)
devuan_jessie_1.0.0_armhf_raspi.img2 264192 3872767 3608576 1.7G 83 Linux
Notice the Units is listed in terms of 512 bytes? Also notice the value of the start of the second partition? In the `dd` command above, `dd` is reading from the image file, skipping the first 264192 units, where each unit is 512 bytes, (the value for the block size or `bs` as well as the units) and writing the output to the second partition of the micro SD card.
When it completes you will be left with a bootable Devuan Jessie system for the Tinker Board. But depending on the size of the SD card, you might have a bunch of free space that's not accessible. So, consider resizing it with a tool like `gparted` before continuing.
Resize It (Optional)
-------------------------
**Again, be sure you are picking the correct device here or you will face potentially catastrophic data loss!**
If you used a larger SD Card, you might want to take the time to resize it using `gparted`. Note, the values here will look a little different. I had to recapture the screenshots and I used a different SD card in testing than what I started with. So now instead of an 8GB SD Card, my screen captures will feature a 32GB one. But the process is still the same.
Launch `gparted` on the appropriate device:
sudo gparted /dev/sdc
Right click the partition and select "Check" from the menu.
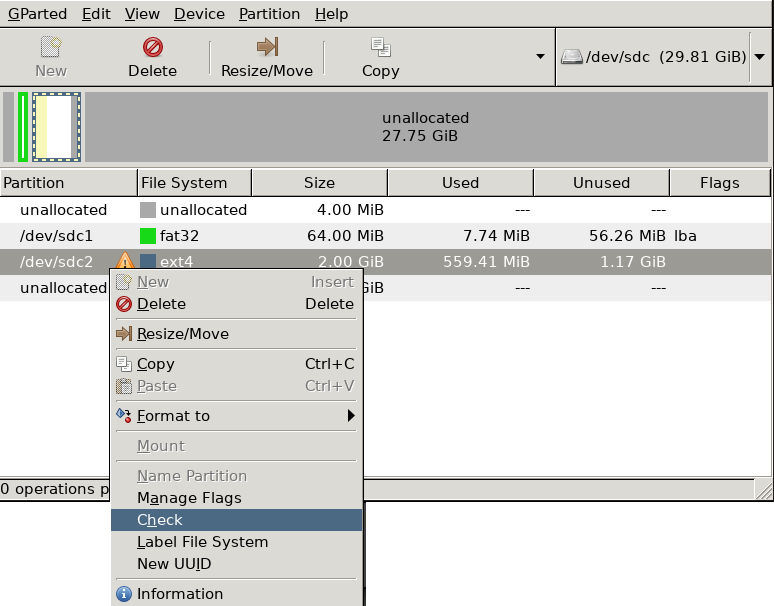
This will show a pending action in the bottom pain that might not be immediately noticeable, but it should look like the following image.
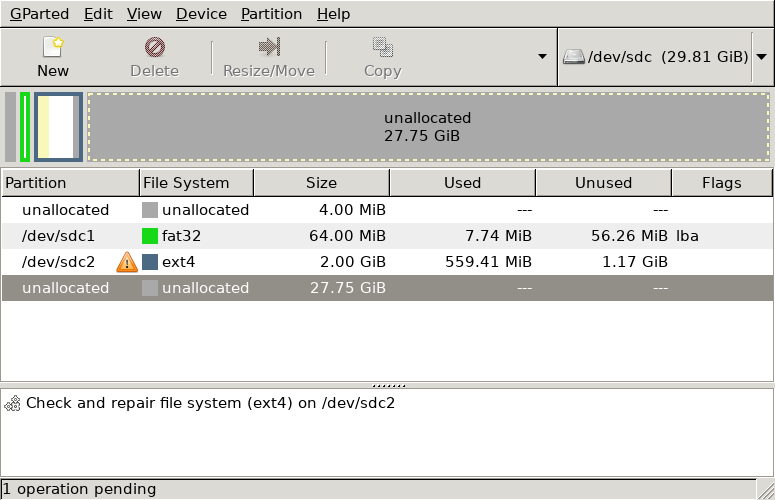
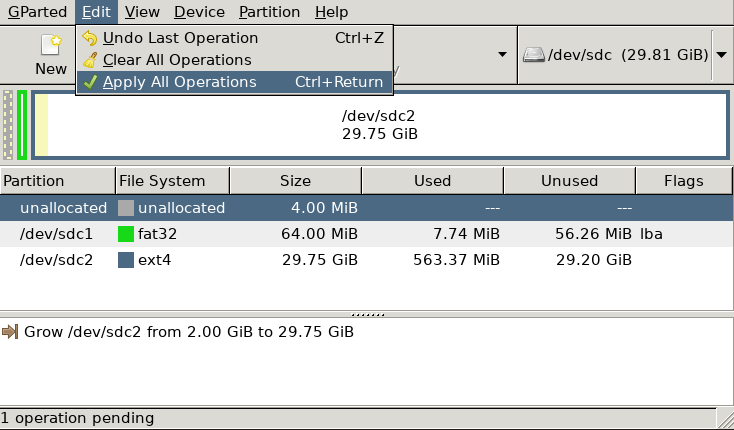
Then go to Edit and Apply all operations.
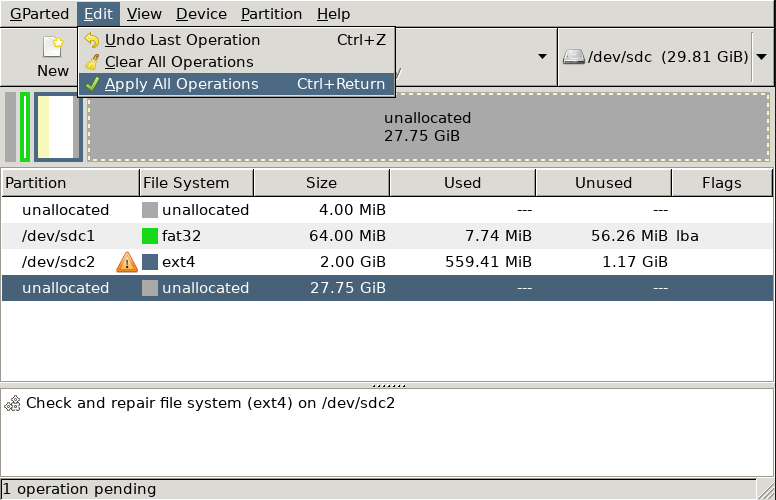
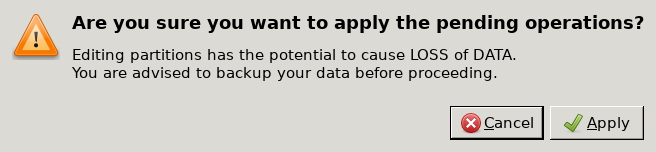
It will prompt again because the operation is potentially destructive.

Once you click Apply, a new window will take its place and display a status bar.
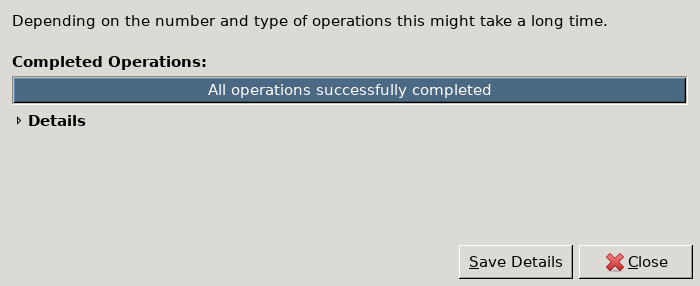
Once you dismiss the dialog, you should see 0 operations pending in the status bar.

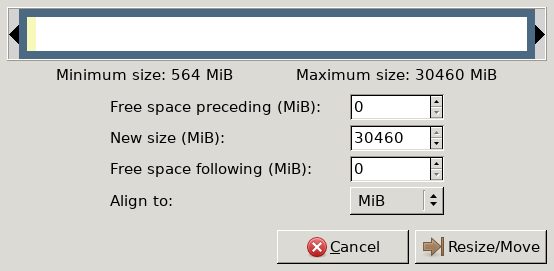
Now you can resize the partition to use the unallocated space by clicking the partition and clicking resize/move.
Click and drag the partition to resize it.
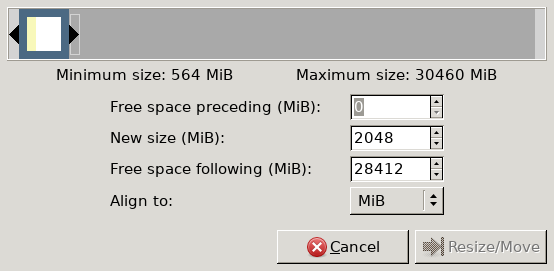
Then click Resize/Move.
Click the Edit menu and select Apply all operations.
It will prompt again because of the risk of data loss. Click apply to continue.
Once that completes, your root filesystem partition will now occupy the remaining free space. You can safely click Close and then exit Gparted.
Boot it up!
-----------
Remove the SD Card from the desktop, put it into the Tinker Board. Also connect monitor, keyboard, mouse, and wired Ethernet, and power it up. When it comes up the login name will be `root` and the password will be `toor`. If all went well, you now have a Devuan text-only Linux install on your Tinker Board. You should also have an internet connection. If you forgot to plug the cable in, you may need to run `dhclient eth0` to get an IP address.
Make sure you can update your package cache:
apt-cache update
Don't get too excited, it's lacking Wifi, Bluetooth, and a graphical user interface.
Rebuild the Kernel
-----------------
> Do this on the Tinker Board.
This is where that wired internet comes in to play, you're going to need it to fetch compilers, dependencies, and the new kernel. Technically you could do this on a desktop using cross compilers but I'm going to explain how to do it on the Tinker Board.
Install the build tools:
apt-get install build-essential python libssl-dev bc
The build-essential package contains kernels, python is needed for build scripts, and `libssl-dev` is used by some of the source being built. And `bc` is used for math, I assume by the build scripts.
Fetch the kernel:
# git clone https://github.com/TinkerBoard/debian_kernel.git -b release
Example output:
Cloning into 'debian_kernel'...
remote: Counting objects: 4811691, done.
remote: Compressing objects: 100% (31/31), done.
Receiving objects: 1% (78477/4811691), 35.55 MiB | 1.12 MiB/s
It's going to take a while to fetch the kernel. Eventually it will reach 100%
Finished output:
Cloning into 'debian_kernel'...
remote: Counting objects: 4811691, done.
remote: Compressing objects: 100% (31/31), done.
remote: Total 4811691 (delta 8), reused 12 (delta 5), pack-reused 4811655
Receiving objects: 100% (4811691/4811691), 1.09 GiB | 1.31 MiB/s, done.
Resolving deltas: 100% (3954528/3954528), done.
Checking connectivity... done.
Checking out files: 100% (62438/62438), done.
Pick the kernel config:
cd debian_kernel
make ARCH=arm miniarm-rk3288_defconfig -j4
> As this is a fork of the Linux kernel, it contains many configurations for many different kernels, by using this build profile, we can take advantage of settings that have been selected for the chip used in the Tinker Board and it will produce a `.config` file which will be used later to build the kernel.
Example output:
#
# configuration written to .config
#
Build the kernel image:
make ARCH=arm zImage -j4
> Notice that `-j4`? That tells make to do as many as four separate compile jobs at once, as this chip has four cores, it makes sense to take advantage of them and try to keep each one busy compiling the kernel.
There will be a lot of output from the compiler (CC) and linker (LD) and assembler (AS,) and other tools. Just wait for it to finish, and at the end should be content like the following:
LD vmlinux
SORTEX vmlinux
SYSMAP System.map
OBJCOPY arch/arm/boot/Image
Kernel: arch/arm/boot/Image is ready
Kernel: arch/arm/boot/Image is ready
LDS arch/arm/boot/compressed/vmlinux.lds
AS arch/arm/boot/compressed/head.o
GZIP arch/arm/boot/compressed/piggy.gzip
AS arch/arm/boot/compressed/piggy.gzip.o
CC arch/arm/boot/compressed/misc.o
CC arch/arm/boot/compressed/decompress.o
CC arch/arm/boot/compressed/string.o
SHIPPED arch/arm/boot/compressed/hyp-stub.S
AS arch/arm/boot/compressed/hyp-stub.o
SHIPPED arch/arm/boot/compressed/lib1funcs.S
AS arch/arm/boot/compressed/lib1funcs.o
SHIPPED arch/arm/boot/compressed/ashldi3.S
AS arch/arm/boot/compressed/ashldi3.o
SHIPPED arch/arm/boot/compressed/bswapsdi2.S
AS arch/arm/boot/compressed/bswapsdi2.o
LD arch/arm/boot/compressed/vmlinux
OBJCOPY arch/arm/boot/zImage
Kernel: arch/arm/boot/zImage is ready
Build the modules:
make ARCH=arm modules -j4
The modules are extra bits of kernel functionality that can be loaded at kernel run-time, as opposed to being statically compiled in.
Select the device tree binary:
make ARCH=arm rk3288-miniarm.dtb -j4
Make the device tree binary:
make ARCH=arm dtbs -j4
> The device tree contains information about the devices on the system that generally offloads board configuration tedium that would otherwise need to be built into the kernel. See [wikipedia](https://en.wikipedia.org/wiki/Device_tree) for more detail.
Back up the old boot files:
mkdir /boot/backup
cp -r /boot/* /boot/backup
> Ignore the error about not being able to copy `/boot/backup` into itself.
Copy over the new files:
cp arch/arm/boot/zImage /boot/
cp arch/arm/boot/dts/rk3288-miniarm.dtb /boot/
make ARCH=arm modules_install
Reboot it. The system should come back up to the login prompt. Login as root, password toor, and you can install the rest of the operating system.
If the kernel failed to boot, put the micro SD card in your desktop and move the contents of the boot partition (of the two it will be the FAT one) backup directory back to the root level, reboot, and retrace your kernel building steps to try again.
Finishing Touches
================
Bluetooth
---------
> Do this on the tinker board.
Bluetooth, sadly, will not work out of the box. Your system will see that it has some bluetooth hardware, but no adapters will be available. To get this working we will use a third party git repo, created by Larry Finger:
git clone https://github.com/lwfinger/rtl8723bs_bt
cd rtl8723bs_bt
make
make install
Then you can use the `start_bt.sh` script from that repo to make use of bluetooth. This could also be set to run on startup, for example, by putting the call to `start_bt.sh` in your `rc.local` file, however I've discovered the script generally doesn't work properly because it makes assumptions about where it is running and it tries to guess the device with an incorrect set of criteria, so instead, just use the `rtk_hciattach` binary provided by that repository, or better, put it in the `rc.local` file. For example::
cd rtl8723bs_bt
sed -i "s#exit 0#`pwd`/rtk_hciattach -n -s 115200 /dev/ttyS0 rtk_h5 &#" /etc/rc.local
This `sed` expressions will replace the sole `exit 0` call in the default `rc.local` with a call to load up and attach the bluetooth adapter and will make the it show up in the available list of adapters. So, when the computer boots up, it will run the following command:
rtk_hciattach -n -s 115200 /dev/ttyS0 rtk_h5
> The `rc.local` file is executed during the Linux Sys-V init boot process as a sort of catch-all for commands to run at the end of teh startup process. It's a convenient place for user-specified startup content. It's an appropriate place for the bluetooth device fixup as ideally that will be integrated into the operating system in the future and then the user can remove this hack.
A Desktop
---------
> Do this on the Tinker Board.
I'm something of a minimalist. I don't like a ton of software to be installed that I'm not going to use, so I generally install `tmux`, `irssi`, `xorg`, `slim`, `fvwm`, a terminal, `suckless-tools`, and then I'll install whatever games or software I need as time goes on. There's no single package that puts everything on the system that I use, but for the rest of the world, there are several desktop packages that can be installed to quickly bring the system up to a "usable" state. For example, there is a quick package for stuff like Gnome or Xfce. You can do the following to get a decent Xfce desktop up and running quickly:
apt-get install task-xfce-desktop
Note: if you didn't install a desktop with a suite of Bluetooth utilities, you'll need to also install `bluez` or something that provides bluetooth tools. Xfce does not provide this, so `apt-get install bluez blueman` or similar tools.
A User
------
> Do this on the Tinker Board.
You should definitely change the root password and you should add a normal user account.
To change root's password, just type `passwd` and enter a new password.
Here's an example of how to add a new user to the system:
useradd -m -s /bin/bash -G adm,audio,disk,dialout,cdrom,sudo,dip,plugdev,input not-a-bird
This will add user `not-a-bird` with a set of groups that work for most things I do, such as editing disks, having sound, and being able to `sudo`. That user (due to the `-s` flag) will have their default shell set to `/bin/bash` and their home directory will be created for them (due to the `-m` flag.) This does not, however, set the user's password, so do that with the `passwd` command, for example:
passwd not-a-bird
This will prompt to change the password for `not-a-bird` and make it possible to use that account for logging in.
Wrapping up
==========
Reboot (or just call `/etc/init.d/slim restart`) and enjoy your spiffy new Devuan system on the ASUS Tinker Board.
That tutorial took quite a bit longer than I expected to write up! But with any luck you were able to follow along and if you didn't create your own Devuan micro SD card for a Tinker Board, you know it's possible, and you also know it's possible to perform similar surgery to get an OS you like onto an SBC or ARM system that isn't explicitly supported.
References
=========
* [Building a kernel for the Tinker board](https://gist.github.com/TinkerTeam/6286550ce70d34f6b3d483cd803da786)
* [Getting BT working](https://github.com/lwfinger/rtl8723bs_bt)
* [dd man page](https://linux.die.net/man/1/dd)
* [useradd man page](https://linux.die.net/man/8/useradd)
</div>
| author | not-a-bird | ||||||
|---|---|---|---|---|---|---|---|
| permlink | how-to-boot-devuan-on-the-asus-tinker-board | ||||||
| category | utopian-io | ||||||
| json_metadata | "{"community":"utopian","app":"utopian/1.0.0","format":"markdown","repository":{"id":89454481,"name":"debian_kernel","full_name":"TinkerBoard/debian_kernel","html_url":"https://github.com/TinkerBoard/debian_kernel","fork":false,"owner":{"login":"TinkerBoard"}},"pullRequests":[],"platform":"github","type":"tutorials","tags":["utopian-io","linux","tinkerboard","devuan"],"links":["https://steemitimages.com/DQmaCAsDYDnHNrBye6fY87seYdGWLLuPGbq2kovU2pfZEoh/slim-0.png","https://www.devuan.org","https://mirror.leaseweb.com/devuan/devuan_jessie/embedded/","https://tinkerboarding.co.uk/forum/thread-69.html","https://steemitimages.com/DQmV5wCcPNRAutUuvjKkCJNXMiBP2CYDyHYnnq3PxWU5LxL/01_check.png","https://steemitimages.com/DQmZpApiuXHd9X8N9uSMqL4kguNFXt25hAY3uxdmNtmbVpB/02_check.png","https://steemitimages.com/DQmV7t3pQYHXFwfLRrMQnRNTpkyAqKYkRJPbpFq8FDsyLjc/03_apply.png","https://steemitimages.com/DQmQQ8wfHDofMpumQMPqyJVnUBhz8hhnHPL38CH28WtgPyx/04_sure_apply.png","https://steemitimages.com/DQme4aN9h2vLfZV7bpEr4a5V7fABESfFBqMriKAskmCVaZL/05_success.png","https://steemitimages.com/DQmVkzX6PtuVa1uwZSssL7V6G1uiiVXKFp3j37hz14ENqPD/06_done.png","https://steemitimages.com/DQmfLRykTN9tCnGb34cpHeHUczvt1UoNVUq2mPYHBJqMrdu/01_resize.png","https://steemitimages.com/DQmZKMGk1j3GRJmoe7s1ackbLQB1i91XNzxhL3uY1YVt1hM/02_resize.png","https://steemitimages.com/DQmQGTiEg1dnFguye654tXB1MuZqU7rRinxVVm34EC71Fua/03_apply_resize_k.png","https://steemitimages.com/DQmQQ8wfHDofMpumQMPqyJVnUBhz8hhnHPL38CH28WtgPyx/10_apply.png","https://en.wikipedia.org/wiki/Device_tree","https://steemitimages.com/DQmb7dGv4BHSSTB3ZyRnsoiNedYmguJqb8FpHATtGzh8zd8/screenshot-0.png","https://gist.github.com/TinkerTeam/6286550ce70d34f6b3d483cd803da786","https://github.com/lwfinger/rtl8723bs_bt","https://linux.die.net/man/1/dd","https://linux.die.net/man/8/useradd"],"image":["https://steemitimages.com/DQmaCAsDYDnHNrBye6fY87seYdGWLLuPGbq2kovU2pfZEoh/slim-0.png","https://steemitimages.com/DQmV5wCcPNRAutUuvjKkCJNXMiBP2CYDyHYnnq3PxWU5LxL/01_check.png","https://steemitimages.com/DQmZpApiuXHd9X8N9uSMqL4kguNFXt25hAY3uxdmNtmbVpB/02_check.png","https://steemitimages.com/DQmV7t3pQYHXFwfLRrMQnRNTpkyAqKYkRJPbpFq8FDsyLjc/03_apply.png","https://steemitimages.com/DQmQQ8wfHDofMpumQMPqyJVnUBhz8hhnHPL38CH28WtgPyx/04_sure_apply.png","https://steemitimages.com/DQme4aN9h2vLfZV7bpEr4a5V7fABESfFBqMriKAskmCVaZL/05_success.png","https://steemitimages.com/DQmVkzX6PtuVa1uwZSssL7V6G1uiiVXKFp3j37hz14ENqPD/06_done.png","https://steemitimages.com/DQmfLRykTN9tCnGb34cpHeHUczvt1UoNVUq2mPYHBJqMrdu/01_resize.png","https://steemitimages.com/DQmZKMGk1j3GRJmoe7s1ackbLQB1i91XNzxhL3uY1YVt1hM/02_resize.png","https://steemitimages.com/DQmQGTiEg1dnFguye654tXB1MuZqU7rRinxVVm34EC71Fua/03_apply_resize_k.png","https://steemitimages.com/DQmQQ8wfHDofMpumQMPqyJVnUBhz8hhnHPL38CH28WtgPyx/10_apply.png","https://steemitimages.com/DQmb7dGv4BHSSTB3ZyRnsoiNedYmguJqb8FpHATtGzh8zd8/screenshot-0.png"],"moderator":{"account":"roj","time":"2018-03-25T07:26:05.593Z","flagged":false,"reviewed":true,"pending":false},"questions":[{"question":"Is the project description formal?","answers":[{"value":"Yes it’s straight to the point","selected":true,"score":10},{"value":"Need more description ","selected":false,"score":5},{"value":"Not too descriptive","selected":false,"score":0}],"selected":0},{"question":"Is the language / grammar correct?","answers":[{"value":"Yes","selected":true,"score":20},{"value":"A few mistakes","selected":false,"score":10},{"value":"It's pretty bad","selected":false,"score":0}],"selected":0},{"question":"Was the template followed?","answers":[{"value":"Yes","selected":true,"score":10},{"value":"Partially","selected":false,"score":5},{"value":"No","selected":false,"score":0}],"selected":0},{"question":"Is there information about the additional frameworks?","answers":[{"value":"Yes, everything is explained","selected":false,"score":5},{"value":"Yes, but not enough","selected":false,"score":3},{"value":"No details at all","selected":true,"score":0}],"selected":2},{"question":"Is there code in the tutorial?","answers":[{"value":"Yes, and it’s well explained","selected":false,"score":5},{"value":"Yes, but no explanation","selected":false,"score":3},{"value":"No","selected":true,"score":0}],"selected":2},{"question":"Is the tutorial explains technical aspects well enough?","answers":[{"value":"Yes, it teaches how and why about technical aspects","selected":true,"score":5},{"value":"Yes, but it’s not good/enough","selected":false,"score":3},{"value":"No, it explains poorly","selected":false,"score":0}],"selected":0},{"question":"Is the tutorial general and dense enough?","answers":[{"value":"Yes, it’s general and dense","selected":true,"score":5},{"value":"Kinda, it might be more generalized","selected":false,"score":3},{"value":"No, it’s sliced unnecessarily to keep part number high","selected":false,"score":0}],"selected":0},{"question":"Is there an outline for the tutorial content at the beginning of the post","answers":[{"value":"Yes, there is a well prepared outline in “What will I learn?” or another outline section","selected":true,"score":5},{"value":"Yes, but there is no proper listing for every step of the tutorial or it’s not detailed enough","selected":false,"score":3},{"value":"No, there is no outline for the steps.","selected":false,"score":0}],"selected":0},{"question":"Is the visual content of good quality?","answers":[{"value":"Yes","selected":false,"score":5},{"value":"Yes, but bad quality","selected":true,"score":3},{"value":"No","selected":false,"score":0}],"selected":1},{"question":"Is this a tutorial series?","answers":[{"value":"Yes","selected":false,"score":5},{"value":"Yes, but first part","selected":false,"score":3},{"value":"No","selected":true,"score":0}],"selected":2},{"question":"Is the tutorial post structured?","answers":[{"value":"Yes","selected":true,"score":5},{"value":"Not so good","selected":false,"score":3},{"value":"No","selected":false,"score":0}],"selected":0}],"score":60}" | ||||||
| created | 2018-03-24 05:21:33 | ||||||
| last_update | 2018-03-25 12:31:30 | ||||||
| depth | 0 | ||||||
| children | 3 | ||||||
| last_payout | 2018-03-31 05:21:33 | ||||||
| cashout_time | 1969-12-31 23:59:59 | ||||||
| total_payout_value | 37.755 HBD | ||||||
| curator_payout_value | 15.954 HBD | ||||||
| pending_payout_value | 0.000 HBD | ||||||
| promoted | 0.000 HBD | ||||||
| body_length | 21,582 | ||||||
| author_reputation | 4,828,771,219,503 | ||||||
| root_title | "How to Boot Devuan on the ASUS Tinker Board" | ||||||
| beneficiaries |
| ||||||
| max_accepted_payout | 1,000,000.000 HBD | ||||||
| percent_hbd | 10,000 | ||||||
| post_id | 46,273,507 | ||||||
| net_rshares | 23,544,346,534,670 | ||||||
| author_curate_reward | "" |
| voter | weight | wgt% | rshares | pct | time |
|---|---|---|---|---|---|
| acidyo | 0 | 1,700,227,869,882 | 12% | ||
| ubg | 0 | 204,938,046 | 1% | ||
| terrycraft | 0 | 14,187,039,715 | 30% | ||
| shadowspub | 0 | 335,649,457 | 0.11% | ||
| oleg326756 | 0 | 204,848,533 | 0.22% | ||
| anomadsoul | 0 | 1,866,956,272,942 | 20% | ||
| scrooger | 0 | 273,682,221 | 0.16% | ||
| mk40 | 0 | 16,769,783,627 | 20% | ||
| elteamgordo | 0 | 20,918,805,595 | 52% | ||
| sensation | 0 | 290,668,640 | 100% | ||
| m31 | 0 | 50,800,092,672 | 35% | ||
| saywha | 0 | 73,153,258,474 | 100% | ||
| ocd | 0 | 631,465,614,040 | 50% | ||
| carlgnash | 0 | 39,107,848,557 | 50% | ||
| theleapingkoala | 0 | 131,196,299 | 0.27% | ||
| samiwhyte | 0 | 53,540,344 | 0.11% | ||
| fishyculture | 0 | 405,102,569 | 1% | ||
| superdavey | 0 | 52,964,965 | 0.02% | ||
| qurator | 0 | 45,323,536,951 | 1.1% | ||
| turtlegurl | 0 | 575,362,486 | 100% | ||
| fknmayhem | 0 | 6,826,467,109 | 50% | ||
| utopian-io | 0 | 18,965,038,322,825 | 11.8% | ||
| evilest-fiend | 0 | 2,413,394,731 | 100% | ||
| azwarrangkuti | 0 | 10,306,207,831 | 25% | ||
| skycae | 0 | 141,587,983 | 0.03% | ||
| zapncrap | 0 | 13,419,644,172 | 50% | ||
| coffeesource.net | 0 | 9,301,465,455 | 100% | ||
| birdland | 0 | 1,248,218,851 | 100% | ||
| geekpowered | 0 | 21,767,156,658 | 100% | ||
| lextenebris | 0 | 28,676,294,233 | 100% | ||
| steembasicincome | 0 | 15,865,599,943 | 4% | ||
| not-a-cat | 0 | 1,031,829,957 | 100% | ||
| bobsthinking | 0 | 2,027,565,110 | 100% | ||
| peppermint24 | 0 | 50,605,785 | 0.05% | ||
| saryn | 0 | 2,121,876,836 | 100% | ||
| energyaddict22 | 0 | 136,231,762 | 0.33% | ||
| kitablempap | 0 | 643,309,408 | 100% | ||
| farisi | 0 | 901,480,069 | 100% | ||
| ahnaf2143 | 0 | 0 | 100% | ||
| hackerzizon | 0 | 285,854,679 | 1% | ||
| xymaros | 0 | 58,339,427 | 40% | ||
| onderakcaalan | 0 | 647,005,831 | 100% |
**The contribution is approved after the suggested changes are made.**

---

>Your contribution cannot be approved because it does not follow the [Utopian Rules](https://utopian.io/rules).

>**Related Rule:**
>- Only contributions made to open source projects with a GitHub repository can be approved.

>**Clarifications and Suggestions:**
>- The linked repository is not the actual repository for Devuan, instead it's a repository of jenkins scripts for Debian packages.
>- I couldn't find any proper GitHub repository for the project itself, if you can, contact me on Utopian Discord server.

You can contact us on [Discord](https://discord.gg/uTyJkNm).
**[[utopian-moderator]](https://utopian.io/moderators)**
| author | roj |
|---|---|
| permlink | re-not-a-bird-how-to-boot-devuan-on-the-asus-tinker-board-20180324t162823492z |
| category | utopian-io |
| json_metadata | {"tags":["utopian-io"],"community":"utopian","app":"utopian/1.0.0"} |
| created | 2018-03-24 16:28:24 |
| last_update | 2018-03-25 07:32:33 |
| depth | 1 |
| children | 1 |
| last_payout | 2018-03-31 16:28:24 |
| cashout_time | 1969-12-31 23:59:59 |
| total_payout_value | 0.762 HBD |
| curator_payout_value | 0.254 HBD |
| pending_payout_value | 0.000 HBD |
| promoted | 0.000 HBD |
| body_length | 713 |
| author_reputation | 12,636,295,215,793 |
| root_title | "How to Boot Devuan on the ASUS Tinker Board" |
| beneficiaries | [] |
| max_accepted_payout | 1,000,000.000 HBD |
| percent_hbd | 10,000 |
| post_id | 46,357,562 |
| net_rshares | 372,831,893,013 |
| author_curate_reward | "" |
| voter | weight | wgt% | rshares | pct | time |
|---|---|---|---|---|---|
| utopian.tip | 0 | 372,831,893,013 | 33.33% |
Hey @roj, I just gave you a tip for your hard work on moderation. Upvote this comment to support the utopian moderators and increase your future rewards!
| author | utopian.tip |
|---|---|
| permlink | re-re-not-a-bird-how-to-boot-devuan-on-the-asus-tinker-board-20180324t162823492z-20180324t192727 |
| category | utopian-io |
| json_metadata | "" |
| created | 2018-03-24 19:27:27 |
| last_update | 2018-03-24 19:27:27 |
| depth | 2 |
| children | 0 |
| last_payout | 2018-03-31 19:27:27 |
| cashout_time | 1969-12-31 23:59:59 |
| total_payout_value | 0.000 HBD |
| curator_payout_value | 0.000 HBD |
| pending_payout_value | 0.000 HBD |
| promoted | 0.000 HBD |
| body_length | 153 |
| author_reputation | 238,310,597,885 |
| root_title | "How to Boot Devuan on the ASUS Tinker Board" |
| beneficiaries | [] |
| max_accepted_payout | 1,000,000.000 HBD |
| percent_hbd | 10,000 |
| post_id | 46,382,605 |
| net_rshares | 1,793,923,462 |
| author_curate_reward | "" |
| voter | weight | wgt% | rshares | pct | time |
|---|---|---|---|---|---|
| roj | 0 | 1,793,923,462 | 100% |
### Hey @not-a-bird I am @utopian-io. I have just upvoted you! #### Achievements - You have less than 500 followers. Just gave you a gift to help you succeed! - Seems like you contribute quite often. AMAZING! #### Community-Driven Witness! I am the first and only Steem Community-Driven Witness. <a href="https://discord.gg/zTrEMqB">Participate on Discord</a>. Lets GROW TOGETHER! - <a href="https://v2.steemconnect.com/sign/account-witness-vote?witness=utopian-io&approve=1">Vote for my Witness With SteemConnect</a> - <a href="https://v2.steemconnect.com/sign/account-witness-proxy?proxy=utopian-io&approve=1">Proxy vote to Utopian Witness with SteemConnect</a> - Or vote/proxy on <a href="https://steemit.com/~witnesses">Steemit Witnesses</a> [](https://steemit.com/~witnesses) **Up-vote this comment to grow my power and help Open Source contributions like this one. Want to chat? Join me on Discord https://discord.gg/Pc8HG9x**
| author | utopian-io |
|---|---|
| permlink | re-not-a-bird-how-to-boot-devuan-on-the-asus-tinker-board-20180325t143351860z |
| category | utopian-io |
| json_metadata | {"tags":["utopian-io"],"community":"utopian","app":"utopian/1.0.0"} |
| created | 2018-03-25 14:33:51 |
| last_update | 2018-03-25 14:33:51 |
| depth | 1 |
| children | 0 |
| last_payout | 2018-04-01 14:33:51 |
| cashout_time | 1969-12-31 23:59:59 |
| total_payout_value | 0.000 HBD |
| curator_payout_value | 0.000 HBD |
| pending_payout_value | 0.000 HBD |
| promoted | 0.000 HBD |
| body_length | 1,086 |
| author_reputation | 152,955,367,999,756 |
| root_title | "How to Boot Devuan on the ASUS Tinker Board" |
| beneficiaries | [] |
| max_accepted_payout | 1,000,000.000 HBD |
| percent_hbd | 10,000 |
| post_id | 46,513,679 |
| net_rshares | 0 |