# Repository
<a href="https://github.com/premasagar/pablo">PabloJs</a>
<a href="https://github.com/onepicesteem"> My GitHub Profile</a>
<a href="https://github.com/onepicesteem/Making-Snake-Game-Using-HTML-5-SVG-With-PabloJs-Part-1">Making Snake Game Using HTML 5 SVG With PabloJs (Part-1)</a>
# What Will I Learn?
- You will learn how to build games using `HTML5 SVG`.
- You will learn to create svg objects more easily using `Pablojs`.
- You will learn `rect()` function with `stroke` in Pablojs.
- You will learn `parseInt()` function in javascript.
- You will learn `setInterval()` in javascript.
- You will learn `Math.floor()` and `Math.random` functions in javascript.
- You will learn how to assign elements when creating an array.
- You will learn `push()` and `shift()` functions to array.
# Requirements
<a href="https://github.com/Microsoft/vscode">Visual Studio Code in GitHub</a>
# Difficulty
- Basic
# Tutorial Contents
Hello to everyone!
We are starting a new game coding with this article. I will show you how to encode the snake game together with this article.
I'll create a snake that moves around constantly. This snake will consist of small rectangles. When creating rectangles, we will use `rect()` function in `pablojs`. I also will show how to use `stroke` to determine the boundaries of the rectangle.
In this article:
- I will form the snake.
- I'll move the snake.
- I will change the direction of the snake.
Let’s start
First create the `index.html` page and set the playing field.
```
<!DOCTYPE html>
<html lang="en">
<head>
<meta charset="UTF-8">
<meta name="viewport" content="width=device-width, initial-scale=1.0">
<meta http-equiv="X-UA-Compatible" content="ie=edge">
<!--include bootstrap-->
<link href="bootstrap.css" rel="stylesheet">
<!--include jquery-->
<script src="./jquery.js"></script>
<!--include pablo.js-->
<script src="./pablo.js"></script>
<!--include custom script file-->
<script src="script.js"></script>
<style>
#ground {
height: 700px;
width:1100px;
border: 1px solid #060;
background-color: #ECF0F1;
}
</style>
<title>Snake Game</title>
</head>
<body>
<div class="container">
<div class="jumbotron text-primary"><h1>Snake GAME</h1></div>
<div id="ground">
</div>
</div>
</body>
</html>
```
<br>
I need to have the `Bootstrap`, `Jquery` and `pablojs` libraries in the file directory and create the `script.js` file and define the `svg` object use pablojs.
```
var svg = Pablo('#ground').svg({ //create svg with height and width
width: 1100,
height: 700
});
```
<br>
### Snake Creation
I will perform the creation of a snake in a function.
Snake will consist of rectangles so I need to know how many rectangles.
Since these rectangles are linked to each other, if I know the x and y coordinates of one, I can create the x and y coordinates of the others.
I will transfer these rectangles to an array so it will be easier to access the nodes of the snake.
Let's create this function.
```
//create snake
function snakeBuilder(node,x,y){
}
```
<br>
This function take 3 parameters. With the `node` parameter we determine how many nodes in the snake and with the `x` and `y` parameters we determine the x and y coordinates of the first node.
I will set the width and height of the rectangles to the `nodeSize` variable so the height and width will be equal.
To determine the borders of the rectangle, I will use `stroke` in the `rect()` function.
With `stroke`, we adjust the edge color.
With `stroke-width` feature, we adjust the thickness of the edge.
I adjust the roundness of the edge with `stroke-linejoin`.
Lastly I will transfer the rectangle created to `arrayNode` array.
```
var arrayNode=new Array();
var nodeSize=15;
```
<br>
Let's turn in a loop according to the number of nodes and create the rectangle.
```
function snakeBuilder(node,x,y){
for (var i = 0; i < node; i++) {
var snakeNode=svg.rect({
x:x, y:y,
width:nodeSize, height:nodeSize,
fill:'#eb4d4b',
stroke:'#006',
'stroke-width': 2,
'stroke-linejoin': 'round'
});
x=x+nodeSize;
arrayNode.push(snakeNode);//add node
}
}
```
<br>
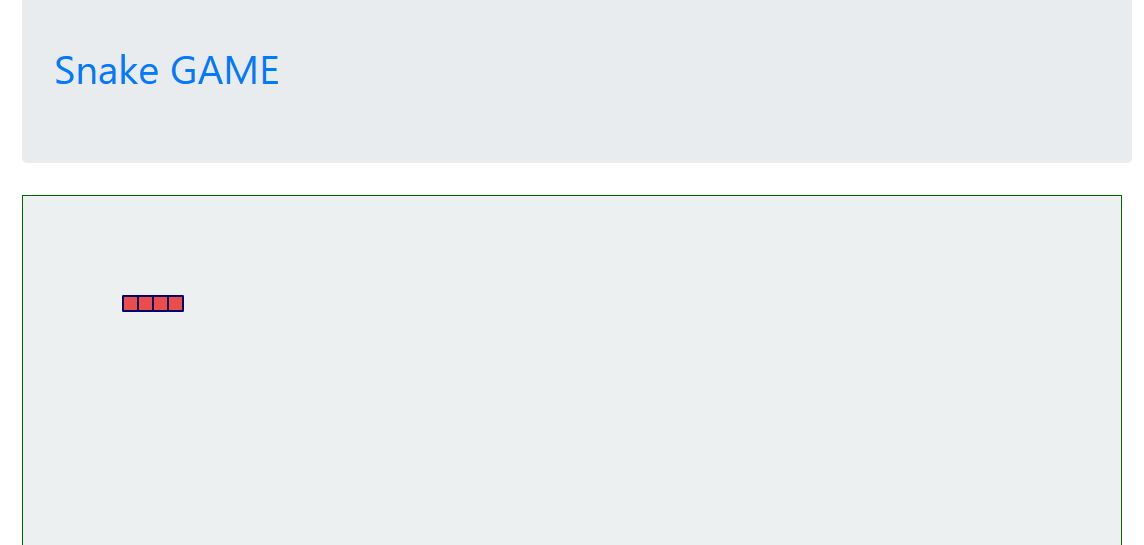
Now we can create our snake by using this function.
Let's draw the snake on the `4-node` and `x = 100` and `y = 100` points of the starting node.
```
snakeBuilder(4,100,100);//draw snake
```
<br>
#### Screenshot 1
<br>
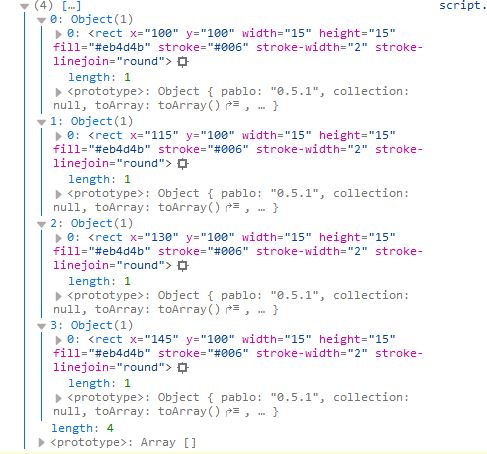
If we want to examine the `arrayNode` array, we can print in console.
```
console.log(arrayNode);
```
<br>
#### Screenshot 2
<br>
So that the first node was the leftmost node of the snake.
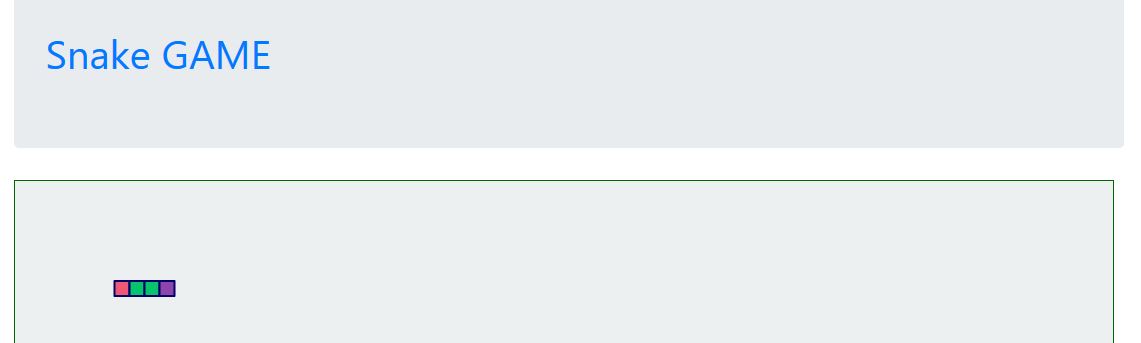
The color of the snake will always remain constant when it moves and grows. If we want the snake nodes to change continuously, we can use a array of multiple colors.
The color of our snake changes continuously if we set a random color in this array to the new node to be inserted into the movement of the snake.
I'm going to create an array and I'll define the elements of this array when I'm creating the array.
```
var arrayColor=new Array("#ef5777","#ffc048","#575fcf","#05c46b","#8e44ad");
var colorIndex=0;
```
<br>
Let's set the `colorIndex` variable randomly and create the `fill` property from the `arrayColor` array in the rect () method.
```
var colorIndex=Math.floor(Math.random() * 5);// A random number between 0 and 5
var snakeNode=svg.rect({
x:x, y:y,
width:nodeSize, height:nodeSize,
fill:arrayColor[colorIndex],
stroke:'#006',
'stroke-width': 2,
'stroke-linejoin': 'round'
});
```
<br>
The game will consist of a snake that changes colors when refresh.
#### Screenshot 3
<br>
### Snake Movement
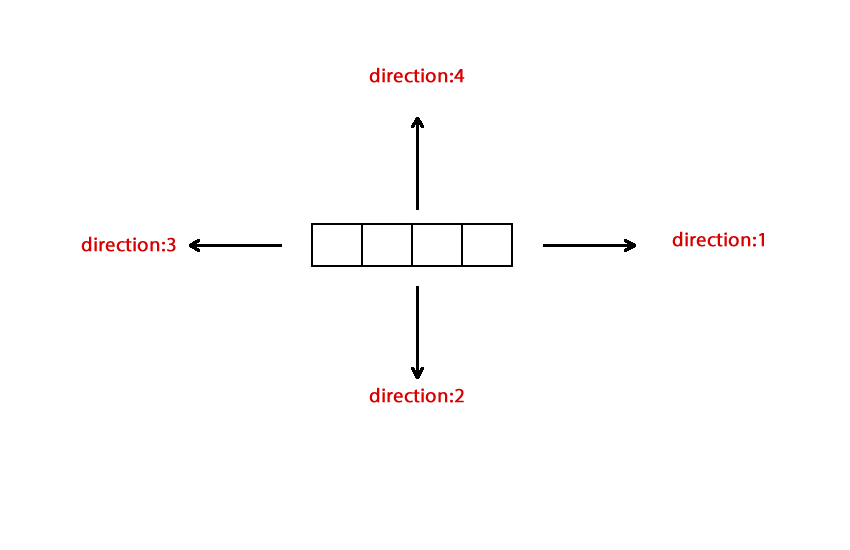
To move the snake, delete the first element of the array and add a new element.
We must first determine the directions. The following figure defines the values for the directions.
#### Screenshot 4
<br>
When the `direction` value is `1` and `3`, the snake is moving on the `x-axis` and when the `direction` value is `2` and `4`, the snake is moving on the `y-axis`.
We need to scroll through the nodeSize amount when creating the next rectangle. By doing so, we move the snake within `15` and its multiples.
Then create a function to provide movement and move the coordinates of the last element of the `arrayNode` array by `direction`.
```
var direction=1;
function snakeMove(){
var x;
var y;
x=arrayNode[arrayNode.length-1].attr('x');//access to the x property of the last rectangle of the array
y=arrayNode[arrayNode.length-1].attr('y');//access to the y property of the last rectangle of the array
if(direction==1){
x=parseInt(x)+nodeSize;//Move on the + X axis
}
if(direction==2){
y=parseInt(y)+nodeSize;//Move on the +Y axis
}
if(direction==3){
x=parseInt(x)-nodeSize;//Move on the - X axis
}
if(direction==4){
y=parseInt(y)-nodeSize;//Move on the - Y axis
}
}
```
<br>
Since x and y variables are created in the function, they can be used within this function. These variables are not numbers because they have the x and y points of the svg object. These values must be integers because we move or subtract to move the x and y axes. With `parseInt()` method, we can create integer value.
Let's create the colorIndex value randomly and create the new rectangle.
```
var colorIndex=Math.floor(Math.random() * 5);
var snakeNode=svg.rect({
x:x, y:y,
width:nodeSize, height:nodeSize,
fill: arrayColor[colorIndex],
stroke:'#006',
'stroke-width': 2,
'stroke-linejoin': 'round'
});
```
<br>
We must remove the rectangle from the first element of the array and remove it from the array to ensure the movement property.
To delete svg elements, we use the `remove()` method and we use the `shift()` method to discard the first element of the array.
If we delete the first element by using the `shift()` method, the index of all elements will be changed and the first element will be the second element before it is deleted.
Let's delete the first element and add the newly created rect element to the end of the array.
We use the `push()` method to add elements to the end of an array.
```
arrayNode[0].remove();//remove first svg element
arrayNode.shift();//delete first element in array
arrayNode.push(snakeNode);//add last element
```
<br>
We have completed the function now we can use.
This function must be run at certain time intervals since the snake will move continuously. The function `setInterval()` used to run certain functions at certain time intervals in javascript.
Let's create a variable to set the speed of the snake and use the `setInterval()`.
```
var speed=200;
setInterval(function(){
snakeMove();
}, speed);
```
<br>
Now the `snakeMove()` function will work one in `200 milliseconds`.
If `direction=1`
#### Screenshot 5
<br>
If `direction=2`
#### Screenshot 6
<br>
If `direction=3`
#### Screenshot 7
<br>
If `direction=4`
#### Screenshot 8
<br>
### Change the Direction
I'll use the direction keys on the keyboard to change the direction of the snake.
We can use the `keydown()` method to capture keyboard events with Jquery. When `keydown()` is executed, the keys on the keyboard have a code and we can capture the code of that key if the key is pressed. These codes can be reached with `event.which`.
```
$(document).keydown(function(event){
//37 = left - 38 = up - 39 = right - 40 = down
var code = event.which;
});
```
<br>
We do not want to turn in the opposite direction of the snake. Then we have to do the control.
For example; The snake should not go to 3 directions as it moves in direction 1 and should return to 4 and 2 directions only.
```
$(document).keydown(function(event){
//37 left - 38 up - 39 right - 40 down
var code = event.which;
if(direction==1||direction==3){
if(code==38) direction=4;
if(code==40) direction=2;
}
if(direction==2||direction==4){
if(code==39) direction=1;
if(code==37) direction=3;
}
});
```
<br>
Now we can move the snake with the keyboard.
#### Screenshot 9
<br>
# Proof of Work Done
<a href="https://github.com/onepicesteem/Making-Snake-Game-Using-HTML-5-SVG-With-PabloJs-Part-1">Making Snake Game Using HTML 5 SVG With PabloJs (Part-1)</a>| author | onepice |
|---|---|
| permlink | making-snake-game-using-html-5-svg-with-pablojs-part-1 |
| category | utopian-io |
| json_metadata | {"tags":["utopian-io","tutorials","jquery","pablojs","make-game"],"image":["https://cdn.steemitimages.com/DQmceiiEouD7HfEHGxt1cvHEKShWRYPJTNAeGiPvS8ZppZA/Untitled-1.fw.png","https://cdn.steemitimages.com/DQmdjs1JuEy48xmi6f6scoGLQoE3RJTppqLfHZ6rAsdPicu/jquery1.JPG","https://cdn.steemitimages.com/DQmYF3mda3ALXDZpur68xaYACqqEQtJ13Gd8jZBME5yyVgH/jquery2.JPG","https://cdn.steemitimages.com/DQmUAbP5zKnbfGQMNjEzK4hmpdkR8ktvVnwJo4G3owRTedB/jquery3.JPG","https://cdn.steemitimages.com/DQmWnehHW99Je82VodKTnTKToxJosUieMTShjkG1fri3jmg/aaaa.png","https://cdn.steemitimages.com/DQmZ4LLmuiLXrP13ULq9k4QbVeixeEkLdMdA723qLKjJNTm/ezgif1.gif","https://cdn.steemitimages.com/DQmZ6cNwApKh5oWNpC7LsntqDnXjucr6888DdMecBG8Ry2U/ezgif2.gif","https://cdn.steemitimages.com/DQmeKHxrNYuSfwEpHHxbZnKPFDMLgcHsw4AR7VqHQyHSf8P/ezgif3.gif","https://cdn.steemitimages.com/DQmbwT1XYPmDeXUGQzJuoMEhpZ4tX7yKEQW4Z4kaDQPd1CE/ezgif4.gif","https://cdn.steemitimages.com/DQmdmaVT4yapNEq863aZsyk3sVdDsbafWufUFTx6GcaXhXh/ezgif5.gif"],"links":["https://github.com/premasagar/pablo","https://github.com/onepicesteem","https://github.com/onepicesteem/Making-Snake-Game-Using-HTML-5-SVG-With-PabloJs-Part-1","https://github.com/Microsoft/vscode"],"app":"steemit/0.1","format":"markdown"} |
| created | 2018-09-25 11:35:54 |
| last_update | 2018-09-25 11:35:54 |
| depth | 0 |
| children | 4 |
| last_payout | 2018-10-02 11:35:54 |
| cashout_time | 1969-12-31 23:59:59 |
| total_payout_value | 26.082 HBD |
| curator_payout_value | 8.389 HBD |
| pending_payout_value | 0.000 HBD |
| promoted | 0.000 HBD |
| body_length | 11,440 |
| author_reputation | 9,626,549,398,383 |
| root_title | "Making Snake Game Using HTML 5 SVG With PabloJs (Part-1)" |
| beneficiaries | [] |
| max_accepted_payout | 1,000,000.000 HBD |
| percent_hbd | 10,000 |
| post_id | 72,220,845 |
| net_rshares | 24,568,773,749,921 |
| author_curate_reward | "" |
| voter | weight | wgt% | rshares | pct | time |
|---|---|---|---|---|---|
| cardboard | 0 | 1,725,924,957 | 100% | ||
| aleister | 0 | 5,989,035,046 | 30% | ||
| leir | 0 | 1,888,589,560 | 50% | ||
| steem-d-anlovnit | 0 | 7,278,630,385 | 15% | ||
| espoem | 0 | 1,370,112,109 | 1.73% | ||
| katamori | 0 | 5,547,798,850 | 100% | ||
| utopian-io | 0 | 24,402,093,768,343 | 17.8% | ||
| jaff8 | 0 | 55,678,485,476 | 100% | ||
| amosbastian | 0 | 17,620,302,414 | 24.71% | ||
| beetlevc | 0 | 629,388,204 | 1% | ||
| vvvvv | 0 | 253,092,028 | 50% | ||
| kolxoznik0 | 0 | 569,794,665 | 100% | ||
| socpublic | 0 | 569,545,302 | 100% | ||
| council | 0 | 689,804,565 | 10% | ||
| andrei8 | 0 | 570,672,677 | 100% | ||
| sauranbek | 0 | 571,536,791 | 100% | ||
| kosheliuk | 0 | 569,962,846 | 100% | ||
| halford | 0 | 569,962,846 | 100% | ||
| minasyanahit85 | 0 | 569,962,846 | 100% | ||
| teovsumsel | 0 | 569,750,931 | 100% | ||
| vaelnaltasa | 0 | 570,511,295 | 100% | ||
| lersus77 | 0 | 570,035,827 | 100% | ||
| viktorpetro | 0 | 569,876,546 | 100% | ||
| voronovboris | 0 | 570,201,238 | 100% | ||
| honestprojects | 0 | 569,694,884 | 100% | ||
| timedouble | 0 | 569,822,237 | 100% | ||
| sigur | 0 | 569,114,193 | 100% | ||
| molly.smith | 0 | 571,126,727 | 100% | ||
| artyr.stepnenkov | 0 | 569,457,177 | 100% | ||
| rwalczak | 0 | 569,618,232 | 100% | ||
| hearttoasting | 0 | 570,342,437 | 100% | ||
| filkreserved | 0 | 569,520,757 | 100% | ||
| ceriumenable | 0 | 569,746,314 | 100% | ||
| whirrhomerun | 0 | 569,931,762 | 100% | ||
| woodtongue | 0 | 569,278,119 | 100% | ||
| friedradius | 0 | 572,257,835 | 100% | ||
| windtwitter | 0 | 569,798,115 | 100% | ||
| pastrytorn | 0 | 569,345,598 | 100% | ||
| artyr.kalmetov | 0 | 569,839,780 | 100% | ||
| bookshydration | 0 | 572,607,502 | 100% | ||
| easiertingley | 0 | 571,388,107 | 100% | ||
| betweeneris | 0 | 572,342,381 | 100% | ||
| curiouscred | 0 | 572,730,347 | 100% | ||
| liquidisebland | 0 | 572,256,509 | 100% | ||
| shagtheorem | 0 | 572,442,073 | 100% | ||
| varvenickel | 0 | 572,303,623 | 100% | ||
| grossoexercise | 0 | 572,775,554 | 100% | ||
| medaltrot | 0 | 569,281,981 | 100% | ||
| abalonegrateful | 0 | 569,080,196 | 100% | ||
| facedwrapped | 0 | 569,217,331 | 100% | ||
| magichive | 0 | 569,021,347 | 100% | ||
| snoozesalsa | 0 | 572,577,839 | 100% | ||
| beeperaquitaine | 0 | 572,659,859 | 100% | ||
| bubblyhexes | 0 | 569,794,214 | 100% | ||
| nbusurev | 0 | 569,845,987 | 100% | ||
| ibogosov | 0 | 569,347,812 | 100% | ||
| shukinsanechek | 0 | 572,228,241 | 100% | ||
| vsmirnov3 | 0 | 569,354,523 | 100% | ||
| joiningagitated | 0 | 571,366,261 | 100% | ||
| agreeablepoop | 0 | 571,407,528 | 100% | ||
| maskoil | 0 | 569,864,729 | 100% | ||
| topkame | 0 | 569,015,384 | 100% | ||
| reluctantmature | 0 | 569,962,846 | 100% | ||
| shockingextoll | 0 | 569,146,146 | 100% | ||
| ovariangroups | 0 | 569,962,846 | 100% | ||
| shortsminge | 0 | 569,364,531 | 100% | ||
| plankkellogs | 0 | 572,634,249 | 100% | ||
| meaninglathered | 0 | 572,353,392 | 100% | ||
| trimminiature | 0 | 572,628,149 | 100% | ||
| uolshviktor | 0 | 569,962,846 | 100% | ||
| barrimakgi | 0 | 569,962,846 | 100% | ||
| uebsterlesli | 0 | 569,826,605 | 100% | ||
| ivan.dyuzhev | 0 | 569,713,182 | 100% | ||
| ekarina10 | 0 | 569,962,846 | 100% | ||
| kosirinr | 0 | 569,962,846 | 100% | ||
| nfc | 0 | 6,935,592,509 | 1% | ||
| curbot | 0 | 4,046,088,816 | 10% | ||
| panickysafe | 0 | 569,962,846 | 100% | ||
| liarslalom | 0 | 569,962,846 | 100% | ||
| skimmingnifty | 0 | 569,962,846 | 100% | ||
| acrylichoot | 0 | 569,962,846 | 100% | ||
| anatoliyleshenko | 0 | 569,962,846 | 100% | ||
| molot.orex | 0 | 569,962,846 | 100% | ||
| korob12 | 0 | 569,956,697 | 100% | ||
| stil1il4up | 0 | 569,956,697 | 100% | ||
| dorrotiz | 0 | 569,956,697 | 100% | ||
| lawcameraman | 0 | 569,953,493 | 100% | ||
| sutecheasles | 0 | 569,953,493 | 100% | ||
| crocodileevident | 0 | 569,953,493 | 100% | ||
| instinctgelatin | 0 | 569,950,558 | 100% | ||
| maternalgrizzled | 0 | 569,950,558 | 100% | ||
| coffleioxhost | 0 | 569,950,558 | 100% | ||
| germharmony | 0 | 569,950,558 | 100% | ||
| droopydefinite | 0 | 569,947,603 | 100% | ||
| smellbaryon | 0 | 569,947,603 | 100% | ||
| otherwiseestates | 0 | 569,947,603 | 100% | ||
| veggiemango | 0 | 569,947,603 | 100% | ||
| weaponturkey | 0 | 569,944,226 | 100% | ||
| boatswainjick | 0 | 569,944,226 | 100% | ||
| espumaringer | 0 | 569,940,730 | 100% | ||
| loutmoaning | 0 | 569,940,730 | 100% | ||
| andespumlumon | 0 | 569,940,730 | 100% | ||
| unitsbus | 0 | 569,940,730 | 100% | ||
| forgettransom | 0 | 569,940,730 | 100% | ||
| plinalacrosse | 0 | 569,940,730 | 100% | ||
| multicackcoward | 0 | 569,940,730 | 100% | ||
| normachazard | 0 | 569,940,730 | 100% | ||
| dominancefels | 0 | 569,940,730 | 100% | ||
| tintblooden | 0 | 569,940,730 | 100% | ||
| ruffcheesy | 0 | 569,940,730 | 100% | ||
| bitessolve | 0 | 569,934,813 | 100% | ||
| charbodge | 0 | 569,934,813 | 100% | ||
| crunjordanian | 0 | 569,934,813 | 100% | ||
| jacksolstice | 0 | 569,934,813 | 100% |
Thank you for your contribution.
After analyzing your tutorial we suggest the following:

- We tested your game and saw that the page has scroll and when we move the snake the page also moves. Remove the header from the page to stay just the game.

- In the next tutorial, put the snake to not go beyond the area of the game and make the game finish when it happens.

This game is very interesting, and the tutorial is very well explained. Thank you again for your good work.

We look forward to your next tutorial.


Your contribution has been evaluated according to [Utopian policies and guidelines](https://join.utopian.io/guidelines), as well as a predefined set of questions pertaining to the category.

To view those questions and the relevant answers related to your post, [click here](https://review.utopian.io/result/8/21321313).

----
Need help? Write a ticket on https://support.utopian.io/.
Chat with us on [Discord](https://discord.gg/uTyJkNm).
[[utopian-moderator]](https://join.utopian.io/)
| author | portugalcoin |
|---|---|
| permlink | re-onepice-making-snake-game-using-html-5-svg-with-pablojs-part-1-20180926t215324521z |
| category | utopian-io |
| json_metadata | {"tags":["utopian-io"],"links":["https://join.utopian.io/guidelines","https://review.utopian.io/result/8/21321313","https://support.utopian.io/","https://discord.gg/uTyJkNm","https://join.utopian.io/"],"app":"steemit/0.1"} |
| created | 2018-09-26 21:53:24 |
| last_update | 2018-09-26 21:53:24 |
| depth | 1 |
| children | 2 |
| last_payout | 2018-10-03 21:53:24 |
| cashout_time | 1969-12-31 23:59:59 |
| total_payout_value | 6.951 HBD |
| curator_payout_value | 2.306 HBD |
| pending_payout_value | 0.000 HBD |
| promoted | 0.000 HBD |
| body_length | 1,008 |
| author_reputation | 599,460,589,822,571 |
| root_title | "Making Snake Game Using HTML 5 SVG With PabloJs (Part-1)" |
| beneficiaries | [] |
| max_accepted_payout | 1,000,000.000 HBD |
| percent_hbd | 10,000 |
| post_id | 72,250,439 |
| net_rshares | 5,711,854,024,211 |
| author_curate_reward | "" |
| voter | weight | wgt% | rshares | pct | time |
|---|---|---|---|---|---|
| espoem | 0 | 10,385,000,975 | 15% | ||
| utopian-io | 0 | 5,661,819,196,651 | 3.93% | ||
| amosbastian | 0 | 616,595,915 | 2.83% | ||
| organicgardener | 0 | 3,360,433,946 | 20% | ||
| hakancelik | 0 | 10,118,936,598 | 30% | ||
| statsexpert | 0 | 1,309,693,549 | 100% | ||
| mightypanda | 0 | 19,485,826,766 | 25% | ||
| fastandcurious | 0 | 931,422,199 | 25% | ||
| mops2e | 0 | 290,831,520 | 10% | ||
| onepice | 0 | 3,536,086,092 | 100% |
thank you for your comment,
I will prevent  page from scrolling in the next tutorial
| author | onepice |
|---|---|
| permlink | re-portugalcoin-re-onepice-making-snake-game-using-html-5-svg-with-pablojs-part-1-20180927t051920050z |
| category | utopian-io |
| json_metadata | {"tags":["utopian-io"],"app":"steemit/0.1"} |
| created | 2018-09-27 05:19:21 |
| last_update | 2018-09-27 05:19:21 |
| depth | 2 |
| children | 0 |
| last_payout | 2018-10-04 05:19:21 |
| cashout_time | 1969-12-31 23:59:59 |
| total_payout_value | 0.000 HBD |
| curator_payout_value | 0.000 HBD |
| pending_payout_value | 0.000 HBD |
| promoted | 0.000 HBD |
| body_length | 84 |
| author_reputation | 9,626,549,398,383 |
| root_title | "Making Snake Game Using HTML 5 SVG With PabloJs (Part-1)" |
| beneficiaries | [] |
| max_accepted_payout | 1,000,000.000 HBD |
| percent_hbd | 10,000 |
| post_id | 72,257,134 |
| net_rshares | 0 |
Thank you for your review, @portugalcoin!

So far this week you've reviewed 7 contributions. Keep up the good work!
| author | utopian-io |
|---|---|
| permlink | re-re-onepice-making-snake-game-using-html-5-svg-with-pablojs-part-1-20180926t215324521z-20181002t084157z |
| category | utopian-io |
| json_metadata | "{"app": "beem/0.20.1"}" |
| created | 2018-10-02 08:42:00 |
| last_update | 2018-10-02 08:42:00 |
| depth | 2 |
| children | 0 |
| last_payout | 2018-10-09 08:42:00 |
| cashout_time | 1969-12-31 23:59:59 |
| total_payout_value | 0.000 HBD |
| curator_payout_value | 0.000 HBD |
| pending_payout_value | 0.000 HBD |
| promoted | 0.000 HBD |
| body_length | 115 |
| author_reputation | 152,955,367,999,756 |
| root_title | "Making Snake Game Using HTML 5 SVG With PabloJs (Part-1)" |
| beneficiaries | [] |
| max_accepted_payout | 1,000,000.000 HBD |
| percent_hbd | 10,000 |
| post_id | 72,466,354 |
| net_rshares | 0 |
Hey, @onepice!

**Thanks for contributing on Utopian**.
We’re already looking forward to your next contribution!

**Get higher incentives and support Utopian.io!**
 Simply set @utopian.pay as a 5% (or higher) payout beneficiary on your contribution post (via [SteemPlus](https://chrome.google.com/webstore/detail/steemplus/mjbkjgcplmaneajhcbegoffkedeankaj?hl=en) or [Steeditor](https://steeditor.app)).

**Want to chat? Join us on Discord https://discord.gg/h52nFrV.**

<a href='https://steemconnect.com/sign/account-witness-vote?witness=utopian-io&approve=1'>Vote for Utopian Witness!</a>
| author | utopian-io |
|---|---|
| permlink | re-making-snake-game-using-html-5-svg-with-pablojs-part-1-20181001t162250z |
| category | utopian-io |
| json_metadata | "{"app": "beem/0.20.1"}" |
| created | 2018-10-01 16:22:51 |
| last_update | 2018-10-01 16:22:51 |
| depth | 1 |
| children | 0 |
| last_payout | 2018-10-08 16:22:51 |
| cashout_time | 1969-12-31 23:59:59 |
| total_payout_value | 0.000 HBD |
| curator_payout_value | 0.000 HBD |
| pending_payout_value | 0.000 HBD |
| promoted | 0.000 HBD |
| body_length | 589 |
| author_reputation | 152,955,367,999,756 |
| root_title | "Making Snake Game Using HTML 5 SVG With PabloJs (Part-1)" |
| beneficiaries | [] |
| max_accepted_payout | 1,000,000.000 HBD |
| percent_hbd | 10,000 |
| post_id | 72,423,766 |
| net_rshares | 0 |