
<br>
# Repository
### React
https://github.com/facebook/react
### Material-ui
https://github.com/mui-org/material-ui
### My Github Address
https://github.com/pckurdu
### This Project Github Address
https://github.com/pckurdu/Build-A-Blog-Site-With-React-Redux-Firebase-And-MaterializeCSS-Part-1
# What Will I Learn?
- You will learn to create a `react project`.
- You will learn the logic of `BrowserRouter` concept.
- You will learn the `Link` and `NavLink` modules in the react router.
- You will learn how to create `navbar` with materializecss.
- You will learn the sub-component router in the react.
- You will learn how to create react component functions.
# Requirements
- text editor (I used visual studio code editor)
- Basic javascript information
- Basic react information
# Difficulty
- Basic
# Tutorial Contents
Hello to everyone,
We're starting a new tutorial series.In this tutorial series we will develop the react application.We will build the `redux` structure to better manage state objects that are complex when developing the react application.Thus we will learn to use redux on the react.
We will perform authentication settings and data storage for our application using `firebase`. We will also review and use cloud functions to instantly show other users' shares to other users.
We will doall the design of the application using `materializecss`.At the end of this tutorial series, we will examine all the fine details of materializecss.
Here are the topics in this tutorial:
- Create React Project
- Create Navbar Component
- Create SignInLinks Component
- Create SignOutLinks Component
Let’s start
### Create React Project
When creating a project, it is very important to configure the project. When we configure this blog site, we need to set up what we want to do. Otherwise it will become more complex as the project progresses, and perhaps not be able to complete the project.
The most logical and shortest way to create a react project is to use the `create-react-app`.With the create-react-app, we can build all essential components for reacting in a short time.
At the command line, we write the following command to the location where we will create the project.
```
create-react-app react-blog
```
<br>
Thus our react project is created.
We run the project with the `yarn start` command and we get the following image.

<br>
Since we have created the react project in this way, it is contained in a number of unnecessary files. We can delete these junk files if we want, but the `App.js` file to resolve the confusion of meaning, let's do as follows.
```
import React, { Component } from 'react';
class App extends Component {
render() {
return (
<div>
<h1>Blog Site</h1>
</div>
);
}
}
export default App;
```
<br>
The following image occurs when we do so.

<br>
We will use materialize to design the pages of our project. We can import `materializecss cdn` after editing the pages. If we place the following cdn in the head field on the `public / index.html` page, we can use the materialize codes in our project.
```
<!--Import Google Icon Font-->
<link href="https://fonts.googleapis.com/icon?family=Material+Icons" rel="stylesheet">
<!--Import materialize.css-->
<link type="text/css" rel="stylesheet" href="css/materialize.min.css" media="screen,projection"/>
```
<br>
We can start to create the files of our project.
Our project will perform verification procedures and write data and get data from the firebase firestore. The created projects will enter users in detail and a list of projects in other users will be displayed. Users will be able to see the details by clicking on the project summary.
We'll add an unchanged layout page on a changed page. This layout page will contain links that users will see after logging in and without logging in.
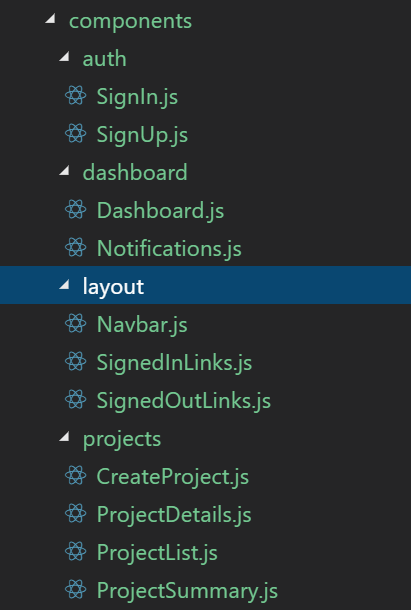
With the logic that we create, let us create the `components` folder in the `src` folder.
Let us create `auth`, `dashboard`, `layout` and `Project` folders under the components folder.
Since the auth folder will perform authentication operations, it must host login and sign up components. So create the `signIn.js` and `signUp.js` files in the auth folder.
The dashboard page is the page you should see after logging in. List of projects and announcements should be included. We add the `Dashboard.js` and `Notification.js` files to the dashboard folder.
The navbar that we created in the Layout folder should be included. Since the `signedInLinks.js` and `signedOutLinks.js` files will be included in the navbar component, they must be included in these files in the layout folder.
In the project folder, the user will create the project and because these projects will be listed, the `CreateProject.js`, `ProjectDetails.js`, `ProjectList.js`, and `ProjectSummary.js` files should be included.
After creating all the files, components will be created as follows.
<br>
Finally, we can form the basis of the router structure to provide link redirection. We need to download `react-router-dom` files to use a router in the react.
We can download the command line if we write the `yarn add react-router-dom`.
We'll get the app component as the base, so we need to write the routing codes here.
```
//Import the routing module.
import {BrowserRouter} from 'react-router-dom';
class App extends Component {
render() {
return (
//other components must be included in the BrowserRouter component
<BrowserRouter>
<div className="App">
<h1>Blog Site</h1>
</div>
</BrowserRouter>
);
}
}
```
<br>
### Create Navbar Component
Navbar is a structure that contains links to the page. We will keep the links to routing on our navbar.
We only need to use the `nav-wrapper` class because we use `materializeCSS` to create a navbar.
We can create the navbar component by creating the navbar function in the `navbar.js` file.
```
import React from 'react';
//to perform routing
import {Link} from 'react-router-dom';
const Navbar=()=>{
return(
//navbar forming class
<nav className="nav-wrapper light-blue lighten-2">
<div className="container">
<Link to='/' className="brand-logo">Project Blog</Link>
</div>
</nav>
)
}
export default Navbar
```
<br>
We need to use this componenti `App component`.
```
//Let's import the navbar function in the file
import Navbar from './components/layout/Navbar';
…
<BrowserRouter>
<div className="App">
<Navbar />
</div>
</BrowserRouter>
```
<br>
So we created our navbar. Since we will do the forwarding process here and we define it in the App component, the `Navbar` component will appear on all pages.

<br>
### Create SignInLinks Component
In this section we will define the links that the user will see when they log in. We have already defined the `signInLinks.js` file. We will call this file in the `Navbar.js` file so the links will be visible on the navbar.
#### Navbar.js
```
import SignedInLinks from './SignedInLinks';
…
//navbar forming class
<nav className="nav-wrapper light-blue lighten-2">
<div className="container">
<Link to='/' className="brand-logo">Project Blog</Link>
{/* SignedInLinks component */}
<SignedInLinks/>
</div>
</nav>
```
<br>
The user must be able to produce new projects, to be able to see their profile and to exit after they have logged in. So we need to create a link in the navbar. We need to use `NavLink` when defining links with NavLink you can router in navbar.
#### SignInLinks.js
```
import React from 'react';
//to perform routing
import {NavLink} from 'react-router-dom';
const SignInLinks=()=>{
return(
// links to the right
<ul className="right">
<li><NavLink to='/'>New Project</NavLink></li>
<li><NavLink to='/'>Log Out</NavLink></li>
<li><NavLink to='/' className="btn btn-floating red">PK</NavLink></li>
</ul>
)
}
export default SignInLinks
```
<br>
<br>
### Create SignOutLinks Component
In this section, we will create links that the user will see without login. We will use NavLink to place links in the Navbar.
### SignOutLinks.js
```
import React from 'react';
//to perform routing
import {NavLink} from 'react-router-dom';
const SignOutLinks=()=>{
return(
<ul className="right">
<li><NavLink to='/'>Signup</NavLink></li>
<li><NavLink to='/'>Login</NavLink></li>
</ul>
)
}
export default SignOutLinks
```
<br>
The following image occurs if we use this component in the `Navbar.js` file.
```
import SignedOutLinks from './SignedOutLinks';
…
//navbar forming class
<nav className="nav-wrapper light-blue lighten-2">
<div className="container">
<Link to='/' className="brand-logo">Project Blog</Link>
<SignedInLinks/>
<SignedOutLinks/>
</div>
</nav>
```
<br>
<br>
Since we don't have any firebase authentication now, all links are seen side by side. keep this for now as we will do this in the next tutorials.
See you in future tutorials
# Proof of Work Done
https://github.com/pckurdu/Build-A-Blog-Site-With-React-Redux-Firebase-And-MaterializeCSS-Part-1| author | pckurdu |
|---|---|
| permlink | build-a-blog-site-with-react-redux-firebase-and-materializecss-part-1 |
| category | utopian-io |
| json_metadata | {"tags":["utopian-io","tutorials","react","redux","firebase"],"image":["https://cdn.steemitimages.com/DQmRpmFiQxCwe4jswNSCADhUgLnyH8Ce249cszhzrYXLGvC/react-redux.fw.png","https://cdn.steemitimages.com/DQmQnXrden2M2WYmcsDar5XbA1ZvzBUwDP9xk6GrgLvbpu1/react1.png","https://cdn.steemitimages.com/DQmf9L97xxxjcRQaYdVh2ixkUtpYRXstFRdC62MVDw4QWyw/react2.png","https://cdn.steemitimages.com/DQmSDzZ2eoMgN3kU2TA6BT4btdXo8wCNeoWWhrs1yERFWmh/react3.png","https://cdn.steemitimages.com/DQmbfaPg4dLJmMEYKCQoMGwe4gc7aWqUqJMvoc5ehoemsB1/react4.png","https://cdn.steemitimages.com/DQmNbc8JmxuETf5y5F85s86LpaC37NtNKjUKZUUUQcjWsE8/react1.gif","https://cdn.steemitimages.com/DQmU8SLVRbbpzK1bdGvmc3tksFbERRaBZm9obb3WrCXANjE/react2.gif"],"links":["https://github.com/facebook/react","https://github.com/mui-org/material-ui","https://github.com/pckurdu","https://github.com/pckurdu/Build-A-Blog-Site-With-React-Redux-Firebase-And-MaterializeCSS-Part-1"],"app":"steemit/0.1","format":"markdown"} |
| created | 2019-03-10 10:16:45 |
| last_update | 2019-03-10 10:16:45 |
| depth | 0 |
| children | 4 |
| last_payout | 2019-03-17 10:16:45 |
| cashout_time | 1969-12-31 23:59:59 |
| total_payout_value | 17.508 HBD |
| curator_payout_value | 5.442 HBD |
| pending_payout_value | 0.000 HBD |
| promoted | 0.000 HBD |
| body_length | 10,115 |
| author_reputation | 23,385,816,696,918 |
| root_title | "Build A Blog Site With React, Redux Firebase And MaterializeCSS (Part 1)" |
| beneficiaries | [] |
| max_accepted_payout | 1,000,000.000 HBD |
| percent_hbd | 10,000 |
| post_id | 81,005,851 |
| net_rshares | 32,653,549,886,339 |
| author_curate_reward | "" |
| voter | weight | wgt% | rshares | pct | time |
|---|---|---|---|---|---|
| tombstone | 0 | 2,184,566,154,355 | 9.39% | ||
| vortac | 0 | 6,530,524,817 | 0.15% | ||
| rufans | 0 | 29,497,194,966 | 100% | ||
| abh12345 | 0 | 15,084,997,984 | 2.34% | ||
| eforucom | 0 | 31,658,367,337 | 3.5% | ||
| vannour | 0 | 580,653,692 | 0.75% | ||
| techslut | 0 | 81,524,117,607 | 20% | ||
| minersean | 0 | 7,377,274,672 | 75% | ||
| erikaflynn | 0 | 15,052,846,098 | 35% | ||
| jakipatryk | 0 | 14,934,540,617 | 50% | ||
| jga | 0 | 1,333,668,917 | 11.74% | ||
| helo | 0 | 55,223,367,612 | 24.59% | ||
| walnut1 | 0 | 23,720,008,059 | 11.74% | ||
| lorenzor | 0 | 639,303,164 | 5.87% | ||
| suesa | 0 | 119,795,181,920 | 25% | ||
| codingdefined | 0 | 28,746,157,311 | 20% | ||
| tsoldovieri | 0 | 831,701,201 | 5.87% | ||
| bachuslib | 0 | 19,576,278,808 | 100% | ||
| tykee | 0 | 6,438,719,158 | 11.74% | ||
| iamphysical | 0 | 15,068,735,429 | 90% | ||
| felixrodriguez | 0 | 420,699,531 | 4.1% | ||
| leir | 0 | 2,138,962,264 | 50% | ||
| azulear | 0 | 482,831,813 | 100% | ||
| silviu93 | 0 | 2,895,533,638 | 11.74% | ||
| jadabug | 0 | 1,302,708,622 | 1% | ||
| dakeshi | 0 | 3,201,688,055 | 50% | ||
| eastmael | 0 | 8,219,799,747 | 50% | ||
| piaristmonk | 0 | 71,011,958,436 | 100% | ||
| espoem | 0 | 47,060,094,105 | 25.86% | ||
| mcfarhat | 0 | 18,439,468,597 | 9.83% | ||
| vishalsingh4997 | 0 | 78,425,105 | 11.74% | ||
| loshcat | 0 | 2,552,144,960 | 100% | ||
| elear | 0 | 3,669,784,998 | 23.49% | ||
| zoneboy | 0 | 11,333,997,337 | 50% | ||
| carloserp-2000 | 0 | 30,693,862,849 | 100% | ||
| carlos84 | 0 | 757,151,117 | 11.74% | ||
| che-shyr | 0 | 824,153,388 | 50% | ||
| utopian-io | 0 | 28,425,572,094,346 | 23.49% | ||
| jaff8 | 0 | 53,688,296,403 | 24.59% | ||
| cheneats | 0 | 1,730,641,092 | 24% | ||
| amestyj | 0 | 262,645,145 | 5.87% | ||
| greenorange | 0 | 547,478,520 | 100% | ||
| funtraveller | 0 | 2,917,731,398 | 2% | ||
| mcyusuf | 0 | 1,465,446,659 | 11.74% | ||
| alexs1320 | 0 | 62,277,199,240 | 51% | ||
| gentleshaid | 0 | 18,639,163,209 | 23.49% | ||
| steemitag | 0 | 3,360,114,402 | 10% | ||
| ivymalifred | 0 | 185,363,859 | 5.87% | ||
| r00sj3 | 0 | 95,314,712 | 0.58% | ||
| aussieninja | 0 | 4,838,252,831 | 11.74% | ||
| vjap55 | 0 | 837,844,926 | 100% | ||
| amosbastian | 0 | 75,696,156,314 | 24.59% | ||
| eliaschess333 | 0 | 1,102,305,333 | 5.87% | ||
| ydavgonzalez | 0 | 126,505,925 | 0.58% | ||
| asaj | 0 | 17,724,625,816 | 100% | ||
| scienceangel | 0 | 68,997,296,316 | 50% | ||
| portugalcoin | 0 | 13,588,293,828 | 15% | ||
| vanarchist | 0 | 2,660,932,963 | 100% | ||
| sargoon | 0 | 670,000,379 | 11.74% | ||
| tobias-g | 0 | 133,161,136,170 | 40% | ||
| osazuisdela | 0 | 191,350,155 | 15% | ||
| didic | 0 | 32,893,298,613 | 25% | ||
| emiliomoron | 0 | 385,917,779 | 5.87% | ||
| ulisesfl17 | 0 | 1,759,836,256 | 100% | ||
| arac | 0 | 966,018,954 | 100% | ||
| fego | 0 | 17,051,691,896 | 24.59% | ||
| tomastonyperez | 0 | 1,268,295,305 | 5.87% | ||
| elvigia | 0 | 1,171,405,698 | 5.87% | ||
| ezravandi | 0 | 4,804,219,099 | 1.5% | ||
| emotionalsea | 0 | 301,569,002 | 5% | ||
| luiscd8a | 0 | 1,591,047,593 | 80% | ||
| statsexpert | 0 | 8,300,942,039 | 100% | ||
| eniolw | 0 | 7,802,896,970 | 100% | ||
| josedelacruz | 0 | 522,121,891 | 5.87% | ||
| joseangelvs | 0 | 244,442,724 | 11.74% | ||
| viannis | 0 | 144,925,247 | 5.87% | ||
| feronio | 0 | 1,088,443,633 | 100% | ||
| flores39 | 0 | 388,469,750 | 100% | ||
| kendallron | 0 | 226,720,592 | 15% | ||
| erickyoussif | 0 | 486,484,070 | 11.74% | ||
| indayclara | 0 | 278,631,865 | 7.5% | ||
| bogdasha | 0 | 2,514,898,412 | 10% | ||
| yougotresteemed | 0 | 143,783,033 | 24% | ||
| photocircle | 0 | 3,770,249,920 | 1% | ||
| anaestrada12 | 0 | 2,057,251,006 | 11.74% | ||
| joelsegovia | 0 | 309,720,607 | 5.87% | ||
| jesusfl17 | 0 | 393,725,742 | 100% | ||
| bflanagin | 0 | 1,893,883,670 | 11.74% | ||
| causkolvetur | 0 | 531,886,252 | 100% | ||
| ubaldonet | 0 | 3,275,511,158 | 70% | ||
| bestofph | 0 | 6,516,595,152 | 15% | ||
| dalz | 0 | 3,548,519,237 | 9.39% | ||
| ulockblock | 0 | 27,168,528,040 | 8.04% | ||
| amart29 | 0 | 196,440,854 | 2.93% | ||
| jk6276 | 0 | 1,166,923,823 | 11.74% | ||
| reinaseq | 0 | 683,433,615 | 11.74% | ||
| proggerdere | 0 | 497,087,644 | 100% | ||
| nieloagranca | 0 | 1,158,501,705 | 8% | ||
| jessicapyah | 0 | 499,026,984 | 100% | ||
| katherine98 | 0 | 531,813,622 | 100% | ||
| dssdsds | 0 | 1,722,723,566 | 11.74% | ||
| musiclove | 0 | 70,221,314 | 24% | ||
| lauren7cpkmdavis | 0 | 497,710,211 | 100% | ||
| jayplayco | 0 | 54,645,626,338 | 11.74% | ||
| cryptouno | 0 | 472,786,844 | 5% | ||
| lupafilotaxia | 0 | 14,001,334,223 | 100% | ||
| fran.frey | 0 | 171,078,969 | 5.87% | ||
| alaiza | 0 | 450,956,370 | 100% | ||
| mops2e | 0 | 280,816,413 | 20.68% | ||
| grace0c3 | 0 | 497,595,434 | 100% | ||
| swapsteem | 0 | 1,051,716,192 | 11.74% | ||
| stem-espanol | 0 | 7,169,476,705 | 11.74% | ||
| lapp | 0 | 453,192,905 | 100% | ||
| steemtpistia | 0 | 452,693,265 | 100% | ||
| crassipes | 0 | 452,927,208 | 100% | ||
| aleestra | 0 | 243,639,689 | 11.74% | ||
| maylocanlay | 0 | 497,016,093 | 100% | ||
| ciedustsouthti | 0 | 498,500,722 | 100% | ||
| icathadty1989 | 0 | 497,416,320 | 100% | ||
| nkilehisli | 0 | 530,647,385 | 100% | ||
| minminlou | 0 | 199,802,155 | 1.75% | ||
| agrovision | 0 | 453,192,754 | 100% | ||
| merlin7 | 0 | 187,052,834 | 0.01% | ||
| steem-ua | 0 | 611,802,091,844 | 6% | ||
| giulyfarci52 | 0 | 80,514,517 | 5.87% | ||
| teamcr | 0 | 826,304,975 | 100% | ||
| alex-hm | 0 | 1,207,948,909 | 50% | ||
| adamantino | 0 | 377,640,369 | 25% | ||
| bluesniper | 0 | 7,452,086,884 | 2.4% | ||
| kakakk | 0 | 1,735,654,935 | 11.74% | ||
| mrsbozz | 0 | 229,596,063 | 7% | ||
| ascorphat | 0 | 2,130,468,681 | 2.5% | ||
| rewarding | 0 | 5,407,514,355 | 61.74% | ||
| bejust | 0 | 1,806,498,074 | 100% | ||
| jk6276.mons | 0 | 950,665,073 | 23.49% | ||
| progressing | 0 | 1,631,583,323 | 100% | ||
| jaxson2011 | 0 | 874,808,869 | 23.49% | ||
| supu | 0 | 29,966,205,781 | 3.5% | ||
| eternalinferno | 0 | 91,052,669 | 23.49% | ||
| utopian.trail | 0 | 9,346,719,430 | 23.49% |
Thank you for your contribution @pckurdu.
After analyzing your tutorial we suggest the following points:

- The tutorial is well structured, but the features explained in your tutorial are very basic. In the next tutorial try to innovate the features that will explain in your contribution.

- Using GIFs to show results is definitely better than standard still images.

Looking forward to your upcoming tutorials.

Your contribution has been evaluated according to [Utopian policies and guidelines](https://join.utopian.io/guidelines), as well as a predefined set of questions pertaining to the category.

To view those questions and the relevant answers related to your post, [click here](https://review.utopian.io/result/8/2-1-3-1-1-4-2-3-).

----
Need help? Chat with us on [Discord](https://discord.gg/uTyJkNm).

[[utopian-moderator]](https://join.utopian.io/)
| author | portugalcoin |
|---|---|
| permlink | re-pckurdu-build-a-blog-site-with-react-redux-firebase-and-materializecss-part-1-20190310t122736335z |
| category | utopian-io |
| json_metadata | {"tags":["utopian-io"],"users":["pckurdu"],"links":["https://join.utopian.io/guidelines","https://review.utopian.io/result/8/2-1-3-1-1-4-2-3-","https://discord.gg/uTyJkNm","https://join.utopian.io/"],"app":"steemit/0.1"} |
| created | 2019-03-10 12:27:36 |
| last_update | 2019-03-10 12:27:36 |
| depth | 1 |
| children | 1 |
| last_payout | 2019-03-17 12:27:36 |
| cashout_time | 1969-12-31 23:59:59 |
| total_payout_value | 9.082 HBD |
| curator_payout_value | 2.874 HBD |
| pending_payout_value | 0.000 HBD |
| promoted | 0.000 HBD |
| body_length | 866 |
| author_reputation | 599,460,589,822,571 |
| root_title | "Build A Blog Site With React, Redux Firebase And MaterializeCSS (Part 1)" |
| beneficiaries | [] |
| max_accepted_payout | 1,000,000.000 HBD |
| percent_hbd | 10,000 |
| post_id | 81,011,081 |
| net_rshares | 17,004,422,487,732 |
| author_curate_reward | "" |
| voter | weight | wgt% | rshares | pct | time |
|---|---|---|---|---|---|
| codingdefined | 0 | 29,080,843,735 | 20% | ||
| espoem | 0 | 27,668,323,613 | 15% | ||
| utopian-io | 0 | 16,794,864,971,179 | 11.71% | ||
| jaff8 | 0 | 35,762,443,191 | 16.18% | ||
| emrebeyler | 0 | 13,464,771 | 0.01% | ||
| amosbastian | 0 | 50,446,296,054 | 16.18% | ||
| nenya | 0 | 1,786,432,718 | 80% | ||
| sudefteri | 0 | 4,737,805,290 | 100% | ||
| reazuliqbal | 0 | 18,784,794,895 | 10% | ||
| statsexpert | 0 | 8,131,272,135 | 100% | ||
| ulockblock | 0 | 15,430,830,703 | 4.68% | ||
| pckurdu | 0 | 5,380,316,822 | 100% | ||
| nijn | 0 | 864,298,815 | 80% | ||
| quenty | 0 | 2,597,193,629 | 60% | ||
| curbot | 0 | 2,446,698,696 | 100% | ||
| ascorphat | 0 | 2,114,137,163 | 2.5% | ||
| nimloth | 0 | 2,599,186,481 | 80% | ||
| holydog | 0 | 1,713,177,842 | 4.44% |
Thank you for your review, @portugalcoin! Keep up the good work!
| author | utopian-io |
|---|---|
| permlink | re-re-pckurdu-build-a-blog-site-with-react-redux-firebase-and-materializecss-part-1-20190310t122736335z-20190313t043039z |
| category | utopian-io |
| json_metadata | "{"app": "beem/0.20.17"}" |
| created | 2019-03-13 04:30:39 |
| last_update | 2019-03-13 04:30:39 |
| depth | 2 |
| children | 0 |
| last_payout | 2019-03-20 04:30:39 |
| cashout_time | 1969-12-31 23:59:59 |
| total_payout_value | 0.000 HBD |
| curator_payout_value | 0.000 HBD |
| pending_payout_value | 0.000 HBD |
| promoted | 0.000 HBD |
| body_length | 64 |
| author_reputation | 152,955,367,999,756 |
| root_title | "Build A Blog Site With React, Redux Firebase And MaterializeCSS (Part 1)" |
| beneficiaries | [] |
| max_accepted_payout | 1,000,000.000 HBD |
| percent_hbd | 10,000 |
| post_id | 81,195,333 |
| net_rshares | 0 |
#### Hi @pckurdu!

Your post was upvoted by @steem-ua, new Steem dApp, using UserAuthority for algorithmic post curation!
Your post is eligible for our upvote, thanks to our collaboration with @utopian-io!
**Feel free to join our [@steem-ua Discord server](https://discord.gg/KpBNYGz)**
| author | steem-ua |
|---|---|
| permlink | re-build-a-blog-site-with-react-redux-firebase-and-materializecss-part-1-20190310t133550z |
| category | utopian-io |
| json_metadata | "{"app": "beem/0.20.18"}" |
| created | 2019-03-10 13:35:51 |
| last_update | 2019-03-10 13:35:51 |
| depth | 1 |
| children | 0 |
| last_payout | 2019-03-17 13:35:51 |
| cashout_time | 1969-12-31 23:59:59 |
| total_payout_value | 0.000 HBD |
| curator_payout_value | 0.000 HBD |
| pending_payout_value | 0.000 HBD |
| promoted | 0.000 HBD |
| body_length | 286 |
| author_reputation | 23,214,230,978,060 |
| root_title | "Build A Blog Site With React, Redux Firebase And MaterializeCSS (Part 1)" |
| beneficiaries | [] |
| max_accepted_payout | 1,000,000.000 HBD |
| percent_hbd | 10,000 |
| post_id | 81,013,932 |
| net_rshares | 0 |
Hey, @pckurdu!

**Thanks for contributing on Utopian**.
We’re already looking forward to your next contribution!

**Get higher incentives and support Utopian.io!**
 Simply set @utopian.pay as a 5% (or higher) payout beneficiary on your contribution post (via [SteemPlus](https://chrome.google.com/webstore/detail/steemplus/mjbkjgcplmaneajhcbegoffkedeankaj?hl=en) or [Steeditor](https://steeditor.app)).

**Want to chat? Join us on Discord https://discord.gg/h52nFrV.**

<a href='https://steemconnect.com/sign/account-witness-vote?witness=utopian-io&approve=1'>Vote for Utopian Witness!</a>
| author | utopian-io |
|---|---|
| permlink | re-build-a-blog-site-with-react-redux-firebase-and-materializecss-part-1-20190311t020047z |
| category | utopian-io |
| json_metadata | "{"app": "beem/0.20.17"}" |
| created | 2019-03-11 02:00:48 |
| last_update | 2019-03-11 02:00:48 |
| depth | 1 |
| children | 0 |
| last_payout | 2019-03-18 02:00:48 |
| cashout_time | 1969-12-31 23:59:59 |
| total_payout_value | 0.000 HBD |
| curator_payout_value | 0.000 HBD |
| pending_payout_value | 0.000 HBD |
| promoted | 0.000 HBD |
| body_length | 589 |
| author_reputation | 152,955,367,999,756 |
| root_title | "Build A Blog Site With React, Redux Firebase And MaterializeCSS (Part 1)" |
| beneficiaries | [] |
| max_accepted_payout | 1,000,000.000 HBD |
| percent_hbd | 10,000 |
| post_id | 81,043,328 |
| net_rshares | 0 |