https://steemitimages.com/0x0/https://cdn.steemitimages.com/DQmZH9GvzdwBgbkkG3nmG1JSmjKjur8nNhFWjQE13S9V4a5/eostuts%2024.png
#### What Will I Learn?
EOSIO - Tutorial 2
EOSIO smart contract development with EOSFactory framework
Setup for smart contract development on Linux OS (should work on Windows and Mac)
- You will learn how to setup EOSIO with EOSFactory for smart contract development
- You will learn how to install and build
- You will learn how to test EOSFactory
- You will learn how to generate contract from template
- You will learn how to script, build and simulate contracts
#### Repository
https://github.com/blws/eos-devenv
#### Requirements
- Linux OS (should work on Windows and Mac)
- 4 GB RAM
- visual studio code
- basic python knowladge
- basic C++ knowladge
- basic EOSIO knowladge you can find my [last tutorial here](https://steemit.com/utopian-io/@proba1/getting-started-with-eosio-tutorial-1)
- installed clang-4-0 lldb-4.0
```
sudo apt-get install clang-4.0 lldb-4.0
sudo update-alternatives --install /usr/bin/clang clang /usr/bin/clang-4.0 40 --slave /usr/bin/clang++ clang++ /usr/bin/clang++-4.0
sudo apt-get install clang-4.0 clang++-4.0
update cmake
```
https://askubuntu.com/questions/859256/how-to-install-gcc-7-or-clang-4-0
- installed python3-pip
- installed termcolor
```
sudo apt install python3-pip
python3 -m pip install termcolor
```
- visual studio code
- plugins for studio code:
- C/C++ IntelliSense, debugging and code browsing.
- CMake Tools
- Python
#### Difficulty
- Basic
#### Tutorial Contents
[This repository](https://github.com/blws-eos-devenv) is an enviroment to script, build and develop eos smart contracts.
### Project structure
I'm using eos and eosfactory submodules forked from https://github.com/tokenika
### Clone
Clone repository like this
```
git clone https://github.com/blws/eos-devenv --recursive
```
### Install and build
After download
```
cd eos-devenv
sudo ./install.sh
```
or manually install
```
cd eos
./eosio_build.sh
cd build
sudo make install
cd ../..
cd eosfactory
./build.sh ~/your_install_path/eos ~/your_install_path/contracts
source ~/.profile
```
### Test EOSFactory
To make sure everything works test EOSFactory
```
cd eosfactory
source ~/.profile
python3 ./tests/unittest1.py
python3 ./tests/unittest2.py
python3 ./tests/unittest3.py
cd ..
```
### Generate contract from template
Templates are located in eosfactory/templates
You can find templates https://github.com/blws/eosfactory/tree/master/templates/contracts
or you can make your own.
To generate contracts change directory to eos-devenv/contracts, then
```
source ~/.profile
python3 generate.py -name -template
```
It generates skeleton template if no template
Examples
```
cd contracts
python3 generate.py example1
python3 generate.py example2 hello
python3 generate.py example3 eosio.token
```
### Build and Script
## Visual Studio Code setup and extensions
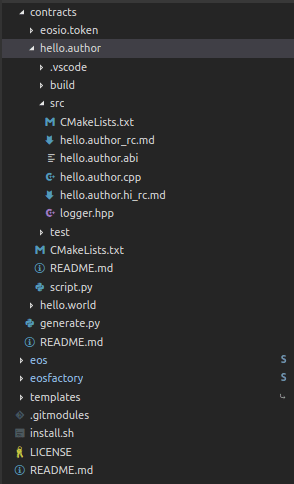
Open contracts/hello.author folder with visual studio code.
First time you open select clang 4

Enable IntelliSense
https://cdn.steemitimages.com/DQmb8DQz41dWc6p2K8hXoU2eoJZvbzjwp2bUs1FS3zg5KB9/allow.gif
Install extensions
https://cdn.steemitimages.com/DQmb2t6ToL1fBrQhY9RtSxsVzFDhBk9ywtErPQNTzq3knMD/extensions.gif
### Hello world example
Open contracts/hello.author
Open src/hello.author.cpp
```
#include <eosiolib/eosio.hpp>
//how to include logger
#include "logger.hpp"
using namespace eosio;
class hello : public eosio::contract {
public:
using contract::contract;
/// @abi action
void hi( account_name user ) {
logger_info( "user: ", name{user} );
// how to requre auth
require_auth( user );
print( "Hello, ", name{user} );
}
};
EOSIO_ABI( hello, (hi) )
```
This is just modified hello contract with 3 added lines: include, log, require_auth
This shows how to log and requrie authentication.
Take a look at hello.author/script.py before we build contract
```
#import everything you need
import node
import sess
import eosf
#resets and starts testnet
node.reset()
#deploys eosio.bios and creates
#sess.eosio sess.alice sess.bob sess.carol
sess.init()
#create account
john = eosf.account(sess.eosio, name="john")
sess.wallet.import_key(john)
#sets conctract
contract = eosf.Contract(john, "hello.author")
#builds
contract.build()
#hash before deploy
contract.code()
#deploys
contract.deploy()
#hash after deploy
contract.code()
#Will not work
#contract.push_action("hi", '{"user":"' + str(sess.carol) + '"}', sess.alice, output=True)
#Will work
contract.push_action("hi", '{"user":"' + str(sess.carol) + '"}', sess.carol, output=True)
node.stop()
```
Code is pretty self explanitory.
User has to be authencticated to recive hello message.
To run script first set
```
source ~/.profile
```
Run
```
python3 script.py
```
To run without exit comment out node.stop() and
```
python3 -i script.py
```
press Ctrl + D to exit
### eosio token example
This example shows how to create issue and transfer tokens
Open contracts/eosio.token folder with visual studio code.
Open contracts/eosio.token/script.py
```
#create users
#load bios.contract and eosio.token contract
#deploy
###############################################
import node
import sess
import eosf
import cleos
node.reset()
sess.init()
bpaccount = eosf.account(sess.eosio, name="bpaccount")
sess.wallet.import_key(bpaccount)
john = eosf.account(sess.eosio, name="john")
sess.wallet.import_key(john)
adam = eosf.account(sess.eosio, name="adam")
sess.wallet.import_key(adam)
#Error 3060003: Contract Table Query Exception -> if wrong name
contract = eosf.Contract(bpaccount, "eosio.token")
contract.build()
contract.code()
contract.deploy()
contract.code()
contract.push_action("create", '{"issuer":"' + str(sess.eosio) + '", "maximum_supply":"1000000000.0000 EOS", "can_freeze":0, "can_recall":0, "can_whitelist":0}')
contract.push_action("issue", '{"to":"' + str(bpaccount) + '", "quantity":"100.0000 EOS", "memo":"memo"}', sess.eosio)
contract.push_action("transfer", '{"from":"' + str(bpaccount) + '", "to":"' + str(john) + '", "quantity":"25.0000 EOS", "memo":"memo"}', bpaccount)
contract.push_action("transfer", '{"from":"' + str(bpaccount) + '", "to":"' + str(adam) + '", "quantity":"25.0000 EOS", "memo":"memo"}', bpaccount)
keyarray = cleos.WalletKeys(is_verbose=0).json['']
unqnamearray = []
for key in keyarray:
namearray = cleos.GetAccounts(key,is_verbose=0).json["account_names"]
for name in namearray:
if name not in unqnamearray:
unqnamearray.append(name)
for name in unqnamearray:
print(name)
contract.table("accounts", name)
node.stop()
```
After we push all actions
```
keyarray = cleos.WalletKeys(is_verbose=0).json['']
```
cleos.WalletKeys() returns array of public keys (6 accounts owner and active plus default)
unqnamearray -> all accounts
```
for name in unqnamearray:
print(name)
contract.table("accounts", name)
```
Last for loop prints all accounts and balances
```
adam
{
"rows": [{
"balance": "25.0000 EOS"
}
],
"more": false
}
carol
{
"rows": [],
"more": false
}
alice
{
"rows": [],
"more": false
}
bpaccount
{
"rows": [{
"balance": "50.0000 EOS"
}
],
"more": false
}
john
{
"rows": [{
"balance": "25.0000 EOS"
}
],
"more": false
}
bob
{
"rows": [],
"more": false
}
```
### Useful links:
http://eosfactory.io/sphinx/build/html/
#### Curriculum
[Tutorial 1](https://steemit.com/utopian-io/@proba1/getting-started-with-eosio-tutorial-1)
This is Tutorial 2
#### Proof of Work Done
https://github.com/blws/eos-devenv/commits/master
https://github.com/blws/eosfactory/tree/36721be4eb693dfa0eda757dab85ab8e799aa6fc
https://github.com/blws/eos/tree/2a4ffd7ae89dc4f184537b88cf3e905162de93f3
https://github.com/blws/eos-devenv/blob/master/install.sh
https://github.com/blws/eos-devenv/blob/master/contracts/generate.py
https://github.com/blws/eos-devenv/tree/master/contracts/hello.world
https://github.com/blws/eos-devenv/tree/master/contracts/hello.author
https://github.com/blws/eos-devenv/tree/master/contracts/eosio.token