#### Contribution Repository
https://github.com/angular/angular
### Disclaimer
Before understanding this tutorial, you must have a little knowledge of SASS and Bootstrap 4
In our [last tutorial](https://steemit.com/utopian-io/@sirfreeman/dtdmq-building-the-frontend-food-order-system-with-angularjs-part-6) we were a able to understand parent to child component interaction, how to create, inject a service and also sending request to an API.
In this series, we are going to work with forms and user input, and build the component responsible for signing up a user into the database.
### Project structure.
+ node_modules/
+ src/
+ app
+ app-navbar/
+ item/
+ items-feed/
+ signup/
+ app-routing.module
+ app.component.html
+ app.component.sass
+ app.component.ts
+ app.module.ts
+ item.service
+ asset/
+ environments/
+ item.ts
+ user.ts
+ .angular-cli.json
+ .editorconfig
+.....
### Rating
This tutorial is rated Intermediate.
#### Requirement.
+ Typescript version 2.4.2
+ Node version version 8.9.4
+ Npm version 5.6.0
+ [Bootstrap 4.0](getbootstrap.com)
+ Visual Studio Code IDE
+ [Voltront front client Repository](https://github.com/ogbiyoyosky/voltron)
#### What would i learn? / Table of content.
1. Recap of the [previous tutorial](https://steemit.com/utopian-io/@sirfreeman/dtdmq-building-the-frontend-food-order-system-with-angularjs-part-6).
2. Creating the Signup Component.
3. Creating the markup and styles for the Signup component.
4. Building the signup method.
5. Two way data binding.
6. Showing error flash messages
## Recap of the [previous tutorial](https://steemit.com/utopian-io/@sirfreeman/dtdmq-building-the-frontend-food-order-system-with-angularjs-part-6).
We were able to create the item-feed and the item component and send request to the Voltron server to get all items, the items were iterated and displayed on the item-feed using a directive `*ngFor` and binding the data to the item component, we also created an item service responsible for using the HTTP module for requesting data from the voltron API.
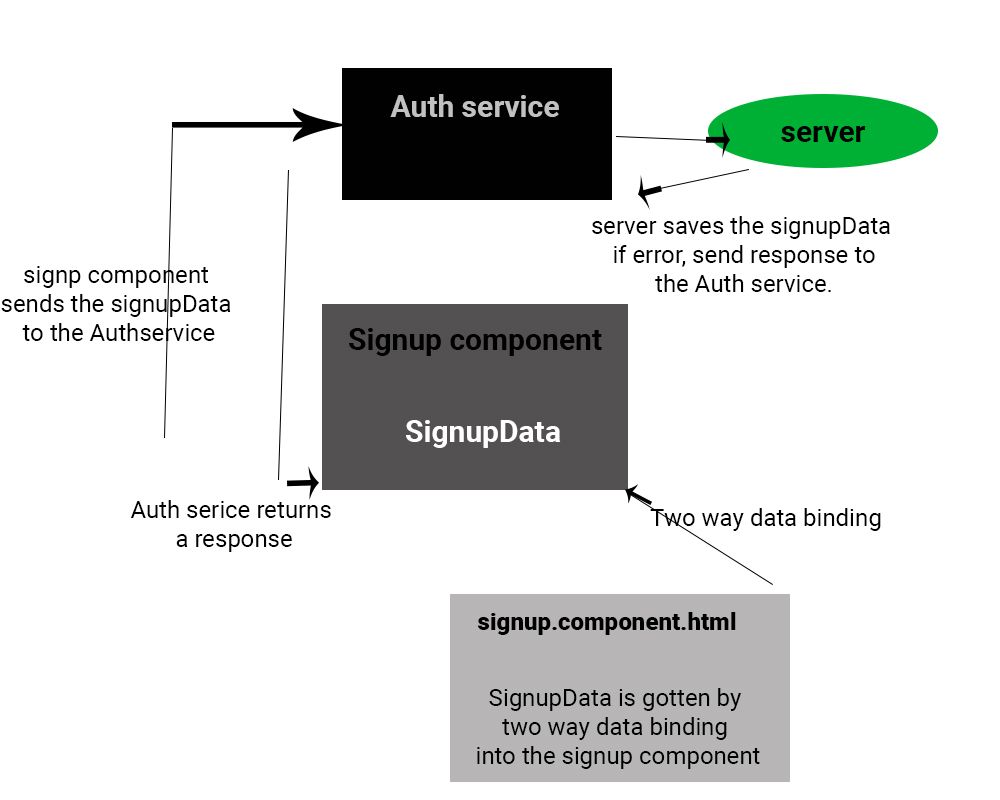
*Schematic diagram of relationships*
## Creating the Signup Component
We need a signup component that is responsible for collecting data from the user, to generate the component on the command line enter
```
ng g c signup
```
we also need to create an interface for the signup component, lets call the interface user. In the `src` folder, create a file called user.ts and create the interface for the user, the interface has the various type e.g name with a type of string.
```
// user.ts
export interface User {
name: string;
username:string,
email: string;
password:string;
}
```
We have the interface ready.
Next up, let us generate an Authentication service which will access the server by making a post request to the Voltron server.
```
ng g service auth
```
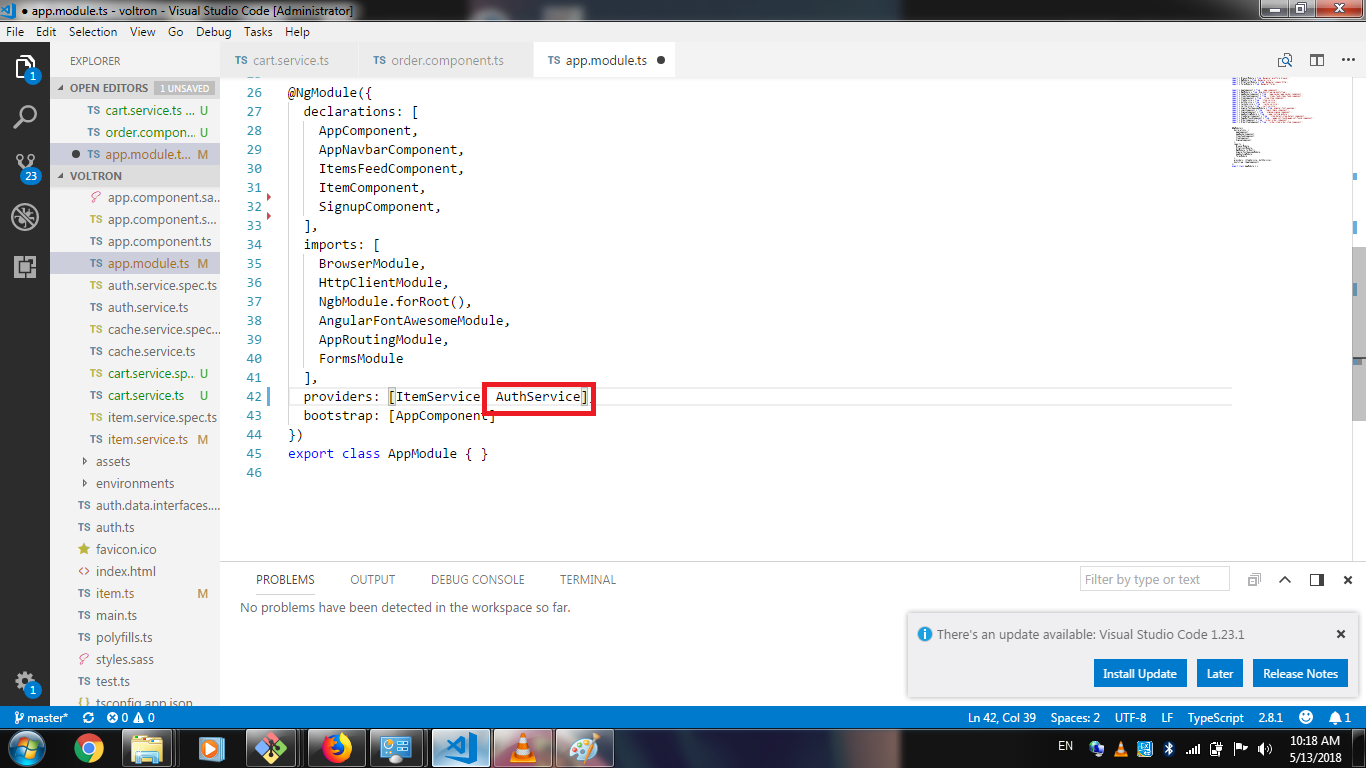
##### Registering the service in the `app.module.ts` .
import to the service in the app.module.ts and the service in the providers array.
```
providers: [ItemService, AuthService],
```
##### Building the auth service.
In building the auth service, we need to list out things we want to do. We would be working on signing up a user for our application, what do we need to signup a user?
The following would be needed
1. A user data.
2. An endpoint to send a post request of users data
So lets begin building the auth service.
We need to import the following modules into the service
+ HttpClient and HttpHeaders for making request and setting headers respectively.
+ Observable for monitoring stream of data.
+ Subject to set a variable as an observable
+ User interface that has all the properties of the user which we created before.
+ catchError, map, tap are used for receiving data and error handling.
```
import { HttpClient, HttpHeaders } from '@angular/common/http';
import { Observable } from 'rxjs/Observable';
import { of} from 'rxjs/observable/of';
import {Subject } from 'rxjs/Subject';
import { User } from '../user';
import { catchError, map, tap, } from 'rxjs/operators';
```
In the auth service class, lets create three new variables to store the endpoint, signup data and the Http client. The http variable has a type of the import HttpClient.
```
private http: HttpClient;
signupEndpoint = 'http://localhost:3000/api/users';
signupData: any;
```
Next up a create the headerOptions and instantiate the HttpClient in the constructor, this would make the module available once the service is called.
```
httpOptions = {
headers: new HttpHeaders({
'Content-Type': 'application/json',
})
};
constructor(http: HttpClient) {
this.http = http;
}
```
Finally we create the observable method for sending the signup data to the server.
```
signup (signupData): Observable<{} | User> {
return this.http.post<User>(this.signupEndpoint, JSON.stringify(signupData), this.httpOptions)
.pipe(
tap(data => console.log(`${data} user created`)),
catchError(this.handleError('signup', {}))
)
}
```
The signup method, accepts a signupData and return an observable, we send a post request to the `signupEndpoint` which is `http://localhost:3000/api/users` which contains the header options and the signupdata. we use `pipe` to receive the response from the server and check if there was an error.
##### Complete auth service.
```
import { Injectable } from '@angular/core';
import { HttpClient, HttpHeaders } from '@angular/common/http';
import { Observable } from 'rxjs/Observable';
import { of} from 'rxjs/observable/of';
import {Subject } from 'rxjs/Subject';
import { User } from '../user';
import { catchError, map, tap, } from 'rxjs/operators';
@Injectable()
export class AuthService {
private http: HttpClient;
signupEndpoint = 'http://localhost:3000/api/users';
signupData: any;
httpOptions = {
headers: new HttpHeaders({
'Content-Type': 'application/json',
})
};
constructor(http: HttpClient) {
this.http = http;
}
}
```
## Creating the markup and styles for the Signup component.
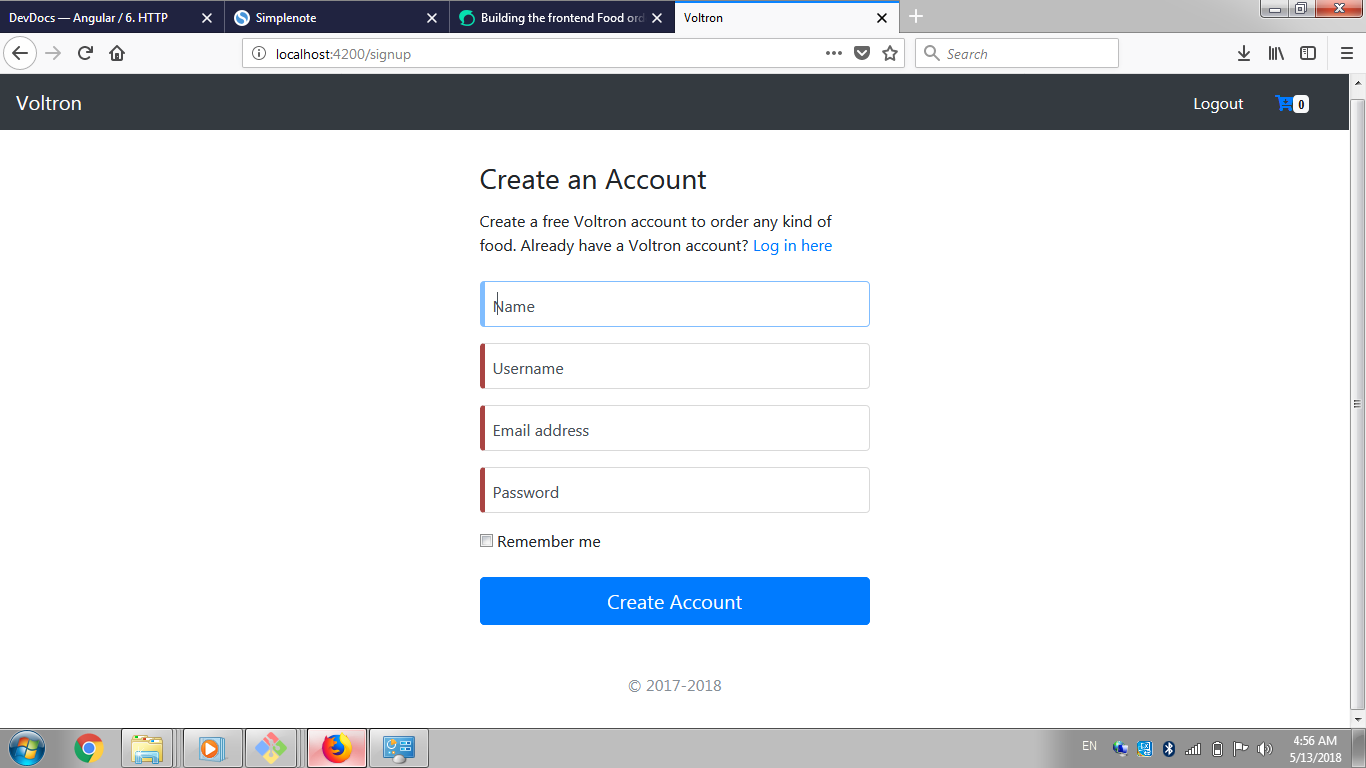
Remember, in this project we are using bootstrap 4, you are expected to have some knowledge of bootstrap 4, teaching bootstrap 4 is beyond the scope of this tutorial. Below is the markup for the `signup.component.html`
```
<div class="signup__container">
<div class="container">
<form class="form-signin" #signupForm="ngForm">
<div class="text-left mb-4">
<h1 class="h3 mb-3 font-weight-normal">Create an Account</h1>
<p> Create a free Voltron account to order any kind of food. Already have a Voltron account? <a class="link" routerLink="/login">Log in here</a></p>
</div>
<div class="form-label-group">
<input type="name" id="inputName" class="form-control"placeholder="Full Name" required autofocus>
<label for="inputName">Name</label>
</div>
<div class="form-label-group">
<input type="username" id="inputUsername" class="form-control" placeholder="Username" required autofocus>
<label for="inputUsername">Username</label>
</div>
<div class="form-label-group">
<input type="email" id="inputEmail" class="form-control" placeholder="Email address" required autofocus>
<label for="inputEmail">Email address</label>
</div>
<div class="form-label-group">
<input type="password" id="inputPassword" class="form-control" placeholder="Password" required>
<label for="inputPassword">Password</label>
</div>
<div class="checkbox mb-3">
<label>
<input type="checkbox" value="remember-me"> Remember me
</label>
</div>
<button class="btn btn-lg btn-primary btn-block" type="submit">Create Account</button>
<p class="mt-5 mb-3 text-muted text-center">© 2017-2018</p>
</form>
</div>
</div>
```
Above, we created four input with the following label
+ username
+ email
+ name
+ password
Lastly, a submit button was added to submit the form.
#### The `style.sass` for the `signup.component.sass`
Lets add some styles for the signup form to make it look pretty.
```
html
height: 100%;
body
height: 100%;
display: -ms-flexbox;
display: -webkit-box;
display: flex;
-ms-flex-align: center;
-ms-flex-pack: center;
-webkit-box-align: center;
align-items: center;
-webkit-box-pack: center;
justify-content: center;
padding-top: 40px;
padding-bottom: 40px;
background-color: #f5f5f5;
.form-control
padding: 10px;
.form-signin
width: 100%;
max-width: 420px;
padding: 15px;
margin: 0 auto;
.form-label-group
position: relative;
margin-bottom: 1rem;
.form-label-group > input, .form-label-group > label
padding: var(--input-padding-y) var(--input-padding-x);
.form-label-group > label
position: absolute;
top: 0;
left: 0;
display: block;
width: 100%;
margin-bottom: 0; /* Override default `<label>` margin */
line-height: 1.5;
color: #495057;
border: 1px solid transparent;
border-radius: .25rem;
transition: all .1s ease-in-out;
.form-label-group input::-webkit-input-placeholder
color: transparent;
.form-label-group input:-ms-input-placeholder
color: transparent;
.form-label-group input::-ms-input-placeholder
color: transparent;
.form-label-group input::-moz-placeholder
color: transparent;
.form-label-group input::placeholder
color: transparent;
.form-label-group input:not(:placeholder-shown)
padding-top: calc(var(--input-padding-y) + var(--input-padding-y) * (2 / 3));
padding-bottom: calc(var(--input-padding-y) / 3);
.form-label-group input:not(:placeholder-shown) ~ label
padding-top: calc(var(--input-padding-y) / 3);
padding-bottom: calc(var(--input-padding-y) / 3);
font-size: 12px;
color: #777;
.signup__container
margin-top: 80px;
```
### Building the signup method.
Open the file signup.component.ts and lets import some modules we would be working with.
```
import { Component, OnInit } from '@angular/core';
import { AuthService } from '../auth.service';
import {User} from '../../user';
```
We imported the Auth service into the component for injection into the constructor method of the signup component class.
Create three variable; message, data and signupData.
The `message` variable would be used to hold message instance from the server and the `signupData` would be gotten from the form input using two way data binding.
```
data: any;
message: string = '';
signupData :User = {
"username": '',
"password": '',
"name": '',
"email": ''
}
```
The signupData has a type of the User interface.
Inject the auth service into the constructor method
```
constructor(private AuthService : AuthService) { }
```
Finally, lets write the signup method
```
signup () {
this.AuthService.signup(this.signupData)
.subscribe(res => {
this.data = res;
this.message = this.data.data['message'];
this.signupData.username = '';
this.signupData.password = '';
this.signupData.name = '';
this.signupData.email = '';
}, err => {
this.message = err.error.msg;
});
}
```
In the method, we use the signup method on the AuthService and pass the signupData to it and subscribe for a response from the server.
Note; the signup method on the auth service sends the post request.
We set the data and message variable to the response from the server and finally we set the strings to empty once the form is processed.
```
this.signupData.username = '';
this.signupData.password = '';
this.signupData.name = '';
this.signupData.email = '';
```
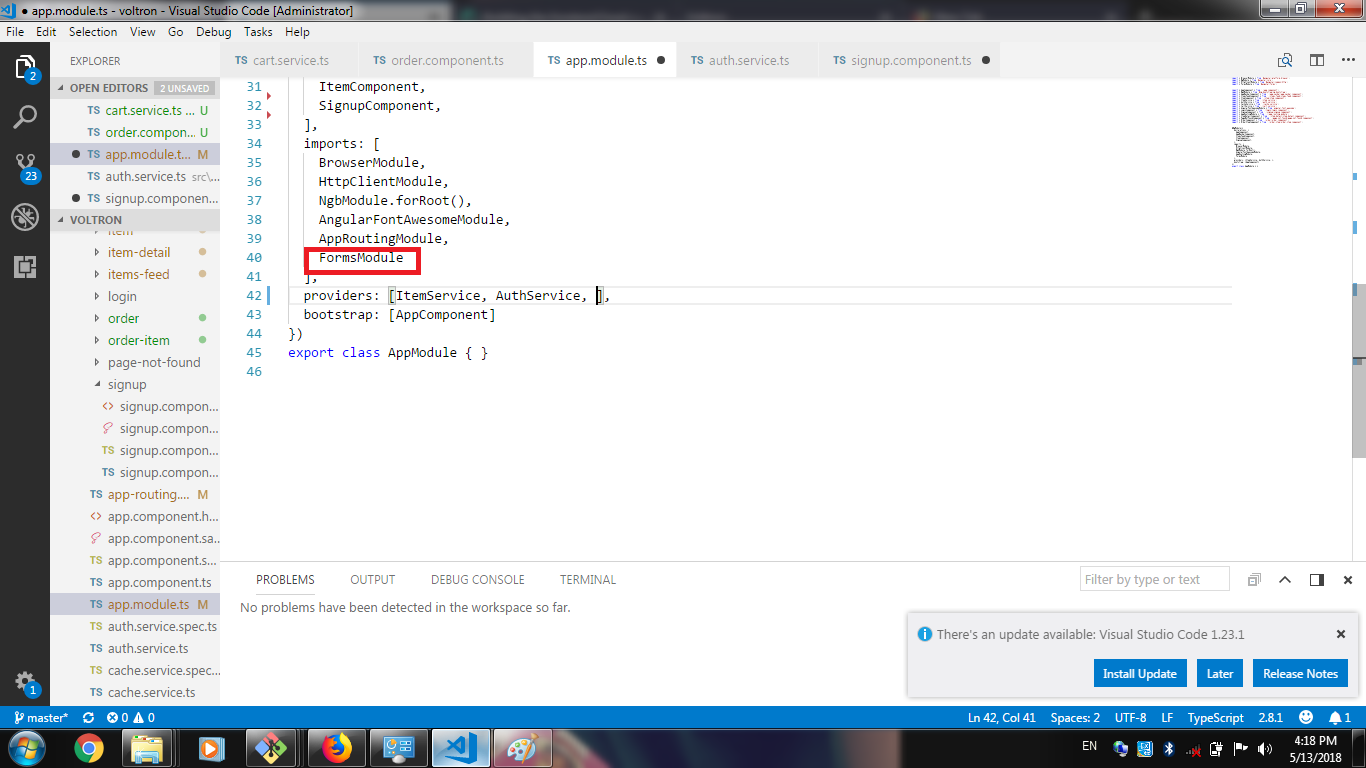
## Two way data binding.
Two way data binding is important for form fields, where we bind the data input on a form to a variable in the component. In the signup component, we need to bind the username, name, email and password field to the signupData object on the component.
Its quite easy, we need import the forms modules to the app.module.ts and add the it to the import array.
```
import { FormsModule } from '@angular/forms';
```
Next on the `signup.component.html` we add the ngModel to bind data from the signupData object and also add the ngModelOptions
example binding the input from the name field to the signupData.name propertie
```
[(ngModel)]="signupData.name
```
On the form element add the method to submit the form using ngSumbit which is bound to the signup method on the component. Once the submit button is clicked, it triggers the signup method on the component.
##### complete signup.component.ts
```
<div class="signup__container">
<div class="container">
<form class="form-signin" (ngSubmit)="signup()" #signupForm="ngForm">
<div class="alert alert-warning alert-dismissible fade show" role="alert" *ngIf="message !== ''">
<strong>Hey!</strong> {{message}}
<button type="button" class="close" data-dismiss="alert" aria-label="Close">
<span aria-hidden="true">×</span>
</button>
</div>
<div class="text-left mb-4">
<h1 class="h3 mb-3 font-weight-normal">Create an Account</h1>
<p> Create a free Voltron account to order any kind of food. Already have a Voltron account? <a class="link" routerLink="/login">Log in here</a></p>
</div>
<div class="form-label-group">
<input type="name" id="inputName" class="form-control" [(ngModel)]="signupData.name" [ngModelOptions]="{standalone: true}" placeholder="Full Name" required autofocus>
<label for="inputName">Name</label>
</div>
<div class="form-label-group">
<input type="username" id="inputUsername" [(ngModel)]="signupData.username" class="form-control" [ngModelOptions]="{standalone: true}" placeholder="Username" required autofocus>
<label for="inputUsername">Username</label>
</div>
<div class="form-label-group">
<input type="email" id="inputEmail" class="form-control"[(ngModel)]="signupData.email" placeholder="Email address" [ngModelOptions]="{standalone: true}" required autofocus>
<label for="inputEmail">Email address</label>
</div>
<div class="form-label-group">
<input type="password" id="inputPassword" [(ngModel)]="signupData.password" class="form-control" placeholder="Password" [ngModelOptions]="{standalone: true}" required>
<label for="inputPassword">Password</label>
</div>
<div class="checkbox mb-3">
<label>
<input type="checkbox" value="remember-me"> Remember me
</label>
</div>
<button class="btn btn-lg btn-primary btn-block" type="submit">Create Account</button>
<p class="mt-5 mb-3 text-muted text-center">© 2017-2018</p>
</form>
</div>
</div>
```
## Showing error flash messages
We add a snippet of code on the `signup.component.html` and use the directive *ngIf to toggle the display.
Note; the message variable is displayed using interpolation
```
<div class="alert alert-warning alert-dismissible fade show" role="alert" *ngIf="message !== ''">
<strong>Hey!</strong> {{message}}
<button type="button" class="close" data-dismiss="alert" aria-label="Close">
<span aria-hidden="true">×</span>
</button>
</div>
```
The code `*ngIf="message !== ''"`on the div makes the flash message to show only when the server returns a message.
## Conclusion
Finally, we are done building the signup component and displaying messages from the server. In the next tutorial, we are going to build the login and logout component and store the user on local storage.
## Curriculum
+ [Building a food order system with MEAN Stack (MongoDB, Express, AngularJs and NodeJs). pt1](https://steemit.com/utopian-io/@sirfreeman/building-a-food-ordering-system-with-mean-stack-mongo-express-angular-and-nodejs).
+ [Building a food order system with MEAN Stack (MongoDB, Express, AngularJs and NodeJs). pt2](https://steemit.com/utopian-io/@sirfreeman/building-a-food-order-system-with-mean-stack-mongoose-expressjs-angularjs-nodejs).
+ [Building a food order system with MEAN Stack (MongoDB, Express, AngularJs and NodeJs). pt3](https://steemit.com/utopian-io/@sirfreeman/pt3-building-a-food-order-system-with-mean-stack-mongodb-express-angularjs-and-nodejs).
+ [Pt4 Building a food order system with MEAN Stack (MongoDB, Express, AngularJs and NodeJs).](https://steemit.com/utopian-io/@sirfreeman/pt4-building-a-food-order-system-with-mean-stack-mongodb-express-angularjs-and-nodejs)
+ [Building the frontend Food order system with Angularjs. Part 5](https://steemit.com/utopian-io/@sirfreeman/4u6mxx-building-the-frontend-food-order-system-with-angularjs)
+ [Building the frontend Food order system with Angularjs. Part 6](https://steemit.com/utopian-io/@sirfreeman/dtdmq-building-the-frontend-food-order-system-with-angularjs-part-6)
### Resources
+ [Angular Docs](https://angular.io/docs)
+ [Bootstrap 4 documentation](https://getbootstrap.com/docs/4.0/getting-started/introduction/)
+ Remember to check out the [Repo](https://github.com/ogbiyoyosky/voltron) for this project
+ [Sass documentation](https://www.google.com/url?sa=t&rct=j&q=&esrc=s&source=web&cd=2&cad=rja&uact=8&ved=0ahUKEwjc4_SPkoPbAhUFwBQKHTQ-ANIQFgg8MAE&url=http%3A%2F%2Fsass-lang.com%2Fdocumentation%2F&usg=AOvVaw2Q4oSAkr7seUJ2buu3aLrv)