The token swap procedure is simple to execute in just a few steps, and will only take a few minutes. To get started, you will need have MetaMask setup with the wallet that holds your SPRK tokens, and a small amount of ETH. The new tokens will be locked until September 2nd 2019 to allow everyone sufficient time to swap tokens.

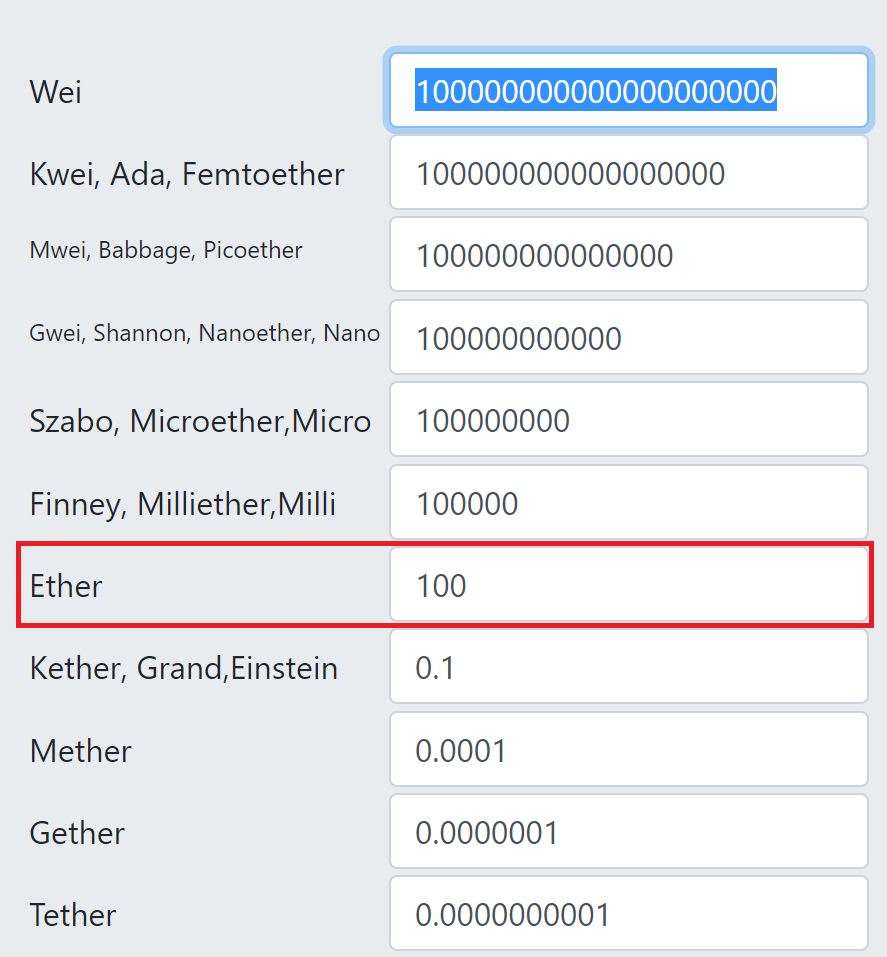
<b>Step 1:</b> First calculate the <i>‘Wei’</i> quantity of the number of tokens you wish to swap. To do this, navigate to https://etherconverter.online. In the <i>‘Ether’</i> field, type in the number of tokens you wish to swap.
For example, if you wish to swap 100 SPRK tokens, you would type in 100 in the <i>‘Ether’</i> field. Copy and paste the <i>‘Wei’</i> value that is generated into a document. You will need this quantity in a Step 4.
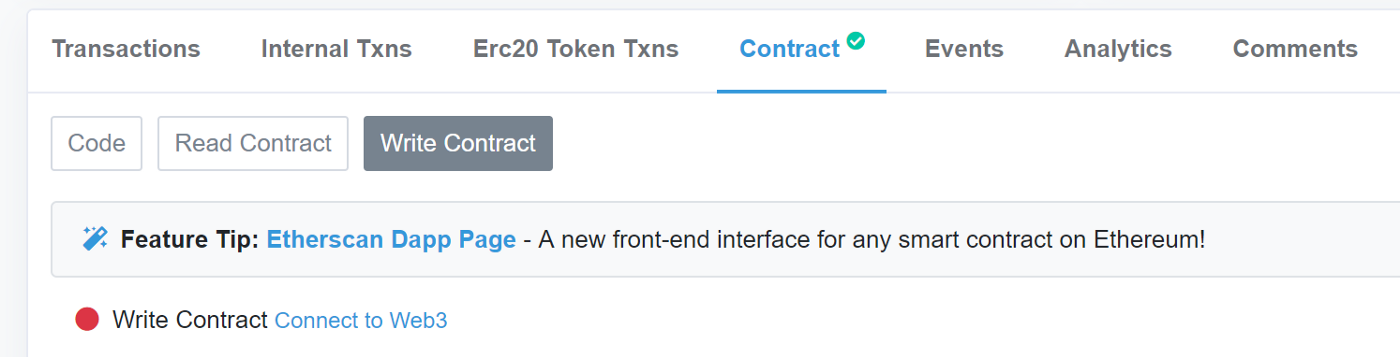
<b>Step 2:</b> Navigate to the existing contract at https://etherscan.io/address/0x971d048e737619884f2df75e31c7eb6412392328#writeContract
<b>Step 3:</b> Next, click on the <i>‘Connect to Web 3’</i> next to the red dot. MetaMask will appear and ask to confirm that you wish to connect your wallet to the contract. Click <i>‘Connect.’</i> You will be then be prompted with a notification message, click <i>‘OK’.</i>
If you are not logged into MetaMask, it will ask you log in, then the red dot will turn green.
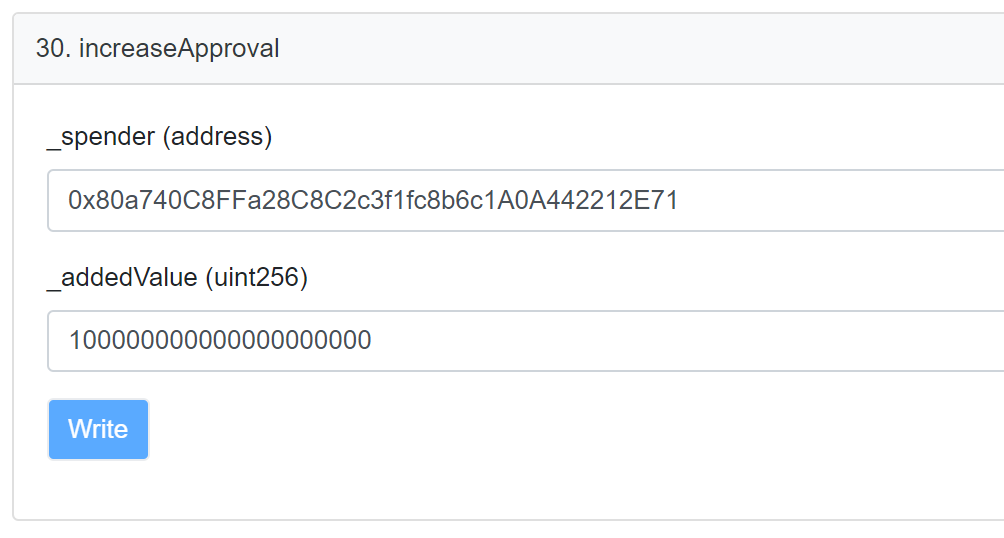
<b>Step 4:</b> Now, scroll down to to section 30, <i>‘increaseApproval’.</i>
In the <i>‘_spender (address)’</i> field insert the new contract address: ‘ 0x80a740C8FFa28C8C2c3f1fc8b6c1A0A442212E71’.
In the <i>‘_addedValue (uint256)’</i> field insert the Wei quantity of tokens from Step 1. In this example, 100 SPRK tokens, that is 100000000000000000000.
Then click <i>‘Write’</i>
<b>Step 5:</b> You will now see a transaction window appear in MetaMask. The transaction will be of zero value. Click <i>‘Confirm’</i> in the MetaMask window.
In Etherscan, a button will appear called <i>‘View your transaction.’</i> Click on this to view the status of your transaction. You will need to wait till your transaction is confirmed, before continuing to the next step.
<center>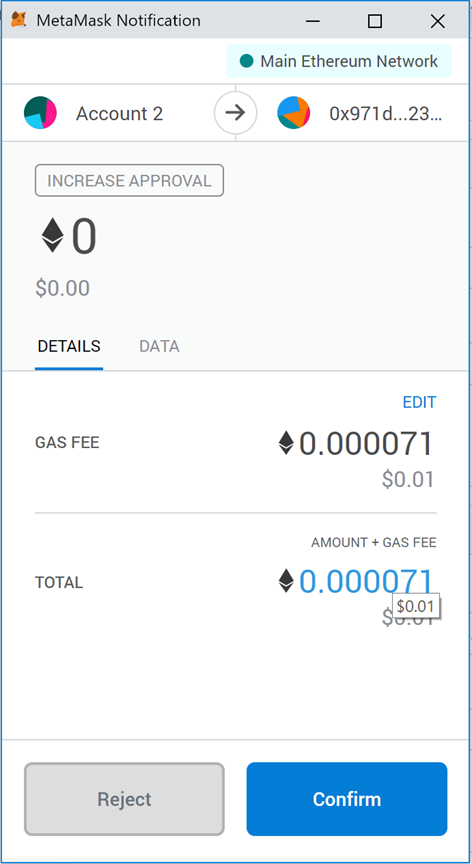</center>
<b>Step 6:</b> Once your transaction has been confirmed, navigate to the new contract in etherscan by clicking here: https://etherscan.io/address/0x80a740C8FFa28C8C2c3f1fc8b6c1A0A442212E71#writeContract
<b>Step 7:</b> Click on the <i>‘Connect to Web 3’</i> next to the red dot, just as you did in step 3, and click the <i>‘OK’</i> button again when the notification appears. The red dot will turn green.
<b>Step 8:</b> Scroll down to section 20 titled <i>‘swapTokens’</i> and click the <i>‘Write’</i> button. This will bring up another zero value transaction in MetaMask. Click <i>‘Confirm’</i> in the MetaMask window, just as you did in step 7.
That’s it! Your tokens have been successfully swapped.