
Saludos Hivers, por aca les traigo una nueva entrega para seguir con los tutoriales de Hive & React. En este articulo veremos como crear algo en el reino de lo que llamamos [Fullstack](https://santandersmartbank.es/talent-scanner/tecnologia-y-data/full-stack-developer/) y trata de como autenticar usando Hive Keychain.
Link al repositorio principal del tutorial completo >> [aqui](https://github.com/theghost1980/react-hive-tutorials?tab=readme-ov-file) <<
-----
🧩 Proceso de Inicio de Sesión con Hive Keychain
1. Instalación de Hive Keychain
El usuario instala la extensión Hive Keychain en su navegador compatible.
2. Importación de la Cuenta Hive
Se importan las claves privadas del usuario en la extensión para habilitar la firma de transacciones.
3. Interfaz de Inicio de Sesión
La aplicación presenta un botón o formulario para que el usuario inicie sesión con su nombre de usuario de Hive.
4. Generación de Mensaje Único
La aplicación genera un mensaje único, como una marca de tiempo, para prevenir ataques de repetición.
5. Solicitud de Firma con Hive Keychain
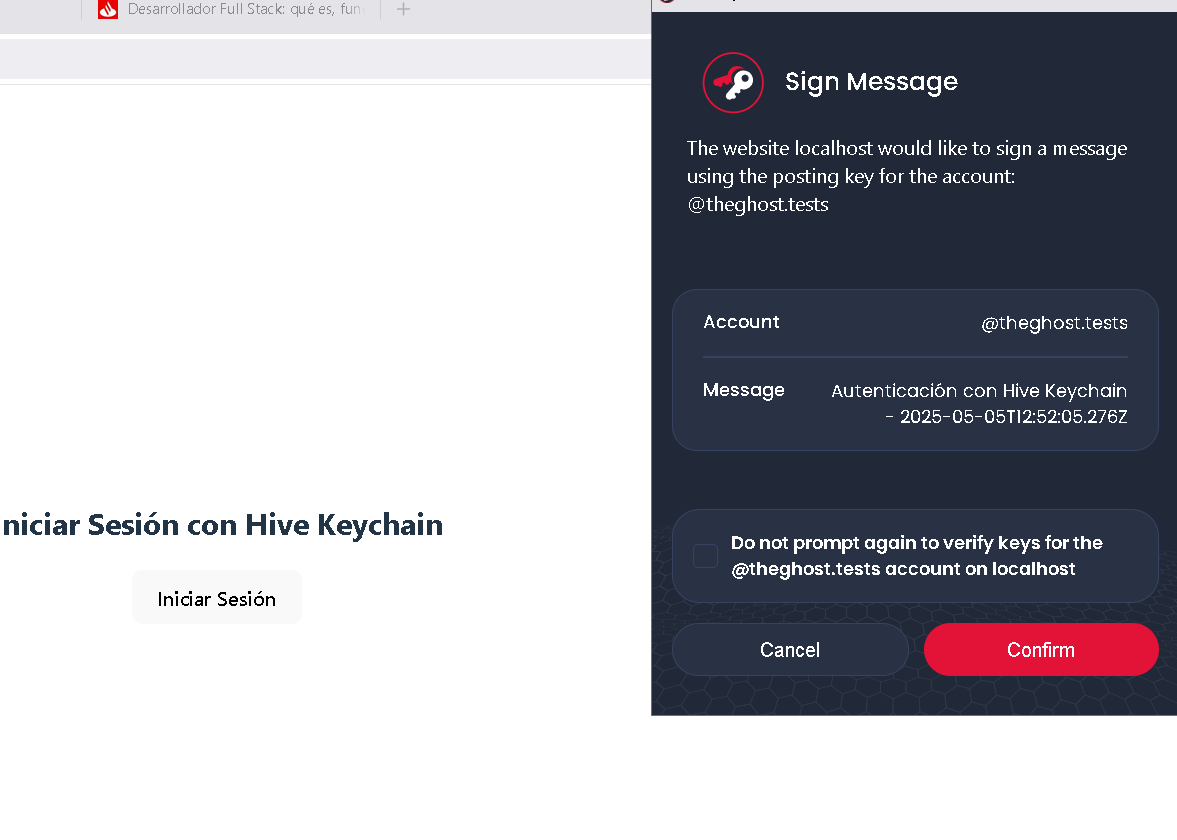
Se utiliza la función requestSignBuffer para solicitar al usuario que firme el mensaje a través de Hive Keychain.
6. Firma del Mensaje
El usuario aprueba la solicitud en la extensión, que firma el mensaje con su clave privada de publicación.
7. Envío al Servidor para Verificación
La aplicación envía el nombre de usuario, el mensaje y la firma al servidor backend para su verificación.
8. Obtención de Clave Pública desde la Blockchain
El servidor recupera la clave pública de publicación del usuario desde la blockchain de Hive.
9. Verificación de la Firma
El servidor utiliza la clave pública para verificar que la firma corresponde al mensaje original.
10. Confirmación de Autenticación Exitosa
Si la firma es válida, el servidor responde afirmativamente, y el usuario es considerado autenticado.
> Este proceso garantiza una autenticación segura y descentralizada sin necesidad de compartir contraseñas o claves privadas directamente con la aplicación.
-----
> English at the bottom
## Frontend: Cliente
---
### 🛠️ Configuración del Proyecto
- Crear el Proyecto con Vite
- Creamos la carpeta para el client y nos movemos a la carpeta:
`mkdir client && cd client`
- Ejecuta el siguiente comando para crear un nuevo proyecto con Vite y React utilizando TypeScript:
```
npm create vite@latest . -- --template react-ts
```
### Instalar Dependencias Adicionales
- Instalemos keychain-helper para ayudarnos a interactuar con la Hive Keychain
`npm i keychain-helper`
- Creamos una carpeta dentro de `/src/` y la llamamos `components` y dentro creamos el archivo Login.tsx:
```
import React from 'react';
import {KeychainHelper} from 'keychain-helper';
const Login: React.FC = () => {
const handleLogin = async () => {
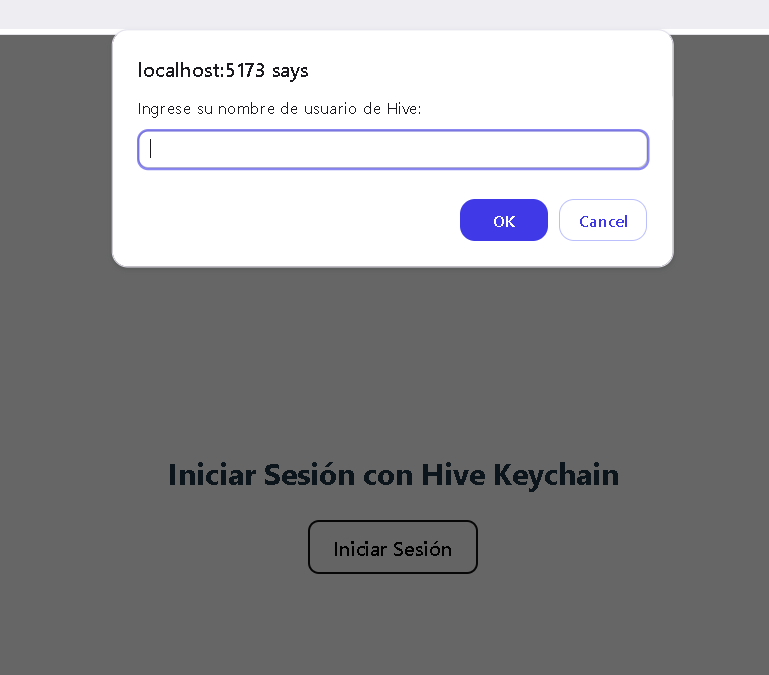
const username = prompt('Ingrese su nombre de usuario de Hive:');
if (!username) return;
const message = `Autenticación con Hive Keychain - ${new Date().toISOString()}`;
KeychainHelper.requestLogin(username,message, async (keychainResponse) => {
if(keychainResponse.success){
//continue to send info to backend for verification.
const responseBE = await fetch('http://localhost:6001/verify', {
method: "POST",
headers: {
"Content-Type": "application/json",
},
body: JSON.stringify({
username, message, signature: keychainResponse.result
}),
});
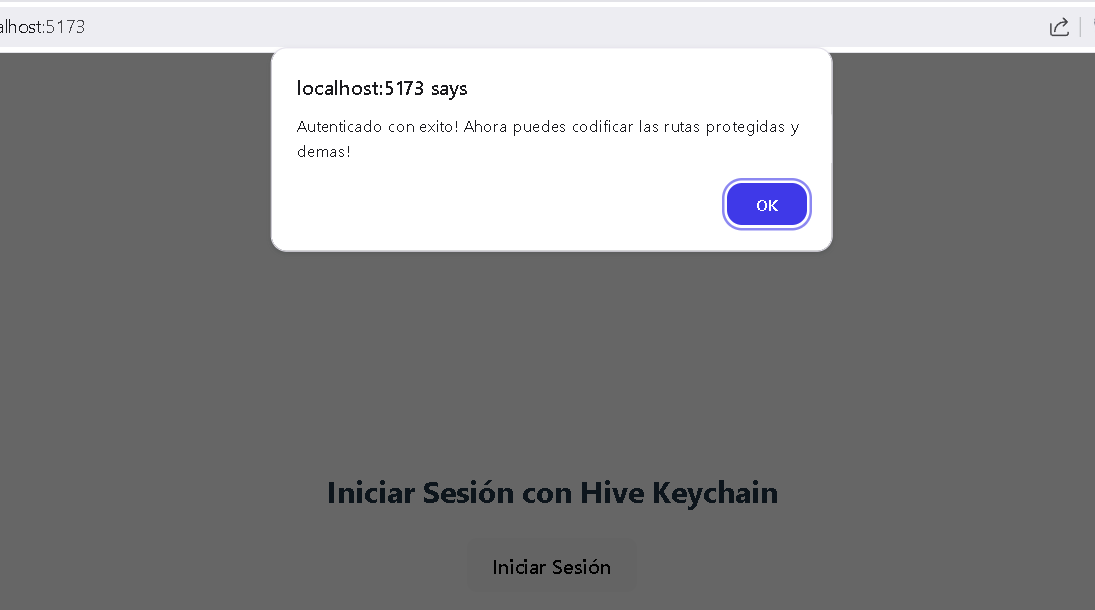
if(responseBE.status === 200){ //{ success: true, message: 'Firma válida' }
const result = await responseBE.json();
if(result.success && result.message === "Firma válida"){
alert('Autenticado con exito! Ahora puedes codificar las rutas protegidas y demas!');
}else{
console.log('No se autentico: ',{result});
}
}
}else{
console.log({keychainResponse});
}
});
};
return (
<div>
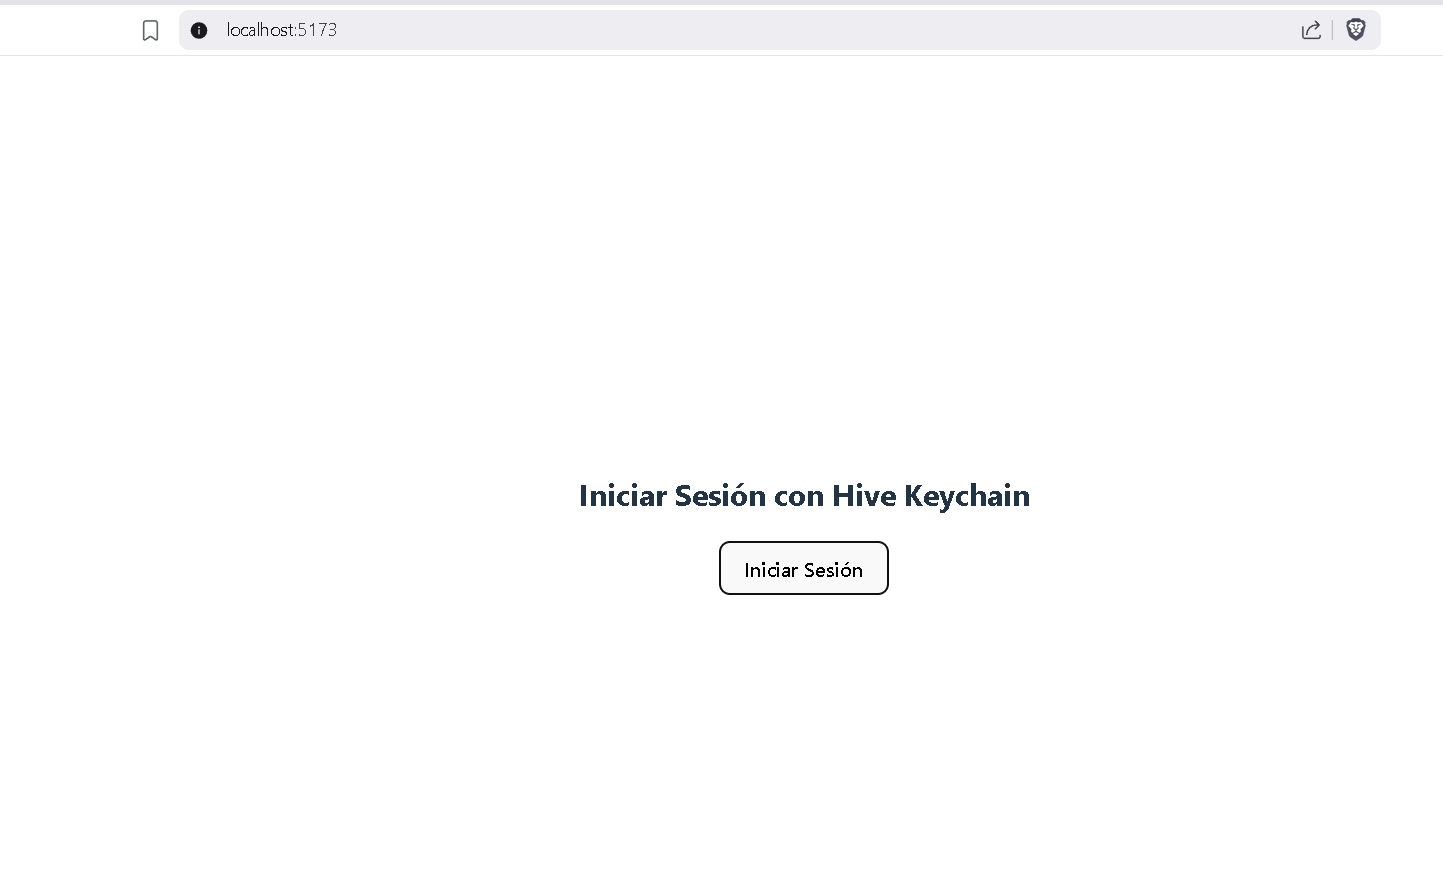
<h2>Iniciar Sesión con Hive Keychain</h2>
<button onClick={handleLogin}>Iniciar Sesión</button>
</div>
);
};
export default Login;
```
- Usamos login en App.tsx y podemos remover todo el codigo por defecto, nos quedaria asi:
```
import './App.css'
import Login from './components/Login'
function App() {
return (
<>
<Login />
</>
)
}
export default App
```
- Iniciamos la App(Ojo el servidor ya debe estar corriendo) y usamos:
`npm run dev`
- Deberias ver algo como esto al ejecutar tu frontend:
> Nota: Hive Keychain debe estar instalado para poder interactuar con la firma del mensaje. Mas info aca: https://hive-keychain.com/
---
### Backend: servidor
---
> Nota importante: siempre que veas una linea de comandos con multiples comandos, puedes ejecutar 1 por una y asi sabras lo que cada una hace o simplemente corre todo a la vez.
### 🔐 Implementación del Backend
- Configurar el Servidor con Express
- Ejecutamos uno a uno, estos comandos si iniciamos el proyecto desde cero:
```
mkdir server
cd server
npm init -y
npm install express@^4.17.1 cors body-parser dhive
npm install --save-dev typescript @types/express@^4.17.13 @types/node @types/body-parser ts-node nodemon @types/cors
```
Lo que hicimos fue:
1. Crear el directorio server
2. Nos movemos a server
3. Inicializamos usando npm, eso nos crea un archivo package.json con la informacion por defecto
4. Instalamos dependencias para express que hacen:
- cors(que nos permite probar el servidor localmente sin uso de https)
- body-parser(procesar los datos enviados en el "cuerpo" de las peticiones HTTP entrantes)
- dhive(libreria para interactuar con la HIVE blockchain y funciones utiles)
5. Instalamos ademas dependencias de desarrollo que son tipos y declaraciones necesarias para typescript.
> Nota decidi dejar esas versiones para express y sus tipos ya que para versiones mas recientes a veces causa errores en desarrollo.
---
- Crea un archivo tsconfig.json en la carpeta server con la configuración básica de TypeScript.
```
{
"compilerOptions": {
"target": "ES2020",
"module": "commonjs",
"outDir": "dist",
"rootDir": "src",
"strict": true,
"esModuleInterop": true,
"skipLibCheck": true
},
}
```
### Implementar la Ruta de Verificación
En el archivo server/index.ts, implementa una ruta para verificar la firma:
```
import express, {Request,Response} from 'express';
import cors from 'cors';
import bodyParser from 'body-parser';
import { Client, PublicKey, Signature, cryptoUtils } from '@hiveio/dhive';
const app = express();
app.use(cors());
app.use(bodyParser.json());
const client = new Client(['https://api.hive.blog']);
app.post('/verify', async (req: Request, res: Response) => {
// Datos recibidos del cliente
const { username, message, signature: signatureStr } = req.body;
try {
// Obtener la clave pública del usuario desde la blockchain
const account = await client.database.getAccounts([username]);
if (!account || account.length === 0) {
return res.status(404).json({ error: 'Usuario no encontrado' });
}
const publicKeyData = account[0].posting.key_auths[0][0];
const publicKeyStr = typeof publicKeyData === 'string' ? publicKeyData : publicKeyData.toString();
// Crear instancias de PublicKey y Signature
const publicKey = PublicKey.fromString(publicKeyStr);
const signature = Signature.fromString(signatureStr);
// Calcular el hash del mensaje
const messageHash = cryptoUtils.sha256(message);
// Verificar la firma
const isValid = publicKey.verify(messageHash, signature);
if (isValid) {
res.status(200).json({ success: true, message: 'Firma válida' });
} else {
res.status(401).json({ success: false, message: 'Firma inválida' });
}
} catch (error) {
console.error('Error al verificar la firma:', error);
res.status(500).json({ error: 'Error interno del servidor' });
}
});
app.listen(6001, () => {
console.log('Servidor backend ejecutándose en http://localhost:6001');
});
```
### 🧪 Prueba/Puesta en marcha de la Aplicación
- Ejecuta `npx ts-node index.ts`
Deberias ver algo como esto en tu consola de VSCode:

## Pro-tip
Siempre inicia el backend primero. No necesitas abrir varios editores de VScode, simpelemte, debajo en la seccion de terminales abre al menos 2. Y vas navegando usando los comandos `ls` `cd` para moverte a la carpeta client y al server.
> De esta manera puede ejecutar cada parte en una consola por separado.
### Si todo marcha como debería, al hacer login sucedera esto:
<details>
<summary>English Version Here</summary>
Greetings Hivers, here I bring you a new installment to continue with the Hive & React tutorials. In this article, we will explore creating something in the realm of what we call [Fullstack](https://santandersmartbank.es/talent-scanner/tecnologia-y-data/full-stack-developer/), focusing on authentication using Hive Keychain.
## Frontend: Client
---
Certainly! Here's the translated and formatted markdown content for the login process using Hive Keychain:
---
## 🧩 Hive Keychain Login Process
1. **Install Hive Keychain Extension**
The user installs the Hive Keychain extension on a compatible browser (e.g., Chrome, Firefox).
2. **Import Hive Account**
The user imports their Hive account into the extension using the "Use keys/pwd" option.
3. **Enter Hive Credentials**
The user enters their Hive username and master password to import their keys.
4. **Set Up Keychain Password**
The user sets a unique password for the Hive Keychain extension on their device.
5. **Access dApp Login Interface**
The user navigates to the decentralized application's login interface that supports Hive Keychain.
6. **Initiate Login Request**
The dApp prompts the user to log in, triggering Hive Keychain to open a signature request.
7. **Sign Authentication Message**
The user reviews and signs the authentication message using their posting key via Hive Keychain.
8. **Send Signature to Backend**
The dApp sends the signed message and username to the backend server for verification.
9. **Verify Signature on Server**
The backend retrieves the user's public key from the Hive blockchain and verifies the signature.
10. **Confirm Successful Authentication**
If the signature is valid, the server confirms authentication, granting the user access to the dApp.
> This process ensures secure and decentralized authentication without exposing private keys or passwords.
---
## 🛠️ Project Setup
* Create the Project with Vite
* Create the folder for the client and navigate into it:
```bash
mkdir client && cd client
```
* Run the following command to create a new project with Vite and React using TypeScript:
```bash
npm create vite@latest . -- --template react-ts
```
## Install Additional Dependencies
* Install `keychain-helper` to assist in interacting with Hive Keychain:
```bash
npm i keychain-helper
```
* Create a folder inside `/src/` named `components` and within it, create the file `Login.tsx`:
```tsx
import React from 'react';
import { KeychainHelper } from 'keychain-helper';
const Login: React.FC = () => {
const handleLogin = async () => {
const username = prompt('Enter your Hive username:');
if (!username) return;
const message = `Authentication with Hive Keychain - ${new Date().toISOString()}`;
KeychainHelper.requestLogin(username, message, async (keychainResponse) => {
if (keychainResponse.success) {
// Continue to send info to backend for verification.
const responseBE = await fetch('http://localhost:6001/verify', {
method: "POST",
headers: {
"Content-Type": "application/json",
},
body: JSON.stringify({
username,
message,
signature: keychainResponse.result
}),
});
if (responseBE.status === 200) {
const result = await responseBE.json();
if (result.success && result.message === "Valid signature") {
alert('Successfully authenticated! Now you can code protected routes and more!');
} else {
console.log('Authentication failed: ', { result });
}
}
} else {
console.log({ keychainResponse });
}
});
};
return (
<div>
<h2>Log In with Hive Keychain</h2>
<button onClick={handleLogin}>Log In</button>
</div>
);
};
export default Login;
```
* Use the `Login` component in `App.tsx` and remove all default code, resulting in:
```tsx
import './App.css'
import Login from './components/Login'
function App() {
return (
<>
<Login />
</>
)
}
export default App
```
* Start the App (ensure the server is already running) using:
```bash
npm run dev
```
> Note: Hive Keychain must be installed to interact with message signing. More info here: [https://hive-keychain.com/](https://hive-keychain.com/)
---
## Backend: Server
---
> Important Note: Whenever you see a command line with multiple commands, you can execute them one by one to understand what each does, or simply run them all at once.
## 🔐 Backend Implementation
* Set up the Server with Express
* Execute the following commands one by one if starting the project from scratch:
```bash
mkdir server
cd server
npm init -y
npm install express@^4.17.1 cors body-parser dhive
npm install --save-dev typescript @types/express@^4.17.13 @types/node @types/body-parser ts-node nodemon @types/cors
```
What we did:
1. Created the `server` directory
2. Navigated into `server`
3. Initialized with npm, creating a `package.json` file with default information
4. Installed dependencies for Express:
* `cors` (allows us to test the server locally without using HTTPS)
* `body-parser` (processes data sent in the body of incoming HTTP requests)
* `dhive` (library to interact with the HIVE blockchain and useful functions)
5. Additionally installed development dependencies which are types and declarations necessary for TypeScript.
> Note: I chose to use these versions for Express and its types because newer versions sometimes cause development errors.
---
* Create a `tsconfig.json` file in the `server` folder with the basic TypeScript configuration:
```json
{
"compilerOptions": {
"target": "ES2020",
"module": "commonjs",
"outDir": "dist",
"rootDir": "src",
"strict": true,
"esModuleInterop": true,
"skipLibCheck": true
}
}
```
## Implement the Verification Route
In the file `server/index.ts`, implement a route to verify the signature:
```typescript
import express, { Request, Response } from 'express';
import cors from 'cors';
import bodyParser from 'body-parser';
import { Client, PublicKey, Signature, cryptoUtils } from '@hiveio/dhive';
const app = express();
app.use(cors());
app.use(bodyParser.json());
const client = new Client(['https://api.hive.blog']);
app.post('/verify', async (req: Request, res: Response) => {
const { username, message, signature: signatureStr } = req.body;
try {
const account = await client.database.getAccounts([username]);
if (!account || account.length === 0) {
return res.status(404).json({ error: 'User not found' });
}
const publicKeyData = account[0].posting.key_auths[0][0];
const publicKeyStr = typeof publicKeyData === 'string' ? publicKeyData : publicKeyData.toString();
const publicKey = PublicKey.fromString(publicKeyStr);
const signature = Signature.fromString(signatureStr);
const messageHash = cryptoUtils.sha256(message);
const isValid = publicKey.verify(messageHash, signature);
if (isValid) {
res.status(200).json({ success: true, message: 'Valid signature' });
} else {
res.status(401).json({ success: false, message: 'Invalid signature' });
}
} catch (error) {
console.error('Error verifying signature:', error);
res.status(500).json({ error: 'Internal server error' });
}
});
app.listen(6001, () => {
console.log('Backend server running at http://localhost:6001');
});
```
## 🧪 Testing/Launching the Application
* Run:
```bash
npx ts-node index.ts
```
## Pro-tip
Always start the backend first. You don't need to open multiple VSCode editors; simply open at least two terminals in the terminal section below. Navigate using the commands `ls` and `cd` to move to the `client` and `server` folders respectively.
> This way, you can run each part in a separate console.
---
</details>