====================================== This is first part of a series for people who ever would like to experiment with server systems, or always wanted to setup their own cheap Linux server at home. Raspberry Pis are not reliable enough for production systems, but they are good enough to get experience with Linux systems and deployment of tiny web services and web sites. Please feel free to comment. Enjoy! ====================================== # Setup your Raspberry Pi to be used via SSH For this you will need following hardware: 1. Raspberry Pi (I use a Raspberry Pi 3 Model B with a clear case and heat sinks) 2. MicroSD (I use a 32GB SanDisk) 3. Micro USB Power Source (5V, 2.5A should do) 4. Ethernet Cable 5. Peripherals for one time setup: Keyboard, Mouse, Screen and HDMI-cable And following software: 1. Jessie lite image (https://www.raspberrypi.org/downloads/raspbian/) 2. Win32diskimage (http://www.raspberry-projects.com/pi/pi-operating-systems/win32diskimager), or any other imager 3. git bash (install git from https://git-scm.com/downloads) ## Preparations: Get your Raspberry Pi ready First, we need to setup Raspbian on our Pi. Get the Jessie Lite image from https://www.raspberrypi.org/downloads/raspbian/ 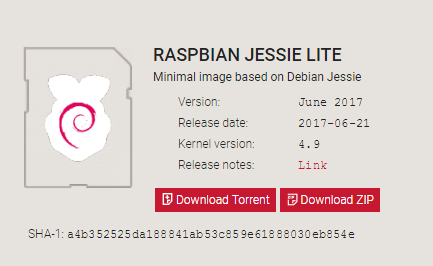 There are several software solutions for write an image to an SD card. I used the win32diskimager. 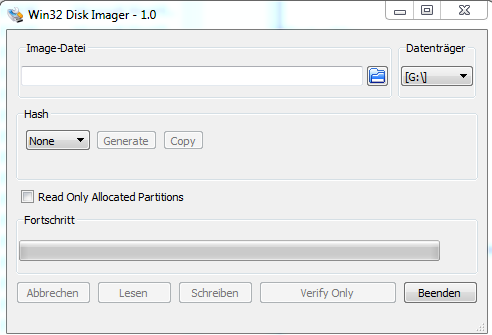 Run the imager, and carefully select the drive you want to write your image to and the jessie lite image you just downloaded from the raspberrypi site. (Hint: In case you would like to set up multiple Raspberry Pis in the same way, the diskimager also can read an image. Once your raspberry pi is set up completely, you can make a backup of it, and even write the same image on multiple new MicroSD cards, when can then be used in other Raspberry Pis) Once the image is written to your MicroSD card, safely eject your MicroSD card and insert it into your unpowered Raspberry pi. 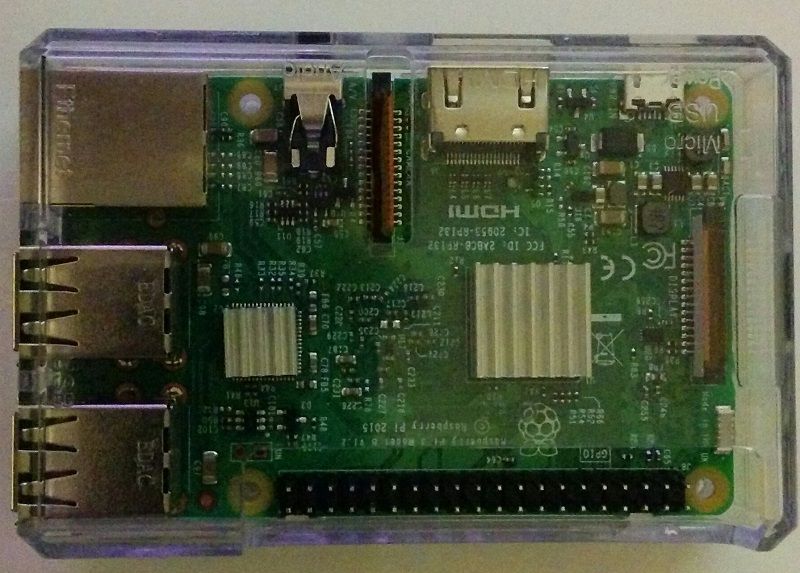 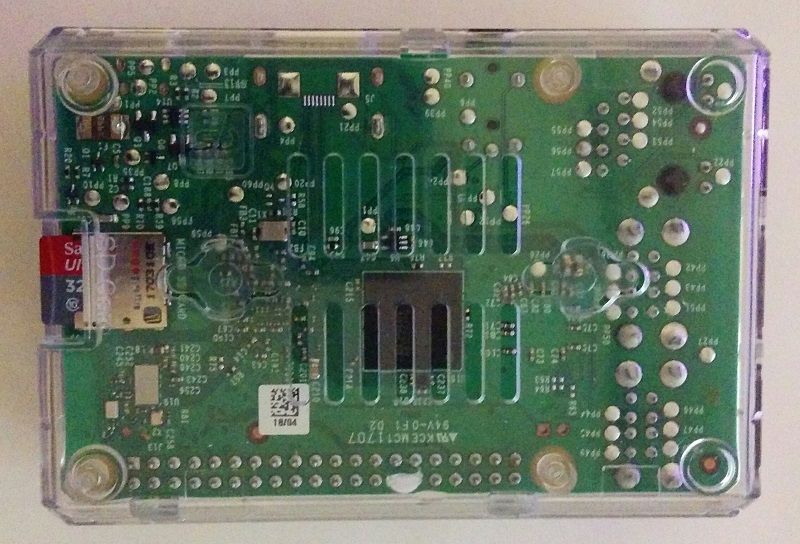 I got a clear case for my raspberry and some heat sinks ## Starting up the Raspberry Pi for the first time Plug in all peripherals (screen, mouse, keyboard) and power up your Raspberry Pi. After the starting up process, you will be greeted with the login prompt: 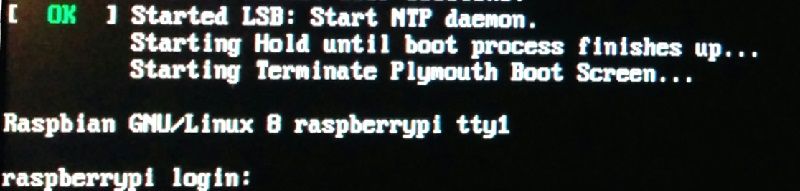 The default login is: user: pi password: raspberry (Hint: Watch out for keyboard language settings) Once we are logged in successfully, we get the next prompt: 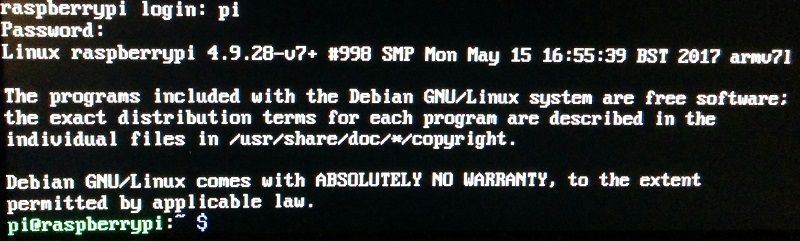 Now we can get started to change the configurations of the Raspberry Pi. ## Setting the Pi's configurations ### Expand Filesystem The first thing we will change is to make sure that the entire SD card is available to the OS. to enter the configurations menu, type: `sudo raspi-config` now choose: **Advanced Options** and finally: **Expand Filesystem**  Once you finished, you will be informed that the filesystem will be resized upon the next reboot. Finish with OK, we still have some settings to set. ### Enable SSH Next, we will enable remote access to the raspberry via SSH. For safety reasons SSH is disabled by default, so we will have to change that. choose: **Interfacing Options** and: **SSH** Here you can enable SSH for our Raspberry Pi, which we will need in future. ### Change password Finally we will set a new password to our raspberry pi, just to make sure nobody can access the pi account. choose: **Change User Password** The `pi` user is a `Sudoer`, which means it can call commands with root permission. In the wrong hands, this could be abused to turn our nice Raspberry Pi `Sudoer` user into an `Evildoer` machine. (Bad joke, sorry) More information about Linux users can be found here: https://www.raspberrypi.org/documentation/linux/usage/users.md Once these three changes are done, shutdown your raspberry pi with following command: `sudo shutdown -h now` ## Connect to Router and first SSH login ### Physically connect your Raspberry Pi to the Router Now take your Raspberry Pi, you can unplug all cables and peripherals. You will only need your Ethernet cable and your Micro USB Power supply. Go to your router, connect your Raspberry Pi via Ethernet and start it up by plugging in the power supply. From this point on, we should not need to touch our Raspberry Pi ever again physically if things go right. ### Find the Raspberry on the Network To ssh into our Raspberry Pi, we need to find out its IP address, and there are several ways to find it. I recommend installing **git**, which will allow us to use **git bash** in the future. Also, in the future we would like to have our own private git repository on our little server. I prefer to use `nmap` for it. `nmap` is an available command in **git bash** by default. After installing git, right click anywhere in a directory and run **git bash**. Now check your standard gateway, this is the ip address of your router. Mine is 192.168.0.1, so I will use nmap to look for all devices connected in this network with: `nmap -sP 192.168.0.0/24` Among other devices, it also shows my Raspberry Pi at the address **192.168.0.136**  ### Login via SSH After finding out the IP Address, we can login to our Raspberry via SSH: `ssh pi@192.168.0.136` This means that we will login as the user pi. At your first login attempt, you need to confirm the authenticity of the host:  Now your git bash terminal is your terminal to the Raspberry Pi', and you can give commands which will be executed by the Raspberry Pi. In case you did not change the password, you will see a warning, and this is the time when you really should choose a new password for the `pi` user. For today, this is how far we go. To finish the ssh connection, you can simply type: `CTRL`+`D` or just type: `logout`  This will close the connection, and your **git bash** will turn back to normal. Next time I will go through the process of generating ssh keys, disabling password login to have a somewhat safe way to open the raspberry to the outside world, so we can ssh to our Raspberry Pi Server from anywhere, anytime.
| author | lynor |
|---|---|
| permlink | raspberry-pi-server-part-0-setup-and-ssh-access |
| category | it |
| json_metadata | {"tags":["it","homeserver","technology","raspberry","ssh"],"image":["https://steemitimages.com/DQmfPfDuFHRquzxd77bJoAfrSZvAw46ta7NnFLoYJiVPV9X/Jessie_Lite.PNG","https://steemitimages.com/DQmYLoso8oWNMXW2WvCEF5f9uhCFwaWjR9fhFBfZSbxJXuF/1_diskimager.PNG","https://steemitimages.com/DQmWK5yWFuTsX3FRMvPbs7XPPWS2jbi9ZFFFB36sCZ2GdWd/IMG_20170628_224822_small.jpg","https://steemitimages.com/DQmXmWMte5TadtyMstTzH8SwkN83kTkJfXRjpUaniZp6S9B/IMG_20170628_224846_small.jpg","https://steemitimages.com/DQme2kDogTA67FfVwgRXyr9KYXUc2NFQRnaHj3YLQLBLNTh/login_small.jpg","https://steemitimages.com/DQmbnd3xiDhaE13eKvBFgR12AshgcFAEB19mNbdQYYgRaWH/first_login_success_small.jpg","https://steemitimages.com/DQmPzj4zwjHwYcC2nUixuaA79LedBD1vTZvnMoNE5NMipfr/image.png","https://steemitimages.com/DQmY2BM8F73BHENKGapfqJaeRrbXYKtCjQmfvfC4sLuqSE2/FindRaspberryIp.PNG","https://steemitimages.com/DQmbcf9GyYDGwiYhTkgVnF6qDtCsayJkhRyaaRGmxMwMBmm/Raspberry_first_login_athenticity_host.PNG","https://steemitimages.com/DQmbHGkBDrzxu7vQ8roAgQEG8QU6aQNqbBh3cjm9g3BCvz5/Raspberry_Logout.PNG"],"links":["https://www.raspberrypi.org/downloads/raspbian/","http://www.raspberry-projects.com/pi/pi-operating-systems/win32diskimager","https://git-scm.com/downloads","https://www.raspberrypi.org/documentation/linux/usage/users.md"],"app":"steemit/0.1","format":"markdown"} |
| created | 2017-07-02 16:29:21 |
| last_update | 2017-07-02 16:29:21 |
| depth | 0 |
| children | 4 |
| last_payout | 2017-07-09 16:29:21 |
| cashout_time | 1969-12-31 23:59:59 |
| total_payout_value | 0.024 HBD |
| curator_payout_value | 0.000 HBD |
| pending_payout_value | 0.000 HBD |
| promoted | 0.000 HBD |
| body_length | 7,200 |
| author_reputation | 1,619,972,702 |
| root_title | "Raspberry Pi Server - Part 0: Setup and ssh access" |
| beneficiaries | [] |
| max_accepted_payout | 1,000,000.000 HBD |
| percent_hbd | 10,000 |
| post_id | 7,033,984 |
| net_rshares | 3,470,469,840 |
| author_curate_reward | "" |
| voter | weight | wgt% | rshares | pct | time |
|---|---|---|---|---|---|
| fiserman | 0 | 0 | 100% | ||
| lynor | 0 | 1,160,695,278 | 100% | ||
| pinemango | 0 | 1,160,692,779 | 100% | ||
| qed | 0 | 1,149,081,783 | 100% |
Excellent write!
| author | adutetrup |
|---|---|
| permlink | re-lynor-raspberry-pi-server-part-0-setup-and-ssh-access-20170726t025650331z |
| category | it |
| json_metadata | {"tags":["it"],"app":"steemit/0.1"} |
| created | 2017-07-26 02:55:18 |
| last_update | 2017-07-26 02:55:18 |
| depth | 1 |
| children | 0 |
| last_payout | 2017-08-02 02:55:18 |
| cashout_time | 1969-12-31 23:59:59 |
| total_payout_value | 0.399 HBD |
| curator_payout_value | 0.050 HBD |
| pending_payout_value | 0.000 HBD |
| promoted | 0.000 HBD |
| body_length | 16 |
| author_reputation | 3,887,745,101 |
| root_title | "Raspberry Pi Server - Part 0: Setup and ssh access" |
| beneficiaries | [] |
| max_accepted_payout | 1,000,000.000 HBD |
| percent_hbd | 10,000 |
| post_id | 9,743,057 |
| net_rshares | 124,672,328,434 |
| author_curate_reward | "" |
| voter | weight | wgt% | rshares | pct | time |
|---|---|---|---|---|---|
| roytrivadnon | 0 | 789,252,609 | 100% | ||
| vendmulwasy | 0 | 795,055,930 | 100% | ||
| lentsoservnor | 0 | 1,120,042,240 | 100% | ||
| ettothene | 0 | 1,160,665,501 | 100% | ||
| pheopramopear | 0 | 940,136,962 | 100% | ||
| tosrecisubs | 0 | 638,364,597 | 100% | ||
| consdwelhardso | 0 | 905,317,064 | 100% | ||
| provputriebled | 0 | 963,350,206 | 100% | ||
| carvielimen | 0 | 1,160,662,892 | 100% | ||
| lumacodi | 0 | 1,160,662,611 | 100% | ||
| thropnewswicons | 0 | 1,160,662,574 | 100% | ||
| proccheeverfe | 0 | 748,627,359 | 100% | ||
| tingtrowsota | 0 | 1,032,989,683 | 100% | ||
| speedanforlo | 0 | 725,414,081 | 100% | ||
| vacecigov | 0 | 887,906,035 | 100% | ||
| blazunocid | 0 | 829,872,958 | 100% | ||
| ypzaidepen | 0 | 905,315,954 | 100% | ||
| pechildgranun | 0 | 980,758,950 | 100% | ||
| adutetrup | 0 | 1,160,661,478 | 100% | ||
| tervisure | 0 | 858,889,493 | 100% | ||
| calransnessmen | 0 | 638,363,805 | 100% | ||
| tatittorsssur | 0 | 1,003,972,067 | 100% | ||
| anefprakan | 0 | 1,091,021,668 | 100% | ||
| downsipasgua | 0 | 1,143,251,426 | 100% | ||
| dismiroree | 0 | 940,135,671 | 100% | ||
| postcenciepen | 0 | 853,085,465 | 100% | ||
| weldchitechlung | 0 | 806,659,042 | 100% | ||
| dunclitpensppos | 0 | 945,938,299 | 100% | ||
| psychinnicoun | 0 | 1,003,971,323 | 100% | ||
| escontahis | 0 | 1,021,381,225 | 100% | ||
| waylebore | 0 | 481,674,092 | 100% | ||
| heihofoper | 0 | 899,511,858 | 100% | ||
| imsecadis | 0 | 1,021,381,205 | 100% | ||
| tradununne | 0 | 696,396,273 | 100% | ||
| radesptogbi | 0 | 1,021,381,183 | 100% | ||
| westderspopa | 0 | 1,160,660,431 | 100% | ||
| earilerre | 0 | 951,741,548 | 100% | ||
| corlerpthumtu | 0 | 1,149,053,818 | 100% | ||
| plorcomqudoll | 0 | 876,298,616 | 100% | ||
| viepobargu | 0 | 1,067,807,584 | 100% | ||
| taicintlaro | 0 | 818,265,587 | 100% | ||
| ranrifibru | 0 | 1,038,791,058 | 100% | ||
| stelcobotca | 0 | 1,062,004,255 | 100% | ||
| popdakoli | 0 | 1,091,020,763 | 100% | ||
| atpretajon | 0 | 783,445,760 | 100% | ||
| corknarneci | 0 | 777,642,455 | 100% | ||
| lauretupe | 0 | 789,249,058 | 100% | ||
| peanolugly | 0 | 1,143,250,469 | 100% | ||
| tradidunde | 0 | 1,015,577,825 | 100% | ||
| geneandpaco | 0 | 742,822,638 | 100% | ||
| litleisenli | 0 | 783,445,745 | 100% | ||
| holdpaperbsearch | 0 | 760,232,538 | 100% | ||
| badccepusi | 0 | 1,056,200,924 | 100% | ||
| rebemenga | 0 | 1,032,987,715 | 100% | ||
| vianokonan | 0 | 1,067,807,525 | 100% | ||
| matisamde | 0 | 841,478,742 | 100% | ||
| chootyvoxti | 0 | 655,773,087 | 100% | ||
| backfatufa | 0 | 777,642,420 | 100% | ||
| ketfnannlegen | 0 | 847,282,039 | 100% | ||
| tranalforlang | 0 | 951,741,466 | 100% | ||
| xaycarfatheg | 0 | 876,298,538 | 100% | ||
| candupostcont | 0 | 1,096,823,989 | 100% | ||
| atacworfa | 0 | 1,160,660,305 | 100% | ||
| planoninve | 0 | 858,888,626 | 100% | ||
| tingreaclover | 0 | 998,167,859 | 100% | ||
| docknolinkgal | 0 | 934,331,537 | 100% | ||
| spypuninun | 0 | 928,528,235 | 100% | ||
| exfredzirnpon | 0 | 684,789,566 | 100% | ||
| crypvolbullstal | 0 | 1,108,430,568 | 100% | ||
| handwenhoma | 0 | 1,131,643,767 | 100% | ||
| chaelicosre | 0 | 858,888,601 | 100% | ||
| liwebquede | 0 | 1,044,594,235 | 100% | ||
| carhighgokeab | 0 | 882,101,797 | 100% | ||
| mindugimhigh | 0 | 1,096,823,944 | 100% | ||
| retimjatel | 0 | 812,462,178 | 100% | ||
| tawhiplorisk | 0 | 766,035,767 | 100% | ||
| freechcokabfo | 0 | 1,102,627,239 | 100% | ||
| fulradeci | 0 | 847,281,982 | 100% | ||
| lighhudddani | 0 | 1,160,659,959 | 100% | ||
| eqinimga | 0 | 928,527,965 | 100% | ||
| terprotenmill | 0 | 922,724,088 | 100% | ||
| jantdanmeback | 0 | 858,887,829 | 100% | ||
| diafertioli | 0 | 974,953,751 | 100% | ||
| uqabhiga | 0 | 696,395,536 | 100% | ||
| sunasanchot | 0 | 818,264,754 | 100% | ||
| stylentedgio | 0 | 899,510,900 | 100% | ||
| veydacero | 0 | 957,543,861 | 100% | ||
| colfernvemi | 0 | 655,772,462 | 100% | ||
| reosisbuytick | 0 | 824,068,049 | 100% | ||
| garmobiti | 0 | 760,231,791 | 100% | ||
| liawehamsi | 0 | 963,347,154 | 100% | ||
| hornnresbencei | 0 | 1,131,642,735 | 100% | ||
| bridirplicti | 0 | 1,003,970,221 | 100% | ||
| ferchelisoft | 0 | 742,821,897 | 100% | ||
| piatlivirel | 0 | 696,395,528 | 100% | ||
| docolude | 0 | 847,281,225 | 100% | ||
| litorfhartqa | 0 | 481,673,573 | 100% | ||
| tramuszanma | 0 | 835,674,633 | 100% | ||
| downthistternre | 0 | 1,038,789,995 | 100% | ||
| orbetira | 0 | 980,757,033 | 100% | ||
| olatrede | 0 | 945,937,256 | 100% | ||
| imesaduk | 0 | 922,724,072 | 100% | ||
| guicalpogoog | 0 | 812,461,446 | 100% | ||
| spacopcrisweas | 0 | 1,137,446,023 | 100% | ||
| fulbobelbe | 0 | 911,117,477 | 100% | ||
| througesburlu | 0 | 992,363,621 | 100% | ||
| quanroyloppond | 0 | 1,056,199,876 | 100% | ||
| pinsviglessspin | 0 | 649,969,154 | 100% | ||
| arremreypor | 0 | 713,805,410 | 100% | ||
| houtenlime | 0 | 905,314,176 | 100% | ||
| tfulovnuero | 0 | 998,166,910 | 100% | ||
| hertotosub | 0 | 905,314,174 | 100% | ||
| foundnuhari | 0 | 1,120,036,126 | 100% | ||
| skyjenevcas | 0 | 754,428,477 | 100% | ||
| glasmenigre | 0 | 1,108,429,530 | 100% | ||
| precodwalbo | 0 | 1,085,216,346 | 100% | ||
| presigburi | 0 | 1,038,789,978 | 100% | ||
| waxtirassi | 0 | 905,314,170 | 100% | ||
| ronerkeedisc | 0 | 562,919,708 | 100% | ||
| isdrudacprot | 0 | 748,625,178 | 100% | ||
| aptucrono | 0 | 1,143,249,301 | 100% | ||
| lefunddartwall | 0 | 940,133,942 | 100% | ||
| sweependitho | 0 | 1,021,380,083 | 100% | ||
| wetvamacmins | 0 | 835,674,613 | 100% | ||
| izlogkaunbik | 0 | 1,062,003,153 | 100% | ||
| highverbume | 0 | 690,592,214 | 100% | ||
| ventioleme | 0 | 1,073,609,744 | 100% | ||
| ninglearnrighcom | 0 | 800,854,833 | 100% | ||
| benarupsa | 0 | 824,068,017 | 100% | ||
| pinensiras | 0 | 870,494,382 | 100% | ||
| aqpocepli | 0 | 1,160,659,176 | 100% | ||
| fecmanalbblog | 0 | 1,062,003,146 | 100% | ||
| consdeschyde | 0 | 957,543,820 | 100% | ||
| blazoutunak | 0 | 951,740,524 | 100% | ||
| facragami | 0 | 899,510,861 | 100% |
Super post
| author | wallaceme |
|---|---|
| permlink | re-lynor-raspberry-pi-server-part-0-setup-and-ssh-access-20170708t145040077z |
| category | it |
| json_metadata | {"tags":["it"],"app":"steemit/0.1"} |
| created | 2017-07-08 14:51:39 |
| last_update | 2017-07-08 14:51:39 |
| depth | 1 |
| children | 2 |
| last_payout | 2017-07-15 14:51:39 |
| cashout_time | 1969-12-31 23:59:59 |
| total_payout_value | 0.090 HBD |
| curator_payout_value | 0.012 HBD |
| pending_payout_value | 0.000 HBD |
| promoted | 0.000 HBD |
| body_length | 10 |
| author_reputation | 1,396,120,544 |
| root_title | "Raspberry Pi Server - Part 0: Setup and ssh access" |
| beneficiaries | [] |
| max_accepted_payout | 1,000,000.000 HBD |
| percent_hbd | 10,000 |
| post_id | 7,760,296 |
| net_rshares | 23,399,901,012 |
| author_curate_reward | "" |
| voter | weight | wgt% | rshares | pct | time |
|---|---|---|---|---|---|
| nomad220 | 0 | 1,160,707,484 | 100% | ||
| maktoeq2 | 0 | 1,161,079,202 | 100% | ||
| makarowdmitry | 0 | 1,160,704,337 | 100% | ||
| nitangringtal | 0 | 829,894,349 | 100% | ||
| kpl00king | 0 | 899,533,287 | 100% | ||
| wallaceme | 0 | 1,160,688,107 | 100% | ||
| leonardoscherer | 0 | 1,160,688,103 | 100% | ||
| emmafox | 0 | 1,015,602,089 | 100% | ||
| lespredateurs | 0 | 864,712,634 | 100% | ||
| philiprabanne | 0 | 673,199,096 | 100% | ||
| ahyivicente | 0 | 684,805,976 | 100% | ||
| chasesa | 0 | 1,056,226,164 | 100% | ||
| mariaerod | 0 | 1,160,688,091 | 100% | ||
| thecolebean | 0 | 1,003,995,196 | 100% | ||
| benny2ooo | 0 | 1,160,688,086 | 100% | ||
| denisbass | 0 | 1,160,688,085 | 100% | ||
| knorberto | 0 | 864,712,623 | 100% | ||
| stevemon | 0 | 916,943,585 | 100% | ||
| duaneaustin | 0 | 1,044,619,274 | 100% | ||
| nikolaking | 0 | 1,050,422,713 | 100% | ||
| doyle1225 | 0 | 969,174,545 | 100% | ||
| huybryan | 0 | 1,160,688,076 | 100% | ||
| iamtheguy | 0 | 1,079,439,910 | 100% |
Thanks!

Maybe i should write a description how to make bots leaving 2 word comments on posts they find.
And maybe, as a follow up, how to make bots which upvote each other's 2 word posts.

What do you think?
| author | lynor |
|---|---|
| permlink | re-wallaceme-re-lynor-raspberry-pi-server-part-0-setup-and-ssh-access-20170710t203141977z |
| category | it |
| json_metadata | {"tags":["it"],"app":"steemit/0.1"} |
| created | 2017-07-10 20:31:42 |
| last_update | 2017-07-10 20:31:42 |
| depth | 2 |
| children | 1 |
| last_payout | 2017-07-17 20:31:42 |
| cashout_time | 1969-12-31 23:59:59 |
| total_payout_value | 0.000 HBD |
| curator_payout_value | 0.000 HBD |
| pending_payout_value | 0.000 HBD |
| promoted | 0.000 HBD |
| body_length | 208 |
| author_reputation | 1,619,972,702 |
| root_title | "Raspberry Pi Server - Part 0: Setup and ssh access" |
| beneficiaries | [] |
| max_accepted_payout | 1,000,000.000 HBD |
| percent_hbd | 10,000 |
| post_id | 8,028,735 |
| net_rshares | 0 |
Ja, also ich hab mich jetzt schon viel mit den Botmöglichkeiten gespielt, und es gibt tatsächlich viele und die machen auch schnell viel reputation mit solchen "thank you's". Ich kann nicht einschätzen wie "detremental" das für die Platform ist, weil es gibt hier ja schon sowas wie ne community, aber es wird glaub ich mit der Zeit nicht besser werden. Hab jetzt in den letzten 10 Tagen jeden Tag was kurzes gepostet, aber bin nicht sicher ob man nicht momentum erreichen kann - wenn das das ziel ist - ohne recht weit runter zu gehn in Sachen lowest denominator. Die programmiercommunity (tags "programming" und "steemdev") ist denk ich, vermutlich, guten Willens, aber noch zu klein.
| author | qed |
|---|---|
| permlink | re-lynor-re-wallaceme-re-lynor-raspberry-pi-server-part-0-setup-and-ssh-access-20170711t222855878z |
| category | it |
| json_metadata | {"tags":["it"],"app":"steemit/0.1"} |
| created | 2017-07-11 22:28:57 |
| last_update | 2017-07-11 22:28:57 |
| depth | 3 |
| children | 0 |
| last_payout | 2017-07-18 22:28:57 |
| cashout_time | 1969-12-31 23:59:59 |
| total_payout_value | 0.000 HBD |
| curator_payout_value | 0.000 HBD |
| pending_payout_value | 0.000 HBD |
| promoted | 0.000 HBD |
| body_length | 686 |
| author_reputation | 371,686,564,844 |
| root_title | "Raspberry Pi Server - Part 0: Setup and ssh access" |
| beneficiaries | [] |
| max_accepted_payout | 1,000,000.000 HBD |
| percent_hbd | 10,000 |
| post_id | 8,161,996 |
| net_rshares | 0 |